
Tamiya Cromwell Mk. IV
Eric MacIntyre
Kit Overview
This new addition to Tamiya’s fine range of 1/35th kits has been long awaited. The Cromwell MkIV fills an important gap in the market for WWII British fighting vehicles. Up to now, this market was mainly tackled by a few high quality resin manufactures and was mostly ignored by the larger plastic kit manufacturers. The Cromwell is a welcomed addition to anyone’s late war Allied vehicle collection.
History
Much has already been published on the subject of the Cromwells history, therefore I will only make a quick summary.
The Cromwell is a direct descendant from the British “Cruiser” series of tank designs. Many of you may be already familiar with the Crusader which is an early war predecessor to the Cromwell. The Cromwell shares many of the same design features with it’s earlier cruiser siblings. The Cromwell is of similar shape and size, uses the Christie based suspension and is highly mobile.
The Cromwell was created to deal with the ever increasing threat of heavily armed and armoured German panzers. However, by the time of it’s combat introduction in Normandy 1944, it was sorely outdated and inadequate to deal with medium and heavy German armour. Nonetheless, as with it’s American counterpart the Sherman, it helped form to bulk of the British armoured force in NW Europe. Through the rest of the war, the Cromwell went on to earn itself an excellent reputation for performance, reliability and speed.
The Cromwell or the A27 Cruiser shared its designation with it’s sister design known as the Centaur. The main differences between the two being the type of engine used as well as the design of the track tensioning system. The Cromwell was equipped with more powerful Merlin engine and the Centaur was fitted with the less reliable and lower powered Liberty engine. As the Merlin engine proved itself far superior and when it was available in sufficient numbers, the Cromwell design was favored and represented the bulk of A27s built during the war. Many Centaur were also upgraded by replacing their engines with the better Merlin engine.
The Cromwell saw several minor improvement during its production. These improvement
consisted mainly of additions of plate armor to the front hull and changes to the driver
hull hatch to eliminate the earlier “death trap” design. 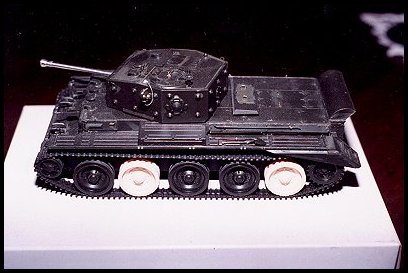
The Kit
The Cromwell is probably one of the finest kits produced by any manufacturer. Tamiya has truly produced an excellent kit in both detail and accuracy. The pieces are packed with remarkable detail which included finely detailed bolt heads and crisply cast weld seems. The areas of plate armor have a beautifully textured surface.
Little has to be done in the area of super-detailing. This is the one kit that I can truly say does not need any additional Photo etch (I am normally a big fan of these update sets) except for the screens sold separately by Tamiya ( kit# 35222). This kit can be built straight out the box and excellent results can be achieved by any level modeller.
Construction
For the most part, the construction of the kit followed the instruction sheet to the letter. Everything is very straightforward, however there are a few points to be careful of:
Lower Hull, steps 1-5
This section is relatively problem free, however one must pay special attention to the instruction sheet as to where not to place glue. Many parts such as the wheels are designed to be workable and this will be important later for painting purposes. I would also not recommend placing the wheels on until after painting as this makes it easier to paint and weather the lower hull. Special attention needs to be given to the alignment of the lower hull pieces as they are being glued. Dry fitting is recommended in order to eliminate small gaps which may occur later when the top hull is attached.
Warning, Step 3:
If you wish to attach the Cullen hedgerow device at a later stage, do not use part A4.
Warning, Step 4:
At this point you are given the option to build either a Cromwell with the external track tensioning system or a Centaur with the internal tract tensioning system. If you wish to build the Cromwell then use parts C26, C27 and omit part A16 in step 6. To build a Centaur simply do the reverse. One thing to note is that “most” Centaurs had perforated road wheels which are not available in this kit. However, Tamiya has just released a Centaur as a separate kit.
Upper Hull, Steps 6-8
Step 6:
Dry fit the upper hull to the lower hull making sure no gaps are present. The kit is
manufactured to very high tolerances, however some gaps may occur in the front if one is
not careful. See above Step 4 for description of part A16. I would also not recommend
attaching the track at this point as it makes painting and weathering easier later on. 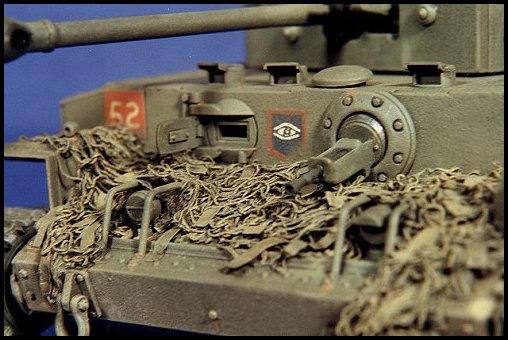
Step 7:
Follow the kit instructions, however be careful in your use of glue as some parts such as the hull machine gun are designed to be workable. It should remain so for ease of painting and weathering later on. You are also given the choice at this point as to how you wish to position the driver’s viewing hatch.
Step 8
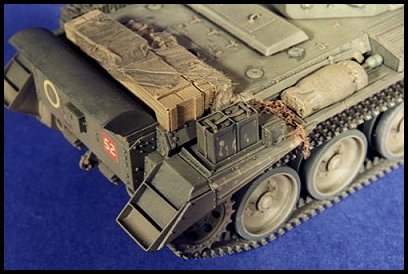
Be careful to follow the instructions at this point and do not mix up the part numbers. Assemble the different stowage bins, paying close attention to which part goes where. It is very easy to mix up the different parts at this point which will cause the bins to not fit properly on the upper hull. Dry fitting to the hull is also recommended.
Steps 9-11:
Here again follow the instruction sheet for the placement of the parts. Pay special attention to fitting all the part in order to achieve proper alignment. This is especially important when placing the fenders as they may leave gaps which are difficult to fill later if they are not properly placed. The fenders and side mudguards can be left off if you wish as many Cromwells often had them removed in the field. Parts A9 are very delicate and should be removed with care from the sprue as they may break. I chose to install the tools at this point, but some people may decide to leave them off for ease of painting.
Warning, Step 9: If you wish to use the Tamiya screens or any other after market ones, they must be placed at this point.
Warning, Step 11: Part D17 should not be used if one is building a vehicle with internal track the adjustment system.
 Steps 12-17:
The turret assembly is straightforward with no real problems. The turret has some excellent detail which after proper painting and weathering will truly make the model stand out.
Steps 18-19:
Here you are given a chance to add the “accessories” to your kit by
incorporating towing ropes, a hedgerow cutter and a Normandy cowl.
Notes
The “Hedgerow Cutter” was pretty rare (at least photographically) on Cromwells and as with the Sherman tank would have only really been used in the Hedgerow country of Normandy as it was a temporary fix to the problem of the hedgerows. It was quite effective for breaking through the hedgerows and protecting the tank from having to expose its underbelly to German anti-tank weapons. However, under normal combat conditions, it would actually act as an impediment to a tank’s cross country mobility by lowering the angle of approach a tank could have to a hill or obstacle. Therefore this device would have been removed as soon as it was no longer necessary. However, as with the case of many other allied vehicles, it may have been left on until wars end. The “Normandy Cowl” was actually an improvement to the exhaust design and was found on many Cromwells from Normandy right up to the end of the war.
Extra Detailing
If one wishes to, there are a few modifications which can be done to improve the detail on this already excellent kit. All of these can be tackled by even a novice modeller and is a good opportunity to practice these skills. Here is a list of what I did. I’m sure there are other details which can be added, however this list is only designed to be a basic guide.
Lower Hull Details 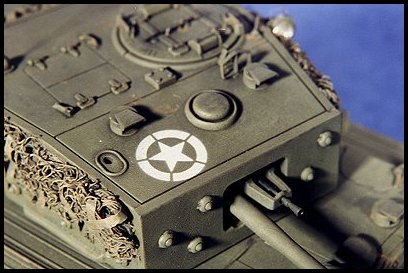
1) The only I changed here was to add some aftermarket damaged road wheels from Jaguar, simply to create a different visual effect with the vehicle.
Upper Hull Details
1) Bolds made from sprue (or if you have one, a punch and die set) can be added to the side fenders to represent the bolds holding the fenders to their mounts. Six bolts must be added to each side (see box art as a guide), two for each section of the fender.
2) If you chose to leave the side mud guards off then small holes should be drilled into the fenders to represent the holes for the bolts that hold the mud guards on. This can be done easily with the aid of the box art and the mud guards themselves as guides for the positioning of the holes. See also finished model pictures.
3) Small bolts can be added to each one of the front light guards (see box art and build pictures as a guide)
4) A small wire was attached to each of the small corner lights which was then routed to nearby connecting points on the front hull plate. These connecting points can be fabricated with a bit of plastic rod. See build pictures.
5) Wing nuts were added to the tools in the rear of the tank. These can be done quite simply by using the ones available from Grandt line or Modelkasten.
6) I replaced some of the larger grab handles with ones made of wire. The smaller handles should probably be left alone as replacement ones would most likely be out of scale unless you have access to the appropriate diamtre wire.
Turret Details
1a) A wire was attached to the side light on the turret which again was routed to a connection point on the turret roof. (see pictures)
1b) Handles for the turret light were also scratch built from leftover brass sheet.
2) Bolts can be added to the hinges of the turret hatches. I however choose to build a later model of Cromwell were the bolt on the hinges were not present. I suspect that the hinges may have been welded, but I have yet to have confirmation of this.
3) I added a new grab handle made of wire for the turret hatch.
4) The gun barrel was replaced with one from Jordi Rubio. I did so simply because I was too lazy to fill and sand the one from the kit. The barrel in the kit is actually very nice.
Painting and Weathering
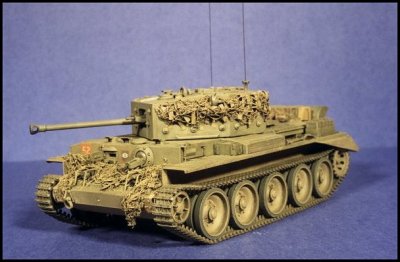
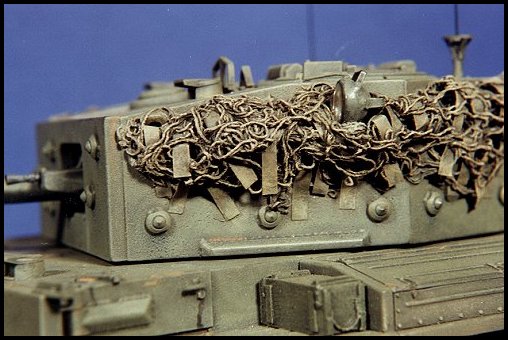
The model was airbrushes with a mixture of Tamiya XF62 and XF51, about a 2/3 to 1/3 mix. The model was completely painted with the wheels being painted separately. Everything was then given a wash using a mixture of thinned oils. At this point, I added the “Hessian Tape” camouflage netting. Please refer to my separate article as to how this was done. I then proceeded to drybrush the upper hull with oils. The lower part of hull and wheels were airbrushed with Polly Scale “Earth” # 414311. When dried they were washed and drybrushed with oils. The whole running gear was then assembled and the tracks were attached. The vehicle markings are a mixture of decals from Accurate Armour and some which were hand painted using stencils. The decals were carefully trimmed and then applied. A thinned mixture of white glue was then painted over the decals to eliminate any glossy finish and to blend them into the rest of the surface. This method is much simpler then having to spray the whole model with flat finish coating. I then finalised the weathering with a “dust coat” of the Polly scale “Earth” and with various pastels to imitate rust, oil stains and dust.
Other “tid bits”
The accessories on the vehicle were added during various stages of the painting and weathering process. Most of the items are from Accurate Armour.
Conclusion
The Cromwell MkIV is among the best Tamiya has to offer and was a real pleasure to build. It is both finely detailed and simple to build. I would definitely recommend this kit to fellow modellers without any hesitation.
| Main | What's New | Articles | Reviews | Gallery | Think Tank | Contests |