|
|
| Home > Articles > Britain WWII > Converting a LRDG Ford F30 30cwt |
|
 |
 |
 |
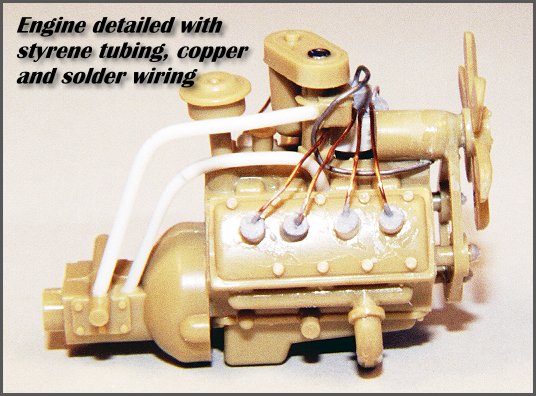
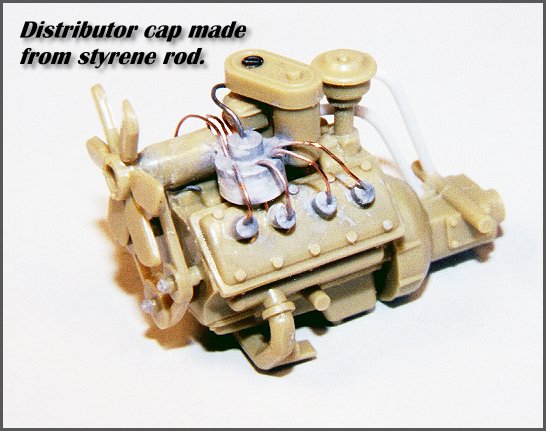
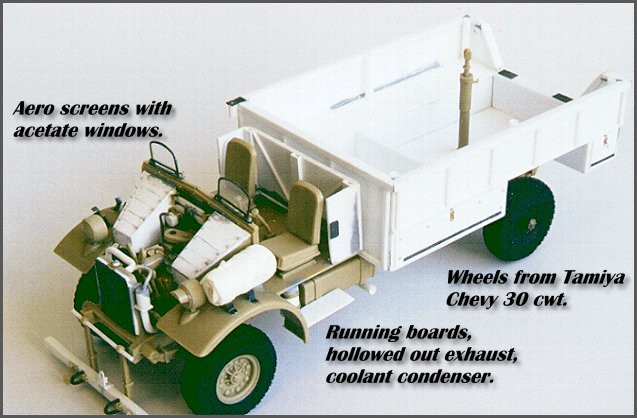
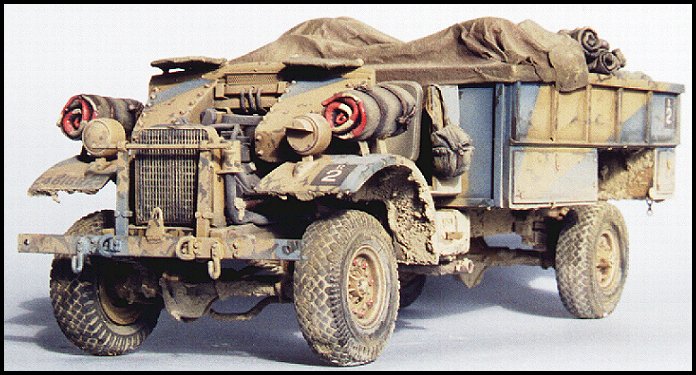
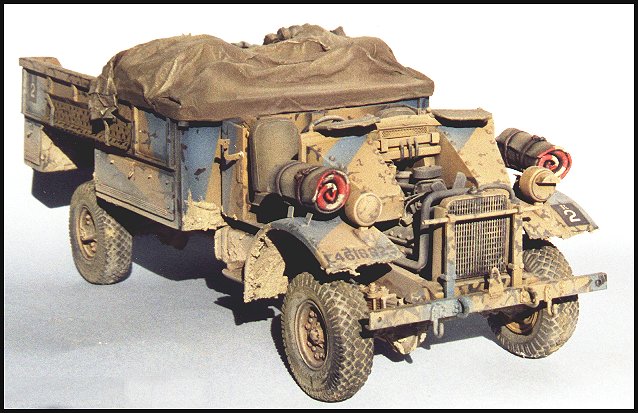
Beginning with the cab floor, I removed everything just forward of the rear seats. I then sawed away part of the front fenders and the plastic in between the running board and the cab. Pay attention to where you are sawing and you’ll be able to leave the kit treadplate intact. I got a little careless and had to laminate a sheet of styrene treadplate over the scratched up kit pattern. I glued a coolant condenser made from tube styrene and brass straps under the floor on the driver’s side. I cut away most of the upper cab – everything above the windshield base can go. I assembled the rest of the cab parts as per the kit instructions. Since the engine is exposed, I had to make some wheel-well covers, adding some small Grandt line bolts to detail these panels up. I added some instrument wires leading from behind the dashboard, a brass tray with battery and leads, headlight wires (though in retrospect, these were probably disconnected), and a perforated vent screen.On the fenders I added some brackets to hold the red & white checkered air ID tarps. These 8 brackets came from the PE set, and each one fell off at least once during construction. It would have been better to make these out of styrene. I added a pair of aero screens with acetate windows, but I ended up covering these with a tissue paper tarp (more on that later).The cab rear was made from three thick pieces of sheet styrene. The thickness allowed me to sand a slight curve where the sides joined the rear. I added some structural detail to the inside face of the cab rear, the remains of the PE door hinges, and finally tiny brackets to hold the Lee-Enfield rifle.The kit engine was used with the addition of a distributor cap, spark plugs, and wires. I also added some hoses and bolt heads to the fan belt pulleys, but you can’t really see them once the engine is in position. After looking at the engine, I think it would be better if the fan blades had been replaced with some thin styrene or perhaps brass sheet.
 |
 |
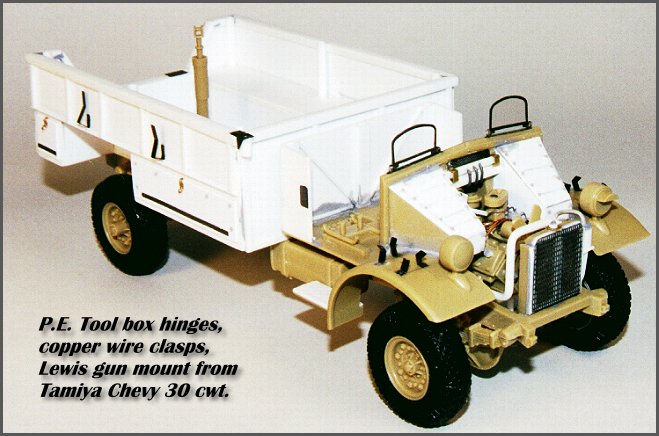
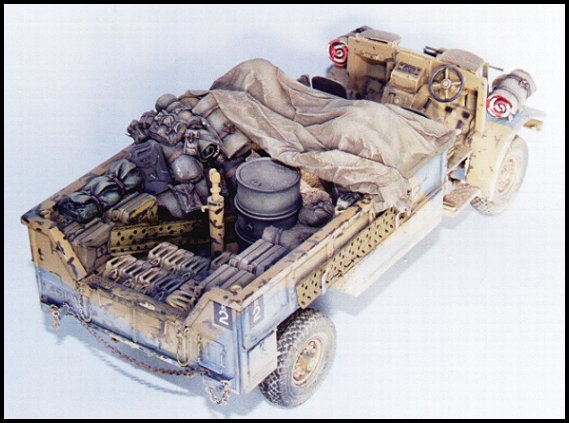
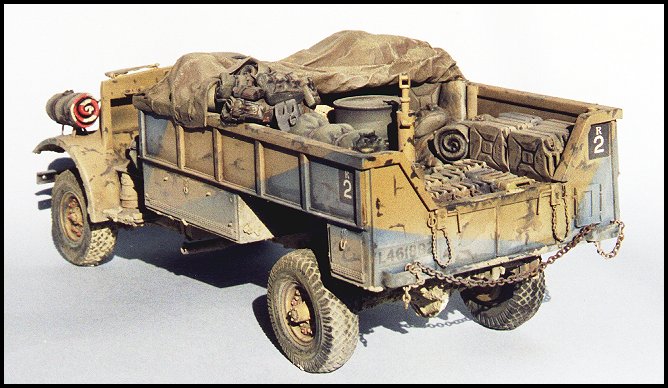
The next part to build was the bed. Being a relative newcomer to scratchbuilding, I was somewhat intimidated by this phase, but it actually went together quite fast – around 8 hours total. Just remember to keep the right angles square as you go. The tailgate got a pair each of fine PE chains, some stretch sprue levers, and a bumper made of thin brass sheet.Inside the bed, I added some weapon mounts at each corner and halfway down each side. I stole the Lewis gun and mount from the Chevy, but this could have been scratch-built easily enough. I added some PE hinges to the cabinets on each side of the wheel well, as well as some latch detail. These cabinets are hollow inside and I now that I think about it, I should have displayed one of them in the opened position. With the bed complete, I could then determine how long to make the chassis. I chopped the kit chassis just behind the cab cross brace. This meant each half of the chassis would have a moulded on brace that would allow them to stay aligned while I figured out what length to cut. To determine this measurement, I positioned the cab over the front portion of the chassis, and lined up the rear of the bed with the rear half of the chassis. The resultant gaps determined how long an extension to cut, which was accomplished with some matching square styrene, reinforced on the inside. I glued some sheet styrene across the extension to give added strength and also to give a bigger gluing area for the bed.I then added the axles, suspension, and other braces according to the instructions. The detail on the fuel (I mean petrol) tanks is a bit vague, so I enhanced it by scribing with an Olfa cutter. The driveshaft was lengthened using the ends of the kit parts mated to a section of plastic tubing. This long driveshaft is quite visible when you look at the vehicle from the side, but you’ll need a dental mirror to see the rest of the detail. Note that these trucks were not fitted with the winch included in the kit. I discovered this when the bed would not sit level on the chassis. It also meant I was going to have to build a new front bumper, as the Tamiya one has a moulded on roller cable lead.The bumper was made with some channel plastic, with some tow hook details added that were carefully chiseled off the kit part. I bent some .030 wire for D-Rings, and stuck on a few bolt heads. I drilled through the tops of the vertical braces, and slid in a thin rod with hollowed out ends.The wheels were adapted by cutting some thick plastic discs to cover the inside of the rim. I used a small rod to attach the Chevy wheel to the Ford brake drum. This modification is almost impossible to see on the finished model.
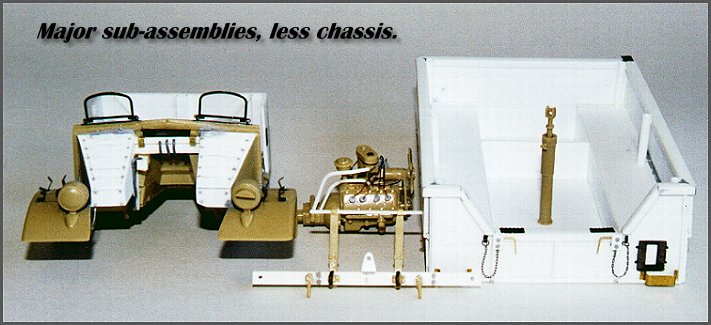
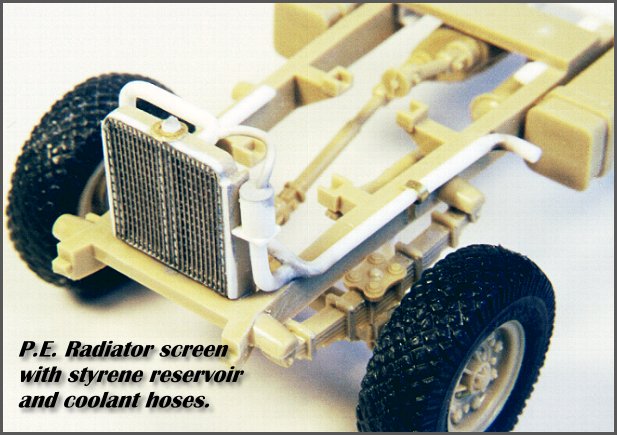
I then moved to the front of the chassis where I built the radiator up using PE screen and styrene. I thought that the PE screening did not look realistic just glued to the flat face of the radiator, so I increased the depth of the radiator before adding the screen. This gives a shallow space behind the screen. I figured the cooling system on these trucks would be beefed up, so I made some hoses out of plastic rod. These were softened up under a flame and then bent to shape. Off to the side of the radiator, I added a small coolant reservoir, and below, some piping that leads to the condenser under the cab. I then added a hollowed out exhaust pipe from tube styrene that I had bored out. The model was now ready for some paint.
 |
 |
 |
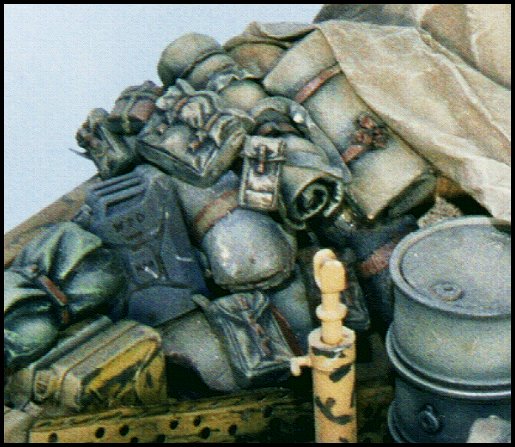
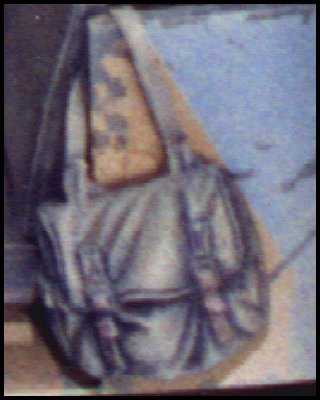
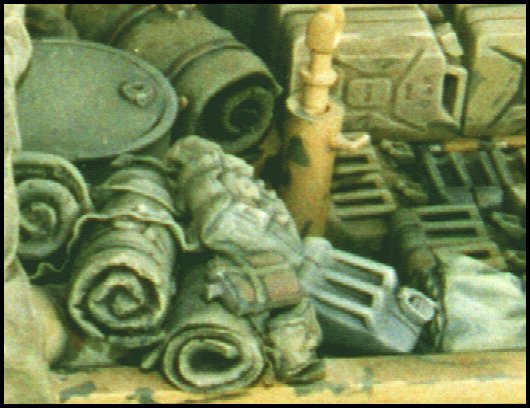
Most references state the F30’s were painted Slate Grey (BSC 28) over Portland Stone (BSC 64), applied in a hard-edged disruptive pattern. The Osprey book has two color plates that show the F30 in this scheme. Other vehicles may have been painted in Black over Portland Stone. I painted the model in its sub-assemblies consisting of the bed, chassis, cab, bumper, and engine with Tamiya acrylics. I base coated the model with XF-10 Flat Brown and hazed on a few coats of XF-59 Desert Yellow. The finish looked pretty good at this point, and I was debating whether or not to add the slate grey camouflage. Due to the vertical struts on the side of the bed, and the diagonal lines of the disruptive pattern, I figured the only way to keep the line straight would be to brush paint. It’s hard to describe, but when you look at the real truck directly from the side, the camouflage pattern follows a straight line; there is no "step" where the paint crosses over one of the struts. With this in mind, I decided to practice my brushing technique on the remnants of the chopped FAT cab. I tried various brands and colours of enamels and acrylics, eventually deciding on XF-18 Medium Blue. Out of the bottle, this was a close enough match (the colour police already have a few outstanding warrants out on me), and it actually looked quite decent while the paint was wet.However, when the paint had dried it looked awful. There were all sorts of brush marks and the demarcation lines weren’t straight enough. Since it lacked the depth of tone achieved through pre-shading the undercoat, the brushed on paint created a bland, dissimilar finish. With all those cons, I submerged the model into a bucket of warm, soapy water. The beauty of acrylics – a few hours later and I was back down to the original bare plastic. I dumped the brown sludge down the drain, and it was at this point in time that I remembered I had used Tamiya Clear Gloss to "glue" the tiny windscreens in place. The detergent dissolved this as effectively as it stripped the paint, hence the tissue paper tarps on the aero screens.I re-primed the kit and painted the blue first, adding flat white and more thinner than usual, using the post-shading technique until I was happy. This was left to dry for two days before masking off the areas to remain blue. I used chart tape for the edges as this could be stretched over the struts and is relatively low tack. The rest of the blue area was filled in with Tamiya tape. I then re-sprayed the desert yellow, mixing successive coats with buff and extra thinner. This sat for only 15 minutes before I pulled off the masking tape. It looked better than the hand painted version, but I had difficulty fading the blue and the tan to the same degree. Since the post shading technique makes the model very susceptible to fingerprints and scratches, I sprayed a few coats of clear gloss. This allowed the oil paint wash to flow better along cracks and bolt heads etc. Before moving on to the detail painting, I decide to fit the stowage.Most LRDG vehicles are crammed to overflowing with cargo, so I cast plenty resin tarp rolls, and used the Jerry cans, oil drums, and bedrolls from the Allied Vehicles accessory kit. With a bit of under cutting from the Dremel tool, the moulding in this set can rival that of the resin manufacturers. I made a set of webbing (bailout kit) from the Tamiya British Infantry on Patrol set using strips of lead foil for the belt and straps. I tried a technique new to me of sculpting some bedrolls and tarps from milliput, as I like the way some modelers display their soft stowage conforming to the lines of the vehicle. I rolled out a sheet of milliput and allowed it to harden up for about 20 minutes. This was then cut into strips and rolled into tarps. I cut short lengths of chart tape to make some tie-down straps, which I cinched into the miliput. The still pliable tarps were squeezed at various angles into the truck bed, and other stowage was pressed into the miliput. This was then allowed to harden overnight.
 |
 |
 |
I painted the canvas gear by first airbrushing it black, and then spraying on thin coats of the base colour (either XF-65 Field Grey or XF-49 Khaki) lightened with white. This was then given a burnt umber oil paint wash, and highlighted with drybrushed modelmaster enamels. The straps were painted flat brown, and a thin black wash was used to accentuate the recesses. I decided to cover the front half of the bed with a partially rolled tarpaulin. This would save me on some stowage, and I thought it would look good too. Initially, I tried to fabricate the tarp out of rolled miliput, but I just couldn’t seem to pull this technique off. I then attempted to use aluminium kitchen foil, but I was concerned about paint adhesion and having to deal with chrome silver paint chips in a tarp. Plus, the foil had a crinkled look that didn’t resemble canvas. I ended up using the old tissue paper/watered down white glue trick. After masking off the bed, this was airbrushed various shades of khaki and XF-57 Buff.
 |
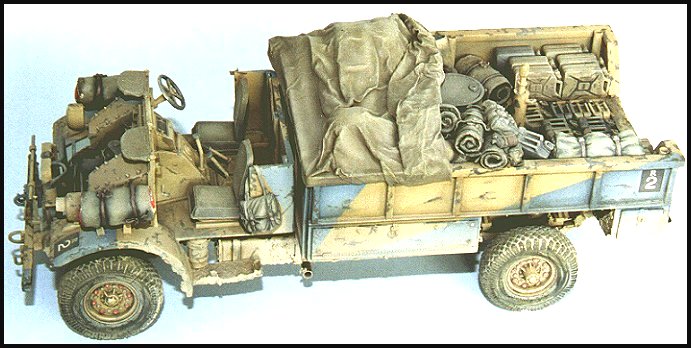 |
The tires were painted buff, and then the tread was scuffed so the "dirt" remained in the tire grooves but the running surface was black. Unfortunately, the tires are already showing the "split" common with this kit. The Tank Workshop resin wheels would not have this problem. Other details were now painted - the Lewis gun, Lee-Enfield, dashboard, wheel nuts, exhaust, and engine. I added appropriate patrol markings and WD numbers from the Chevy, and the truck was ready for weathering.
 |
 |
The Osprey publication cites the LRDG receiving seventy 4x4 Ford F30’s March 1941, to replace a variety of vehicles (Chevy WB 133in 30 cwt 4x2’s, Chevy 15cwt, Ford V8 01). Within a year however, the Fords were completely worn out, and these were replaced by the popular Canadian Chevrolet 1533x2 4x2 30cwt in March 1942. I decided to depict a Ford that would have taken part in Op CRUSADER commencing on 17 November 1941. I reckoned that eight months into their 1-year service, the stresses of combat recce and strike patrolling in desert terrain would justify a very heavily weathered vehicle.To begin, I used a thin localized wash of burnt umber oils in the panel lines, over bolt heads, etc. This was allowed to dry for two days and was then followed by a light drybrushing with enamels. To create the effect of weeks of caked-on dust, I mixed powdered marble with Tamiya putty, liquid cement and tan paint. This concoction has a very fine gritty texture that looks like scaled down dirt. The whole model was then hazed over with a coat of Modelmaster clear flat acrylic and then finally a buff, flat earth, and neutral grey mixture, about the same consistency as milk. A bas was cut from clear pine and given 3 coats of water based varnish. I taped off a border and filled the centre with cellulose compound and fine sand. While this was setting up, I used a spare wheel to impart a tire track in the sand. This was given a shot of white glue and then painted and lightly dry brushed. The model was glued to the base, and the groundwork and the kit got a dead flat toner coat of isopropyl alcohol tinted with buff. Lastly, I added an engraved brass identification plate. That’s the whole project. It didn’t take as long as I had thought it would and I’ve found scratchbuilding conversions one of the most rewarding aspects of the hobby. If I were to tackle this project again, I’d build the F30 version equipped with the Quick Firing 37mm Bofors Anti-Tank Gun. The LRDG modified five such F30’s with this field expedient mount designed to give the patrols a degree of anti-armour capability. Now that would make a great looking load-out for the cargo bed.
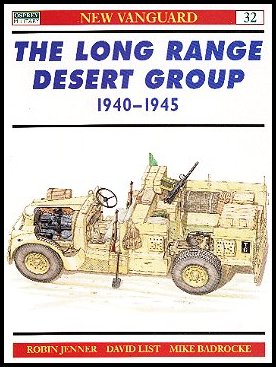
Refs: 1. Osprey New Vanguard #32, The LRDG 1940-1945, Jenner, List, Badrocke; 1999 Osprey Publishing ISBN 1-85532-958-1.2. Army Navy Modelworld Magazine, F30 4x4 Wireless Conversion, Jenner, February 1984.
3. www.lrdg.org
| |
|
Home |