
Matilda I A11 Infantry Tank
Peter Brown
Part 1: The Models
Model - K67 Matilda I A11 Infantry Tank From Accurate Armour Limited, Units 15-16 Kingston Industrial Estate, Port Glasgow, Inverclyde, Scotland PA14 5DG www.accurate-armour.com Price Ł57.50 plus postage and handling Multimedia 1/35th scale kit, with 65 resin, 84 white metal, 36 etched brass parts, plus a sprue of resin wingnuts, fine wire and brass rod, decal sheet with 35 items, enough for five different vehiclesRating - 10 out of 10
Recommended for those into British AFVs with some knowledge of working in resin and metal
(Author's note - while my models do not match Steve Zaloga's in quality or quantity, I have built the AA Matilda which appears elsewhere on this site. Others may like to read my opinions and see what a mess - sorry, slip of the keyboard there - model resulted)
The Accurate Armour Kit
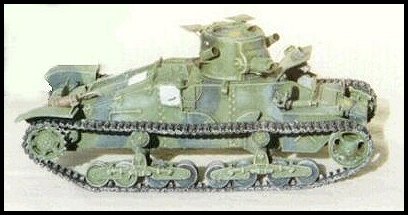
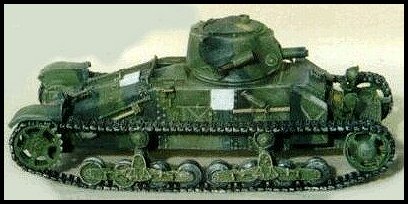
Mastered by Tom Wark, this model was based on the vehicle recovered after many years as a target on an army range and restored to running order by the Tracked Armour Group for the Tank Museum at Bovington, England. The resin is their now standard pale green variety, it may not look good but it takes detail well and the model benefits from it. Some very thin items are moulded in resin, which other manufacturers would tend to use brass or end up with an overscale item these canny Scots end up with a good representation.. As the instructions state, "It's just a great wee model" which I would agree with. Something done well by those who can do it well looks easy, it's just the "just" part which not everyone can achieve.
The hull is in one main piece, with a recess moulded to allow the driver's hatch to be depicted opened up to show a seat base and back, and the turret is also partly hollow although no detail is included there. Standard of moulding of all resin parts is fine, flash is light and detail very good indeed. Look on the top of the hull, there are not only recesses for the screws holding the hull together, but the cross head slot of the screws themselves is depicted... White metal items are also well produced and a lot of though has gone into the design of the kit.
While it has a lot of parts, and some need to be removed carefully from their carrier blocks, it goes together well and even quickly. Instructions are clear, with photos of a model under construction including detail close-ups and separate shots of the suspension units. These are needed as the units are fairly complicated in order to match those on the original vehicle.
Each of the four bogies is in white metal, and two parts each. The wheels are in white metal, these need some little cleaning up and sorting out into pairs. There are male and female versions of each type (metal rimmed and rubber covered) and these need to be glued together. Note that the outer face of each of parts 8 inner and outer and 9 inner and outer, which forms the spindle which attached them to the axle plates, have a small flat extension moulded on them. This is not a mould fault, but forms the lower part of the axle plate, resin parts 6, and should not be filed off. Each axle plate needs careful cutting to remove it from the carrier block. Care must be taken not to break the part or cut too much off, the two ends of the plate must be semicircular. I found it best to open the holes in the plate with a rat tail file before cutting from the block. Once the wheel pairs are assembled, add them to the axle plates. Keep the best plates for fitting to the outside face of the suspension, any less than perfect can be used inside where they will be less easily seen.
Fit the completed units onto the man spring parts 4 and 5, remembering that you need two bogies with all rubber tires and two with mixed steel and rubber ones, the steel ones always being at the rear, and keep the wheels level unless you plan to depict your vehicle on uneven ground. Add the plate pivots parts 7 between the plates, with the small round greasing access point to the top. With that done, which is not as hard to do as it sounds, the units are complete. I found these parts sufficiently strong, and anyway too delicate, to add any reinforcement. I did add my usual short wire strengtheners when fitting the bogie units in place. The same applied to the track support rollers parts 10 and the sprocket and idler units. The sprockets are in four parts, inner and outer parts 17 and track support rings parts 16. These need to be aligned, there must be enough room for the track teeth the pass between the support rings, but inner and outer sprocket parts have small keys to align them. Take care if drilling the sprockets and idlers parts 15 or you may drill all the way through as I did and have to disguise the resulting hole...
When fitting the etched brass details on the hull top, I fitted the transverse plates parts E12 and E13s first. These would have been better as one piece, due to the thin sheet they are etched from they bent very easily and getting them to stay put while the glue dried was not easy. I also had to trim the main engine grilles, E1 and E2, to get a snug fit, and had to flatten them several times as they bent easily. The small forward grilles E3 were a good fit and here their bend ability was useful as they have to be shaped to fit the hull top. The area below each grille was painted black before adding the brass, muffler or exhaust to us this side of the Atlantic part 45 was added after the grilles. Markings plates E17 and number plate holder E18 were added after most of the painting had been done. Assembly of the rest of the vehicle is straightforward, there is only a small amount of resin to be cleaned off the lower face of the hull. Note that the area below the sprocket mounting is flat on the real vehicle to allow the lifting jack to fit well. Care must be taken cutting the suspension mounts parts 2 and 3 from their carrier blocks so as not to take off too much resin. Note that the forward mounts have to mate to the angle hull sides so are handed left and right.
I fitted all the small fittings, tools etc before adding the bogie units. Many of the mountings for these are etched brass, they have bend lines in them and fold easily. Even the spring on the aerial mount is a white metal part! The wing nuts are very small, luckily plenty of spare ones are included. Headlamp brackets parts E25 were added last of all, I had a problem bending the metal lamp brackets parts 27, the first one broke so I copped out and made new ones from brass wire. These items are a difficult shape to mould, being basically a large U item with two pairs of 90° bends, so would be fragile no matter how they were made. My only deviation from the instructions concerned the smoke discharger units on the turret sides. These need to be modified according to the instructions to take the detail off the two brackets parts 11. I think the kit as it stands depicts them at too steep an angle, so cut the two mounting points off the turret side and repositioned them, made two new plain card brackets and fitted kit smoke dischargers parts 12 after carefully drilling out the muzzle ends. Add the cables which fire these from fine wire, these cables come from the small square box on the turret rear and pass along the lower edge of the turret, through the clips moulded for support, and attach to the trigger guard of the smoke dischargers.
I assembled the basic parts less tracks and mudguards, then painted the vehicle in mid green Humbrol 103 with dark green Humbrol 116, as I did not have the recommended Xtracolour paints, then lightly weathered while I still had good access to the hull. Tracks were then added, these come in eight lengths which is fine for straight runs and flexible enough to fit round the large sprockets and idlers. The tracks are moulded in grey resin, they were painted mat black and dry-brushed in steel coloured paint before assembly, where wheels and tracks touched the paint was scraped off and the tracks superglued on. Track sag on Matildas was officially 2" to 3" between the idler wheels, noticeable enough in this scale. There is more than enough track, I had almost two whole lengths left over. When the tracks had been added, the final small items like number plate E18 arm of service plates E17, rear view mirror E20, mudguards 41 and 42 and those parts which came adrift during assembly were added. The decal sheet gives the red and white arm of service markings, two pairs of the 'Chinese Eyes' for the turret sides, white recognition squares and vehicle names, serial numbers and registration plates for five different tanks. If you did not want to depict a BEF vehicle, leave off the white squares and arm of service plate, and add all the other markings for a pre-war finish. DEMON was shown to King Carol of Roumania and other dignitaries in 1938 in plain green, at which time she did not have the rear mudguards fitted although a set of record photos of her show them in place. Decals had to be cut from the sheet, they are printed on a solid backing not as individual items a la Tamiya etc, but are good and were soon put in place. I could not see any photos showing the T-prefix census numbers on view in France in 1940 so left those off, the other items add small and welcome spots of colour to the model. White squares were hand painted as they were in areas not best suited to decals, and the vehicle was finally weathered.
In time I will add crew figures from my spares box to depict a crew in training during the Phoney War period, winter 1939-40. RTR crews in France wore plain black overalls - an RTR custom still current today - and the pattern was not unlike the standard khaki battledress. In winter they also had brown leather sleeveless jerkins and woollen extras knitted by mothers and others back home. Headgear would be black beret with silver tank in wreath surmounted by crown badge. Gas masks in khaki bags were slung on one hip or on the chest ready to use. Revolvers were worn in the special AFV crew open topped holster, strapped to mid-thigh and suspended from a web strap attached to the normal webbing waist belt. Overall Verdict and an alternative At first sight, this looks a complicated kit, but it builds up easily due in no small part to good moulding and design. It would not be an ideal first resin kit, nor one to be built in a hurry. There are lots of small parts - all apart from the turret and hull - so you need a steady hand and good tweezers to fit them together. All fitted well with superglue, and there were no problems apart from the headlight mounts mentioned above. It only lacks a towing cable and crew to be complete in all details. All concerned with the kit deserve congratulations on a fine effort, I would also commend Accurate Armour on a unique choice of subject if it were not for another Matilda I being brought out at the same time - surely any kit manufacturer's nightmare, especially in the specialist resin market.
Commander's Kit
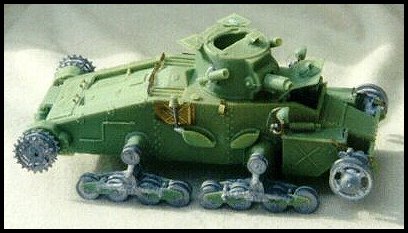
The other Matilda I kit is No 1-005, British Matilda Mk 1 (Late) from Commander Series Models Inc., 551 Wegman Road, Rochester, New York 14624, USA. (I do not have the current price for this alas) This kit consists of over 50 resin, 16 white metal and around 60 etched brass parts. The hull and turret are solid, and the resin is not as well moulded as the Accurate Armour kit. A large block of resin had to be removed from the bottom of the hull and the sprocket and idler wheels had to be cleaned up and straightened out in hot water. My sample had some of the road wheels and return rollers missing but had extra ones of the wrong sort. As Matilda I had two sorts of wheels I was able to convert some to make the review model. The instruction sheet consists of a parts list which is not accurate and a sets of sketches and written description of building the model. The brass parts in the kit are not the same as shown on the instruction sheet which meant I had to work out what many parts were and where they went. Some of the metal parts are not well moulded, and I had a lot of trouble fitting the headlights and the mudguards made from several pieces of etched brass. The track parts included individual links but these were not needed as the long lengths were enough and bent to shape well. No colour or markings details were included in my kit although this may have been because they were missing from my sample. The box top has a colour photo of the finished vehicle, most of the tanks used in France in 1940 by 7th Battalion The Royal Tank Regiment were painted mid green and dark green with white recognition squares and squadron markings with vehicle names like GLENLYON and GARBO on the hull sides and rear. I will add these later when I have got some small enough dry decal lettering.
Final Analysis
Were I to build another Matilda I, my choice would be the Accurate Armour version. It is to my thinking just better all round, both in parts and especially in the instructions, to the Commander's version, and also scores with decals as there are few suitable ones from other kits which can be adapted. As prices are around the same the only other thing to recommend one or other kit would be availability, both could be had from specialist stockists or direct from the manufactures. If you only want a Matilda I and are not bothered which sort, I would recommend the Accurate Armour version.
Part2: Additional Details
The Matilda I - Scourge of the Blitzkrieg?Background
The enemy's tanks came closer. Their dark shapes moved with slow deliberation. Bullets spat from machine guns as they advanced. Anti tank guns opened fire, their small shells bounced harmlessly off thick armour. The tanks came on. Would nothing stop them?
The place, Arras, France. The date, May 21 1940. A major attack was taking place, heavily armoured vehicles shrugging off ineffective fire from the latest weapons. Was this the mighty German Blitzkrieg in its race to the Channel? No. It was tanks of the British Expeditionary Force making a counter attack. These few tanks were mostly small, two man machines, designed to be built cheaply and armed with only one machine gun. In a few hours they scared their opponents, the 7th Panzer Division, so much so that their commander, General Erwin Rommel, reported being attacked by hundreds of enemy tanks. The attack was only stopped when heavy artillery and anti aircraft guns were brought into action.
As reports of the battle were passed up the chain of command, senior officers feared that the rapid German advance would be cut off and destroyed. At the highest level, Hitler called a halt, albeit temporary. Meanwhile, the Royal Navy landed forces at various French ports, and moves were made for the evacuation of the BEF. Many of its men, although almost none of their equipment, withdrew to better positions. The Panzers resumed their advance and reached the coast, where their crews posed for the cameras looking across the English Channel through their binoculars. The only ones who got a closer look did so as prisoners of war or as post-war tourists. So, what were these tanks which in a few short hours halted one victorious and confident army, saved another and helped to ensure World War Two did not end in 1940 with a total German victory?
The Tank Described
In late 1935, when most British tanks were built by Vickers-Armstongs Ltd.,the company was given a specification for a small, well armoured tank armed with just one machine gun. It was to be proof against all known anti tank weapons. It was to be ready in six months. And it was to be cheap. The result was the A11, Infantry Tank Mark I, nicknamed Matilda after a cartoon duck of the period.
For the vehicle to be ready quickly, existing components had to be used. Engine was a 70hp Ford V8, with a Fordson four-speed gearbox and steering similar to that used on Vickers light tanks. Suspension was adapted from the Medium Dragon Mk IV artillery tractor, itself based on their company's Six Ton Tank Model E which had been sold abroad and developed into the Soviet T-26 and Polish 7TP. These economies meant that the projected price of Ł15,000 actually fell to closer to Ł5,000. Its armour was up to 60mm thick with 10mm in less vulnerable areas. The long hull had the main mechanical components at the rear, and was riveted together. Its plates were thick enough to keep the structure rigid without the need for internal stiffening. Overall appearance was of a long box, with the wheels attached to the sides by suitable extensions. Sprockets were at the rear, and two bogie units each side provided the suspension. These each had two sub units, with two wheels each. Most wheels were encased in rubber tires, but those at the rear of the tank had steel rims as they took a lot of wear.
Upper run of the track was supported on two return rollers each side, and a large idler at the front, carried on a cross beam, was adjustable to take up any slack in the tracks. The track was totally exposed, with only a small sheet metal mudguard over the sprocket. The cast, drum shaped turret was just ahead of the vehicle centre line. The commander, who was also gunner and radio operator, sat on a sling suspended from the turret sides. His access was through two hinged flaps in the roof, and vision through a periscope. He operated a single machine gun, also a Vickers product, its water filled cooling jacket protected by an armoured sleeve. Most vehicles used the armoured vehicle version of the .303" Vickers, some had the heavier .50" version which gave them some anti armour capability. Additional armament in the form of 4" smoke dischargers were fitted on the sides of the turret. In front of the turret sat the driver, with his own hatch in the hull roof which also contained a periscope. His forward vision was through a small slit at eye level. After tests on a pilot vehicle, an improved version was put into production.
Some minor problems were encountered with the driver's front vision and turret flaps, these problems were corrected in the second batch. These tanks had a hinged cover protecting the driver's visor, headlights moved forward and downwards, and the location of items of stowage changed. While surviving documents at the Tank Museum, Bovington show these changes, they do not give different designations for the two types, and I have never come across any references to what each was called to tell one type from another. In all, almost 140 of these tanks were built. Dimensions also seem to have varied, the official 'Instruction Book for the Tank, Infantry, Mark I' was amended to change length from 15' 11" to 16' 3" (4.85m to 4.95m) and height from 7' 8" (which may have been a misprint) to 6' 6-1/2" (2.34m to 2m) while the width stayed the same at 7' 8" (2.34m). The reason for these changes is not explained, why they altered from the June 1939 edition to the amended ones in July 1940 may have been because the two varieties were different.
Matilda was designed to give direct support to attacking infantry, and so they did not need to be fast. Maximum speed was quoted as 8 miles per hour 13 km/h) to match the speed of troops on foot. A governor limited the engine speed, although in service this may well have been adjusted to allow more speed. Total weight was around 11 tons (11200kg). As a fighting machine, these tanks had many drawbacks. With only two men in the crew, all duties other than driving had to be carried out by the commander. Armament was limited but then it was never intended to be heavy. The exposed tracks and suspension were vulnerable, but the main armour itself was proof against any anti tank weapon which the tank might come up against.
These drawbacks led to a better tank being produced. The A12 was a bigger, better armed and better armoured vehicle, and was also named Matilda. To tell the two apart, the new Infantry Tank Mark II was named Matilda Senior or Matilda II, although when the A11s went out of service they were known simply as Matilda.
The Tanks in Action
Both types of Matilda went to France with the BEF as part of 1st Army Tank Brigade, which was under the Army level control and not part of an armoured division. At Arras, it consisted of the 4th and 7th Battalions, Royal Tank Regiment. 4RTR had 35 Matilda I's and the 7th had 23. Of the 16 Matilda Seniors belonging to 7RTR, seven were loaned to the 4th to give them some anti tank firepower. Some Light Tank Mk VIb were also used as liaison and reconnaissance vehicles.
In the hastily planned attack, Matilda I's performed well enough. Some were hit many times without being stopped. Those which were knocked out had been hit in the exposed suspension, and had to be abandoned. Even a hit which did not penetrate could cause problems, one tank commander was pinned to the back of his turret when a hit forced his gun back into the turret. He withdrew, freed himself, cleared the stoppage on his gun, and attacked again.
Despite their best efforts, the two regiments were forced to retire when heavy firepower was brought against them. The BEF withdrew from France, leaving its armour and heavy weapons behind. The Matilda I had had its day, those few left in the UK were used as part of the anti invasion measures, then for training, and finally, as targets on the ranges. A single late version was kept at the RAC Tank Museum, Bovington. Recently, one early version was recently retrieved and rebuilt by members of the Tank Museum's Friends and the Tracked Armour Group, and is now in running order fitted with a modern engine. Matilda Senior continued in production, and in the early stages of the war in North Africa gained a reputation as an almost invulnerable vehicle, until it met the German 88mm brought in to oppose it. Colours and Markings
The British Expeditionary Force's armoured vehicles were painted in a disruptive scheme of Dark Bronze Green, applied by the troops themselves over the basic factory Khaki Green. All AFVs also had white squares approximately 12" per side located so as to be visible from any direction, on Matilda I's they were on the hull sides, engine deck and turret rear and also on other surfaces. Interior was to be painted in aluminium paint. Vehicles attached to Divisions carried that Division's emblem, 1st Tank Brigade were not part of any Division so lacked this marking. A white number on a coloured square usually denoted a unit's position and status within a Division, this was usually put onto a suitable vertical surface front and rear, on a metal plate. Army troops still had this Arm of Service marking, but theirs was marked onto a metal plate about 12" square. References state that 1ATB used the number 4 stencilled or painted on a red square with a white line above it to denote that they were an Army unit and not Divisional troops, this was certainly true of 4RTR, I have seen one photo of a 7RTR vehicle using the number 5 while most photos show no plates in use.
As it was expected that gas would be used, patches of gas detector paint was painted onto suitable surfaces, often in front of the driver's visor and hull top. This was a mustard yellow colour under normal circumstances, if it changed colour it gave a good reason why you were feeling unwell. Which Company (the Army Tank Brigades did not use the usual Squadron designation) a vehicle belonged to should have been denoted by a mark painted on the turret, approximately 9" high. HQ Company used a diamond, A Company a triangle point upwards, B Company a square and C Company a circle. (7RTR called their third company D Company following Regimental tradition). Photos show these were not always carried, coloured pennants were also carried on radio antennas to mark Section, Company and Battalion commander'stanks.
Vehicles usually carried a nickname in white letters. 4RTR used names beginning with D on the hull front above the driver's vision slit, 7RTR names started with G and were on the hull sides and rear, in white letters. This naming convention dated from the time they were D and G Battalions, Tank Corps, respectively. 4RTR also had another mark first used in WW1, the 'Chinese Eye' in white with a black outline and blue pupil, on the turret sides above the smoke dischargers. These marks were first applied to tanks by Chinese labourers working at British tank parks, who thought the tanks needed eyes or else they could not see... All British military vehicles before late 1940 carried a civilian registration plate with white letters and numbers on a black ground to conform to then current legislation. This practice was dropped in 1940 as fewer civilian vehicles were in use, and the number of military vehicles increased rapidly. The vehicle census number, carried as well as the registration before then, was used to identify the vehicle, as instead of being painted in small characters on the side of the vehicle, was now some 3 or 4 inches high and in a more prominent position. These numbers were prefixed by a letter to denote the type of vehicles. Tanks (and also, tracked Carriers) were prefixed T. Thus vehicles can be identified by one or other number. Photos indicate that the census numbers were not painted on Matilda I's in France.
Of the 140 Matilda I's built, the details of serial, registration and contract numbers held in the files of the Tank Museum, Bovington are -
Prototype T1724, CMM889 Ordered January 1936
First Pattern T3433 to T3492, HMH788 to HMH847 60 tanks ordered April 1937
Second Pattern T5551 to T5610, RMY905 to RMY964 60 tanks ordered May 1938
and T8101 to T8119, PMX458 to PMX476 19 tanks ordered January 1939
By the time the final 19 vehicles were built, the use of registration numbers was dropped in favour of just the census number, so they may not have been used on these vehicles. On later Matilda II's some carried registrations and some did not. The late type vehicle in the Tank Museum does have the number but the markings are of an Arras period vehicle, which as none came back to UK are not correct for that actual vehicle.
Sources
'Matilda Infantry Tank 1938-1945' by David Fletcher with colour plates by Peter Sarson, Osprey New Vanguard No 8, ISBN 1 85532 457 1 covers Matilda I but mainly the Matilda II. It contains a four-view full colour 'plan' of a Matilda I DERWENT HMH793, an early type with 4RTR as at Arras.
Two of David Fletcher's series on British AFVs, 'Mechanised Force - British Tanks Between the Wars' (ISBN 0 11 290487 4) and 'The Great Tank Scandal - British Armour in the Second World War Part 1' (ISBN 0 11 290460 2) published by HMSO for the Tank Museum include data on the Matilda I, and are the best references available on British AFV design and development of the period.
For the Matilda I in action, see 'The Matilda - Armour in Action 2' from Ian Allan Ltd (ISBN 0 7110 0405 6) or 'Through Mud and Blood' published by Robert Hale (ISBN 0 7091 4822 4) and both written by Bryan Perrett. These cover the Matilda, mostly the II but also I, and all types of British Infantry Tanks respectively. They are out of print.
Colour schemes, Steven J Zaloga's 'Blitzkrieg - Armour Camouflage and Markings 1939-1940' from Arms & Armour Press (ISBN 0 85368 334 4) which has a section on the BEF's vehicles and covers all those nations who fought in the early WW2 campaigns. It is also out of print.
| Main | What's New | Articles | Reviews | Gallery | Think Tank | Contests |