
DML Valentine
Peter Brown
Some Background
Usually any review starts by saying who makes the kit, in this case it is not that easy... The model originates from Russia as it says clearly on the sprues. From what I hear it came originally from Allan in the CIS, but I have not seen it from them. Instead, I have different examples marketed by DML/Dragon including a North American issue with a very good crew figure, typical 8th Army style but not available in my native England for some reason. To really confuse things it also appears in RPM, Toga and VM boxes. They all contain much the same plastic parts although two styles of tracks can be found, the main difference being packaging, instructions and decals. While the latter seem to be very similar subjects their quality varies. So too does the price, Dragon costing around Ł24 to Ł25 in the UK and the others more like Ł18, although nowadays more and more kits are being discounted and US prices are often very low. It seems Dragon no longer list the Valentine though many of their kits are reissued or have appeared under the Shanghai Dragon label. So plenty for the kit box collectors to search for. As the plastic is the same apart from some variation in colour, assuming you have access to more than one package you can vote with your money when you decide to buy. My constructed example was from a Dragon box but I built it back-to-back with a Toga Bishop and very soon all track was lost of which parts came from which box.
Whichever make you purchase, the vehicle it depicts is the Valentine
Infantry Tank. To those not familiar with British WW2 armour or its nomenclature, an
'Infantry Tank' was designed to accompany infantry in the assault and as such was better
armoured but slower than the medium 'Cruiser Tank' although its armament was not much
different. The first two types of 'I' tank were the A11 and A12, both called Matilda and
both used in France in 1940. The second Matilda was very successful in the early Desert
battles and later in Australian hands in the Pacific, but the Valentine's career was
somewhat different.
First of all, it was unusual in that it was not an official government design. It was
developed by Vickers, then as now active in tank design, as a private venture and aimed to
be an alternative to the Matilda with the advantage of being cheaper and easier to build.
It used the same design of suspension as Vicker's A9 and A10 Cruisers and also the same
2pdr gun, but with more armour to fit its role. It was good enough to be taken into
British service in 1940, and was in part responsible for a change in naming practice. Not
having an official 'A' design number allotted to tanks when the specification was first
issued, it could be called 'Infantry Tank Mk III' but the name Valentine was attached to
it. Whatever the disputed origins of this, it was built in large numbers - at around 7250
gun tanks alone, more than any other British wartime tank - by three UK manufacturers and
another in Canada.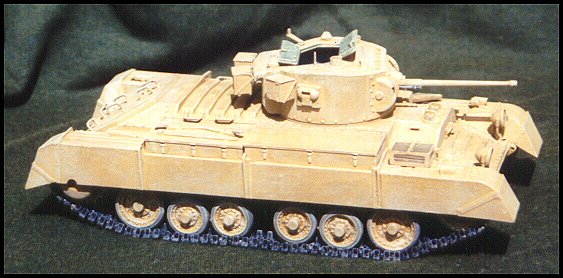
While designed as an Infantry tank, it was widely used in British armoured divisions ('I' tanks were usually employed in separate Tank Brigades to be attached to infantry divisions on an ad-hoc basis as needed) in the United Kingdom, with many a tank crewman cutting their teeth on them. Its main active employment was in its intended role in North Africa, and a large number were sent as aid to the Soviet Union, over 2000 from the UK with 300 odd more lost en route, and all but 30 of the 1420 Canadian ones being given over. The tank also developed into a series of marks. The main drawback it had was its small size, and the initial design had a cramped turret - I have been inside one so I can vouch for that! - with just enough room for two men and the gun. To overcome this, a revised design extended the turret at the front and back to allow room for three men - been in one of them too, and it is a little better - then it was realised that the 2pdr was no longer powerful enough and a new turret with a 6pdr was designed and fitted. Initially this lacked a co-axial machine gun, so another type with both gun and machine gun was produced, and finally a 75mm was fitted. When added to different engines - initially petrol but later British or mostly General Motors diesels - and the slightly different Canadian ones which used .30 Browning machine guns instead of the 7.92mm BESA and also had the front hull section cast instead of fabricated, there were in the end eleven gun tank marks. Also one SP with a 25pdr field gun of which more separately, another with a 17pdr anti tank gun, a bridgelayer which was widely used, amphibious 'DD' tanks of various marks, and flail mine clearers and a variety of other variants built as one-offs and small runs. Some served as command vehicles in North West Europe in 1945. There are enough variations to build a good armour collection with just Valentines alone!
Yet there has been little interest in the tank from model manufacturers in 1/35 scale. Accurate Armour have produced two gun tanks and the 17pdr Archer and there have been smaller scale versions from Fujimi and Esci, but we have had to wait a long time for a plastic kit in a larger scale. There was a plan to release one in 1/32 many years ago from Airfix but that never happened, in the end it is down to the Russians of all people to come up with the goods. Overall it is worth the wait. Allan have produced a good model of the Mk II variant, with two-man turret mounting a 2pdr gun, which is a good choice as this is the type most widely used in North Africa and most Canadian ones were similar to this type. The other variants all used the same basic hull so we may well see other flavours at a later date, and regardless of that the after market manufacturers could find lots of scope for different turrets. The kit itself is well up to current standards from the CIS, maybe not as good as Dragon could do themselves or the likes of Italeri, Tamiya or AFV Club. The main drawback of release through Dragon is cost, for example I could buy an ex Zvezda SU-100 via Italeri for half the cost of a Dragon Valentine or pay less for a model in a Middle European box, yet the vehicle and resultant model is not that big. But, if you want a Valentine and prefer plastic to resin, at least you have a kit to work from.
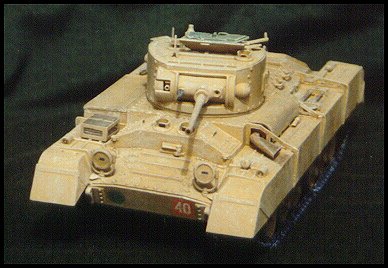
The Model
Whatever the box the kit itself comes on six sprues, with wheels and turret on their own sections, hull on another, suspension and details on the fourth while two more contain individual link tracks. In total, I counted 135 in grey plastic plus another 240 more track links. Two types of these have turned up in different boxes, with the Dragon distributed one being the one which seems more common in photos. There is some choice of options, with both the small front mudguard sections and the desert style sand shields included, and the standard of design and moulding is good enough for someone used to modern kits. Indeed, straight from the box it makes a very pleasing replica, although there have been a few glitches and as usual there is scope for improvement. The plastic itself can be brittle so take a little care when removing parts from the sprues. Assembly is best done as per the instructions. The suspension is the first part, and needs a little care. The large finned external brake drums parts E74 should be assembled and left to set, then any join line carefully cut and sanded off before fitting to the drum cover E75 and sprocket E73 as once fitted they would be hard to work on. I chose to fit the final drive housings E79 to the hull and add the sprocket unit later.
The four bogie units look more complicated than they really are. Each has
a large spring part C40 which will need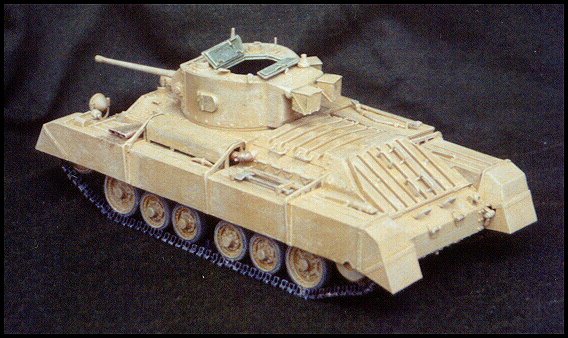 cleaning up before assembly. Note that the coils of this were square in
section so do not attempt to round them off! Fit to the support units C42/C43 or C41/C44,
taking care to open the locating hole in one part which is moulded closed. It may be best
to assemble the units and clean up the joins before gently opening up the arms and
springing the springs into place, keeping the moulded details facing upwards. On the
front of the idler mounting parts C50 and C51 is a small extension, in real life a slot to
fit the track tension adjusting tool into. This can be opened up for extra realism. As to
the wheels, the real vehicle had tires which had a rounded edge, not the square finish as
on the kit. This is soon corrected with a little scraping and filing. Painting is easier
if the wheels are not assembled until after they have been painted, so you can soon move
on to the hull.
cleaning up before assembly. Note that the coils of this were square in
section so do not attempt to round them off! Fit to the support units C42/C43 or C41/C44,
taking care to open the locating hole in one part which is moulded closed. It may be best
to assemble the units and clean up the joins before gently opening up the arms and
springing the springs into place, keeping the moulded details facing upwards. On the
front of the idler mounting parts C50 and C51 is a small extension, in real life a slot to
fit the track tension adjusting tool into. This can be opened up for extra realism. As to
the wheels, the real vehicle had tires which had a rounded edge, not the square finish as
on the kit. This is soon corrected with a little scraping and filing. Painting is easier
if the wheels are not assembled until after they have been painted, so you can soon move
on to the hull.
This consists of a lower open-topped box, an upper unit with integral mudguards, and some smaller sections. The lower section has a large bulkhead moulded into it so should be good and square, and the parts are well enough designed to match the complex angles of the original tank. One pointer though is to fill the locating holes in the rear vertical plate part A3 as these are for the Bishop's towing hook unit and are not needed on this model. Other than that, just add parts in order, taking care to dry-fit them first and you should not go far wrong. One area which needs a little modification is the driver's hatches. While parts A13 and A14 are fine, straight from the box they are not totally accurate. The front visor plate part A11 should be altered to make a small step where the downward slopes meet the vertical outer edges, with a 1mm horizontal being cut and the slope altered to meet it. This done, shave the hatches A13/A14 to fit with the outer edge in line with the step, so there is a 1mm gap between the vertical edge of the hull and the outer edge of the flap. This is not easy to put into words but is not hard to do. Some filling, either using scrap plastic or your favourite putty, is then needed and you have added some accuracy to your model. A minor point and one you many like to not bother with as it is not too noticeable.
The real vehicle had a series of metal strips around and below the large engine compartment doors part A4 which are added from thin card strip. Other details, engine compartment lower sides parts A5 and A6, try not to mix them up and there should be a distinct gap between their upper edges and the main hull. The many handles parts C62 could be left till a later stage and should be treated with care as they are not too robust. Exhaust muffler unit is hardly seen with its cover in place, the fishtail outlet part C53 is improved by opening its outlet out and adding three small supports into the gap, see the model photos and box art for a guide.
Stowage box arrangements seem to have varied on Valentines. The large forward box parts A7 and A8 had a plain lid on many tanks and I smoothed the moulded ribs off mine. Canadian built vehicles had a distinctive design of diagonal ribs with a round raised shape in the centre which you may like to duplicate. The rear box parts A9/A10 benefits from a new hinge of the same design as its larger counterpart, easily made using a strip of sheet plastic and a length of fine rod or stretched sprue. When the glue has dried thoroughly, make cuts into the rod and remove short lengths to match the kit hinge.
Tools on the model are sparse. The shovel and crowbar unit C60 is adequate but I made the shovel blade less pointed in outline. The handle for the pick C69 needs making from scrap or rod, basically a flattened rod 28mm long will suffice, and the distinctive curved track adjuster needs making. The photos show it and it is soon done from a 'boomerang' of 1mm plastic rod with 26mm long bent in the middle until its overall dimensions are 24mm and 7mm 'across'. L shaped pieces of scrap 4mm long by 2mm high at each end finish the item. See the model pictures for the final appearance.
One other item is the wooden blocks for the jack. There were two short,
thick pieces of wood on the real vehicle, and appearances are improved by filing part C59
smooth, scribing a line all around the outer edge and then adding the frame for the blocks
and a strap from thin plastic sheet. Note also, the strips across the front and rear at
the top were not there on the original, so leave them off unlike me! The rear view mirror
part C70 I left off, adding the locating brackets on the hull using the kit part as a
guide. Headlights come with deep moulded in indentations where the lens was left
clear of the paint used to cut down reflections. These I filled and filed smooth, just
painting a small area glossy black for the clear space. Some tanks carried their lights
reversed and folded with the lens areas laid down onto the hull to protect them.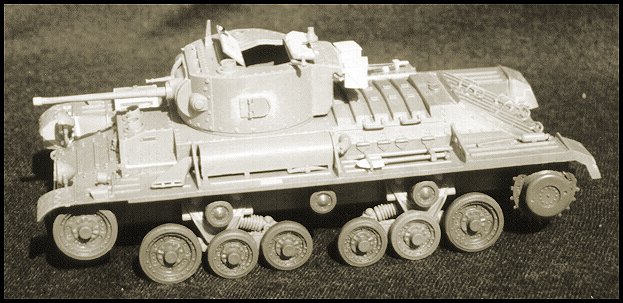
The turret needs some work. First of all, the D shaped pistol port on the left side part 23 is the wrong way round, it needs to be carefully removed and re-fixed with the vertical hinge facing forward. The separate port on the other side part 28 could use a bolt head at each corner. Most parts fit well enough but the joint at the front of parts 23 and 24 may need some filler, and I filed the rear lip on the turret back - which is correct in having an opening under it so no filling is needed to block it off - to thin down its outer edges. 2pdr guns came with two styles of barrel, that in the kit with distinctive steps at the muzzle and near the mantlet while others had a smooth transition for the change of outside diameter and a slight belling out at the muzzle. Either can appear on Valentines so watch this if you want to depict a specific vehicle.
Sight vane part 36 can be thinned down or replaced with card or maybe an after-market etching if one is available, and some detailing on the inside face of the hatch flaps parts 33 and 34 is of benefit if you want the hatches open as these had padding on them. Hatch stops can be added from scrap sheet. Turret interior detailing could be done using the basic gun breech parts 29/30 but if you add figures you will not be able to see much anyway. I will leave this to your discretion and refer you to the Museum Ordnance Special or Bellona Print for inspiration.
One common extra fitting was the three boxes for magazines for the anti-aircraft Bren gun, made from plastic sheet these are 8mm wide and high by 6mm front to back, with lid slightly oversize and detailed with scrap strip. The distinctive Lakeman mounting can be made from plastic strip with a Bren taken from a Tamiya Universal Carrier kit or one of several figure or weapons sets, but this is not an easy task and also from photos was not widely used. I did fit a short piece of 0.5mm rod on a scrap of strip on the right of the turret hatch to depict the base for the mount however, and a sun compass bracket from scrap as well on the other side.
While I agonised for some time over making up the tracks, in the end I finally took the parts off the sprue, cleaned them up and assembled them and found it not too difficult. With the bogie units added and the main painting done, the tracks were made up into two long lengths for the track on the ground and four shorter units for the two sections curving upwards. These were painted black with a heavy dry brushing of pale grey - I prefer this to stagy silver but a dull aluminium shade does just as well. Several individual links were painted up and fitted directly to the sprockets and idlers. Ground runs then upswings were glued into place and finally the sprockets and idlers glued on and adjusted to meet up with the upswings. All it needs is a little care. As I wanted a vehicle with sand skirts the top run of the track was not fitted.
Final major item added was the sand skirts A17 and A18 which had the inner faces thinned down for scale effect and the locating lip filed off as with it in place the guards fit too low down, their top edge should align with the top edge of the mudguards. I also had to move the front stiffening rib detail on the left side A18, cutting it off using a thin sharp blade, and repositioning it to line up with the mudguard stay part C57 ahead of the exhaust outlet. In doing this I missed the fact that the sandshields were not vertical, but flared out on the way down... Alas by the time I spotted this it was too late and all I can do is advise you not to make this mistake! As a guide, the outer edge of the vertical 'ribs' on the outer faces of the sandshields should be vertical.
The small mudguards parts A15/A16 are needed to provide contact area for the front of the mudguards, I chose to cut these down and just use their top edge to fill the chamfered area under the mudguards. The real vehicle had rubber or similar sections on the front and rear extremities of the mudguards, the join between these and the sheet metal is depicted on the kit as a zig-zag groove. Many desert vehicles had sheet metal extensions in their place, so I filled and sanded the grooves and added card pieces at the final stage by eye from photos and the kit colour scheme diagrams. Refer to photos of a specific vehicle before you do this as it was not a universal detail. Likewise, some tanks also had a rail along each side of the sandshield to take the steel tube and canvas 'Sunshade' which disguised them as trucks. Looking at photos, this seems to have been fitted to either all tanks in a unit or none, although as vehicles were moved around this would not have been a hard and fast rule. I did not add this item but it is easily made from plastic strip about 1mm square or a little over 1mm deep lengths of 0.25mm sheet, with the same used for five brackets to space it out from the sandshield.
I also kept the extra stowage down as Valentines did not seem to have as much of this as some desert tanks. Common in the desert were extra fuel and water cans, and some tanks had a large auxiliary fuel tank on the left hand side. This item and some one-gallon "flimsy" come in the Bishop variant and a kit could be robbed to add them to your model, or the parts used as a basis to make from scratch. I will not mention the fact that Valentines in Russian service would not use sandshields despite what the Dragon instruction sheet says, while the British ones had sand shields which Toga think they did not..
Colour Schemes
Valentines were painted 'Khaki Green No 3' in the factories with the interior in aluminium according to the original specifications, although this was probably changed to plain white. Home service vehicles usually had the No 4 Dark Green shade added in broad bands. Markings followed the unusual practice of the time, with coloured brigade and divisional signs on the front and rear of the hull, squadron markings on the turret, and vehicle serial numbers in white on the driver's door flaps or sometimes the turret sides and on the hull rear. I decided on a desert vehicle but hit a couple of snags when finishing my model. One was deciding which unit to depict, and the other was that I could not find my Dragon decal sheet so safely had I stored it... However, I did have a Toga one, and this coincided with my final choice of subject.
My model depicts a vehicle from 40th Battalion, Royal Tank Regiment on Ruweisat Ridge in July 1942. The Toga sheet gives full decals for the tank commanded by Second Lieutenant L Wiard - named CULLODEN, it was vehicle 10 in C Squadron, the red circle and number decal is correct and all it needs is the area behind the 10 painting in a rough green circle while the rest of the vehicle was 'Pale Stone' or sand yellow, not sand and brown as listed on the Toga colour notes. Trackguard front and rear extensions were not carried. I chose another vehicle of the same unit without the white lettered name or turret markings but with trackguard extensions. 40RTR tanks in photos of the time did not have the long flat rails on the trackguards for Sunshade cover which make the tank look like a lorry when seen by prying aircraft. The white 40 on red square and green and black GO sign of the 8th Armoured Division could be found on other sheets or hand painted, these marks seem to have appeared on the front only, although the vehicle in the Tank Museum, Bovington here in the UK has them on the back photos show that was not always the case at least.
Both the Toga and Dragon sheets also have decals for 50RTR in Tunisia 1943 - not 'El Alamein' as the Dragon colour notes suggest - and while not too bad some details are a little out. The vehicle's name RESPOND was in a dark shade, possibly black, and the turret appears to have a C Squadron circle, although possibly also HQ in small letters within that. Colour seems to be pale stone and green or possibly brown, somewhat the worse for wear after pursuing the Afrika Korps for many long miles. Trackguard extensions are not fitted or missing, but the rail for sunshade was carried.
Mixing decals could also give marks for 40RTR in Tunisia, they carried the 23rd Armoured Brigade's black and white 'Liver Bird' depicting their Liverpool origins on the left front and 40 on the red square on the right, a mirror image of those in 50RTR - who says markings instructions are always obeyed? Colours were sand and green in bands.
Dragon give a set of markings for '1st Army Tank Brigade' and I think this is a machine of 8th Battalion, Royal Tank Regiment. Another of their vehicles named HAL II appears in a photo to have a three colour camouflage scheme, with an upper band in a dark shade which varied from dark grey to purple brown, a middle band in pale blue-grey and the lower surfaces sand yellow. The white-red-white recognition marks were often obscured with paint or a mixture of oil and sand as they were a good aiming point for Afrika Korps gunners.
Both decal sheets show the same Red Army vehicle but do not name the unit.
As an alternative, Polish vehicles could be modelled if you use some hand painting or else
track down the Intech decal sheet booklet series 4. These were produced in Krakow in 1996
and may still be around although I have lost touch with the UK supplier. The decals come
with a small booklet which has photos and colour profiles of several vehicles, this set
has full markings for a Valentine of 1st Polish Armoured Division from 1942 as well as
Shermans, Matilda and a Jeep plus Pz III and Steyr RSO in unusual markings.
Further Details
Other colour schemes (including a plate showing Lt Wiard's tank) can be found in the old Osprey Vanguard series no 23 'British Tanks in N. Africa 1940-42' by Bryan Perrett, 'Desert Tracks - British Armour Camouflage and Markings in North Africa' by William E Platz, the classic 'Armour Camouflage & Markings, North Africa 1940-1943' by George Bradford, and more desert - with a photo of RESPOND - and schemes for tanks in training in the United Kingdom in 'British Tank Marking and Names' by B T White, all sadly out of print.
An alternative is on the Polish Intech decals sheet no 4 and the original out-of-print Osprey Vanguard series no 30 'Polish Armour 1939-45'. These are for vehicles of the 1st Polish Armoured Division in England in 1942 and include the census (vehicle serial number) of the special batch allocated to the Polish Forces. These are from a series from the non-armoured or B vehicle blocks for some reason, and appeared on a variety of vehicles.
One of the few currently available books on Valentine is from Darlington Productions of Aberdeen, MD in the USA. Their Museum Ordnance Special no 10 by Paul Roberts which has some fine detail photos of the tank preserved at Camp Borden in Canada and a later Mk III in the Virginia Museum of Military Vehicles. The Borden example has some unusual and early features which differ from the kit plus items which differ in Canadian manufacture such as headlamps, as well as interior photos and drawings. Well worth having for reference.
Another useful source are the Military Vehicle Workshop series from Allied Command Productions of Ottawa, Canada. These use original vehicle manuals and official publications to show vehicles in great detail. Two titles cover Valentine, MV-2 does the vehicle from the outside including the suspension and details of the Canadian pattern hull nose as well as both UK and Canadian stowage bin layouts. MV-05 takes a look inside, with seating and ammunition stowage, radio installation and the engine compartment.
Other sources of information are the two works on British Armour in the
Second World War, 'The Great Tank Scandal' and 'The Universal Tank' by David Fletcher,
published by HMSO for the Tank Museum, Bovington, England. The former even has makers
plans for an early Valentine and a three-man turret version, the latter ones for a 6pdr
armed Mk IX, and both have much to commend them for anyone interested in period British
armour.
The old Bellona Prints series no 34 covered the Valentine two-man turret versions, and no
38 dealt with the later versions with text and plans to 1/76 and 1/48 by D P Dyer. Sadly
they are long put of print as they give very detailed coverage of the tank. Mr Dyer gave
his opinions on building the kit complete with 1/35 scale plans in the Military Modelling
"AFV Modelling Special Issue" (Vol 28 No 12, August 1998) which you may like to
seek out. He used Fruilmodel tracks on his model.
For details of the tank in action, seek out 'The Valentine in North Africa' by Bryan Perrett (Arms & Armour Press, London, England) - another out of print title - or try '50th Royal Tank Regiment - The Complete History' by Stephen D Hamilton (The Lutterworth Press, Cambridge, England) for use in North Africa or 'With Churchills to War - 48th Battalion Royal Tank Regiment at War 1939-45' by Peter Gudgin (Sutton Publishing, Stroud, England) which deals with their Valentine tanks in the UK as well as the unit overseas with Churchills. These last two should be available from specialist mail order booksellers.
Overall Rating
Despite a few shortcomings, where other manufacturers may not have done any better, this is a good kit. It could almost but not quite convert me to liking individual link tracks, as link and length looks as good to me and saves time. Having waited for a plastic kit of the tank I am not disappointed, and the best I can say is to slightly paraphrase the words of the Soviet government in Worlds War 2.
Of all the equipment supplied by the Allied nations to the USSR, one of
the few, and possibly the only, item they commented on was the Valentine. They liked it,
and to show how much they liked it, they asked for more! Fifty and more eventful years
later I would send the same comments back. Rumours of other marks and variants continue to
be passed around, with the Bishop the only one seen so far.
| Main | What's New | Articles | Reviews | Gallery | Think Tank | Contests |