
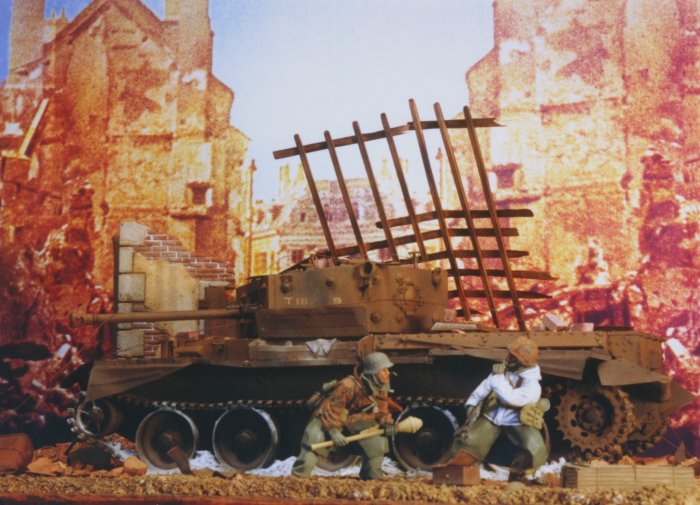
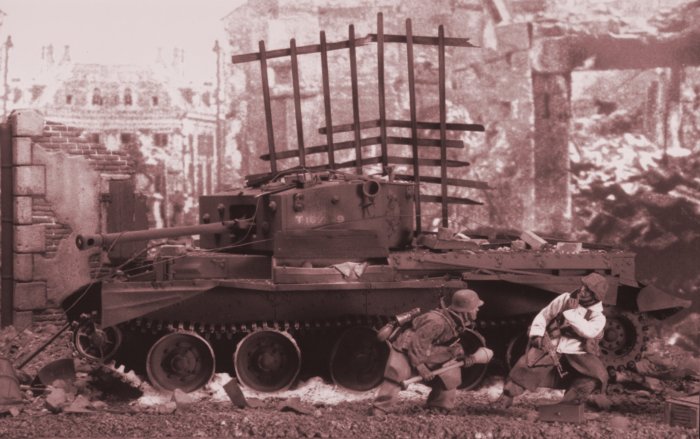
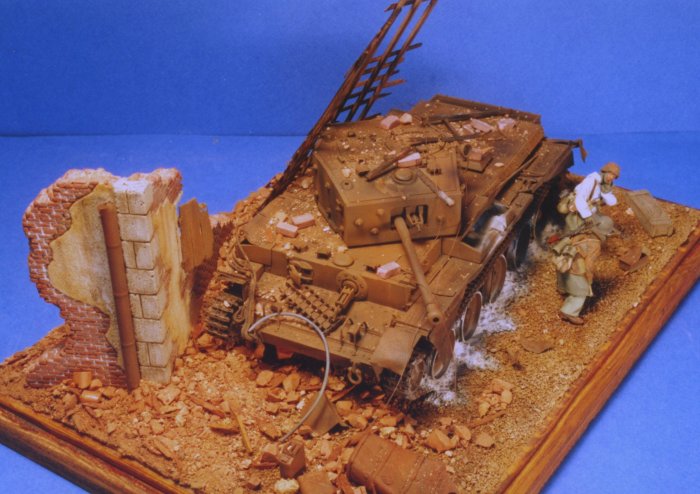
"Silence!" Diorama featuring the Tamiya Cromwell and Warriors Panzerjagers.
Mario Ales
1-introduction
From time to time, after having built three or four "superdetailed" vehicles,displaying them as they are adding only one or two figures,I like to build a diorama,first to vary the scratchbuilding,painting and weathering techniques as ruins, trees and different landscape details are requested,and also to display a quite different subject like a destroyed tank.
Some time ago, I had bought a couple of Warrior’s ss panzerjagers well suited for a knocked-out tank,but I could not figure a good background to place them as I did not want to represent the usual Russian or U.S.tank;so despite their good pose, they finished in a drawer for a rather long time until I purchased a copy of Daniel Taylor’s "Villers-Bocage through the lens".
This book is dedicated to the homonymous (and famous) battle fought on the 13TH of June 1944 when Michael Wittmann, at the time commander of the second company of Schwere SS-Panzer-Abteilung 101 of 1ST SS Panzer-Korps, with his Tiger destroyed 12 tanks,13 halftracks and two anti-tank guns in a solo action,halting the thrust of the 7TH Armoured Division.
As can be easly understood the book is full with shots of destroyed and burnt-out MKIVs giving very good references to the modeller.
At the same time,while looking through the Tank’s workshop catalogue I received from LSA Models, I noticed their burnt-out Cromwell’s wheels.
Immediatly I ordered the wheels,took the new Tamiya Cromwell kit and started the project.
2-Historical background
The development of the A27M Cromwell IV or Cruiser tank MkVIII,an intended descendant and replacement for the Crusader,began in early 1942.
The rather obsolete English tank doctrine of the time still provided three roles for the tanks:reconnaissance,troop support, and mobile operations of pursuit and exploitation where fast,gun-armed but light armored tanks, the cruisers in our case,were employed in much the same manner as cavalry in the past.
According to these parameters the Cromwell IV featured a maximum frontal armour of 76 mm in the turret,carried a 75 mm gun derived in part from the 6pdr specifically modified to fire the same ammunition as the Sherman, and was powered by the mighty Rolls Royce Meteor engine,a variant of the famous Merlin aircraft engine used in the Hurricane and Spitfire which made the Cromwell the fastest British Cruiser tank,though later models were geared down to improve the reliability of the suspension.
Initially this engine could not be provided in sufficient quantity,so the old less powerful Liberty engine used in the A13 and Crusader, was installed in the early models, designated A27L Centaur, which were later converted to Cromwells by adding the new 75mm gun and Meteor engine.
After all it was a fair tank,with good anti-personnel capabilities, that could deal with PzIVs and stug IIIs,but that was absolutely no match for the heavier German beasts, a common problem to almost all allied tanks.
The precise number of Cromwells built is no longer known,but would appear to be about 2050.
It equipped the 7th Armoured Division’s 22 Armoured Brigade and the armoured recce regiments of the 7th, 1th, Guards, and 1st Polish Armoured Divisions, all of which fought only in the North-West European theatre from the Normandy landing up to the end.
Cromwells also saw limited action in Korea.
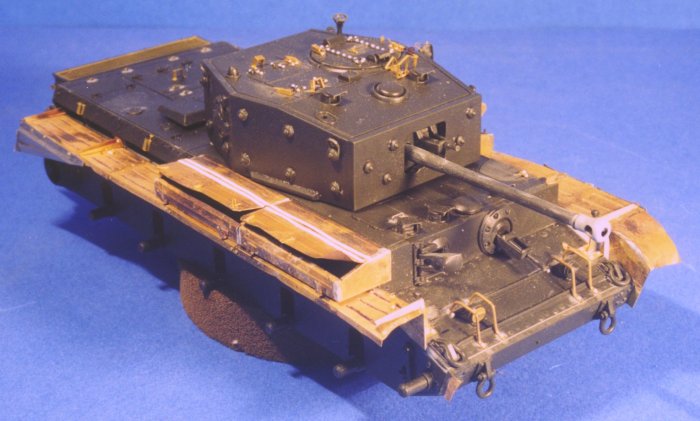
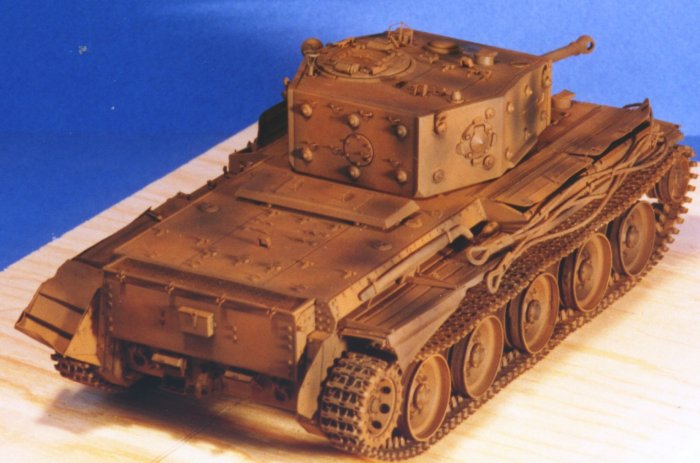
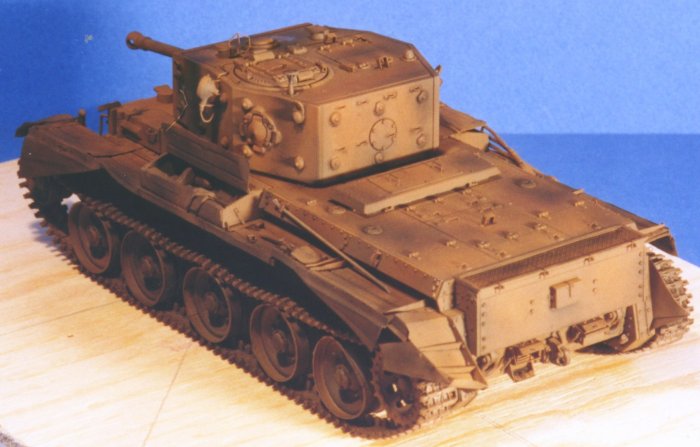
3-the model
The Tamiya kit is at the usual high standard of the last releases of the Japanese manufacturer.It can be built straight out from the box to obtain an almost perfect replica of the real thing.
It shows a MK IV with the "C" bolted hull type.
It’s dimentionally correct; the gun is well moulded,the casting is excellent down to the smallest details,the rough looking of the cast plates is extremely realistic.One only minor point is represented by the several handles ,expecially on the engine deck, which are all solid for moulding reasons, and that need to be replaced by new ones made out of wire.
The tracks are the vinil type,have a very good surface detail and will satisfy the average modellers.The most particular ones can replace them with the Model Kasten or Friulmodellismo tracks to improve the looking of the model.
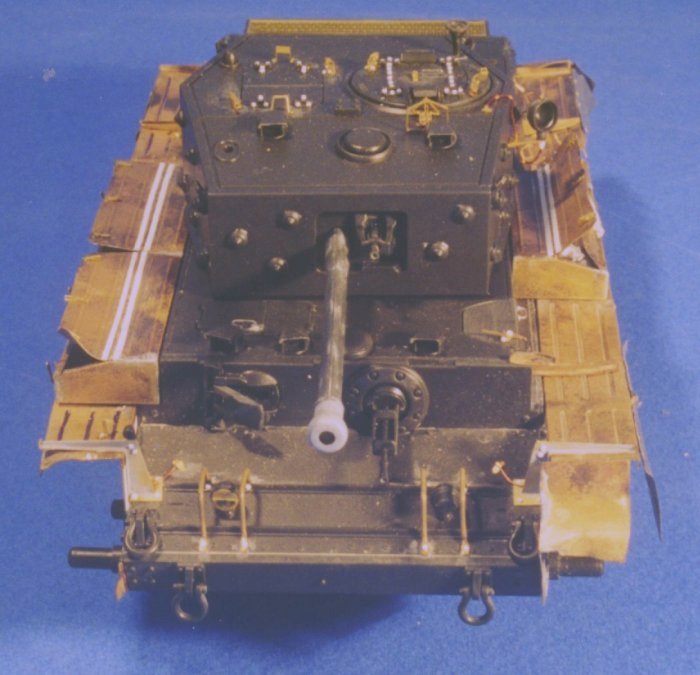
Finally as I like precision, I decided to use the Aber P.E. sets to improve my model mainly around the fenders area because I wanted to show a damaged vehicle with some battle damage.
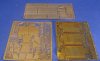
4-Aber p.e.
I decided to use three Aber p.e. sets:
-35060,the main fret.
According to the well established Aber tradition,the level of detail is incredible,with many microscopical pieces to improve almost every detail of the model.However, paradoxically, this high precision becomes sometimes unnecessary: first because many pieces are so small that it is almost impossible for a human being to remove from the fret and handle them without damaging or loosing some under the workbench,and then because many details are so well reproduced on the plastic kit that there is absolutely no reason for replacing them with a p.e. equivalent.
The most usefull features of this fret are: the grills over the air intakes, the "normandy cowl" covering for the exausts,the front and rear fenders, suitable for Cromwells and Centaurs, even if the side fenders are not present forcing the modeller to buy the corresponding fret,new more accurate smoke generators and an array of handles,buckles,tie-downs, periscopes, so that everyone is free to reach the level of precision he likes.
One very useful item is a round perforated mask that fits the kit’s wheels and permits to reproduce with a round burr the perforated tires typical of early production Centaurs,and that can also be used coverer with some masking tape to overspray the base colour without ruining the pre-painted outer tyres.
Only one negative remark concerns the instruction sheet.It is too crowded with drawings sometimes misleading or wrong as is the case of the retaining spring of the smoke generators;or with a wrong number as it happens with the front fenders supports.
This can be only a minor nuisance for an expert but a great problem for the beginner.
-35A60, the side fenders.
This set makes it possible to replace the kit’s fenders.It is not necessary as the original fenders are beautifully moulded,anyway I decided to do so mainly because the brass can be twisted,bent and dented to achieve realistic battle damage.
In this case the instruction sheet is very clear and assembly goes straight with no problems.
-35A61 the stowage boxes.
Even in this case the kit’s parts are very good,and I decided to replace them only because they can be shown opened and battered as in a real knocked out tank.
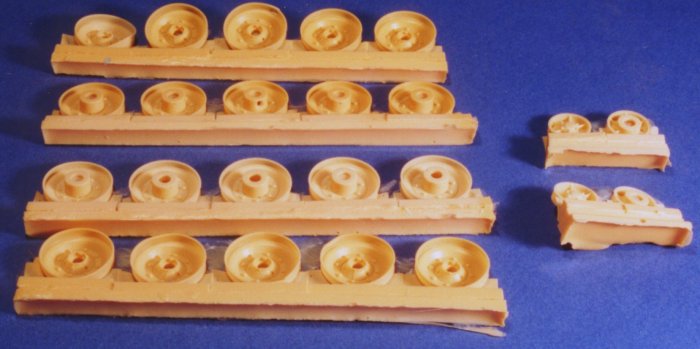
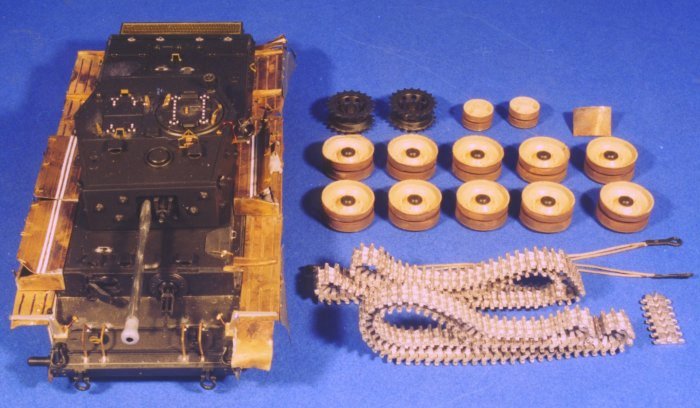
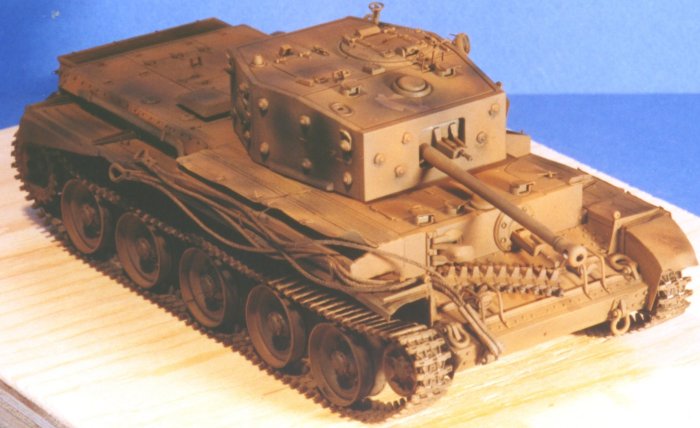
5-running gear
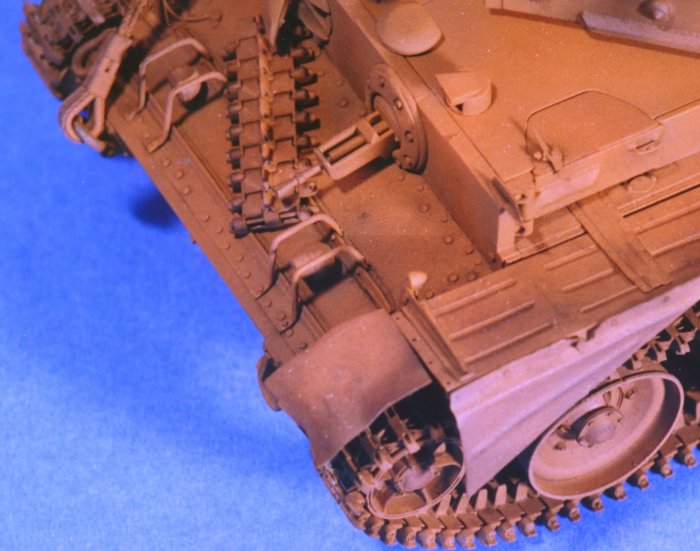
The burnt-out Tank Workshop wheels are very well casted with no air bubbles and only a couple of minor breakings which can be easly repaired with some cyano-acrilate glue.They require only a lot of attention when removing the big resin plugs to avoid ruining the thin outer rim.
They accept the original vinil poly-cap making easier the installation and will be completed by the kit’s wheel hubs. As I was planning to build a destroyed vheicle I needed articulated tracks to give them the right amount of slackness. I decided to use the Friulmodellismo tracks because I think they are simply a masterpiece.
They are the new type requiring a lenght of wire to join the single links,and this is the only drawback (together with the price!), as every track needs 180 links;but after four evenings of work I obtained two real metal tracks only scaled down 35 times.
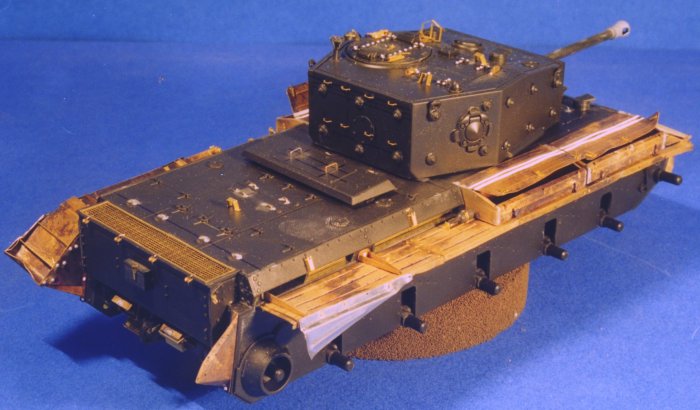
6-hull
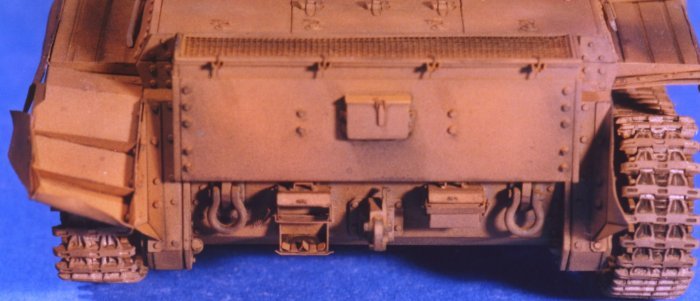
The first step consisted in scraping the moulded fenders to replace them with the brass ones.As usual with the Aber frets it can be useful to heat the parts until they become red, and then let them cool slowly.This procedure softens the metal that will be very easier to bend.
Before gluing the new fenders it is necessary to scrap the moulded rivets on the upper side plates and replace them with new ones made with the punch and die set.These new rivets will go in the corresponding holes in the brass fenders. Then I made the side fenders that cover the sprocket and idler wheels with lead foil pressed over the corresponding plastic parts to get the right contours.
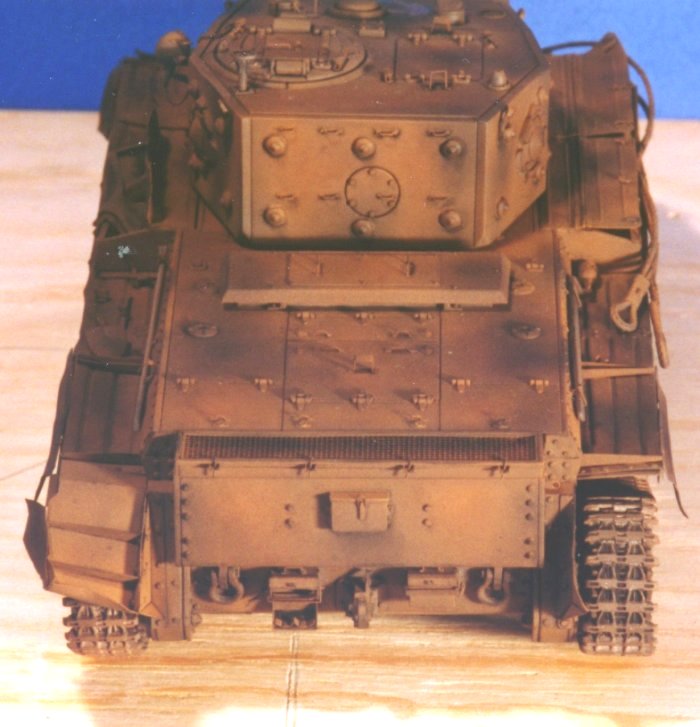
Turning to the back plate,first I replaced the kit’s smoke generators with the p.e. ones,completing them with the electrical conduit and coupling.When assembling the smoke generators the retaining springs will run from the lower corner to the first hole in the handle and not to the second as erroneously reported in the instruction sheet.Before gluing the new generators I scraped the moulded supports and added six new rivets.Than I added the four p.e. handles that (un)locked the wading plate.
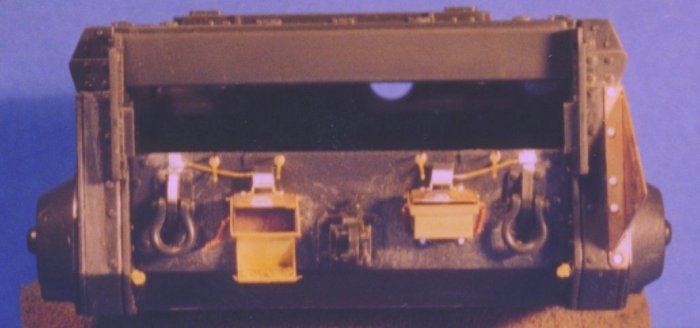
Proceding to the front hull I decided to replace the armoured protections over the lamps with new ones made of brass wire,because on real vehicles they should be bolted to the second raised flange and not welded to the main plate as reported in the kit.This required the filling of the locating holes and the reworking of the upper splash guard with pieces of plastic strips.
The two supports for the fenders with their corner lights came from the Aber set with the addition of the electical conduits and brass couplings.
On the engine deck I scraped the moulded solid handles to replace them with new ones.As they are really thin,and the P.E. parts are too small to be handled without destroyng them,I decided to use the Aber Tie-down set,to obtain new handles a little bit overscaled but probably with a better look.
Finally I added the various tool brackets (all working!) and the new brass stowage boxes.
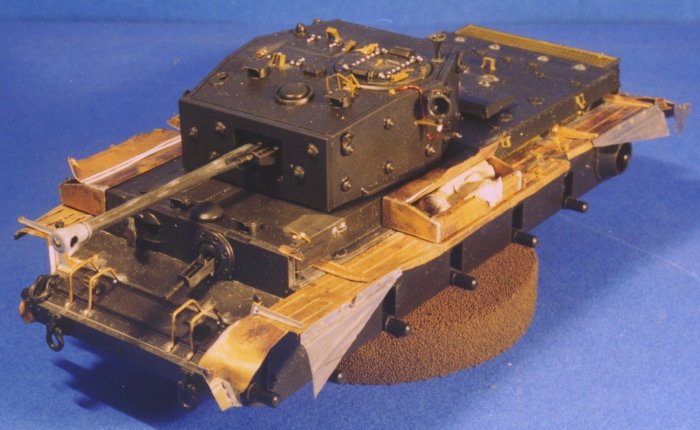
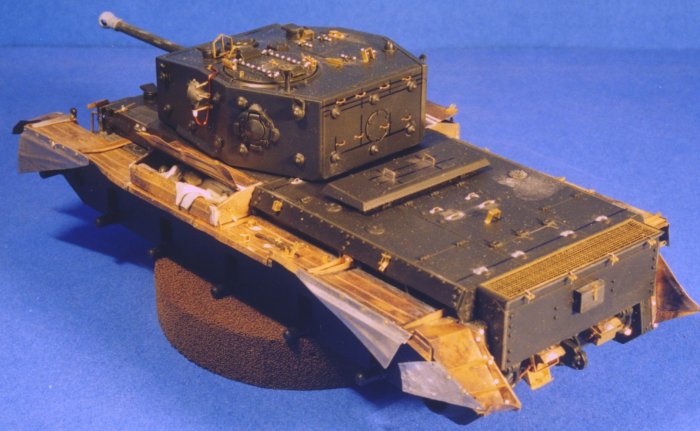
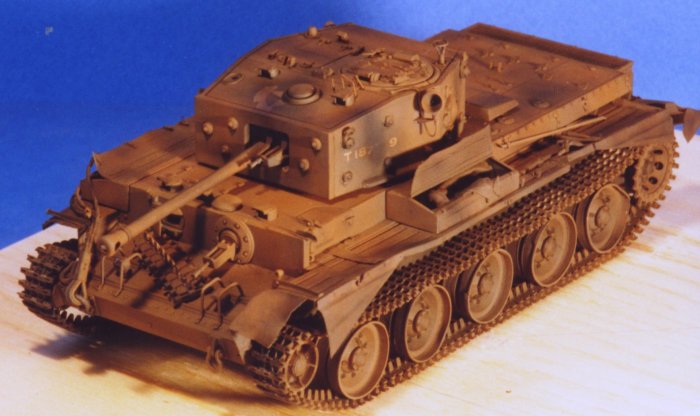
7-turret
As the hull,the turret has a very good surface casting detail and requires only a few minor improvements.
I replaced the lamp support adding new handles and the electrical cable which runs from the turret roof to the lamp. I added the p.e.stops for the loader’s hatches and replaced the four moulded hatches locks with the Aber ones. Oddly the hinges have no retaining rivets that can be easly added from the punch-and-die set.
Finally I replaced the commander’s hatch handle with a new one made of steel wire and added to the rear plate eight tie-downs of brass wire. The gun is well moulded and requires only a little filling and sanding, so it is not necessary to buy a new turned one.
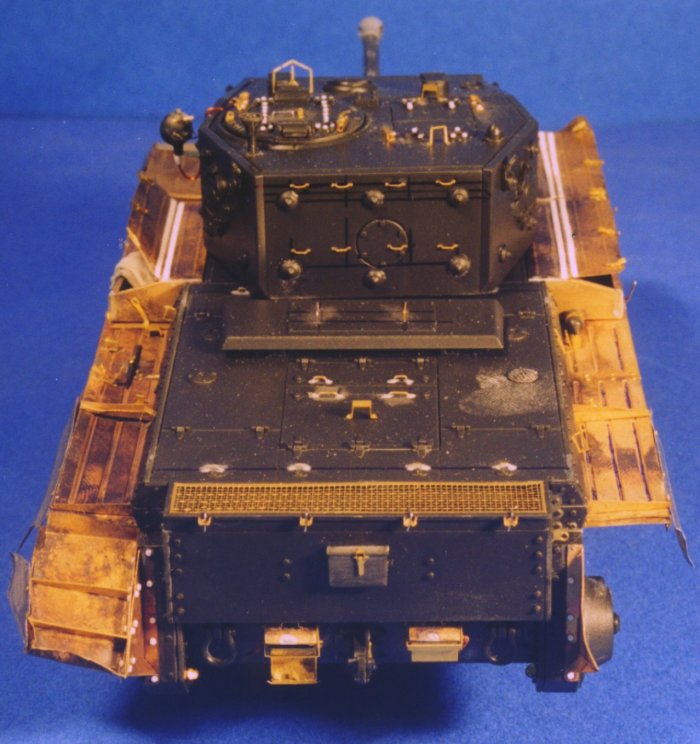
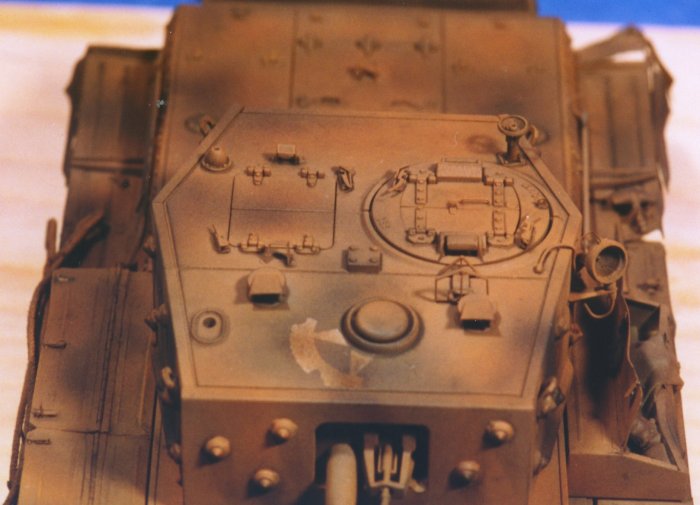
8-painting and weathering
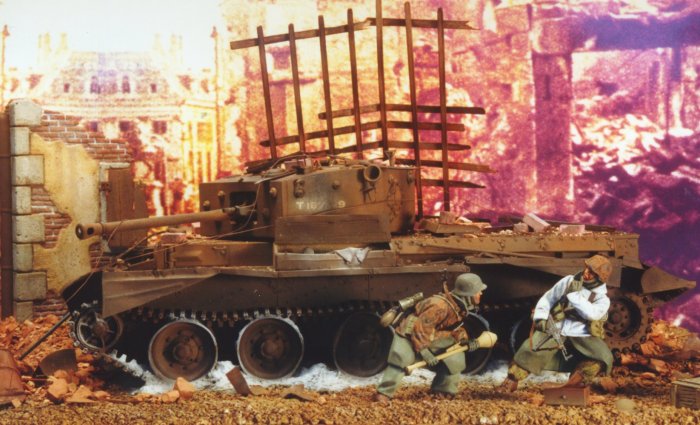
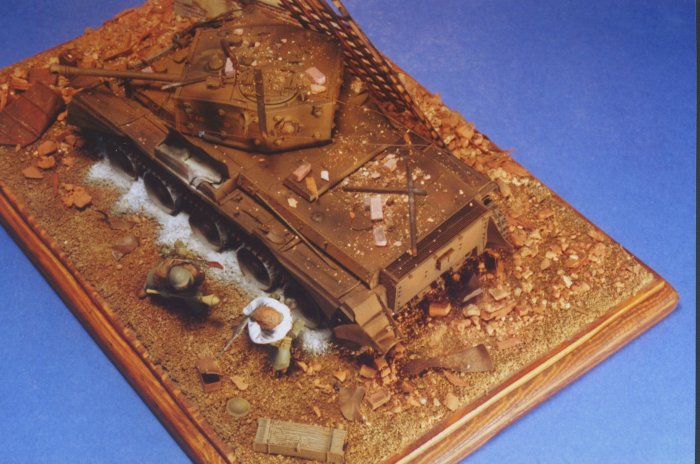
Painting a destroyed and burned vehicle is somewhat different from painting an intact one.This kind of tanks have usually a rusted appearance as fire tends to quickly oxidise the surface of the steel plates giving them an orange-brown looking.Moreover the attendant smoke will more or less blacken the tank.
A good source for painting such a veheicle is represented by the several books dedicated to the Gulf war where it is possible to appreciate all kind of wrecks,from partially to completely destroyed. In my case I wanted to depict a completely burned tank, keeping the wrecking to a minimum to preserve the basic shape of the tank.

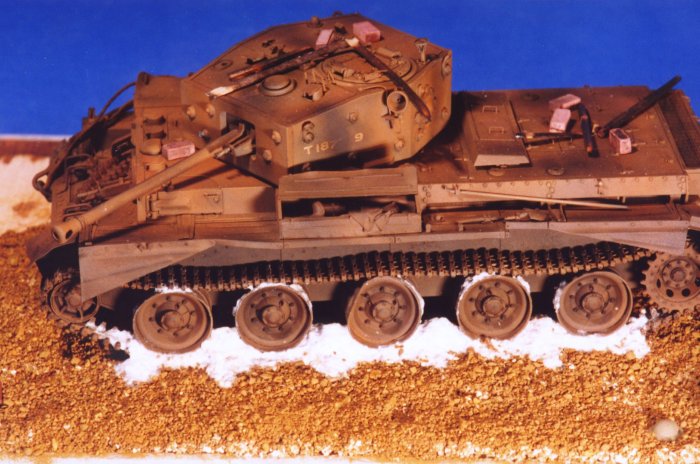
As I wanted to show some remains of the turret numbering and upper star I started by spraying matt white over the turret’s roof and sides.Than, using dry transfers I applied a Verlinden star to the roof,and letters and numbers I found at my local stationer’s shop to the sides.
Lastly, after having sprayed the basic colour I removed the transfers using some tape obtaining perfecly painted numbers and star. I use Humbrol enamels,so I will constantly refer to them unless differently stated.
To simulate rust I sprayed the whole model with a very dark brown like matt 98 chocolate to get a basic shade of the final colour.Then I oversprayed the upper surfaces of hull and turret with matt 62 leather which gives a beautiful shade of orange very similar to new rust.
This colour was airbrushed in a random pattern ,to alternate darker areas of old rust with others of new orange rust. After twelve hours I oversprayed the model with an acrylic matt trasparent varnish, to protect the colour from the following washes. In this case, for the wash, I used a black oil colour to achieve a blackened looking.Again, the wash was given in a random way ,more intense on the lower hull,running gear and engine compartment.
When completely dry, I drybrushed the more rusted surfaces of the turret and upper hull with several shades of orange and yellow using oil colours. Then I airbrushed the more blackened areas like the running gear and lower hull and several spots of hull and turret with straight black, to achieve a more sooted appearance. The ashes from the burned tires were later painted using several shades of grey.
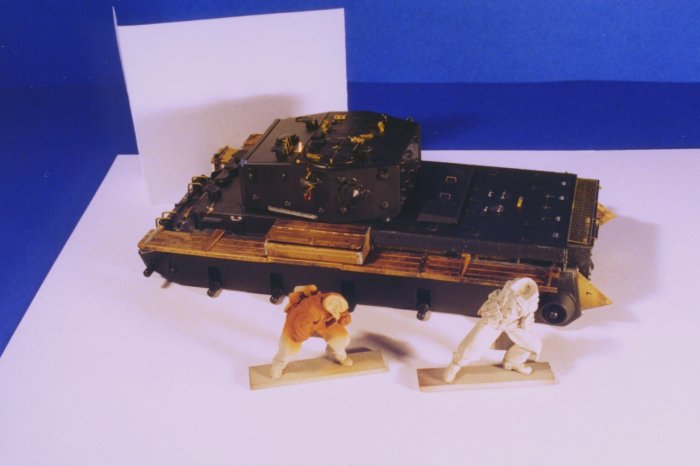
9-the figures
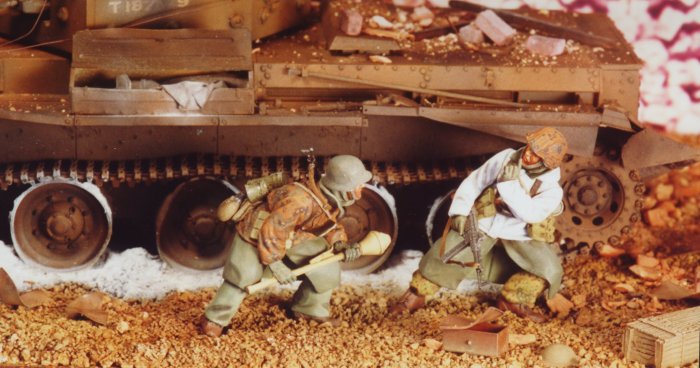
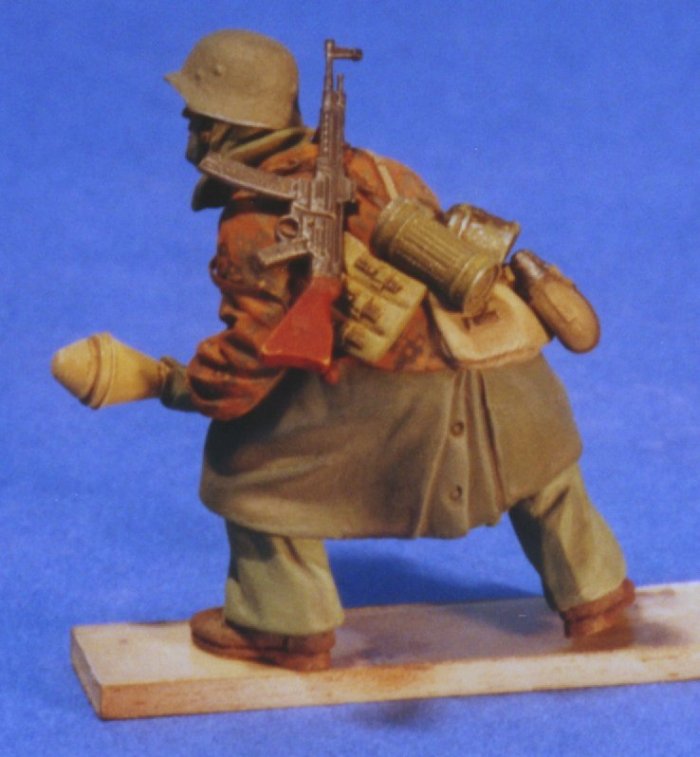
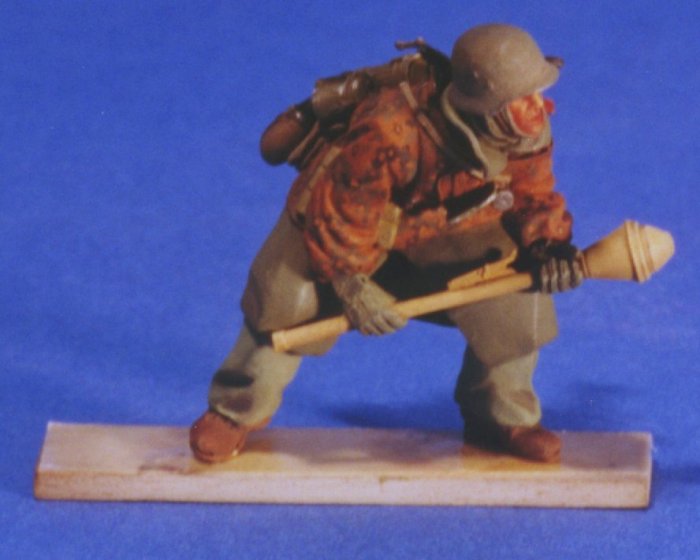
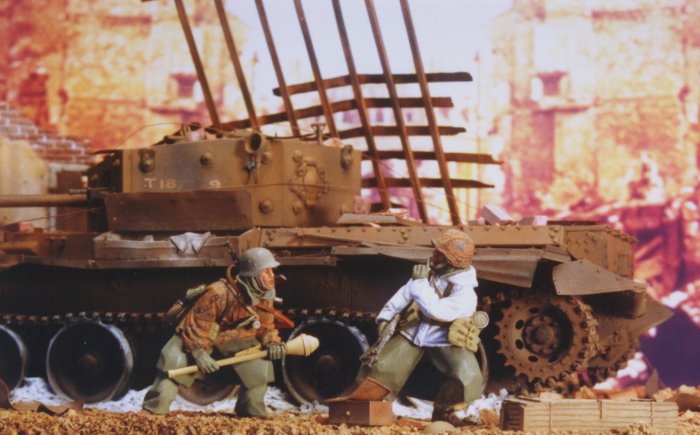
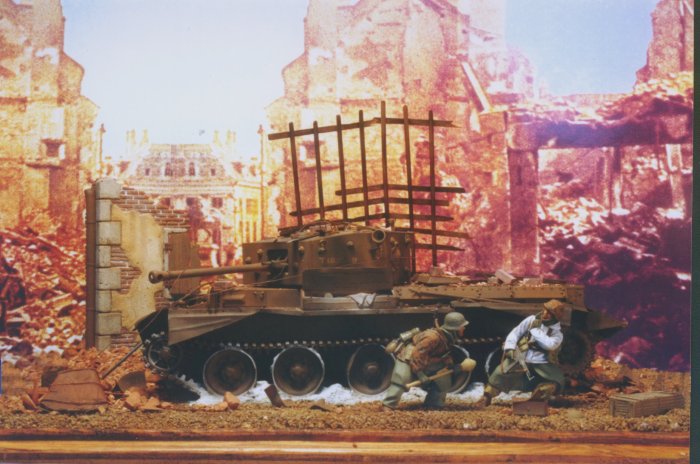
The two Warriors Panzerjagers are beautifully sculpted by Tony Williams.Their pose is really natural and convincing expecially for the squad leader asking for a silent approach to a near target. They are shown wearing heavy winter clothing with a camouflage smock and a jacket of the white-grey reversible winter uniform over the regular greatcoats for better protection from the cold air.
The "panzerfaust man"comes in one big moulding with the exception of the hands moulded with the panzerfaust to achieve a realistic grip, while the leader comes with separate arms to make painting easier.
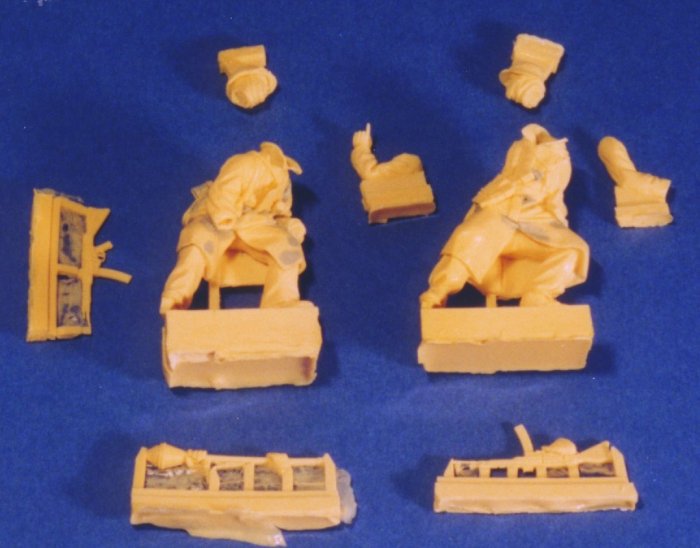
All the details are very well reproduced with the exception of the area around the eyes of the leader which I think could be better sculpted.There are no air bubbles and only a minor breaking in one collar easy repaired with milliput.
However such big moulding present some heavy moulding lines and many flashes under the several recesses and crevices which ask for an accurate sanding and filling job.
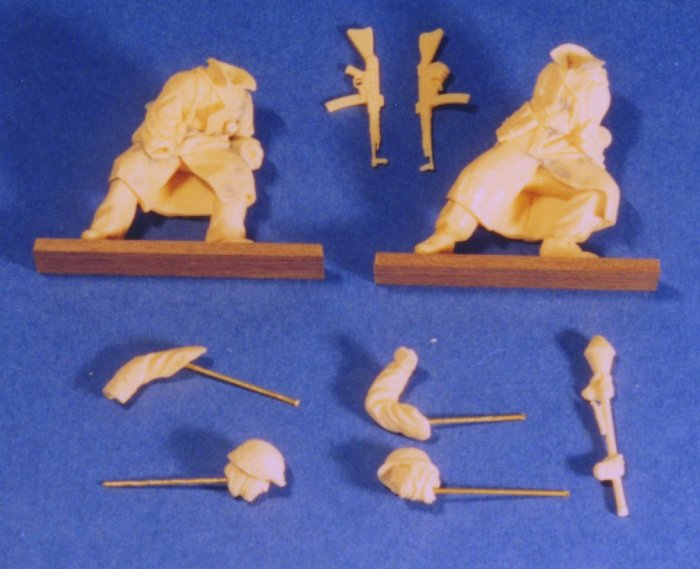
I decided to substitute the kit’s MP44s with two Tamiya ones as it is almost impossible to remove them from the resin plugs without breaking the muzzle.I cut the MP with the moulded hand in two,gluing only the forward Tamiya half.
Stangely the haversacks present the depressions for the canteens,but there are no canteens in the kit.Again I took two ones from Tamiya. The painting is the most pleasant job as you can decide the camouflage pattern you prefer choosing betwenn SS or "regular" Wehrmacht troops, as the two figures carry no unit insigna.
I choose the SS autumn "oak leaf" pattern for the smock ,and white for the winter white-grey reversible leader’s jacket togheter with "pea pattern" trousers to give some colour to the scene. Again, the most important thing about choosing the right colours is to refer to good pictures of the real uniforms to find the shades that match the original ones. First the figures were oversprayed with acrilic Tamiya XF-57 deck tan,then the skin areas overpainted with matt 63 sand.
Flesh was painted with oils using the wet on wet technique, giving a base of burnt sienna and blending the highlights first with cadmium yellow and then with straight white.The beard was added with raw umber,while a spot of cadmium red over cheeks and lower lip completed the job.
The grey parts of the uniforms were painted with matt 111 uniform grey and-or matt 31 slate grey to vary the shades.For the shadows I mixed the base color with some raw umber blending it to the still wet base,while for the highlights I drybrushed lighter shades of the base colour.
The adjutant’s smock was first painted with matt 62.I added irregular patches of matt 66 olive drab toned down with the base colour,and of black again toned down with matt 62.Then spots of these three colours completed the job.The shadows were added with a wash of raw umber,the highlight with a gentle drybrushing with matt 62.
The leader’s trousers were painted with a base of matt 110 natural wood with rounded patches of matt 93 desert yellow and matt 91 black green.The spots were added usung matt 29 dark earth,matt 93,matt 91 And matt 120 light green.Again shadows were added with a wash of raw umber, the highlight by a light drybrushing with matt 93. The leader’s jacket was the most difficult to paint as white is a real challenging colour to me.
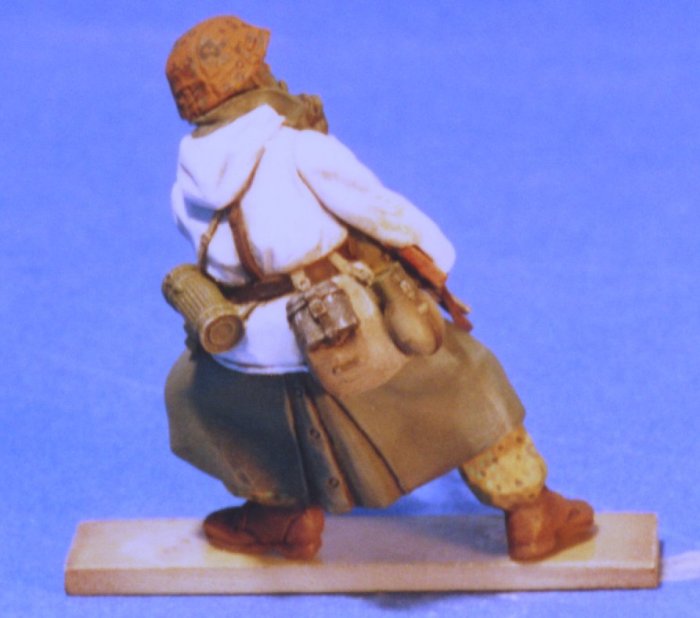

First I gave an heavy wash with raw umber to the basic Tamiya’s deck tan colour to enhance the shadows.Then I started to add small spots of titanium white,blending the shadows with some raw umber until I was satisfied with the shade of the white.Some raw sienna blended over the elbows was used to give a worn looking.
All the leather items were painted matt 98,washed with straight black and drybrushed with raw umber,burnt sienna and raw sienna to vary the shades.
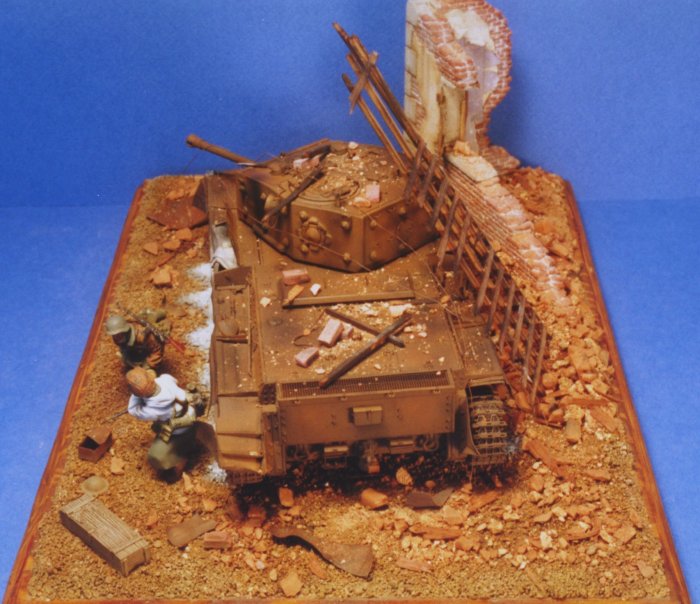
10-the diorama
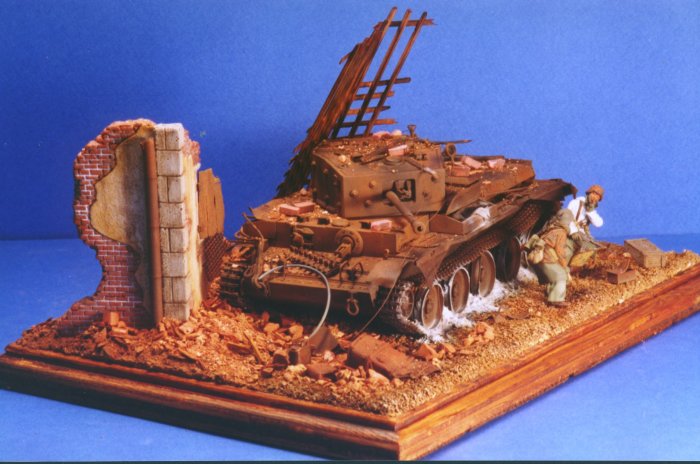
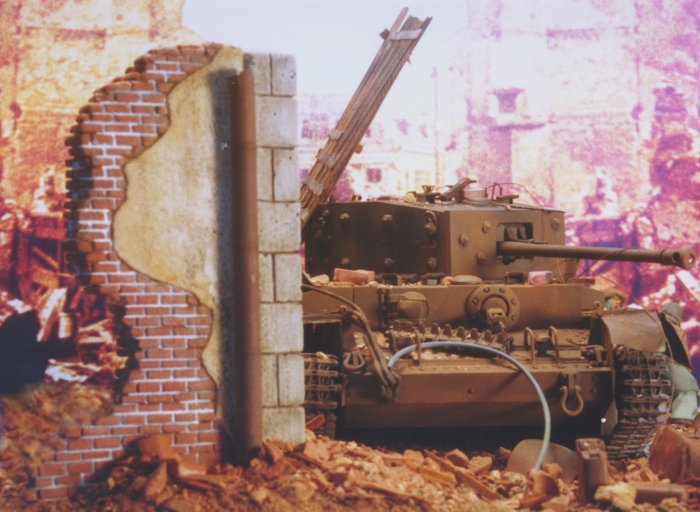
I wanted to place my scene in the outskirts of a small town, during the winter months immediatly preceding the Battle of the Bulge.
The most important thing when building a diorama ( or in this case "vignette", according to the standards of Euro Militaire 2000) is planning.
First it is necessary to set out all the elements such as ruins, vheicles,figures and other details so that there will be no empty spots or crowded ones,taking care of placing the highest items in the background and the lower ones in the foreground,so that the viewer’s attention will be immediately catched by the focal point of the scene, and not distracted by other details.
When I was satisfied with the look of the mock-up I took the measurements for the base and started the building of the accessories.
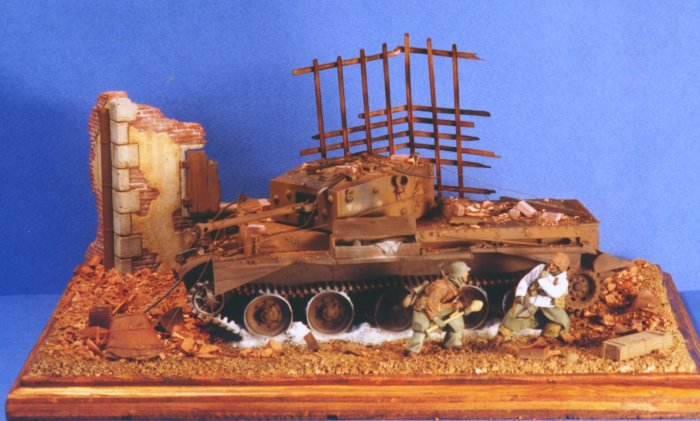
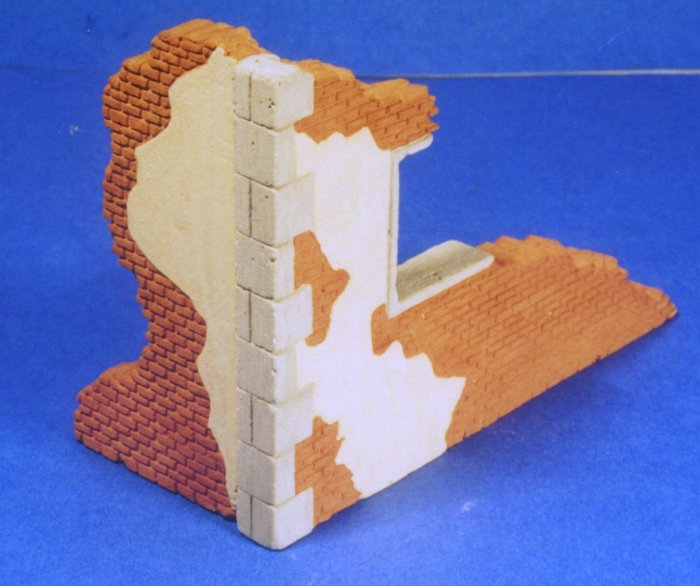
I wanted to show a section of ruined building as the backgound so I decided to scratchbuild it as commercial ones are either too expensive or require a great detailing job,and seldom have the required dimensions needed for the diorama. Scrathbuilding a ruin is not difficult but fairly boring and a little time consuming.
First,using a soft pencil directly on a plasticard sheet I made a specular drawing of the facade including all the details such as bricks,stones,plaster and so on.
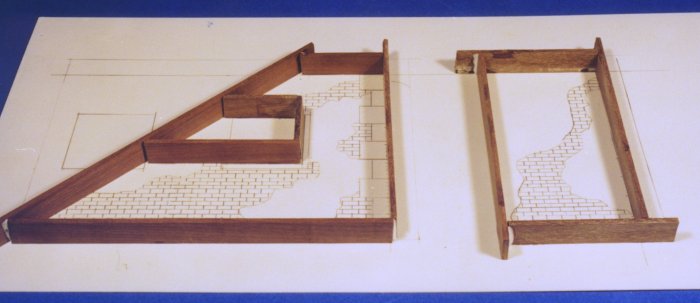
I use plasticard because it will be easier to remove the plaster blocks when dry. When finished I glued pieces of balsa beams to the perimetrical lines,using 10-12mm beams to be in scale and poured some plaster of Paris in this sort of mould letting it dry for 12 hours.
In this way, when I remove the plaster from the moulds, the lines of the drawing will be magically transferred on the blocks.This is why the original drawing needs to be specular,otherwise everything will be reversed.
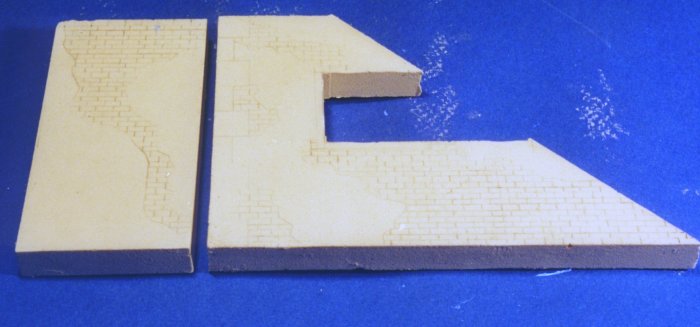
At this point I engraved the lines on the plaster using a pointed tool,and than I scraped the surface with a flat X-Acto blade to achieve a tridimensional look. In other words I first scraped the areas with bricks and plaster to lower them and than I re-scraped only the bricks to ulteriorly lower them.
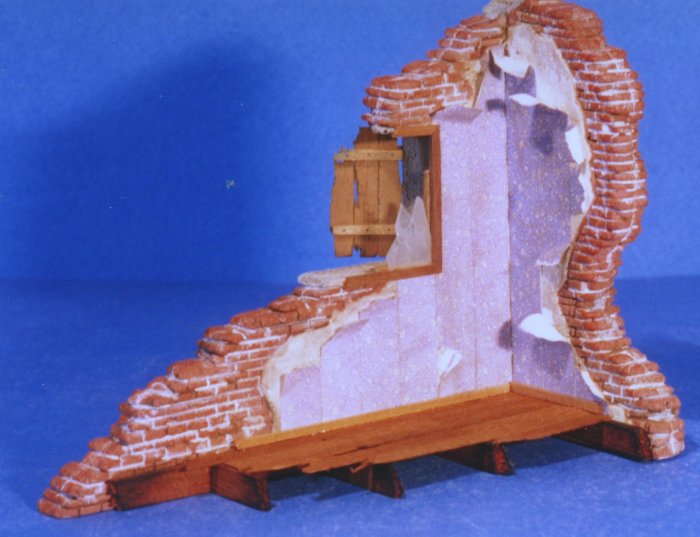
The inner sides need to be drawn agin with the pencil before engraving and scraping.
In case I need raised details I add them using wood pieces covered with plaster or making RTV moulds and resin or plaster castings.
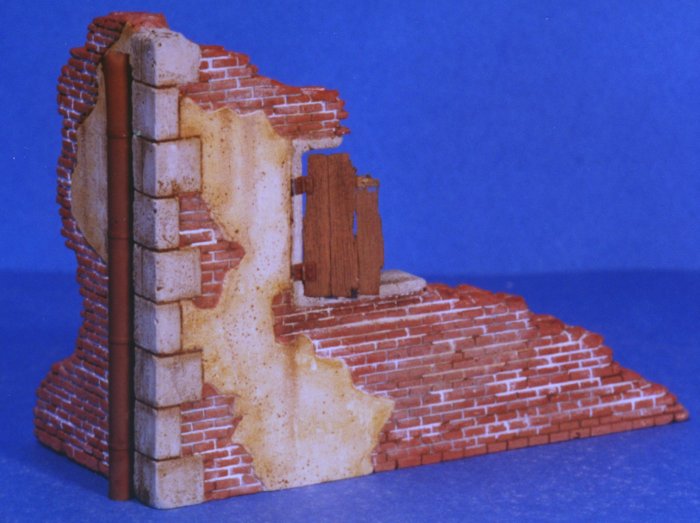
I glued the plaster blocks using 5 minutes epoxy glue, painting and weathering them the usual way.
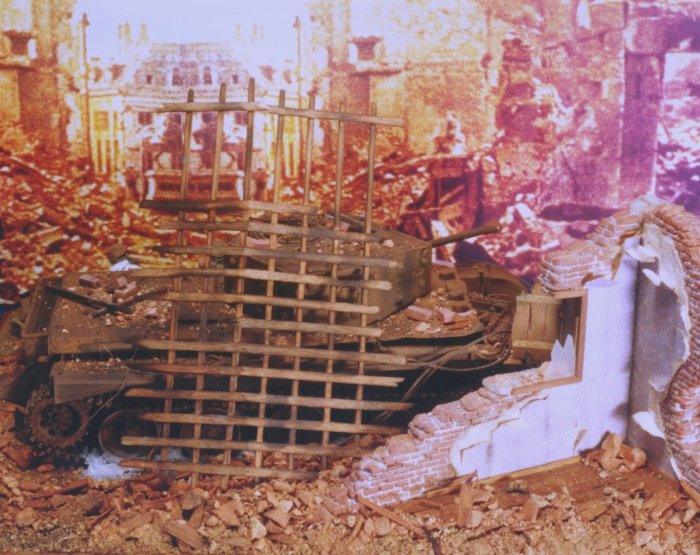
As the final step I added details such as the floor and a broken shutter made of wood strips,a gutter pipe made with a plastic tube, Verlinden wall-paper, and so on.
Other scenic items were either scratchbuilt as is the case of the remanants of the ceiling, or taken by the spare-parts box such as the squashed barrel,crate,and so on. With all the components painted and weathered it was time to assemble them onto the base. First I glued the ruin and the tank to the base again with epoxy glue.
To recreate the ground texture I used a material called Perma-scene covered with natural earth taken from my backyard. This material has a very coarse texturing and is particulary suited for urban settings requiriring a lot of debris. With the Perma-scene still soft I pressed the figures and the other details over their intended place so to leave a mark and give the impression of weight. After the drying of the ground I used some Celluclay to recreate the texture of the ash around the wheels.
Then I added some commercial rubble all around the ruined building, fixing it with thinned white glue. Finally the ground was over-sprayed with several shades of brown,washed and drybrushed.
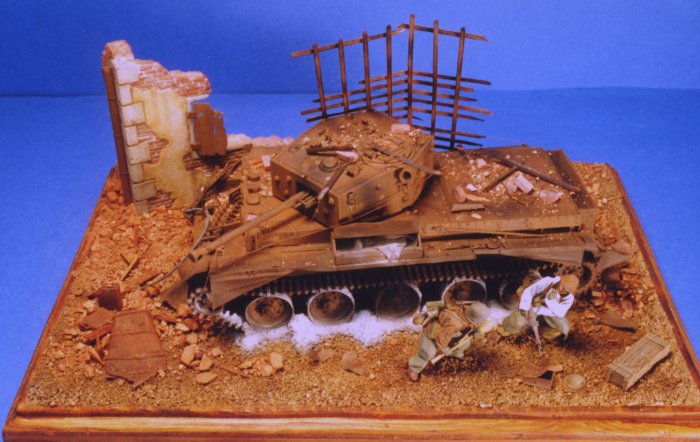
As the last step I glued all the items on their previous marks, and then I blended the whole thing using several shades of pastels. The background picture came from an old magazine.I scanned and retouched it into my computer using a photo-retouch program(Paint Shop Pro 6)and than printed it using photographic paper. A self-made wood base and a glass display completed the job.
11-acknowledgments and references
Warriors Scale Models Inc.-519 South Raymond,Pasadena,CA 91105 U.S.A.
Internet address:www.warriors-sm.com
The tank Workshop.-6110 West Solano Drive S.,Glendale,Arizona 85301 U.S.A.
Perma-scene.-Permacraft Products Inc.,P.O.box 81142 Cleveland,Ohio,44181 U.S.A.
Verlinden Productions Inc.-Lone Star Industial Park,811 Lone Star Drive,O’Fallon, Mo 63366,U.S.A.
Internet address:www.Verlinden-productions.com
Viller-Bocage Through the lens of the German war photographer.-by Daniel Taylor,published by Battle of Britain International Limited Church Houde,Church street,London E15 3JA.
Available through Chris Evans book,Unit 6, 2 Jervoise Drive,Birmingham,B31 2XU,Great Britain.
Internet address: www.chrisevans.com
Wydawnicto MILITARIA n°14-Cromwell.-Wydawnicto Militaria,00-961 Warszawa 42,skr.poczt.106.
Ground Power n°1 1998-published by DELTA Publishing Co.,Ltd.,1-50,Kanda Jinbo-cho, Chiyoda-Ku,Tokkyo,Japan.
Aber Photo-etched sets.-40-060 Katowice ul. Fliegera 8\6 Poland.
| Main | What's New | Articles | Reviews | Gallery | Think Tank | Contests |