Winter Offensive 1943
|
1-Introduction After having destroyed the Sixth army at Stalingrad, the Russian winter offensive continued relentless. On January 12th, on a front running from Orel to Rostov, four Soviet fronts: Bryansk, Voronezh, South-Western and Southern ,attacked simultaneously toward Kharkov. On the right wing the Soviet tanks smashed the II Army forcing it to retreat beyond Kursk. In the middle Kharkov was taken during the first days of February, while on the left wing of the attack, Manstein's forces managed in stopping the soviet trust, and even if greatly inferior to the enemy, to retake the city of Kharkov and to establish a more stabile front along the Donetz, before that the Spring thaw at the end of March would stop any troop movement. From this positions the Germans will launch operation Zitadelle, during the following Summer. This diorama is placed during the German counter-offensive which led to the recapture of Kharkov during February-March 43. 2-The T34\76 mod. 43.
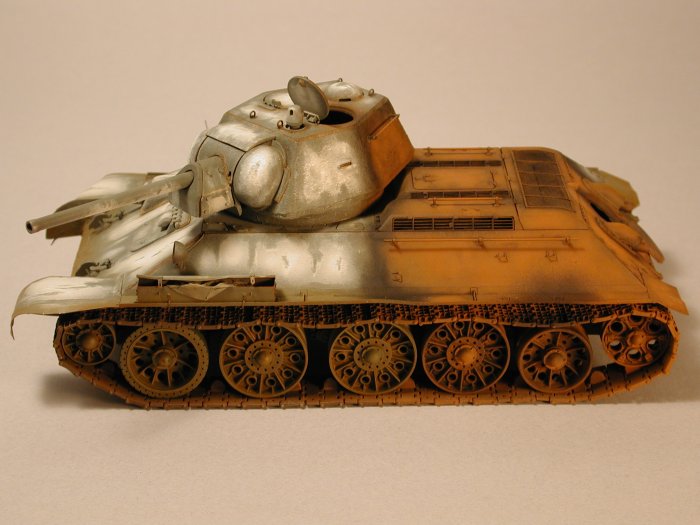
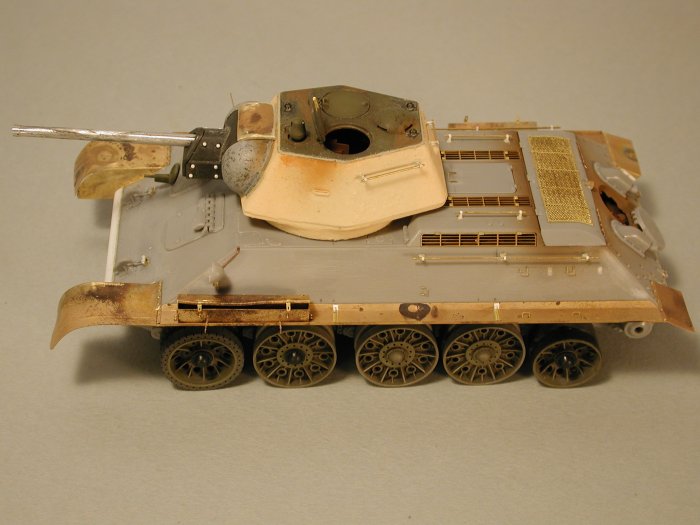
Today we can easily find two plastic kits of the T34\76 mod.43. The old Tamiya kit with a good turret, but that has a hull plagued by several inaccuracies especially in the area of the rear deck, with wrong angles among the several plates, and the Italeri-Zvezda kit, that is more dimensionally accurate, but has a really poor quality of details, requiring an hard improvement work. So, to obtain a realistic T-34\76 mod.43, I decided to back-date the Dragon T34\85 mod. 44 as it is absolutely the best kit on the market. -Running gear.
I used the Tamiya wheels to show the typical running gear of the T-34/76 of that period with three central steel wheels, and two rubber-rimmed wheels in the first and last positions. They fit with no problems the Dragon hubs, have good dimensions and a fair surface detail. I scraped the rubber from one of them as I wanted a burnt-out wheel The tracks came from an old Friulmodel set. -Hull.
The hull was built straight from the box, scraping all the splash guards, adding a rounded front joining plate from plastic tube, new handles, filling the holes for the fuel drums, and replacing\adding all the Aber details such as fenders, grilles and so on. It was also necessary to glue a plasticard ring in the hull opening to insert the new smaller-diameter turret.
I finally added a Verlinden engine for a bit of realism. -Turret.
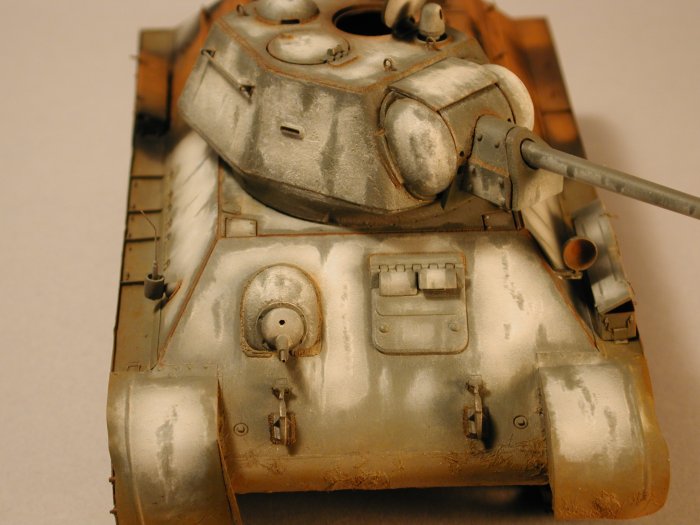
I used a Tank Workshop’s resin turret left from an old plan. It has a very good surface detail, is hollow for those willing to add interiors and will accept the Tamiya roof and gun mantlet. I only added a turned metal barrel and a few inner details taken from the Tamiya kit with minor scratchbuilding as I wanted to show an open hatch.
3-Painting
When I planned this diorama, the first think I had in my mind was the contrast between the white of the snow and the orange and black of the burnt-out tank. When painting vehicles I use only Humbrol enamels and Winsor and Newton oils, so I will constantly refer to them. First I pre-shaded the whole model with 98 which is a good base both for the Russian green and the orange of the rust. Than I airbrushed the rusted surfaces with 62,while the rest of the tank received an overcoat of 114 progressively lightened with 72. The lower hull was coated with a mix of 98,29 and 26 to achieve a dirty look. After 12 hours I coated the model with a water-base transparent varnish to protect the base colour from the subsequent steps involving turpentine. For the worn white mimetic scheme first I airbrushed some white 34 over the areas I intended to cover, and after waiting five minutes, I removed the unwanted white with a flat brush moistened with turpentine. The rusted areas were heavily washed with oils using different shades of orange from dark to bright, while the black of the smoke was achieved using the airbrush. Finally, the model received the usual treatment of washes using raw umber, burnt and raw sienna, black for its final look. No drybrushing was used on this model.
4-The figures
The figures came from two different Warrior sets, and were built straight from the box barring the leader who had the binoculars substituted with a more appropriate Ppsh. They are at the usual high Warrior standards, requiring only the filling and sanding of minor casting faults. The were painted entirely with oils, as I found they are easy to blend thanks to their long drying time. The technique is the same for skin tones and uniforms. First I give an undercoat with an enamel colour similar to the final shade, than when dry, I mix and apply a mid-tone with oils, brush away the excess, and add and blend shadows and highlights. -Skin tones. Undercoat with 63, base of burnt sienna, highlight with white. Burnt umber and yellow ochre for beard and hair. -white. Undercoat with 64,base titanium white, shadows burnt umber. When dry line all the seams with diluted raw umber, give a subtle drybrushing with white and add stains with pure raw sienna. -grey. Undercoat with 111, base mix of white ,black and a touch of yellow ochre, shadows burnt umber, highlights white. Lining and staining as above. The details were all painted in the same way.
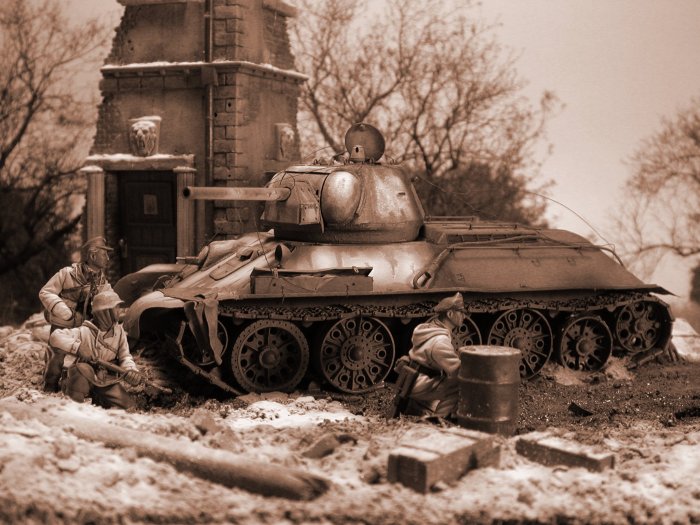
5-The diorama
When planning a diorama I try to keep it as simple as possible so that the focus of the action can be caught at first glance. After having the idea, the most important thing before starting anything is planning.I put the tallest items, usually the ruins, in the background, the main subject, the tank and figures in this case, in the centre of the action, and fill all the empty spots, like the corners, without covering the centre.
In this specific case I wanted to show some German soldiers bypassing a disabled T34 against a ruined building.The tank has been hit probably by a sort of Molotov Cocktail and is half burnt-out. We are at the end of Winter, in March, so there will be not much snow, moreover the heat of the flames has melted the snow leaving a muddy ground with many puddles. I built the ruins following my usual method. First I drew the plans on a plasticard sheet, to avoid the sticking of the plaster, delimiting the borders with 1 cm. balsa strips. Then I poured some plaster obtaining the basic blocks.When dry these blocks were then scribed with a pointed tool, glued together, and the various details added from plastic strips and tubes, balsa, resin or plaster castings. The whole was than painted and weathered the usual way.
The groundwork is Permascene mixed with white glue and covered with earth taken from my backyard, and a mix from commercial and natural debris. When set, it was airbrushed with several shades of brown, adding the puddles with a mix of acrylic raw sienna and gloss transparent varnish. The ashes of the burnt wheel are Celluclay painted with oils.
The other items came either from the spare box, or were scratchbuilt such as the broken telegraph pole and the shattered tree. The snow is a product called "effetto neve ( snow effect)" produced here in Italy by the manufacturer Prochima. It was sprinkled over a layer of diluted white glue obtaining a realistic effect. CAUTION: always wear a good mask and work in a well ventilated area as the inhalation can be very dangerous. The base is a piece of wood bevelled with a do-it-yourself tool and painted. The whole was Photographed against a Photographic background with a Nikon coolpix 990.
Bibliography and acknowledgments -T34 in action: armor n°20 by Steven Zaloga and James Grandsen, Squadron Signal Publications. -Russian battle tank T34: Schiffer Military History Vol.59 by Horst Scheibert, Schiffer Publishing Ltd. -Waffen SS Uniform in colour Photographs: Europa Militaria n°6 by Andrew Stevens and Peter Amodio, Window and Green. Prochima:www.prochima.it. My best thanks to Piero Morana, a dear friend of mine who kindly lent me his Nikon Coolpix 990. |