
April 1945: Approaching the End
Fabrizio Micheli

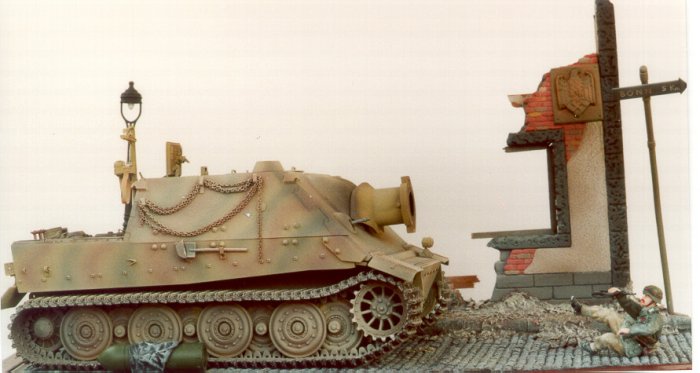
Some times ago, I was reading the Ryton book on Tiger I and Sturmtiger and I was particularly impressed by this latter German "Beast". One of the photos of the book particularly attracted my attention. It was related to a vehicle found almost intact by American troops near Bonn after having run out of ammunitions. It presented a supplementary armour plate in the front and no zimmerit paste at all. Moreover, at a first glance, I was not able to understand if it was painted in plain Dunkelgelb color or if it was so covered by dust that any possible camouflage was not visible.
Therefore, I decided to invest some more time in finding additional information on that particular tank and I was quite lucky. Considering Missing Link as one of the best Web sources available I found almost immediately an excellent article by J. Blackwell that used that particular tank for the description of his very interesting "post-shading" technique.
I like new ideas and new approaches, therefore I planned to apply this approach to the Tamiya Sturmtiger and to insert the finished model in a small scenario which reminded of the original one captured near Bonn.
Considering that the tank had little or no damage I decided to imagine what could have happened ten or fifteen days before the German run out of ammo. Maybe the crew and the tanks were not to far from the place were the photo I saw was taken. The Germans possibly were trying to load every shell available, taking care to stay in some suburbs and avoiding any allied bombing or attack.
Once decided what I wanted to represent, I took a pencil and a piece of paper and I spent some hours planning the final scene. Then I started examining the needs of that project.
First of all, a Sturmtiger, then additional shells, some ruins and a couple of figures. Considering the bore of the mortar (remind of the famous photo of the GI bailing out from it) I decided that a good after-market interior set was absolutely needed. And if I had to detail the interior, what about a nice photoetched set for the exterior too........
Many of the items needed had been sitting on my shelves for some times waiting to be built.
In the end I used the following items: Tamiya Sturmtiger & Aluminium shells; Eduard Photoetched set; Royal Model interior set; Custom Dioramics plaster ruins and cobblestone; Friulmodellismo late Tiger workable track; Tamiya signals, lamp and poles set; Verlinden figures and bricks; Belgo Models WWII poster and newspapers.
The Tank.
First of all, before starting any workbench activity I started reading and carefully looking at all the references I could pick up on that particular vehicle and I compared it with the instructions present both in the Tamiya box and in the aftermarket packages.
After having put in evidence the mistakes that needed to be corrected, I decided to go for the building of two separate parts (the hull and the upper structure) to maintain the task easier.
The additional armour plate was cut out from the appropriate sheet of plasticard and the rivets prepared with a punch and die set.
The unnecessary part of the interior in the lower hull removed. The Royal Model interior set is very nicely cast and, once cleaned up, it fits like a glove in the hull. Brakes, transmission, foot pedals and levers, shock absorbers, torsion bars, radio and a number of other item were all there. Once assembled, I painted the interior with Tamiya Hull Red and then used Humbrol enamels to reproduce the grey-green tint of the tiger till the sponsons.
The floor palate was weather with a number of oil stains and the pattern in the tread plate was treated with a metallic paint to give it a high sheen.
Near the driver seat I put a bottle of wine and some towels were cut out from a thin aluminium sheet (yoghurt covers) just to add some realism.

As far as the superstructure is concerned, I started from the mortar. The appropriate rifling was present in the Eduard photoetched set and it was very carefully bent around a wooden bar that was sanded to be just smaller of the bore. This trick avoided the problem to have a "all ninety degree" rifling and allowed a quick gluing of the whole sheet to the inner part of the mortar using CA glue.
After having positioned all the Royal Model accessories on the walls of the upper hull, I faced a problem: what was real the interior colour? The interior photos I saw presented "ivory" vehicle and from B&W photos is difficult to do any guess. The "ivory" colour could have been a re-painted interior, but we also know that at the end of the war German used pure white as the interior colour of their turrets too. In the end, I decided to go using an off-white tint that was then carefully weathered with a number of washes. All the interior stowage was painted black. Some chipped paint was represented on the locks of the two pistol ports.

A number of shells were assembled, the aluminium well washed with soap and warm water and primed. Then a dark green tint was used. The white line present in the middle of the shell and used to lift them with the crane was hand-painted. The white stencilled writing was reproduced using the Tamiya decals. Before applying the decals (which are a bit thick in my opinion), they were cut to remove the excess of clear part. The surface of the shell was treated with some clear paint and appropriate softener was used to settle them. Once dried, a gloss coat was given. Unfortunately, once positioned on their racks within the tank, I had to notice that these markings showed some bright shine. So I removed them from the racks carefully; using a very thin brush I painted every not stencilled space with some diluted green paint and then repositioned them. This time the result was acceptable from every point of view and in any light conditions.
Before sealing the two part together, I added the wiring for the Bosch light and closed all the hatches from the inside with masking tape.
All the clamping for the tools were removed and replaced with photoetched parts. A mudguard was added and its superior part built with some thin plasticard. All the handles were replaced with copper wire. The mudguards were sanded to make them thinner and detailed with photoetched parts.
The complete tank was sprayed with Tamiya primer. Then, a coat of 70% Tamiya XF59 Dark yellow and 30% Flat white was airbrushed as base colour.
At this point I followed Mr. Blackwell’s suggestions. His notes are very clear and, after a couple of try on an old model, I managed to have some nice effect on my tank (obviously not comparable with the Master’s ones).
The Friulmodel track were then built. Each single track link was cleaned with a blade and each hole cleaned with a hand-drill. Pins of the appropriate length were cut from the metallic wire included and fixed with a drop of CA glue. The finished complete track was painted with Humbrol scenic track colour and once dried they were sanded a bit to show the original metal under the paint using very fine sandpaper. Once applied they showed "natural" slight sag .
I proceeded with the weathering effect airbrushing some very diluted buff colour to give the idea of a vehicle covered by dust.
The teethes of the sprocket wheels were painted with Tamiya aluminium metallic tint.
Then, using pastels, I put a bit of rust here and there and some black smoke around the mortar and the rusted (white glue, orange pastels and sodium bicarbonate sprinkled liberally) exhaust pipes. I used quite strong colour because I knew that the final gloss finish would tone down a bit their tint.
Finally I removed the protective tape from the hatches. Mr. Blackwell’s technique gave my model a more realistic finish of the classic wash and dry-brush system and I was happy with this results.

The scene.
I wanted to depict some small town near Bonn where the crew and other German soldiers were reloading their tank with a number of shells and were worried by allied attack.
I gave a look at my drawer and I found a very nice building ruins by Custom Dioramics together with a couple of their cobblestone pavement.
So I took a wooden picture frame and set the cobblestone avoiding any parallel line with the edges of the frame. Then I put some balsa to create a risen surface to set the building ruins and a pedestrian route.
Everything was covered with Milliput that was then carved to create the different stone patterns in the scene. The building was assembled, putty was used to fill the gaps and then it was carefully painted as it was new. Masking tape was put on the walls were pictures were supposed to be and wooden parts were used to simulate the different supporting structures of the floors.
Broken frames were added to the windows using wooden strips and then painted.
A Verlinden nazi insignia was put on the broken wall and painted with Humbrol Antique Bronze enamel. It was subsequently heavily washed with a copper-green tint.
A raised base obtained with Milliput was used as a support for a lot of debris that were put here and there and fixed with diluted white glue after having carefully checked photos of really bombed structures.
A bent road signal and a street lamp from Tamiya were added too. All the items were painted as they were new, then everything was then heavily washed using the airbrush and spraying very diluted (85% thinner) brown-black mixture.
Eight dry-brushing steps were performed and, in the end, the brighter tints were toned down a bit by airbrushing a very diluted buff colour: the same tone used for the last step on the tank.
Finally, I put a WWII nazi-image on thin plasticard and provided the picture with a wooden frame and a broken glass made by transparent acetate. I removed the protective tape from the inside of the building and applied the picture on the wall slightly oblique so that a cleaner shadow could be observed.

The figures.
Considering the scene I wanted to depict I looked for a couple of figures which could give some drama to the representation.
So I decided for a tanker looking for airplanes or snipers and a wounded soldier. I was very happy to find both of them in the Verlinden catalogue and I immediately started working on them.
After a careful construction I primed them and painted their face and hands with oils. After a couple of days I sealed everything with a clear acrylic coats. I proceeded painting the uniforms using acrylics and gave a final touch using some pastels powder dissolved in turpentine.
Finally some small touches of satin coat were applied on the raised parts of the face and on the "blood" of the hit soldier to give the feeling of something wet.
| Main | What's New | Articles | Reviews | Gallery | Think Tank | Contests |