Weathering uniforms
by Mark Bannerman
In recent months, I have received several emails asking about ways to
approach weathering and dirtying clothing on figures; specifically, for
showing mud, fading, stains, dirt, etc.
Bill Horan makes excellent use of enamels for weathering his figures.
He weathers all of his figures and always ensures that it is not overdone.
His approach is to mix "flesh" and earth toned Humbrol paints
into the semi-wet base colour he uses for the uniforms. With slow and
meticulously placed jabs and pokes of the paint brush, he blends the earth
colours into the base by varying the colour tones – adding lighter
and darker colour shades. This approach, combined with carefully controlled
and strategically placed washes of enamel earth tones, goes a long way
to achieving realistic faded and dirty areas on clothing.
Of course, there are many approaches and different techniques depending
on the medium (acrylics, oils or enamels) you opt to use. Here I'll deal
with a "quick and dirty" approach to weathering clothing which
I use.
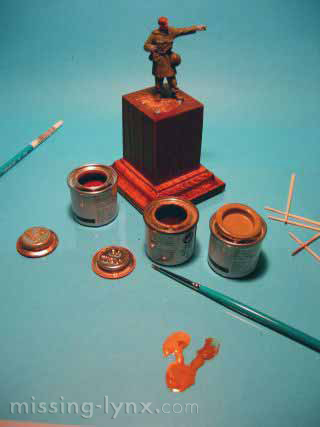
My choice of medium for dirtying clothing is enamels. My reason for this
is that I find it the simplest to use, it dries extremely flat and matt
and it is manageable. Also, because of the extended drying period of enamels
(over acrylics), application of enamels can be "reversed".
Once a figure is completely painted - be it in acrylics, enamels or
oils - I proceed to work on the uniform to transform it from a "parade"
clean-looking uniform to a weather beaten, dirty and dusty uniform. Before
applying the weathering, consider the terrain, the circumstances, and
the degree of weathering you want to achieve: it can easily be overdone.
The golden rule is that "less is more".
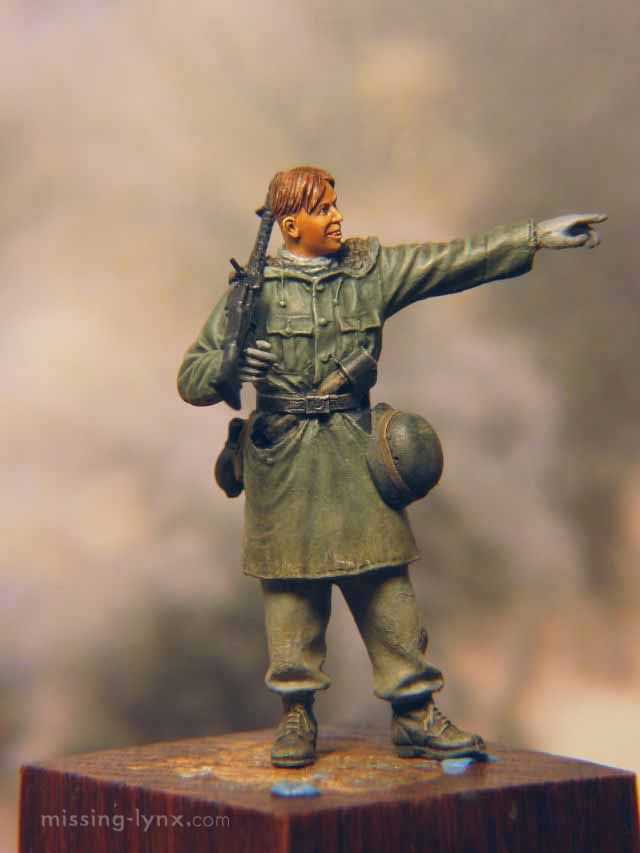
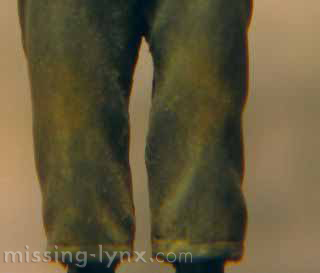
I used Jaguar figures - designed by Yoshitaka Hirano - with Hornet heads
and a few other small alterations - hands, arms etc. As I am depicting
a Karkhov scene, both would need to show considerable wear and tear. The
first figure (pointing) was painted entirely in Humbrol paints - a green-greyish
mix for the jacket and a blue-ish grey for the trousers. The highlights
and shadows were completed (adding black to the base colour of the jacket,
dark grey shadows for the trousers, and white in both instances fore the
highlights). After all had dried, I decided where to show the wear and
tear - and decided on the knees, the bottom of his jacket, his boots and
his elbows.
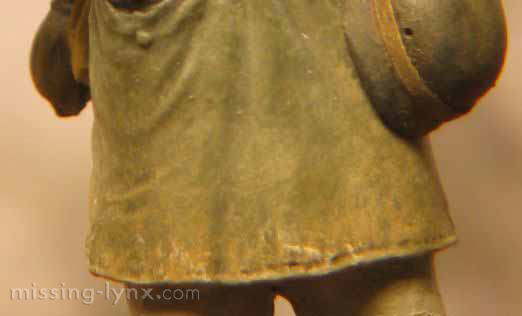
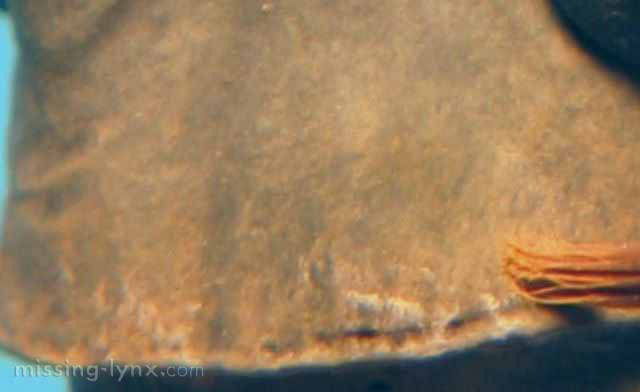
Firstly, the lower half of his jacket. To depict dried mud, I used Humbrol
72 (Khaki Drill), Humbrol 29 (Dark Earth), and Humbrol 61 (Matt Flesh).
I reached to the bottom of each tin with a tooth pick and placed a bit
of the residue at the bottom of the tin onto a palette.
I then proceeded to mix a bit of Humbrol 26 with Humbrol 72 in a 50/50
ratio. I placed a bit of paint on my "00" brush, removed the
excess (similar to the amount of paint you would typically need on your
brush for drybrushing armour) and proceeded to lightly jab the paint onto
the lower jacket. At first, it may seem as though no paint is adhering
at all. This is fine and perfectly normal. Next, I added a bit of Humbrol
"flesh" to the mix and again, removed the excess paint and lightly
jabbed the brush onto the same lower area of the jacket going all the
way around. I probably jabbed the brush 100 times going all around the
jacket. I then added Humbrol 34 (Matt White) to the mix and repeated the
step. It is ideal to go from a dark tone on the lower part of the jacket
working your way up to a lighter tone on the upper section to depict dried
mud/dirt on the top and fresh mud/dirt at the bottom.

The trick is to ensure that the paint application is kept very light
with each jab, avoiding at all costs scrubbing the brush back and forth
and if it appears not enough paint is not adhering,

The same technique was used for the trousers and elbows with the exception
of starting with a circular pattern of lighter dirt tones (Humbrol Khaki
drill mixed with Matt White) and working your way to the centre of the
knee cap and elbow, finishing off with Humbrol 29 neat in the centre part.
Again, always keep as little paint on the brush as possible, keeping it
all subtle.
If you applied too much dirt, there are two ways to reverse this. You
can either "mute" or cover the effect by jabbing some of the
original uniform base colour to tone it down or use a little thinner to
remove the excess paint. I would suggest the first option as this carries
less risk of messing up your work.
The figure is still in progress - but at this point, the weathering process
is complete.

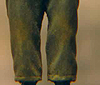
On the second figure, I painted the figure's trousers with Vallejo paints.
I wanted to keep the weathering minimal but also wanted to accentuate
dirt on the knee area as much as possible whilst keeping it realistic.
In this instance, I used two colour combinations - Humbrol 26 and Humbrol
Flesh. I proceeded with the very same technique as above but keeping the
paint in one area - almost in a circular pattern. I jabbed the Humbrol
26 straight out of the tin and added Humbrol Flesh in minute quantities,
I was able to draw different tones within a very small area.
Pastel chalks do have their purposes for weathering AFV/armour but unfortunately
they are not the best for depicting wear and tear on uniforms. There are
a few reasons for this. Firstly, at close glance chalks tend to look as
though they are sitting on the surface of the uniform and were applied
as an afterthought. The result one is trying to achieve is to show "ground-in"
dirt. Secondly, pastels are not permanent, so any exposure, handling or
otherwise would quickly ruin the effect. Also, pastels can sometimes obliterate
well executed highlights and shadows.
Moreover, the jabbing motion is critical because it gets the paint into
those hard-to-get-to nooks and crannies. The stroking of a brush back
and forth - like drybrushing - to apply dirt and mud results in only the
highlight areas receiving the treatment. Also, the back and forth motion
of the brush creates nasty brushmarks, another undesirable effect.
|