
Painting Asian Faces
Mark Bannerman
Many have asked me why I always post photos of completed heads... but with
semi or incomplete or no bodies. Why not the whole thing ? Great question :) I had to
laugh very hard on that. There are a few reasons. I have more heads than bodies and I kid
you not when I tell you I have rows upon rows of completed heads awaiting torsos :) More
importantly, I think most modelers' are quite satisfied with their own personal treatment
of uniforms and non-flesh areas. For this reason, I don't bother going through all the
motions. The biggest challenge are generally heads, and for this reason, I zoom right in
on the problem
area where it may help fellow modellers. Writing short articles like these on painting
heads is only worth it to me if someone else can benefit from it. That's where I get the
most satisfaction from the hobby.
Here is a relatively interesting project which did not take me long but is a new one for
me. Someone had asked some time ago how I would approach painting Asian subjects.
Something I have never done but I was a little interested myself in trying this out. I
made an attempt using one of R. Saunders' 1/35th scale heads. The approach was similar to
my usual way but when mixing the oils, I used Yellow Ochre (instead of Gold Ochre - more
black) with Titanium White and a touch of Mars Red (instead of Sienna). Using Yellow Ochre
for the flesh mix did not make it obvious at first but does make for a very small contrast
to my other figures.
I am not convinced changing my colour palette was necessary at all, particularly where the figure is so small and if he is stand-alone. In future, I will probably just stick to what I usually use. I think it may only be on larger figures (120 mm) where it is necessary to vary the colour tone slightly, especially where one might want to place a caucasian figure along side.
Having said this, I will share a short a paragraph on the approach:
1) Spray an undercoat of Tamiya Desert Yellow mixed with acrylic Flat White in a ratio of
2:1 mixed with gloss coat and allowed to dry for 12 hours.
2) Mix up Raw Umber and enamel thinner. Apply a *VERY* thin wash to the entire face and
neck. Add washes until you are satisfied with the results. Let it dry for one day.
Remember to exaggerate where there are deep creases.
3) Eyes were tricky on this one. I dropped a small amount of black mixed with thinner into
the sockets. When dry , I added two tiny specs of white oils mixed with a tad of pink oil
paints in the corners. I have to be honest, this was not really necessary as one
cannot see anything at normal distance. I use my trustee toothpicks for this
"operation". When dry, I dropped a little gloss with thinner into the
socket to give it a little life. This was also unnecessary.
4) Prepare a flesh mix by adding Yellow Ochre, Mars Red, and Flake White to a 3:1:4 ratio.
Apply the paint to the entire face by dabbling and poking - and not stroking. Stain
the paint on in very thin coats. Let this dry for an hour.
5) While flesh is still semi wet, add a few dots the size of a typed period of pure white
to each of these highlight points - Upper cheek bones, ridge of the nose, above the eye
browse, chin, sides of nostril, tops of ears and knuckles. Leave under direct light for
three hours. Stroke downwards with a soft, dry, brush very lightly downwards across the
face one or two times. The white paint will then be blended into the semi-dry flesh
colours leaving a subtle highlight colour.
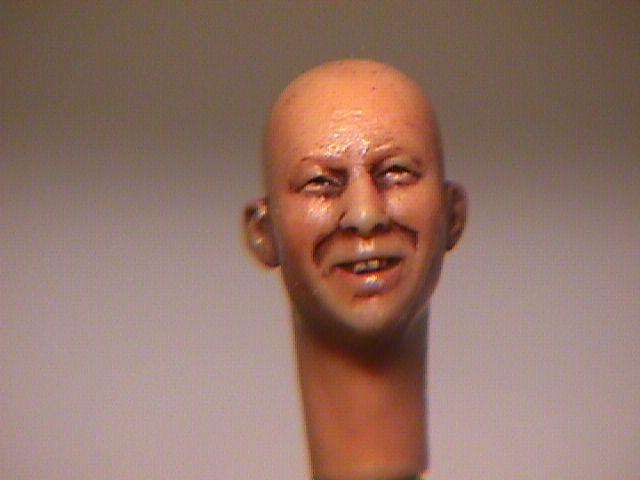
6) Add some raw Umber into shadows areas with a liner brush - note the heavy crease under
the cheeks and around the eye socket in the photo. You are accentuating what should
already be there as a result of your earlier wash.
7) Mix some Burnt Sienna and your flesh colour and *very* lightly dabble your brush onto
the cheeks and forehead area, lower cheeks, and side of the nose
7) When completely dry, add a pin head-size drop of pure white highlight to the
peaks of the facial features again (the eye ridge, nose bridge, top of cheeks, sides of
nostrils, and chin). Let it sit for one hour and whisk a dry brush across the face
downwards very lightly. On the lower lip, mix a little Crimson colour to your flesh
and paint in the lower lip only. When dry, place a little spec of white in the middle of
the lower lip. When I took the photo I had not brushed out that little white spec
completely as yet - but you can see how much was put on. It is very little.
I did not add a five o'clock shadow or eyebrows for obvious reasons. I have yet to
do the hair but will opt to throw on an Airfix 1/32nd scale helmet from the multi-pose.
When head was thoroughly dry, I sprayed a thin coat of semi gloss to the head from
above so that the gloss catches only the protruding features. This is really crucial. It
will add that much more life to your figure.
If anyone has any suggestions on ways to change this or improve or another way, share it
out ...alwayslooking to find another way :)
| Main | What's New | Articles | Reviews | Gallery | Think Tank | Contests |