
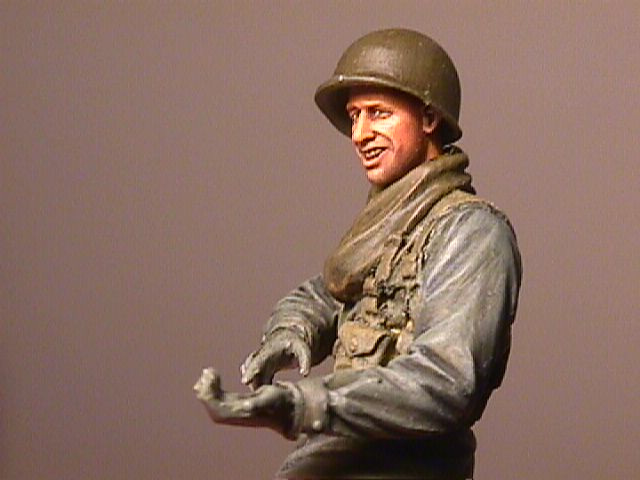
Painting 1/35 scale heads in 8 steps
Mark Bannerman
I would like to share with you the most common approach I use when painting a head. There are many ways but this is the quick and easy system I have used for the past few years. It is essentially a mix of many techniques wrapped into one methodology.
Step 1 - Priming
Prior to starting, wash the figurine entirely with soap and water; for white metal use vinegar and water. Remove all flash, and fill joints and holes with Milliput or plastic putty. Spray an undercoat of Tamiya Dark or Desert Yellow mixed with acrylic Flat White in a ratio of 1:1 mixed with gloss coat Let dry for 24 hours.
Step 2 - Deep Shadows
Give yourself fifteen minutes a day for each of the following steps over a course of two weeks. I have chosen oil paints as my standard medium for painting figures. You will require four tubes of oil paint -Gold Ochre, Burnt Sienna, Raw Umber Flake White. Mix up Raw Umber and enamel thinner. It should be tainted thinner, and not thinned paint. Apply a thin wash to the entire face, neck and hands as well as any other exposed flesh area. The oil/thinner mixture should find itself into all the crevices. Little by little , add a wash until you are satisfied with the results. Let it dry for a day and prepare yourself to work on the eyes.
Step 3 - Painting the Eyes
Drop a little spec of enamel Flesh Pink to white oil on your palette and bring the mixture to an off white-pink colour. Before you do the eyes, the sockets should be dark as a result of your umber wash. Dip your toothpick/needle in your whitish mixture and place a tiny spec in the inner and outer corners of each eye socket. Basically, you've put in the whites of the eyes, leaving the middle area with a dark residue from the original wash . Let this cure for two days. Split toothpicks in half and you will note that the halve-ends actually break into extremely thin splinters. You may need to split a dozen before you get that perfect splinter. Dab a splinter into a brown/black oil paint mix and place a dot in each of the sockets between the two specs of white. I tend to avoid straight head-on glares, and generally place irises looking slightly off centre, either looking left, right, up or down. In my experience, straight on looks can never be perfect! Let the paint dry thoroughly for three days.
Step 4 - The Flesh
Prepare a flesh mix by adding Gold Ochre, Burnt Sienna, and Flake White to a 2:1:4 ratio. Fiddle until you like the colour of the flesh tone. Remember, wet oil colours tend to dry to a slightly darker shade so be liberal with the white! With a good brush (but not necessarily a pointed brush), apply one coat of paint in a very thin layer by jabbing the paint on softly to the entire face , neck and hands, always avoiding both the eye sockets and avoid directly painting in flesh where you have residue from your original wash of burnt umber. It should be thinly spread out and translucent enough so that the base colour be visible through the fresh flesh oil paint. Oil colours in general, and particularly white, are translucent in nature and this is favourable. Let this dry for two hours under direct light.
Step 5- Highlights
While the flesh is still semi wet and with the aid of a toothpick, add three tiny dots the size of a typed period of pure white to each of these highlight points - Upper cheek bones, ridge of the nose, above the eye browse, chin, sides of nostril, tops of ears and knuckles. Leave under direct light for two hours. Take a soft, dry, fan-shaped brush and very lightly stroke downwards across the face one or two times. The white specs of paint will then be blended into the semi-dry flesh colours leaving a subtle highlight colour. The effects of the highlight won't be apparent while the paint is wet, oils look glossy when wet which obliterates the highlight completely. As it dries, you will begin to see the results take life.
Step 6 - Painting Other Facial Details
If you feel the face needs a little more colour contrast, mix a little Burnt Sienna and thinner and very lightly wash your figure's face, paying particular attention to the forehead, lower cheeks, nose, and again avoiding the eyes. If are going to do this, I suggest spraying a little gloss coat to protect the dry oil paint underneath. Let this dry for an hour. This step is the equivalent of blending "rosy" oil colours and if done with a little patience, gives similar a result. This step is not entirely necessary and it is up to you to judge wether it is required. If you do decide to lightly wash your figure's head, ensure the oils have dried for at least a week! When all has dried, add a pin head-size drop of pure white highlight to the peaks of the facial features again (the eye ridge, nose bridge, top of cheeks, sides of nostrils, and chin). Let it sit for one hour and whisk a dry brush across the face downwards very lightly. On the lower lip, mix a little Crimson colour to your flesh and paint in the lower lip only. When dry, place a little spec of white in the middle of the lower lip. Paint the hair whatever colour you wish -- Raw Umber mixed with Black makes quite a good colour match. When the hair is thoroughly dry, a slight wash of black (any medium) through tire hair will provide the shadows followed with a highlight of white whisked across the hair tops.
Step 7 - Extra Facial Details
There are few important steps which can make your figure look that much more realistic. The 5 o'clock shadow can be achieved by combining of Paynes' Grey with Burnt Umber and applying it very lightly, almost a drybrush stippling motion to the area you want covered. It has to be very subtle. "Rosy" cheeks is quite easily duplicated by adding Humbrol 50 with Burnt Sienna (50/50) to your flesh base and lightly applying to the cheeks area. It is best to apply this when the base flesh tone used for the face is still wet so that you can blend the two together. However, I tend to apply this last and directly on top of the dry flesh paint. If it looks too rosy, add a little of your mix of flesh to it and blend it in. I rarely paint eyebrows unless they protrude - but in some instances where these are necessary, use a toothpick splinter and apply dotted line of Raw Umber across the eyebrow area. I treat hands similarly to the face. However, the Raw Umber wash could a be a little heavier to ensure that the recesses between the fingers are well accentuated. Another wash of Burnt Sienna will shade those areas between the deep shadows and high points on the hand. A neat trick after this all dries is to add little specs of white oil on the knuckles and joints. Once the white dots are in place, draw a wide brush across the hand and the white oil paint will blend out. This could either be done wet on wet or right over the dry paint.
Step 8 - Last but not least...
This last step is probably the easiest. When your head is thoroughly dry, spray a coat of semi or gloss coat to the head from above so that the gloss catches only the protruding features. This is really crucial. It will add that much more life to your figure.
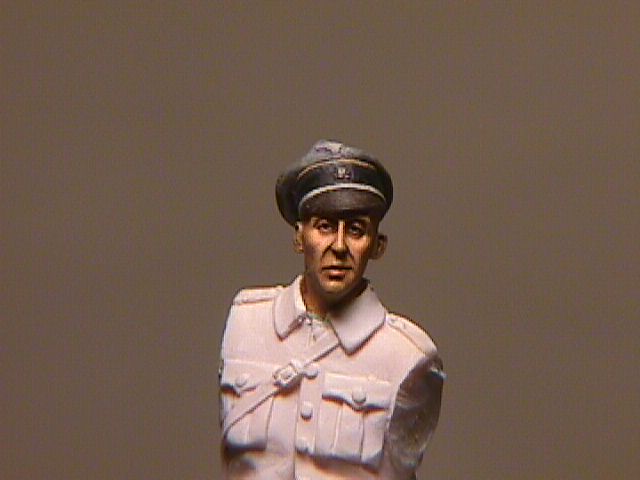
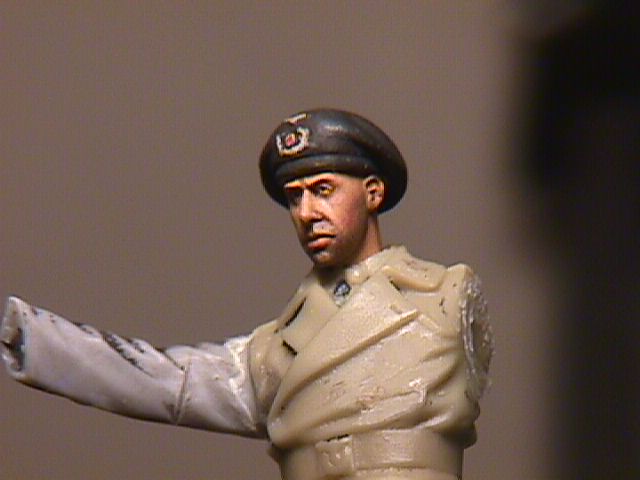
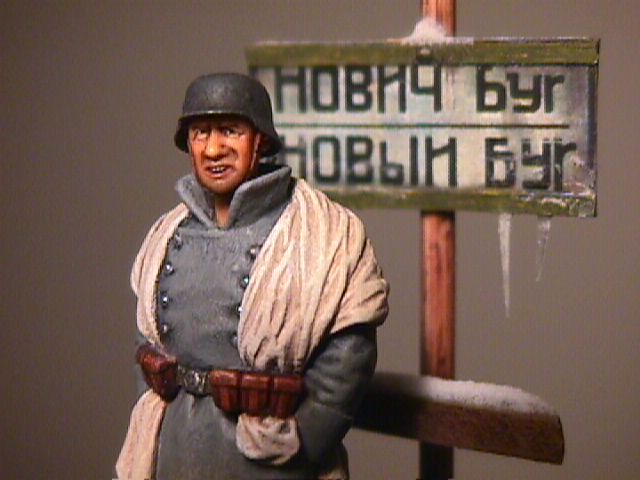
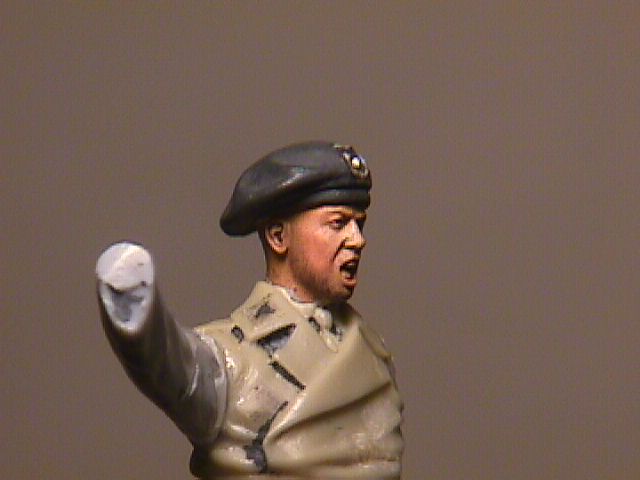
That wraps up a step by step. I have attached a few heads which were painted in this manner.
| Main | What's New | Articles | Reviews | Gallery | Think Tank | Contests |