
Painting an Italian Tank Commander Figure
Mark Bannerman
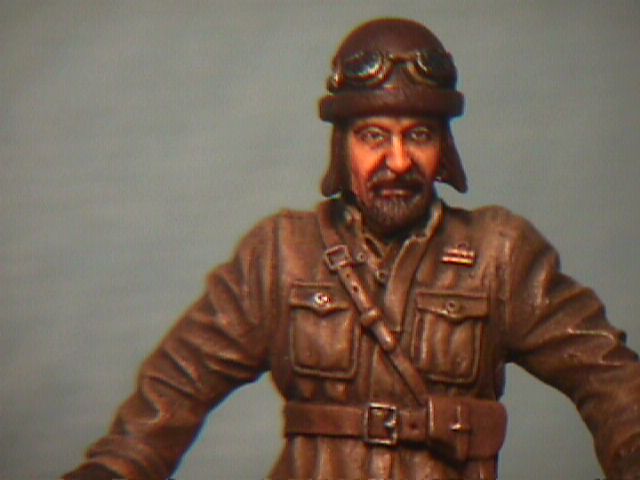
This figure is a 1/35th scale resin offering by WOLF with unattached arms and head. WOLF offers several Italian figures and I strongly recommend these to any Italian figure buffs. They are crisp, animated and very little clean up required. In fact, I think this is probably one of the more interesting figures put out by WOLF thus far.
After attaching the arms with 5 minute epoxy, and a thorough scrub with
soap and water, I airbrushed the figure in Tamiya Khaki XF49 cut with rubbing
alcohol 50/50. Most would argue that Italian desert overalls were in fact dark blue.
However, uniforms were delivered to North Africa in a Khaki colour and dyed a dark
blue colour in the field. The reason for this is still a bit of a mystery ..perhaps
something to do with camouflaging oil and grime stains. Regardless, I decided this one did
not get the dyed treatment and left it in a khaki colour shade.
After the Tamiya base had thoroughly dried, I painted in all the shadows areas with
Humbrol 159. To ease this task, I placed the figure directly under a lamp and applied
shadows in those areas where the light did not enter. This is far more effective and time
saving than attempting to identify where the shadows should be.
Before the paint dried, I went back into the shadow areas again and added smaller amounts
of Humbrol 179 mixed with Raw Umber oils 50/50. I left this to dry for about one hour. Now
it was on to the highlights. I added Humbrol 94 to Humbrol 159 (30/70) and dabbled the
paint on the the highlight points, particularly the tops of the folds. Let thoroughly dry
for a day.
When you come back to it, I admit it will look like a total disaster ! If you ever run
into this situation where the highlights and shqadows just don't blend, here is a little
trick. In this case, I prepared a small diluted wash of Burnt Umber mixed with Humbrol 159
and applied it thoroughly onto the figure. What this wash will achieve is a total tone
down of the highlights and blend the shadows and highlights together. You will be
surprised how effective this simple trick can be. Some figure painters apply their paint
with washes exclusively from beginning to end without ever stroking a brush !
Ideally, highlights and shadows are supposed to be of the same colour but different tones. In this sense, you want to make sure there is a small amount of one paint type in both highlight and shadow applications - in this instance, I used Humbrol 159. This is really important when highlighting and shadowing particularly if you are not using the time consuming wet-on-wet blending technique.
Consider this: If you place pure black in shadow areas and highlight in
pure white, you are literally left with two unmatched and distinct colours creating a
sharp border - a very undesirable and unrealistic. However, if you were to apply black
shadows with a little bit of white added in and applied white highlight with a little bit
of black to it, you will have two greyish tones - one dark and one light - yet their tone
value will be equal. While this is the extreme example, it illustrates that a common
colour value should be in both the highlights and the shadows. I used Humbrol 159 but
could have very well used any of the colours used
depending on the appearance you want to achieve.
Moving on, I painted the belt strap in Humbrol Earth 29 mixed with black and highlighted the edges with Humbrol 29 with white oils. The gloves and boots are straight Burnt Umber with a wash of black several weeks later. I added in gold pennants using Humbrol Gold toned down with black and I used gun metal with silver to do the belt buckle. As soon as everything had dried, I sprayed a dull cote over the entire uniform area to give it the dusty and dull look.
The face was painted in my usual manner as per earlier article on painting faces. The helmet was painted in Burnt Sienna, and when dry I applied a mix of Mars Black and Brunt Umber. The goggles took a dark blue (can`t remember blue type but any will do) and when dry, I applied a thin coat of Polly S Gloss with a brush. That wraps up a short and fun project which took about two evenings to finish. If you enjoy Italian subject matter, WOLF, ROYAL and Cri.el have some interesting figures to look out for.... which prompts me to suggest that more Italian figure articles will be on their way :)
| Main | What's New | Articles | Reviews | Gallery | Think Tank | Contests |