
Painting an Italian Tank Officer Figure
Mark Bannerman
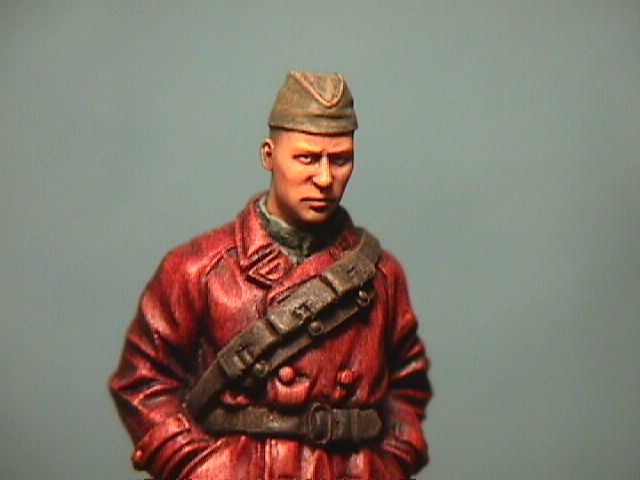
The figure represents an Italian tanker by WOLF in 1/35th scale resin with a modified
Russian head from the HORNET series. The figure is a one-piece with unattached head. After
minor clean up of seam lines, and leaving the head unattached, I sprayed the figure with
Tamiya White cut with rubbing alcohol. Once dry, I checked to see if all the mold lines
and seams were removed. Any air bubbles were filled with car filler. I again resprayed the
figure lightly with Tamiya Acrylic White. Once the Tamiya White was perfectly
dry, I proceeded to examine how best to approach the figure. My thoughts were to paint the
leather immediately as it is a prominent part of the figure and then paint the details
afterwards.
The first step was the laying of a very thin cote of Burnt Sienna oil on the entire
jacket. Before applying the paint, I generally place the oil on paper for one hour so that
some of the oils in the paint are soaked up. The more oil in the paint, the longer the
drying period. You do want to leave some oils in the paint as this will provide the sheen
of natural leather.
When you begin the process of applying Burnt Sienna over the entire jacket, pay particular
attention to placing Burnt Sienna in all shadow areas and inside all seams. I stress very
thin coats as this will be important when you apply the second coat. Think of it as
staining the white on the jacket as opposed to actually painting it. You want to make sure
that you can still see the white through the Burnt Sienna. Let this to sit under a glass
to dry for about an hour.
While the oil paint is still wet, I take a wide but soft dry brush and lightly whisk it
downwards from the shoulder to the edge of the jacket going around the figure. Only one
pass will be necessary. In other words, do not stroke or scrub downwards in the same area
more than once. Just go around and whisk the jacket. What you are doing is drawing excess
Sienna paint off the highlight points and literally disposing it in the shadow areas. When
you have completed this task, sit back and look at the jacket. The shadow areas are taking
a darker tone while highlight points look extremely light, almost white. If this is the
case, you have been successful in Step 1!
Because the drying time is long (48 hours) for oils, I would like to suggest you leave the oils to dry for at least a week as this will become very important in the further painting process of leather. During this week long period, I decided to painted the trousers. Italian tanker trousers came in various tones from dark blue, brown, greens and ochre colours. I opted for the green look. Using Humbrol Forest Green, I laid a thin cote in Forest Green straight from the tin to the entire trousers. I immediately applied shadows using Humbrol Forest Green mixed with Paynes Grey oil (50%-50%) and also applied highlights using same base green mixed with 50-50 White oils. Once all colours were in place, I literally poked my paint brush between highlight and shadows to create a mix of both highlight and shadows and create a mid-tone of the two colours. While Humbrols do dry rather quickly, mixing oils in the enamels allows for more "wet" time and also allows to work the wet highlights into the shadows. I do not generally like to paint wet on wet as it is time consuming but this technique does allow for gradual shadows and highlights as opposed to sharp borders between highlights and shadows. It is a bit fiddly to say the least but because the area is quite small and controllable, it took all of 45 minutes to apply the base paint, highlight, shadow and blend the trousers. I also painted the boots in Humbrol Natural Wood, and when dry applied a wash of Sepia (or black) oils. I left the trousers, jacket and boots to dry for well over a week under a glass. I came back to the figure a few weeks later and proceeded with step two on the leather jacket. This time, I used the same technique as the Burnt Sienna but I will use now resort to using Burnt Umber oil which is a darker shade than Burnt Sienna. Again using above technique, ensure it is a thin coat and apply right over the dry Burnt Sienna, always making sure to get inside the seams. Let it sit for an hour and similarly lightly whisk with a soft dry brush downwards over highlight leaving the paint your are drawing into the shadow areas.
Now you have a jacket that has very light highlights and very dark shadows. Let this sit for two days under a glass and come back to it. If you feel it is still to light and are looking for a darker shade, wait another week and apply a mix of Black oils with Burnt Umber (50-50) using same technique. Or, apply another cote of Burnt Umber.I stopped at the second step because I note from photographs that desert leather tended to fade somewhat in the sun and for this reason I preferred to keep on the reddish side.
The face was painted similarly to the article on painting faces - with the exception of painting the hairline in a light Paynes'; Grey, and painted the beret in Tamiya Khaki drybrushed with Humbrol 93. The last step was the painting of the belt - I used a mix of Humbrol 29 and Humbrol Matt Black cut 50-50, and when dry, a small wash of Sepia oils was applied and highlighted with Humbrol Natural Wood on all the tops of the belts.
This completes another small but fun project which spanned two weeks. The enjoyable part of this technique of applying subsequent oils over dry oils is it can be used on all sorts of leather and wood subjects. If you do not feel comfortable trying this out on a figure just yet, try it on a rifle butt - apply White, then Sienna, and finally a Umber or Black combination - to create a really stunning effect. And if you feel adventure-some, try some other colours in the oil range. The two keys to success is to always start with a lighter colour, and perhaps more importantly, making sure you allow the oils to dry completely before applying another coat of oils.
| Main | What's New | Articles | Reviews | Gallery | Think Tank | Contests |