
Painting Shadows with Oil Pencils
Mark Bannerman
Some time ago, I experimented with an oil pencil which I purchased from my
local art store and wrote up a short blurb about it some months back. Since that time,
many have asked that I write an article with more detail on this approach and share how I
approached this method.
The pencil itself is an Elanté Artist's oil pencil which runs $1.99 at my local art
store. I purchased this thinking I would be able to use it to accentuate shadows by
literally running lines inside and along panel and edges on my armour, similar to the way
aircraft modelers shadow panel lines. Once I got home, I looked at a primed head sitting
on my workbench and wondered if ...just maybe.... this could alternatively be applied to
figures...and so I dabbled.
I sharpened the pencil up with an Xacto knive to a very sharp point and decided to attempt
laying shadows on a head which had just just been primed the day before.
Here is the method I used to apply the shadows with the pencil on a Hornet 1/35th scale
Russian head.
A) Hornet figure primed in my usual mix of Tamiya Desert Yellow and White mixed with
Pollys gloss - ratio 2:1:1. Let dry for a day.
B) Pencil should be sharp but before applying it to figure, lightly draw a
few lines on a piece of paper. This will round or dull the pencil slightly to avoid a
needle sharp point which would end up going through your primer. This scribbling on a pad
will also help loosen up the pencil tip slightly as these tend to be dry at first.
C) When applying the shadows, let your pencil point touch the surface and slowly stroke
your hand back and forth. This is extremely delicate. If you push your pencil a little too
hard, you will go through your primer. Just lightly motion back and forth letting the
pencil just touch the area and let it do the work while keeping within the boundaries of
the shadow area. On the forehead alone in the attached photo, I think I stroked the pencil
back and forth 15 -20 times to create one line. At
the time, it seemed as though nothing was coming off my pencil, - similar to pastel
chalks - but a subtle shade did appear. You need patience for this but keep going until
you see the area subtly darken.
D) Around the nose area, I again stroked very lightly but nothing seemed to give so I applied a little pressure and I soon noted that the area was becoming very dark, very quickly. I thought this might be problematic with too much shadow but I later realized it was actually very desirable. I will explain later.
E) I applied some pressure when applying the pencil into the socket. The
entire socket area was now dark brown and I also drew the eyebrows in by laying the pencil
on its side. In other words, instead of using the point for the eyebrows, I ran the shaft
of the point along the eyebrow ridge. I applied a few lines within the inside folds of the
ear contour and around the outside of the ears. I also placed the tip of the pencil
between the upper and lower lips and motioned back and forth. I also added a dark line
parallel to the lower lip in the crevice just above the chin.
*A special note - every 10-12 strokes, the pencil requires a quick sharpening using the
X-acto knife. But you want to ensure to keep your pencil just short of a needle point. And
this simply requires stroking the tip on a piece of paper.
F) Before I applied the oil flesh tone, I took my 00 brush, dipped into Humbrol thinner
and went back in to sharpen up the details, remove excess or heavy areas, particularly
around the eyes. You want to make certain the eye area is sharpened up where there will no
doubt be a definitive overlap in the application of the pencil. If the brush does not seem
to clear off those areas which are "grounded" into the primer, use toothpicks to
scrape the undesirable or excess away.
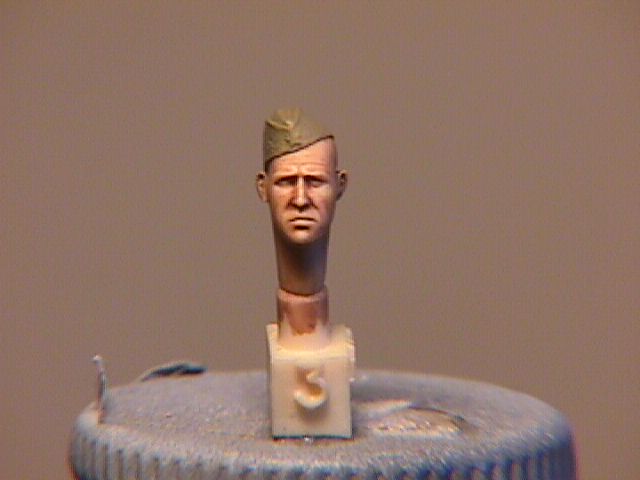
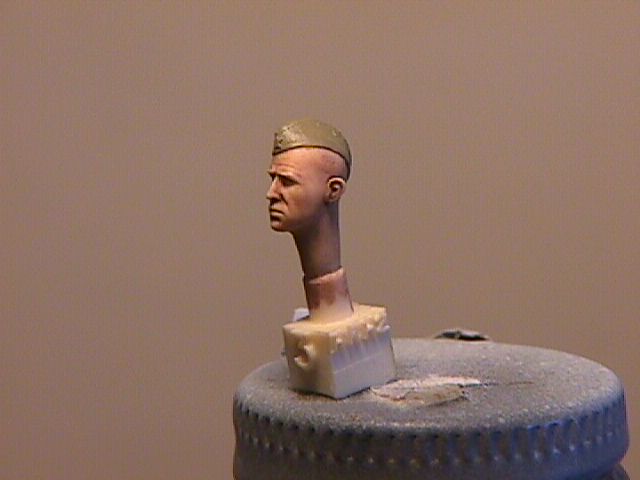
G) I applied a very thin stain of my usual oil mix of base flesh (Burnt Sienna, White, and Gold Ochre) and the attached photos were taken at this very point - primed, "penciled" and my base flesh tone had dried and applied a small wash of Burnt Sienna to blend it all together.
The eyes, highlights, 5 o'clock shadow, lips, weathering of cap etc...would all be done later. You will note that the lines on the forehead are very subtle - this is a result of applying my oils flesh base as a stain right into the crease and subsequently muting the initial stark affect. In other words, before I applied my first oil stain, the pencil lines were substantially darker than on the photo - which is the reason I stated above that if it looks too dark, don't worry as you will have an opportunity to tone it down with subsequent application of flesh. Moreover, a small tainted wash of Burnt Sienna with Humbrol thinner will go a long way to toning down your shadows by blending it all together.
One important point, when you apply your highlight flesh and the
high-highlight tones, avoid placing these inside the darkened areas altogether. Instead,
paint your highlights along the ridge separating the medium flesh and shadows areas.
Overall, I found it gratifying that it actually worked :) But I think other methods
of applying shadows are far less time consuming and far less fiddly. With the pencil, you
also run the risk of removing your base primer with either a tip that is too sharp or a
forceful stroke due to short patience. On the plus side, it is a very controlled
application - more so than a wash - and this can be important when dealing with such a
small area such as a 1/35th scale head. For this reason, I think the pencil route, while
applicable to 1/35th scale, would be far more advantageous on larger scale figures (1/16th
and 1/9th) where one has a
greater a working area to work with.
A fun and different experiment.....
| Main | What's New | Articles | Reviews | Gallery | Think Tank | Contests |