|
Hello, fellow modellers, my name is Ray Farrugia.
I'm a member of the Society for Scale Modellers - S.S.M.- which is I.P.M.S.
Malta.
The objective of this article is to share with you various techniques
which I learned from the top names of this hobby, from their articles in
magazines and some which I discovered by myself.
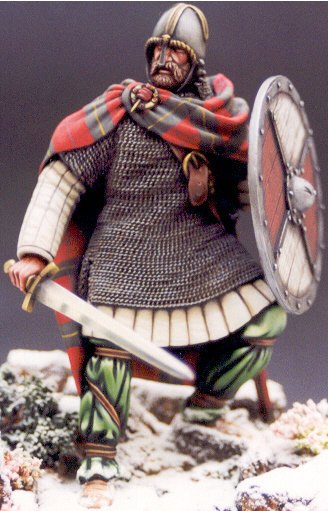
The subject of this article is a 120 mm left handed Highland King which
got me moving when I read Phil Kessling's article in Military Modelling of
July 1995.The kit that I had was from David J Parkins and what a beautiful
kit it was ! It was a one piece resin casting with the sword, scabbard and
nose guard cast in white metal [separately] and both arms and shield cast
in resin [separate as well]. Like Phil Kessling I wanted to represent the
King as a right handed swordsman making a dramatic last stand. However I
did not shorten the sword like Phil did as I believed, the size of the
sword highlighted the King's own strength and power! I did shorten the
hilt to a hand and a half grip however and used a new right hand from
Verlinden's assorted hands packet which was holding a Luger.
FACE
With the biggest headache cured, I moved on to paint the face which I
found out became extremely difficult as I could not hold or place my
painting hand on the cloak. But somehow I managed and the colours used
were all Phil's.
Base>Mars Brown+Alizarin Crimson+Cad Yellow+Tit.White.
Shade>Base+Mars Orange+Purple Madder.
Deep Shade>Brown Madder+dab of Purple Madder.
Highlight>Base+Cad Yellow+Tit.White.
Light Highlight>Tit.White. Cheeks&Lips>Mars Red.
The beard was painted in a yellow acrylic undercoat. Mars Brown+Mars
Yellow+Brown Madder was applied and excess removed with a dry brush.
Highlight was Base+Mars Orange+Mars Yellow and Tit.White was used for
certain ageing areas.
HELMET and SHIELD
The helmet was painted with an acrylic chain metal color by LIFECOLOR, an
Italian brand which is very good as it has no grain .Shadows were painted
with Lamp Black. The same procedure was used on the shield metal parts.
These were highlighted with silver printers ink.
SHIELD
The back of the shield was painted in a brown acrylic colour. A grain
pattern was painted from Mars Black+Mars Yellow+Tit.White. This was then,
gently blended with a large dry brush. When it was dry I gave it a wash of
Winsor&Newton Canary Yellow drawing ink to get a warm golden oak tint. The
front was painted in the same manner to depict red and white painted wood.
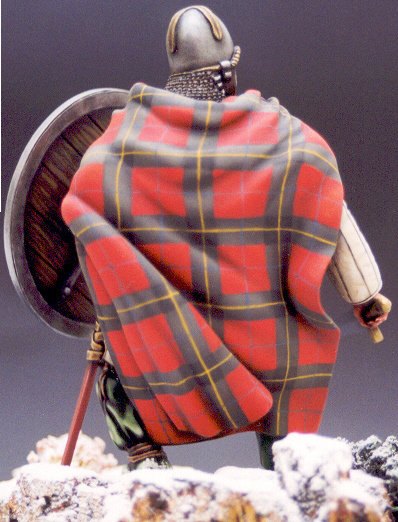
CLOAK
I started with the cloak, as I wanted to cheat a bit! So I sprayed the
entire cloak with a humbrol medium grey. Now the real fun begins! With,
Tamiya's 6mm masking tape I masked the cloak at intervals, vertically and
horizontally where the wide dark grey stripes would be on the finished
cloak, and this process left me with exposed squares which I sprayed with
humbrol scarlet 60.So when I pulled off the masking tape I had the tartan
pattern printed on the cloak! But it was far from ready. Now I had to work
with a free hand, but at least I had the edges to go by with. So I started
to paint the dark grey stripes for which I used a base mix of [Winsor &
Newton oils unless specified] Mars Black+Tit.White. This was highlighted
wet-in-wet by adding Tit.White and more Tit.White for the extreme
highlights. When all was dry I painted the overlapping squares of these
dark grey stripes in Mars Black and highlighted this with Tit.White.
Now I could move on to the red squares. I did not make a base mix but made
up two mixes of a shade and a highlight. I will call these two mixes as
shade #1 and highlight #1. I applied these two mixes next to each other on
the [printed] red squares and blended the edges to create the #3 shadow.
But that was the only wet-in-wet blending of the red. Everything else had
to be applied when all was dry. So I applied highlight #2 and shadow #2 on
the dry highlight #1 and dry shadow #1 respectively. For extreme
highlights I used Naples Yellow, a tip borrowed from Phil Kessling's
painting of Le Cimier's Murat. For the deepest shadows I used Mars Black.
The mixes that I used for the red squares were:
Shade #1>Cadmium Red Deep+Mars Violet+Brown Madder+Purple Madder.
Highlight #1>Bright Red+Cad Red Deep.
Shade #2>shade#1+B.Madder+P.Madder.
Highlight #2>Cadmium Scarlet.
Next came the thin yellow and blue stripes and these were diluted a bit so
that the underneath colours will show through. For the yellow stripes I
used Yellow Ochre+Cadmium Yellow Deep and to emphasize the intersecting
part, I added more Cad.Yellow.
For the Blue stripes I used Cobalt Blue+Raw Umber+Tit.White and for the
intersecting part, I added more Cobalt Blue.
When all was dry I sprayed on a matt varnish [ Revell + Humbroll 80/20];
be very careful with the humbrol matt as too much of it and you cover
everything under a yellowish almost opaque film! Also this mixture
requires a high dilution rate with cellulose thinner like a 20 varnish and
80 thinner, but once applied properly and carefully, very light sprays and
MOVE your airbrush, it gives a dead matt finish; the finish I was after in
order to matt the cloak's material and also to unify the colours. I was
quite happy with the result and although the cloak is not depicted in a
heavy woolen texture like Phil's [I'm not as good as he is] it is enough
to recognize it as a piece of cloth.
CHAIN MAIL
The mail was undercoated with a black acrylic and dry brushed with silver
printers ink+Mars black. Silver printers ink was used to pick out the
highlights and when it was dry, washes of Burnt Umber+Burnt Sienna were
used to depict rust in armpits and other areas. Shadows were emphasized
with Mars Black.
SWORD
The sword was buffed and polished and Ivory Black was used for the
shadows. All gold metal parts on sword, helmet and buckles were painted
with gold printers ink and shadows with Burnt Umber. The rest of the King
was painted as follows;
SWORD BELT
Base>Mars Brown+Burnt Sienna+Tit.White.
Shade>Brown Madder+P.Madder.
Highlight>Mars Orange.
Light Highlight>Cad.Yellow+Tit.White.
SCABBARD
Base>B.Sienna+Mars Violet+P.Madder.
Shade>Brown Madder+Lamp Black.
Deep Shade>Lamp Black.
Highlight>Base+Mars Yellow.
Light Highlight>Highlight+Tit.White.
PADDED HAUBERK
Base>Tit.White+Raw Umber+Mars Yellow.
Shade>Base+Raw Umber.
Deep Shade>Mars Black.
Highlight>Base+Tit.White.
Light Highlight>Tit.White.
LEGGINGS
Base>Indigo+Mars Yellow+Chrome Green.
Shade>Base+Blue Black.
Deep Shade>Blue Black +Lamp Black.
Highlight>Base+chrome Yellow +Tit White.
Light Highlight>Tit.white+Chrome Yellow.
SHOES
Base>Mars Orange+Raw Umber.
Shade>Mars Brown+Brown Madder.
Deep Shade>Shade+Ivory Black.
Highlight>Mars Orange+Mars Yellow.
Light Highlight>Tit.White.
FINISHING
Finally after about 200 hours of modelling [ I did not have a crock pot at
the time!] the King was ready for the Highlands' snowy terrain which I
created from pieces of cork bark glued together on a beautiful mahogany
base supplied by my friend and club member, Marco Portelli. The snow was
depicted by micro balloons. Everything was sealed off by hair spray which
gives the whole scene a wet look and 'freshly fallen snow'. All vegetation
was made from dried flowers and synthetic shrubs. Nameplate was supplied
with the kit and I was very satisfied when the Highland King was a Class
Winner at the 1998 I.P.M.S. Nationals in Telford, a bronze medal winner at
Euro Militaire in 1999 in Folkstone and a silver medal winner at the
Athens Expo 2000,organized by the Star Figure Modelling Club of Athens.
So, there you are, and I hope that you find something useful from the
mixes and techniques that I used which after all are mostly borrowed from
Phil Kessling. So, until we meet again I would like to thank Historical
Modellers Forum for giving me this opportunity to share my meager skills
and hope that it will not be my last!
|
