
Painting Large Scale Figures
Rob Plas
Construction:
For building large resin figures you need a razor saw to remove the casting plug, which can be very large on these figures. After removing the plugs I smooth the surface, but I don't bother to get a perfect smooth and flat surface because I glue the parts together with a thin layer of miliput. I find this easier than filling joints afterwards.
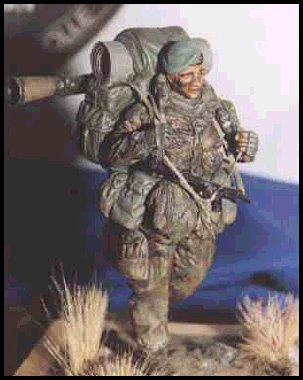
I add a 1mm thick layer of the putty on one of the parts and then press the other part firmly in it's place, adjusting the pose a little to my wishes. Sometimes I use .8 mm thick copper wire to make the joint a little stronger, especially when the figure needs to be attached to a boot cast in a diobase. (My Fort Royal Review 120mm British Marine Commando, Falkland Campaign, is a fine example of that. Standing on one foot, loaded with gear this figure is destined to fall over, so it must be helped with a copper wire.)
When the two parts are firmly pressed together, putty will be pressed from between the two parts. You only need to remove these rims with a knife and smooth the surface with a wet fingertip. Sometimes I sculpt little folds and wrinkles in armpits and other parts where clothing forms lots of little wrinkles.
All larger parts are attached this way, because it also gives the advantage of filling the gap between the figure and the webbing often seen at 120mm figures. On my latest figure I painted it before adding the also pre painted webbing and arms. This helped to get the complex modern british camo scheme right, instead of painting in between the many pouches, bags and gear.
Adjusting a pose:
To adjust a different pose on a arm or leg simply remove the joint in that limb. Just saw away the elbow or knee and drill a 1 mm hole in the center of both surfaces. Next you need to add a 1mm copper wire into both hole, keeping in mind the total length of the leg or arm.
Now you can bend the arm into the desired position. Next you need to fill the gap with a royal amount of milliput. Next you need to sculpt the folds, wrinkles and seems which is much easier than it sounds. Just follow the folds allready there on the remaining part of the original arm. I use tooth picks, needles and some dentist hooks to sculpt the putty. Just remember to keep the tools wet, spit works best.

Painting:
Before painting I always prime my figures with ordinary carprimer from the hardware store. Costing about 6 or 7 dollar these spray cans will last you several models. Lately I started using black primer by The Games Workshop. The black gives the advantage of the shaded effect you will get when you miss any spots in painting.
Next I do the faces and other flesh parts. I start with abase coat of Humbrol 93 Sand yellow or sometimes I use Matt 88. Both of these colours are a kind of pinkish sand yellow and will form a good base for the shading.
After letting the sand colour dry for at least 24 hours I take my oils: I mix a little Burnt Sienna, Raw Sienna and Raw Umber in a 1:1:1 ratio to get a reddish chocolate brow. With this mix I paint the flesh parts thoroughly, making sure that I fill all the deeper parts. Directly after applying the oils I wipe it all off with a soft paper handkerchief. This way you will remove 95% of the brown colour leaving just shades in the deeper lying parts of the face.
With a soft paintbrush I then smooth the oils, removing all hard edges. Next I mix some Titanium White, cadmium Yellow and a very tiny bit of Cadmium red to get a very light pinkish orange and highlight the higher parts of the face: top of the nose, cheekbones, chin and forehead. With a soft brush the light colour gets blended in.
Do this very gentle and subtle: Better to repeat the process time after time then adding too much in one time. You will end up with a greyish pale figure. When you are satisfied with the results leave the figure to dry at least overnight, oils dry very slow. Later you must paint the details in the face:
Mouth: when open: Work from the inside towards the outside:
Tongue: mix a pink from red and white, not too light.
Teeth: White with a touch of yellow, not pure white, we can't all be George Michael.
Upper lip: Mix a little red with burnt Sienna, a little more red will do for the under lip.
Unshaven shade: Mix a little black with blue to get a dark bluegrey, drybrush it where you want to have the beard.
Hair; Eyebrows: Black is easiest. Try to mix various shades of brow using raw umber, yellow and white. Do this in layers; Start dark, drybrush lighter shades.
Eyes: Get the best brushes you can get for this part of the job:
I usually make the whole eye brown, black or blue depending on the size of the eyeball, depending on the opening of the eye. Next I add tiny spots of white in the corners of the eye: very tiny spots will do. Spot on both sides: person looks ahead Spot on the leftside: person looks to the right and vice versa. Spot on both outer sides: person looks cross eyed.
In short:
You need the following colours in oils:
Bunt sienna
Raw Sienna
Raw Umber
Titanium White
Cadmium red
Cadmium Yellow
A middle blue
Black or even better Sepia Extra, which is a very dark brown, also suited for washes.
These paints are expensive, but they last for years.
I have tubes over 9 years old, still doing fine.
My favorite brand is Renbrandt, by Talens from The Netherlands.
As always in our hobby: practice a lot. You can think about getting a head set by Verlinden to play with, better ruin a 3 dollar head then a 35 dollar figure.
The uniforms:
Now this is why I like these figures so much: the uniforms. The difference between 1/35 and 1/15 is that in the smaller scale you can get away with an impression of the camo pattern, in 1/15 this is not enough. In fact the way I work is by getting as much pictures and when ever possible a real sample of the desired uniform and copy that. (I am very lucky, I have a friend who collects real WW II uniforms, so he is an incredible source of reference material.)
The trick is to understand how a pattern is build up, and copy that in scale. Start with the same base colour and add the camouflage patterns in the same sequence. I don't think it is useful to give you colour numbers, I mix them a lot and even take pictures and uniforms with me into my local hobby shop to help me choosing the right colours.
I do all my uniforms in Humbrol, but any flat paint that is easy applied with a brush will do. Just make sure that you always use flat colours, unless a piece needs to have a shine like leather or rubber. (When you mix oils with Humbrol paints you get a great rubbery shine.) After I applied the colours I start shading the uniform with a wash of Sepia Extra and Humbrol thinner. It is in fact the same technique used on vehicles. I make a rather light wash, better to repeat the treatment then to overdo it.
After I like the results I let the figure dry overnight and finally I do a very light drybrush with a light khaki or white, depending on the base colour. This is just enough to highlight the rims and edges of pockets and other features. Next I do the webbing, painting it in the desired colour. And dry brushing it also with a light shade.
The fun part of 120mm painting is that you won't get away with "I guess it will do". You need to be exact in reproducing the features like shine of the buttons and plastic features.
For questions you can always contact me at:
robplas@zeelandnet.nl| Main | What's New | Articles | Reviews | Gallery | Think Tank | Contests |