
BUILDING A PORSCHE JAGDTIGER
by Antonio Martin Tello
Introduction
The design of tank destroyers or assault guns using well proven chassis of existing tanks was a common practice by the Germans during the second world war. Vehicles such as StuGs III and IV, Jagdpanzer IV and Jagdpanther are typical examples. The Jagdtiger represents the end of this trend. This vehicle was the result of installing a casemate with a 12.8 cm gun on a lengthened Tiger II chassis. The Jagdtiger was a massive vehicle, the largest and heaviest (75 tons) to see action during WWII (well, the Maus does not count, does it?). No allied or soviet tank could resist its powerful gun even at a very long distance, and it was almost invulnerable to enemy tanks, except perhaps for the soviet heavies, such as the IS-2, ISU-122 or ISU-152 at short ranges. Nevertheless, the mechanical breakdowns and the shortage of fuel were the main enemies of the Jagdtiger, and the fate of many of them was to be demolished by their own crews to prevent capture. Anyway, very few of these vehicles, around 77, were built during 1944 and 1945, due to continuous technical problems, lack or raw materials and allied bombing of the factories, and they had not a significant role in the overall development of the final stages of the war.
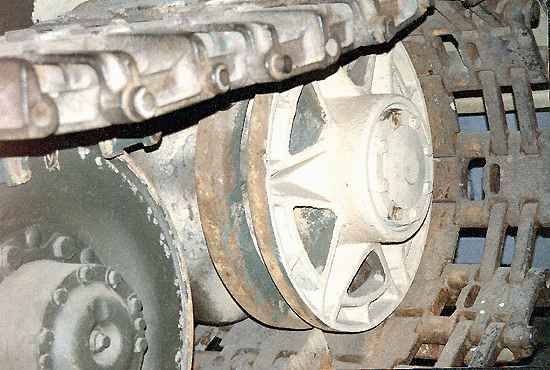
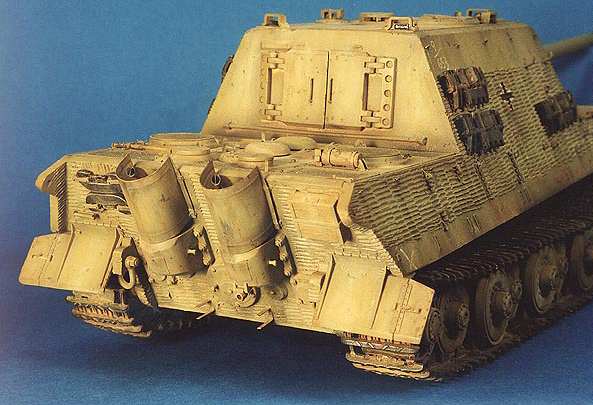
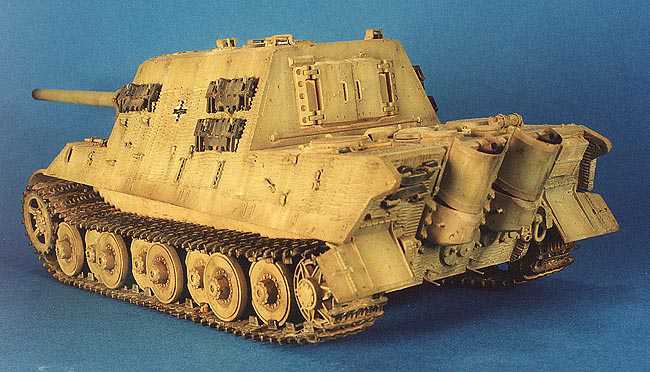
Most of Jagdtigers produced had the Henschel designed torsion bar suspension system of the Tiger II, but eleven Jagdtigers (usually early models) were completed with a different Porsche design suspension (as the one I have built), similar to the one developed for the Elefant tank destroyer. It seems that all of these eleven carried Zimmerit and were used mainly for training purposes. Apart from some very few vehicles used for training and testing purposes in special places, most of the Jagdtigers, both Porsche and Henschel were delivered to and used by the 653rd and 512nd heavy tank destroyer battalions.
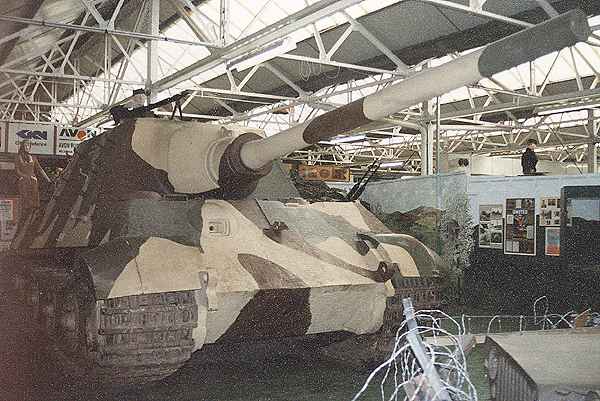
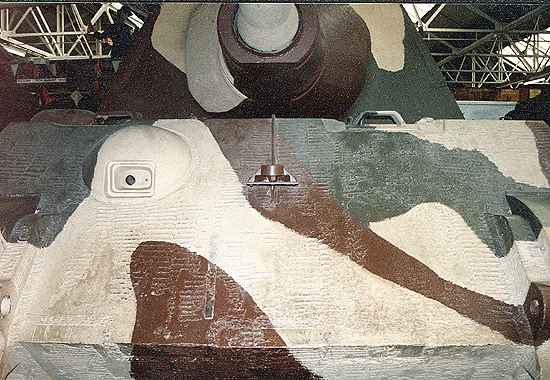
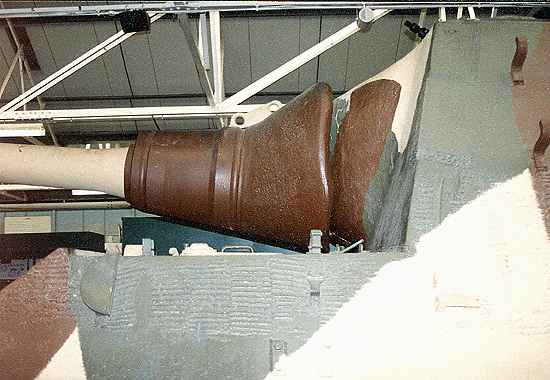
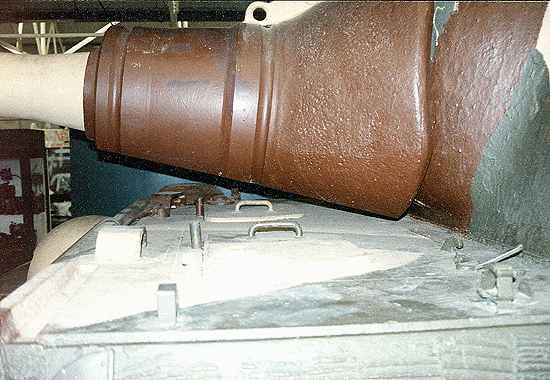
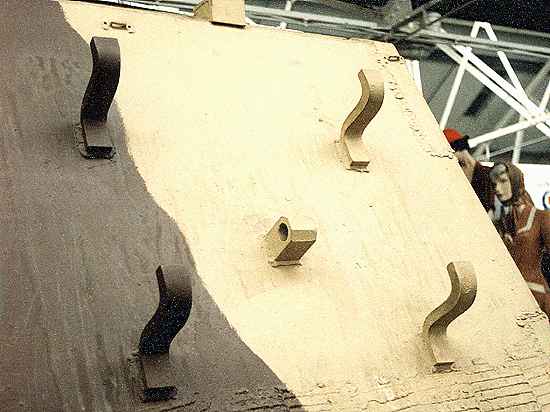
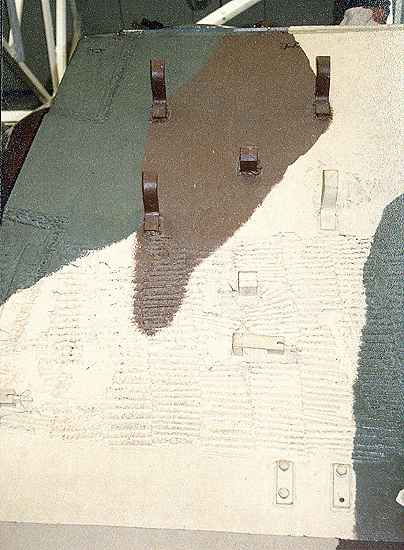
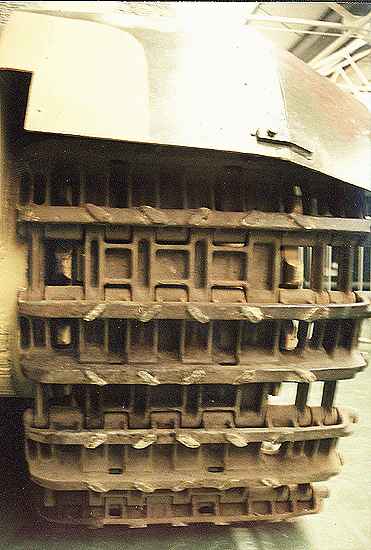
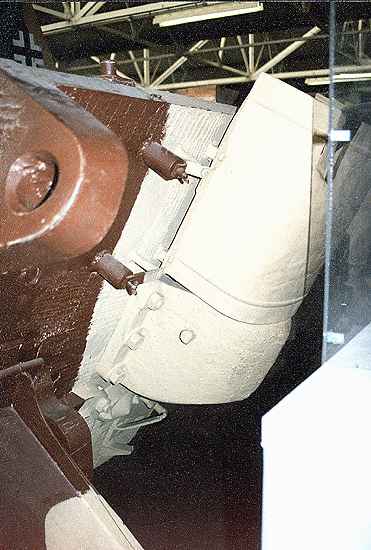
To the best of my knowledge, there are three Jagdtigers preserved in museums today. The ones in the Aberdeen Proving Grounds (U.S.A.) and Kubinka (Russia) are of the Henschel suspension type (You can se pictures of both of them here on Missing Links). The Jagdtiger preserved in Bovington (Great Britain) has the Porsche suspension. This vehicle has the chassis number 305004 and was built in August 1944. It was captured by the British in the Henschel proving grounds at Haustenbeck, Germany, in 1945. During trials in Germany, one of the suspension bogies broke down. Below are some photographs of this machine taken in 1994 and 1995.


The Model
Dragon has in their catalogue three versions of the Jagdtiger. The number 6050 is the Henschel running gear type with broad combat tracks but, curiously, no side fenders. 6051 is basically the same kit with the change of the suspension for the Porsche type, including new tracks with a row of teeth cut off, and the addition of the fenders. Finally 9036 is a "late" Henschel version, with no side skirts, narrow transport tracks and three rows of side hooks for spare tracks.
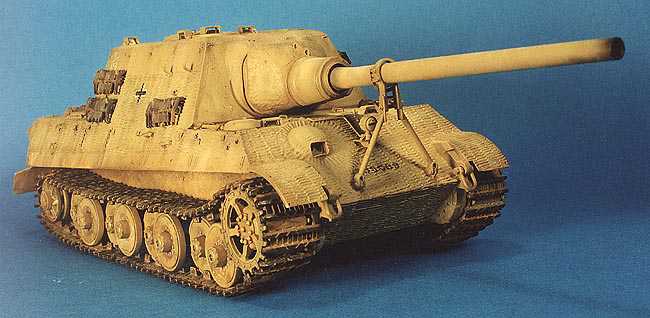
The model I have built is the Porsche suspension type. I replaced the kit tracks with the narrow tracks, also from Dragon, intended for railway transportation. I replaced the kit gun barrel for a turned aluminium one and I used part of Aber's photoetched set (35041) for the Jagdtiger. I said part because in fact I used some of them in my previous project, a Tiger II have a look to it in PanzerNet.
The model is quite good, one of the best efforts of Dragon so far, almost comparable with the latest Tamiya jewels. The detail is crisp and the assembly does not imply great problems, except for the tracks, but I'll write about this later. In some parts, a nice cast look has been achieved. The box includes a small photoetched fret containing the radiator and ventilation wire screens, some parts for the gun travel lock and the tie downs which the Jagdtiger had all around the upper part of the superstructure (and in other places) to fix a canvas cover. These tie downs are plane and, in my opinion, do not render properly the three dimensional look of the real thing. In few words, an excellent base to start with.
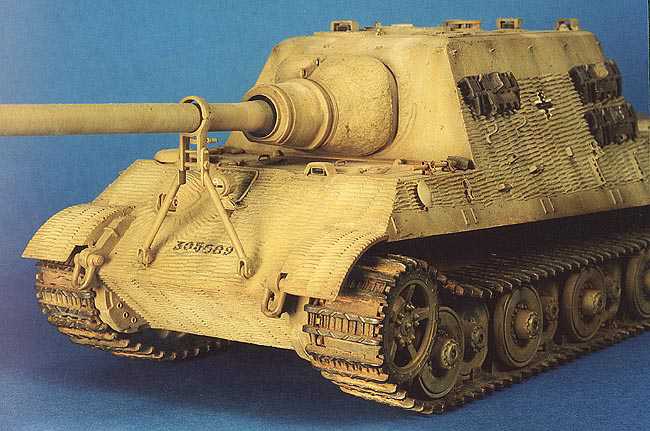
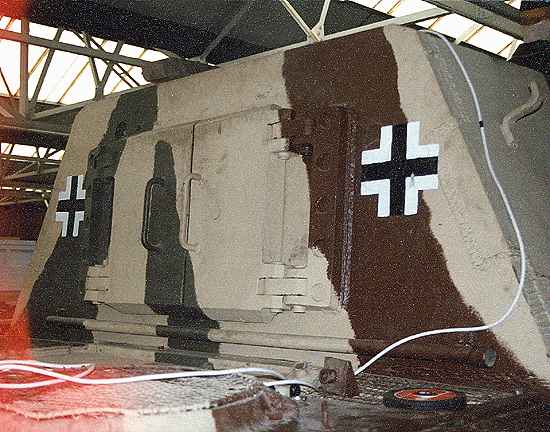
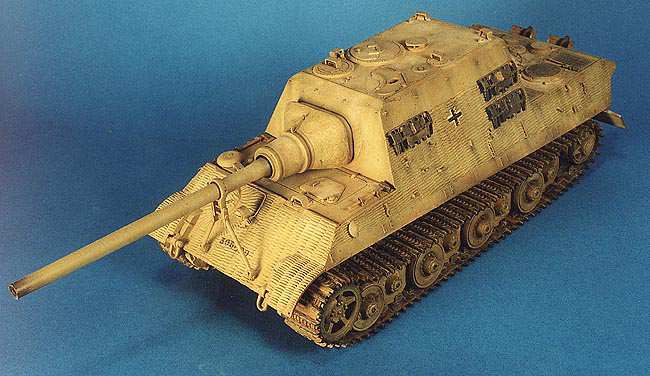
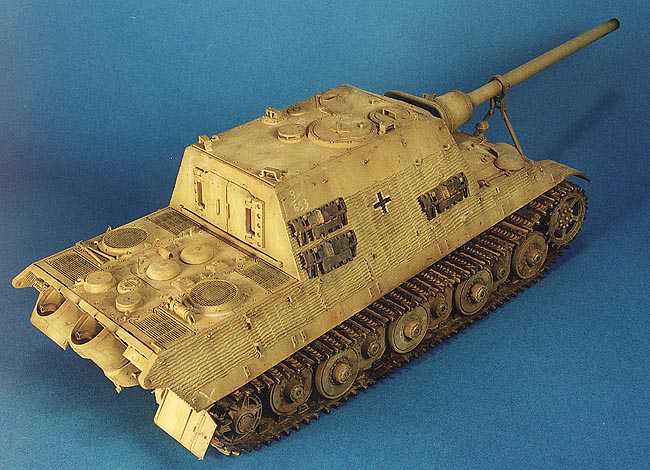
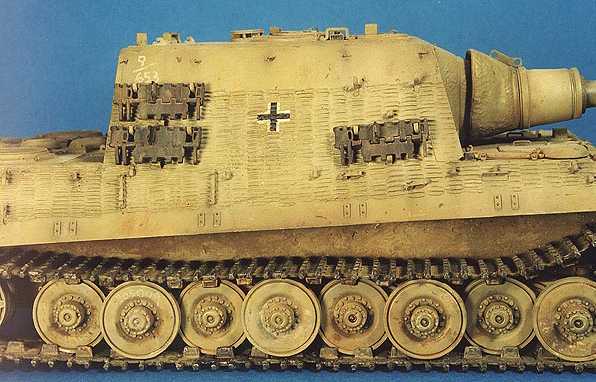
I decided to build my model as the tank with chassis number 305009 depicted in the excellent K. H. Munch's book "The Combat History of the 653. sPzJgAbt.". In this book, several photographs of this vehicle can be seen loaded on a railway flatcar and in what seems the first attention given by the unit personnel after its unloading. The captions of the pictures state that these are photographs taken at Dšllersheim when this machine (and other with chassis number 305010) was delivered to the Abteilung in October 1944. This Jagdtiger, as most of the ones with Porsche suspension type, had Zimmerit, was painted in plain dark yellow (while its "brother" 305010 has a three tone camouflage) and had the chassis number painted on the glacis, under the headlight. No marks, apart from the two balkenkreuz on the sides, are carried. In this photographic sequence, the Jagdtiger had the narrow transport tracks, no tools or towing wires on the sides (a common practice when transported by rail), but several spare track links hung from their hooks.
Well, lets see what I did...
Building the Jagdtiger
Despite I usually follow the sequence proposed in the model instructions, I tend to pass the small details and parts in order to complete the main body of the tank, just to have an idea of the look and size of the model. Well, this one is big, one of the biggest you can get at 1/35. Moreover, in this case, I needed to complete this general assembly with no details because I had to make the Zimmerit.
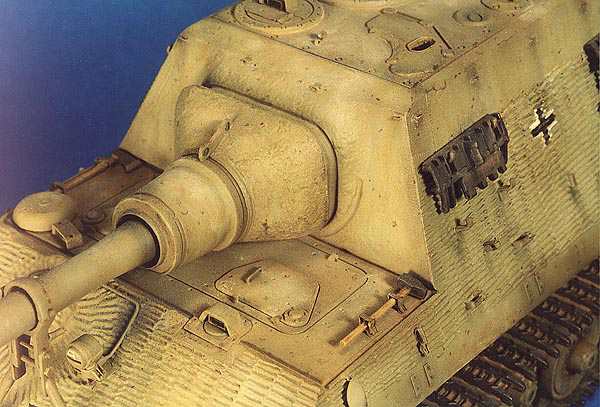
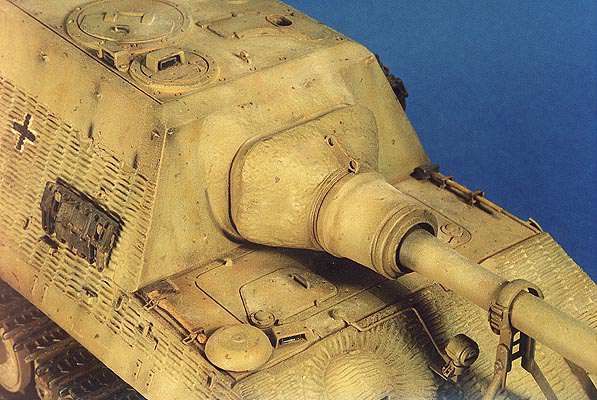
The Zimmerit was done with a low power (30 W) solder with a screwdriver head attached to it. This is the cheap, home made alternative to a pirogravurer. The head comes from an inexpensive screwdriver which as a set of interchangeable heads, with different shapes and sizes. Choose a plane one, of approximately 4-5 mm. width. It is necessary to wait for some minutes till the head reaches the working temperature. Check if it is ready somewhere in the model, of course, in a non visible area, such as the underside. When the head is hot enough, go ahead. It is not difficult, and quite quick. Check pictures of the real think to look for particularities of the vehicle you are modelling. It this case, the height until the Zimmerit was applied on the casamate sides, the particular disposition around the MG bulge in the front, or the rear plate, in which, zones hidden by the jack rest block or the metal sheet exhaust protectors were not zimmeritted. When finished, in order to smooth some hard edges, I slightly sanded the zimmeritted areas and later, I applied a coat of Humbrol liquid cement on them with a brush.
After that, I continued building the model. The running gear was next. Since I did not plan to put the side fenders, the tracks could be installed after the vehicle was completely finished and painted. In order to ease this job, I did not definitely glue neither the sprockets, nor the idle wheels, just held them in place with a little bit of Maskol (masking fluid).
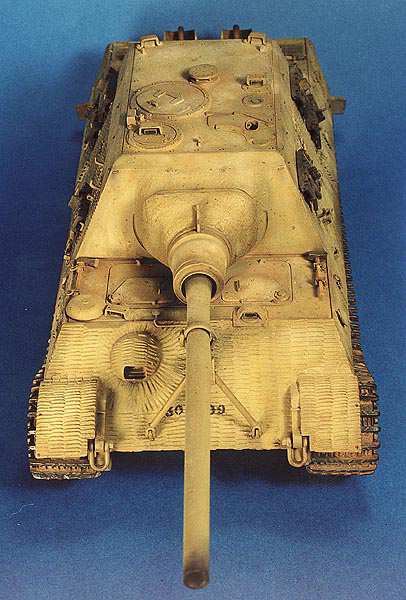
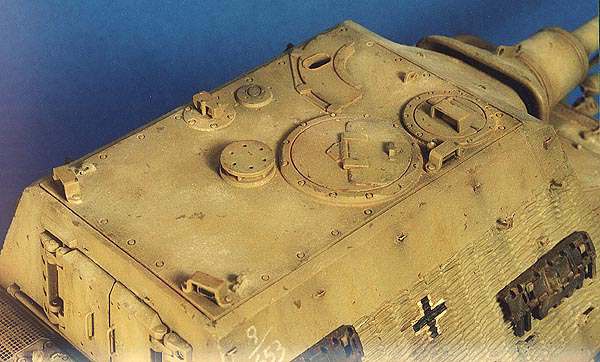
The building progressed now basically following the instructions. Some details were added such as the wire for the Bosch headlight on the front. Check your references, since it seems that the shape of the wire setting is slightly different in each vehicle. The support for the headlight was a Aber PE part. The small hook was added at the rear of the headlight itself. The gun travel lock deserved also some work. There were several types with minor differences, once again, check your references if you are modelling a specific vehicle. In this case, my Jagdtiger and its brother 305010 had different locks. In mine, the horizontal bar al the low part is missing, and also, the fixing of the lock to the glacis is different from the one in the model. Nothing that cannot be easily fixed with a knife, glue and putty.
The front mudguards were sanded down to an appropriate thickness. Several minor parts were added to the internal parts of the mudguards. Aber provide some of this tiny bits, but I used them for my Tiger II, so I had to make them again using plastic card and lead foil. Use the Aber instructions or the invaluable Achtung Panzer no. 6 as a reference. Finally, I drilled three holes in the outer side of the mudguards, where the extensions used with the wider combat tracks were screwed.
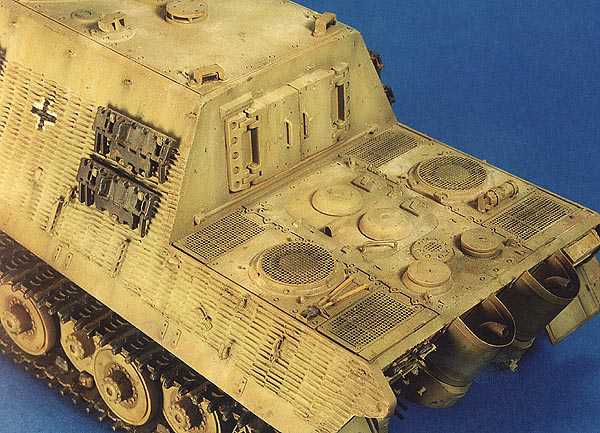
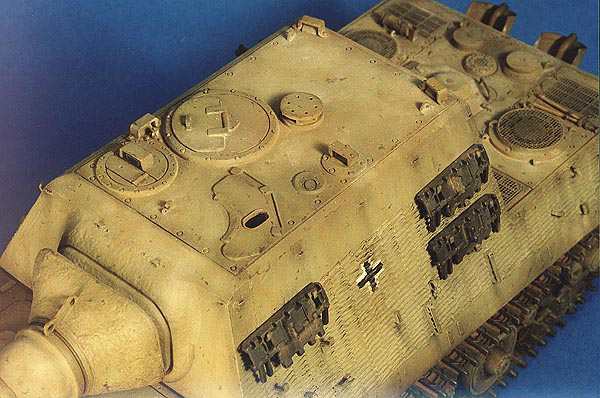
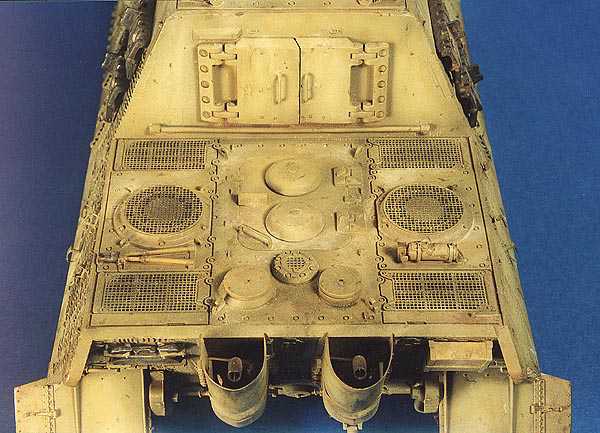
In the rear part, the metal sheets covering the exhaust come from the Aber set. Also, a wingnut was added in each of the rear mudguards. On the engine deck, the photoetched grilles are the ones provided in the kit, and of course, they fit perfectly. The fire extinguisher were replaced by one made from Alhambra Models, from Spain. It is nicely done, with the attachments and straps in PE and the extinguisher itself in white metal. A clamp was added to the wire cutter, and the two rows of tie downs, one at each side or the engine door, were added, by using fine wire, instead of the planar PE parts of Aber or Dragon. Also, tie downs were added all around the casamate walls, near the roof. A small hole were drilled in the four big lifting hooks on the engine deck (and also in the three ones on the casamate roof).
The clamps for the tools and towing cables are included in the Aber photoetched set, but I used most of them in my Tiger II, so I had to make them from scratch by using plastic, lead foil, stretched sprue and spare PE parts. Again, the Aber instructions and the Achtung Panzer no. 6 are excellent references to do this work. The Zimmerit had to be "removed" with a knife in the place where the clamps had to be glued. Once the part is glued, a little bit of putty diluted in acetone is added around. The parts were the towing cables and the tools for gun cleaning were attached were done in this way: Five holes were drilled in a straight line in a small rectangle of plastic card (about 1 mm thick) and then cut in two halves along the holes.
The tracks
The narrow transport tracks (type Gg 24/660/300) are from Dragon. In fact, my Jagdtiger's tracks were a gentle donation from a Dragon Panther II kit, but they can also be purchased separately (catalogue no. 3810). These tracks have two different links, one contains two teeth, the other is plane, and a small connector joining them. The main problem to adapt these tracks to a Porsche Jagdtiger is that for this particular vehicle the inner row of teeth on each track were cut off in order to avoid damage to the suspension, as it is correctly depicted in the normal transport tracks which are included with the kit. I realized this when I already had "preformed" the tracks in four sections (see below) so I only cut the extra teeth in the zones were they can be seen once the track is in the vehicle. As I said before, for each side I made four sections: Lower part, upper part and two rounded pieces around the drive sprocket and idler wheel. I gave the appropriate shape the fragments while the glue still was not completely set.
With these tracks, with two different kinds of links, to connect properly both ends of the track can be a nightmare, you can believe me. Whether it is to short, but just for one link, or too long, but again just for one link, and the problem is that you have to add or remove always two links. That's Murphy's Law applied to modelling. Well, I tried to do my best, but if I had to do it again (and I will have, for a Tiger II) one trick could be not to glue the idle wheel arm to the hull, and thus, to tight or untight the track by pivoting this arm, as much as it was done in the real vehicle.
The tracks sections were painted separately from the model and add to it at the end of its painting process. First, a base coat of Tamiya's acrylic matt black was airbrushed. Following that, they received several washes of Humbrol enamels and oils of brown and reddish tones. Finally, they were drybrushed several times with a mixture of black and silver enamels, each time richer in silver and of less intensity in the application. The tracks were finally treated with pastels, after setting in the model, at the same time than the rest, in order to blend them better with the rest of the vehicle (see below).
Painting the Jagdtiger
Painting a vehicle in a single colour states a challenge. Tonal variations had to be created in order to avoid to end with a plain, dull vehicle. All the painting work in this model was aimed to this goal. Moreover, the zimmeritted surfaces were an additional problem. Due to their very rough texture I discarded here the oil washes (and of course, the drybrushing, as in most of the model), since I thought the pigment would accumulate in excess in the recesses. Well, less theory and go with the painting.
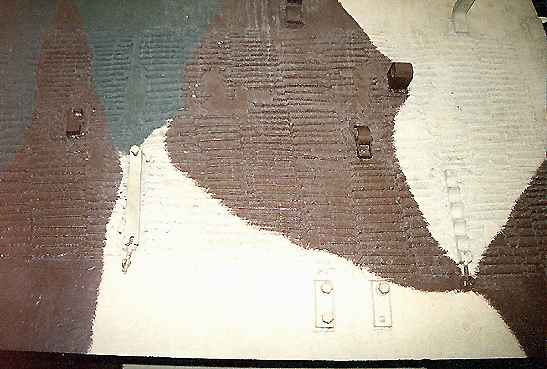
The base coat is airbrushed with Tamiya acrylics diluted with isopropyl alcohol in a ratio 25% paint and 75% solvent. The vehicle was "pre-shaded" with a mixture of 50% of dark yellow and 50% matt earth. When this was dry (almost instantaneously) I gave a coat with pure dark yellow in the center of the panels and surfaces, allowing to the previous color to arose in the edges or lines of the model. A third airbrushing was done with a mixture of 50% of dark yellow and 50% of buff and the last one with pure buff. At this moment, the model had some zones very contrasted, with a very light color, buff, in the center, and a gradation towards the darker mixture of dark yellow and matt earth in the edges.
Next step was to mark the profiles and lines airbrushing a very diluted (more than 90%) mixture of black and matt earth, more of the first colour than of the second. With this mixture, some vertical lines were also made on the sides, front and rear plates, to simulate dirt. It is important to dilute quite a lot the paint and to be quite subtle. It is better to give several quick airbrush strokes if you want to mark more a line, than to use less diluted paint or to move slowly the airbrush.
Now, the decals. This is a tricky step, since the two only decals of the model, two balkenkreuz, had to be put on the Zimmerit. Glups!. First, I applied gloss varnish on the zone where the decals had to be. After dry, I cut the decals on the paper with a x-acto with a new blade just until the printed area, eliminating all the surrounding film. I used Tamiya's decals, since I find they are the best. After some few minutes in water, I slipped the decals into their position, which previously had been wetted with Microset. With tissue paper I removed the excess of liquid and applied more Microset on the decal. After some minutes, with a brush I damped the decal with Microsol. The decal wrinkled (which is good, believe me) and tended to adapt to the zimmeritted surface. It is better not to touch the decal while it is wet, but if you are like me, of the impatient type, after some minutes press the decal with a soft brush to force it to adhere to the surface. Probably you break the decal a little, but also probably you manage to get a better look. After several hours, you may have to repeat the Microsol process until the decal is "in shape". When you are happy with the results, let the decal to dry completely, repaint the broken zones with fine brush if necessary, and apply a coat of matt varnish on the zone to protect the decal, and to eliminate the glossy look of the previous varnish. The small capital "A" in the Bosch headlight and the chassis numbers on the front plate were hand painted (and it was not easy!).
I made some chipped paint. There are several kinds of scratches. Some were made with the base color lightened, as if the outer paint was chipped off, and a previous coat arose. Others are made with dark brown or reddish brown colors, simulating the bare, slightly oxydized metal, or the primer coat. In all cases I used a thin brush, and made small, irregular dots, or lines. I insisted along the edges, hatches, tool clamps and were I thought is was more likely the paint was chipped off or simply worn out, such as the zones were the crew would climb up and stand. I also did some chipped paint simply with a well sharpened soft lead pencil, specially were the surface should look shine because the frequent use, such as handles or the edges of the hatches.
The following step was the oil washes. First some general comments about this technique. I use Humbrol enamel thinner as solvent since it dries fairly quickly, does not produce these glossy stains and dilutes the oils perfectly. About the oils, I think that the brand is not very important, neither the exact tone or colour. As a general rule, I deposit a small fraction of the oils on a tissue paper and wait for 15-30 minutes. Some of the greasy components of the oils (responsible for the "oily" glossy stains) are absorbed by the paper and this does not affect to the pigment. I wet a zone of the model with clean Humbrol thinner and then apply a very small quantity of oil directly on the model, blending it quickly, or I dilute previously the oil in more thinner and brush this on the wet surface, dispersing it. I never use a general wash, but small washes of several shades in small zones. In my opinion, the trick is that the oil has to be blended with the surroundings (no hard edges should be visible), and to achieve subtle tonal variations in different parts of the same zone, for instance the casamate roof.
As I said before, no oil washes were applied on the zimmeritted surfaces. On the rest, I started with white. As always, it is better to do it very smoothly twice tan one with the brush heavily charged of white oil. The white colour gives some dusty and degraded look to the paint. After, I used several shades of ochres and browns. With burnt umber I marked some recesses and details, but avoiding to leave a very dark ring around the nuts and other raising details. Then, I drybrushed very slightly (very, very slightly) some details with a mixture of dark yellow and white. It should be so subtle that you almost shouldn't notice it.
There are some details that really does not matter when you paint them. For example the oxide in the exhaust were achieved with a base of an reddish brown enamel and several oil washes of different shades of brown and ochres. The glass of the episcopes were painted in very dark green, and then with gloss varnish. The tail distance indicator was in blue. The teeth of the drive sprockets were slightly drybrushed with a mixture of silver and a little bit of grey...
And now, the pastel chalks. Before that, I put the tracks in their definitive position. I used several shades of pastels basically a very light beige, a couple of ochres, a medium brown, a red brown, and black. With a knife I deposit a small amount of powder from the pastel stick on a small dish and a pick it with a small brush. Then I applied the brush on the model, but just in small, irregular areas. If necessary, the operation is repeated. Again, the trick is to create small subtle chromatic variations, trying not to hide too much the previous work. In this model I insisted with the pastels on the horizontal surfaces, driving compartment roof, casemate roof and engine deck, using mainly lighter shades to simulate dust and dirty caused by the crew. Very few pastel was applied on the sides. On the lower parts, a bigger brush can be used. The tracks receive a generous amount of pastel, almost a dry wash, and after that, the excess was removed from the outer details with the finger. The outer details for the links were highlighted with a soft lead pencil, "drawing" directly on them.
Conclusion
If you are a fan of German tanks, the Jagdtiger is a must for you, and fortunately we have really good kits to build both Henschel and Porsche suspension types. For modellers in general, the big, boxy and even "brute" look of this vehicle made of it an attractive model to tackle. I enjoyed a lot building and painting it and I do not hesitate to recommend it to all of you.
References
- "Encyclopedia of German Tanks of Word War II", by P. Chamberlain, H. Doyle and T. Jentz. Arms and Armour Press. London (U.K.) 1993.
- "Sturmtiger, Elefant, Jagdtiger", by W. Schneider. Schiffer Publications. Pennsylvania (U.S.A.) 1990.
- "Jagdtiger" (Armour in Focus no. 90), by J. Ledwoch (English editing by M. J. Shackleton). Wydawnictwo Militaria. Warsaw (Poland) 1999.
- "Preserved German Tanks, 2", by T. Larkum. Armour Achive. Northampton (U.K.) 1995.
- "Achtung Panzer No.6: PanzerKampfWagen Tiger", by M. Bitou. Dau Nippon Kaiga. Tokyo (Japan) 1999.
- "The combat history of the 653. sPzJgAbt.", by K. H. Munch. J. J. Fedorowicz Publishing. Winnipeg (U.S.A.). 1997.
| Main | What's New | Articles | Reviews | Gallery | Think Tank | Contests |