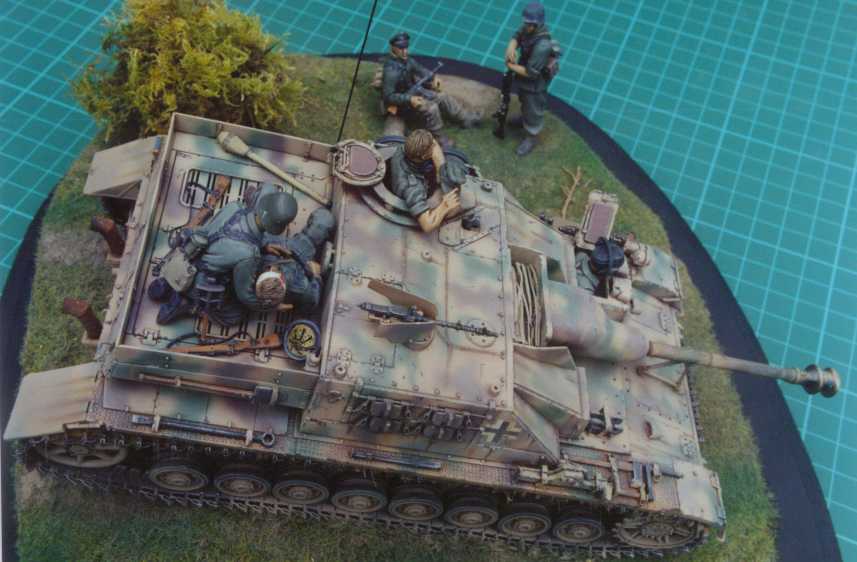
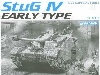
A StuG IV with a Twist!
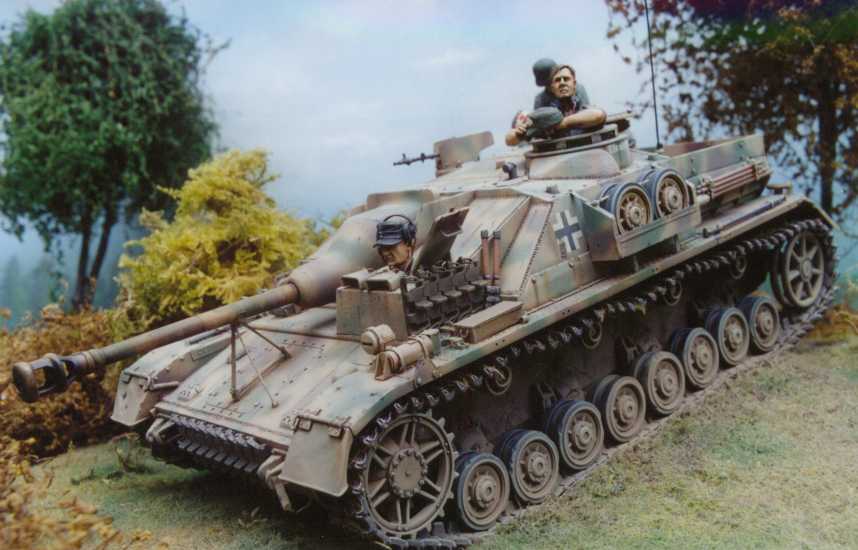
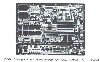
Modelling a slightly unusual Sturmgeschutz IVThe seeds of this little project actually were planted about 1 ˝ years ago. It all started when I bought DML’s early Stug IV (Kit No 9038) at a club swap night. The main reason? It was cheap! (about $15.00 Australian if I remember correctly). I then slowly started gathering various bits and pieces over the next few months (as an example, Abers’ detail set for this kit No 35044, Abers’ brackets for Stug IV side skirts No 35 A44, Elephants’ turned aluminium barrel No 35-366 ECT). At about the same time Wydawnictwo Militaria released their book on the Stug IV (No 94) which I managed to get my hands on. After gathering all these and other bits and pieces together I decided that I would make the Stug IV my next project.
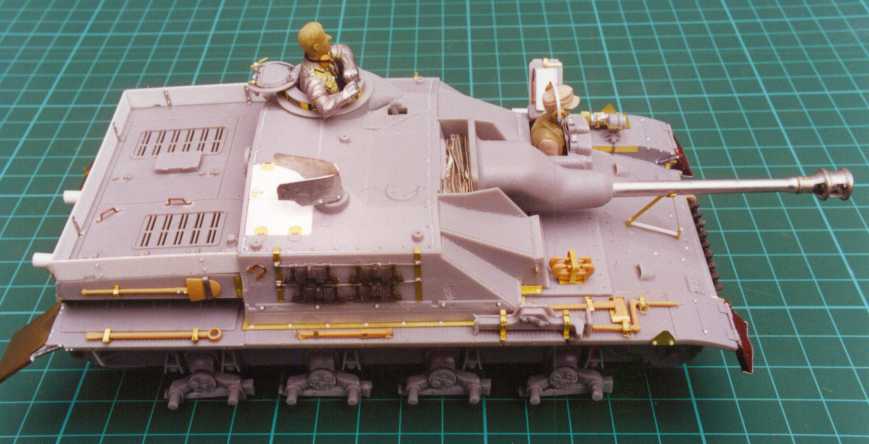
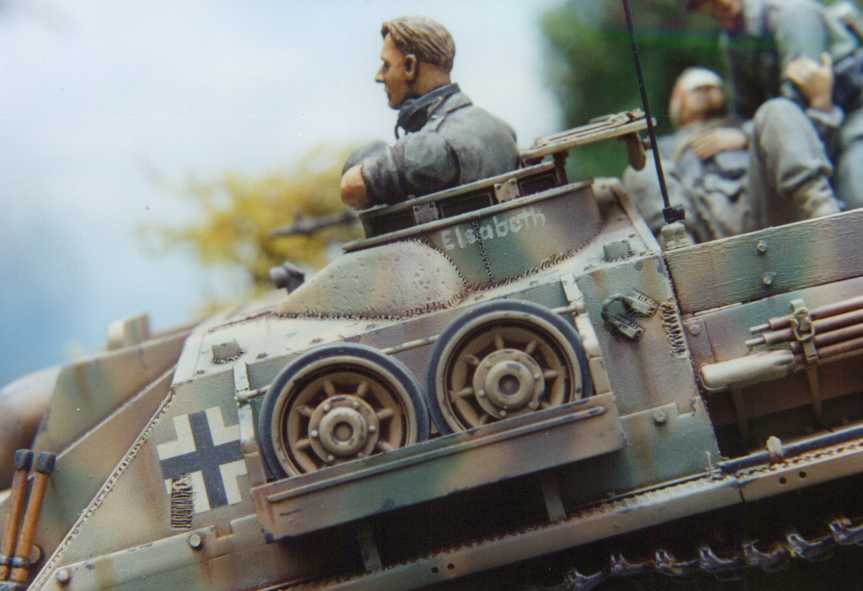
The next task was choosing which particular vehicle to base my model on. I had wanted to do a vehicle that didn’t have zimmerit (a task I’m not overly fond of) and had schurtzen hanging rails (to use the Aber set). Well at the time I wasn’t able to find a picture that fitted both of my criteria (I have since collected 126 different images of Stug IV’s in which there are a few shots of vehicles that would of fitted into my criteria perfectly, oh well next time). I eventually settled on a vehicle pictured on page 26 of the Wydawnictwo book. It shows a group of Stug IVs from the 912th Stug Brigade that had surrendered to the Russian at Courland in May 1945. The particular vehicle I decided to do did fit some of my criteria (it didn’t have zimmerit) but it also didn’t have schurtzen brackets but I was willing to live with that. I’ll save the Aber set for another project later. So "Elsabeth", which was the name that appeared on the cupola became the chosen one. As I studied the photo there was some strangle features on this vehicle that made it a bit different to your standard Stug IV and its these things that I am going to outline and explain as I take you through the processes I took to build this model. ConstructionBasically I will let the pictures do the talking in this article. I’m not going to call out everything I have added or replaced. Things like the extra photo-etched can be seen in the pictures. If I have used etched not from the Aber sets I will call it out as I go. The same goes for all the Punch & Die bolts, you can see what I have added in the shots. I will mostly be concentrating on the features that make this Stug IV different. Also it will be obvious from the pictures were I have added or enhanced weld lines and seams with the trusty Pyroguave.
As I studied the pictures this vehicle (I say pictures as I was provided with some other shots of this vehicle by James Blackwell, which appeared in Ground Power No 42, thankyou James) it became clear that this particular Stug IV was a mid to late version. Now the kit I had was the early version but in typical DML style most of the parts for doing the later versions were included in the kit. I will call these out as I progress. To help identify the parts that I have used that are different to the ones mentioned in the instructions, I will place a “*” at the end of the part number.
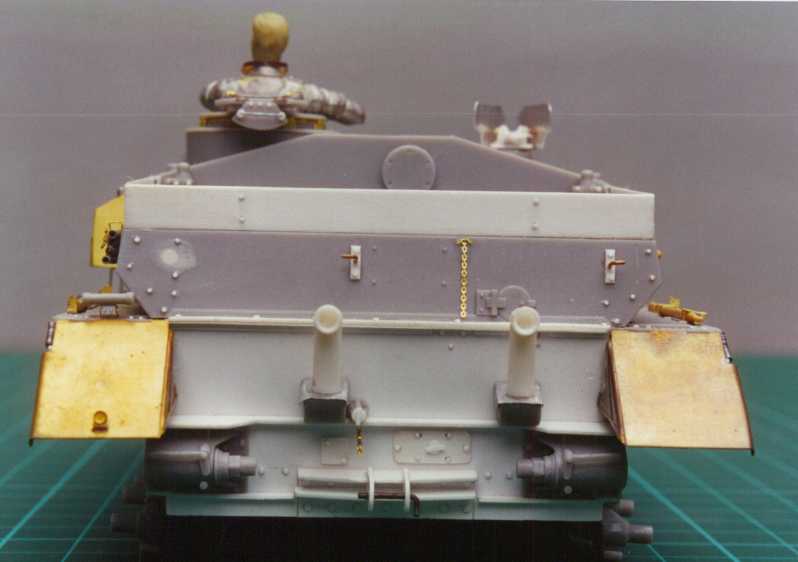
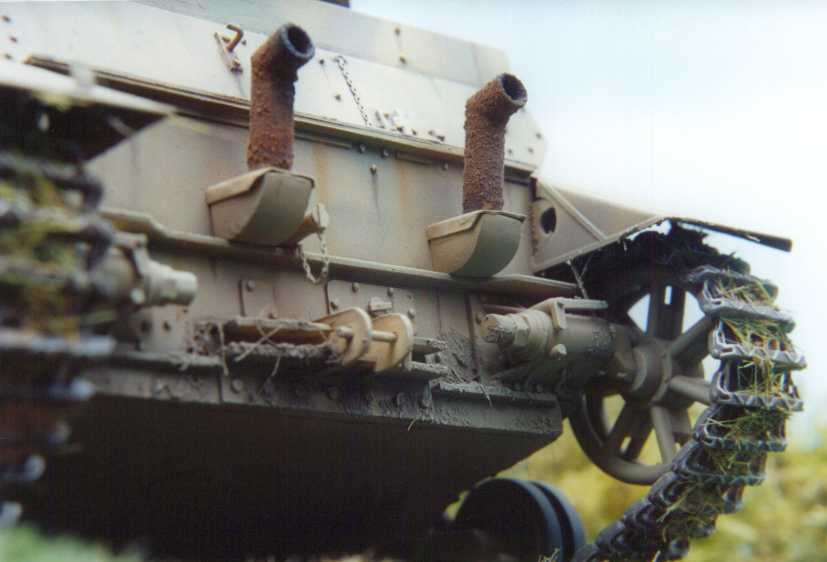
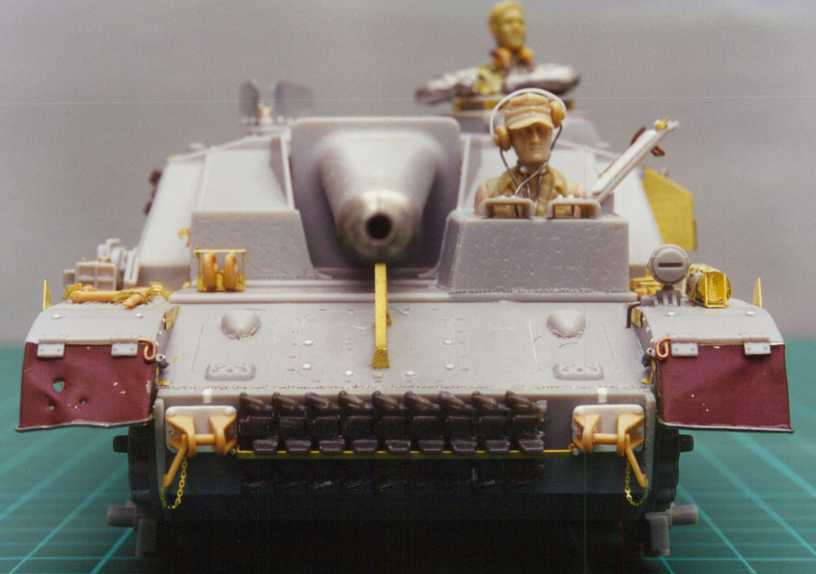
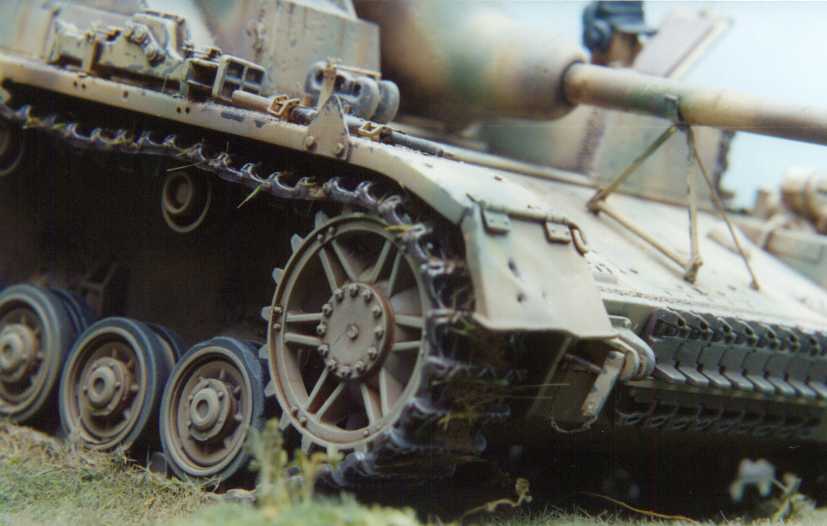
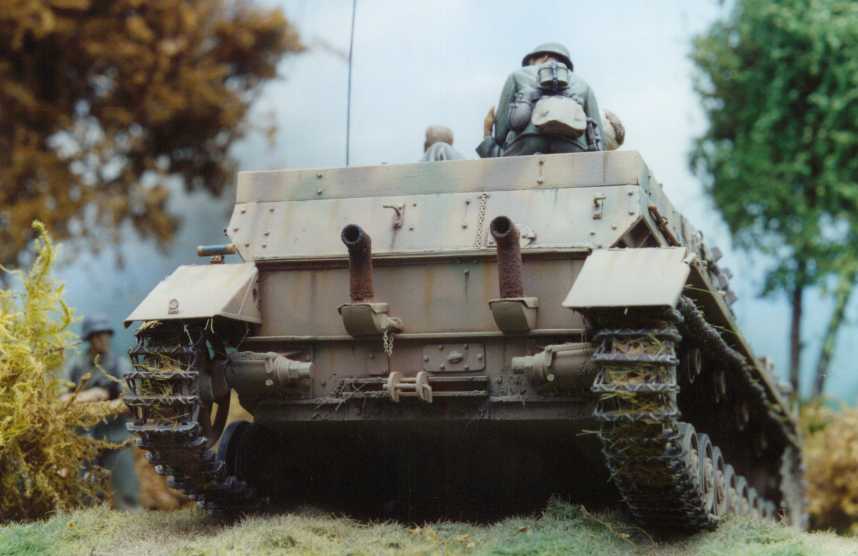
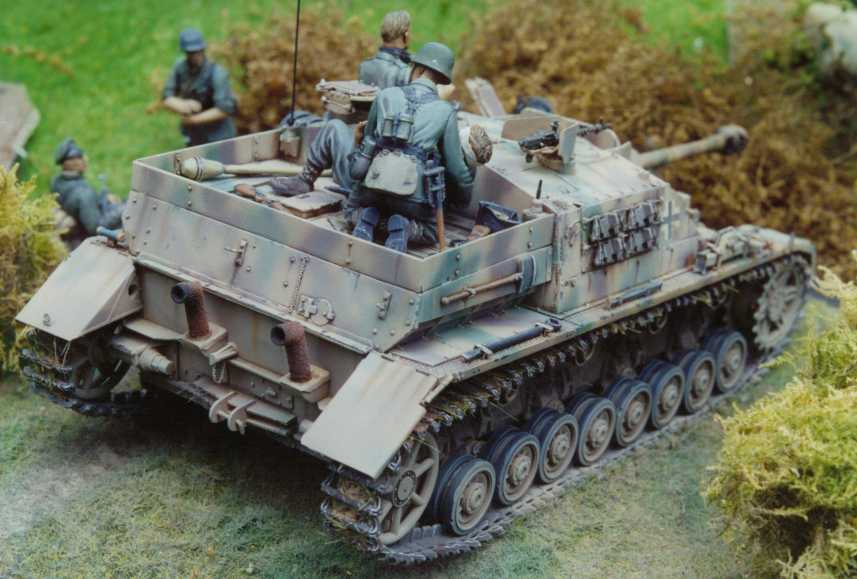
The first thing I decided to do was replace the rear plate. The kit part is OK but it has quite a few injector pin marks in places that are almost impossible to get to (although if you were doing a early version with zimmerit you could use this to cover them up). I used the kit part as a template and cut a new one from 40 thou card. The various braces running across the length were added with 20 thou card, as was the new rear towing pintle, a feature of later production Stug IV’s. All the different access hatches were made from 5 thou card and the various bolt heads made with a Waldron punch & die set. On the rear plate we encounter one of the strange features of this Stug IV, the “elbowed” exhausts. I have to admit that I have used a bit of artistic licence here. I don’t have a picture that shows the rear of Elsabeth but all the other Stugs in the shots have this feature so I figured it was a pretty safe bet that this one would have them as well. The bases of the exhausts are modified kit parts (No C54), the covers on top of the bases are from lead foil bent to shape and the pipes themselves are from plastic tubing, cut at angles and glued back together to form the “elbow”. The cooling water outlet next to the left exhaust base is kit part C44*, with a top from the P & D set and a length of etched chain from the Aber Chains set (35 A16). The bases of the idler adjusters are kit part C55* & 56* with the bottoms sanded down flush, with the end covers being kit parts F9*. Also added on the idler housings was the “L” shaped tensioning handles, part numbers C14* & C15*.
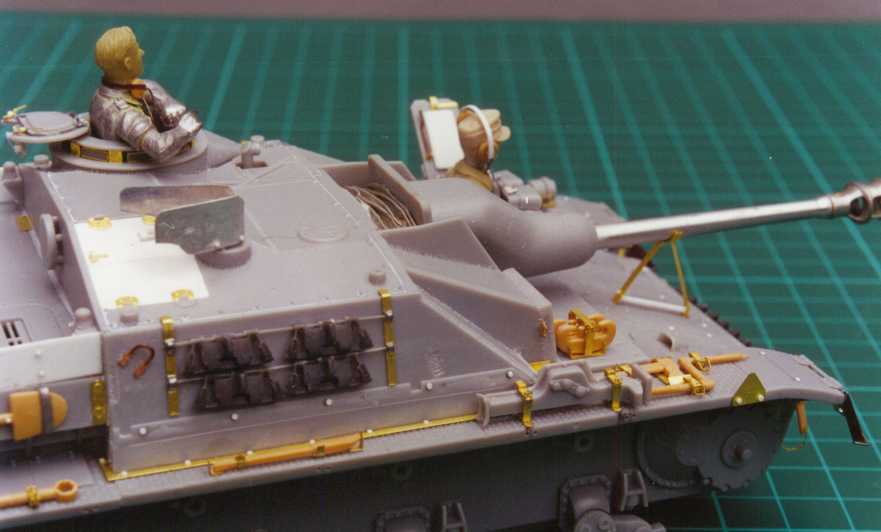
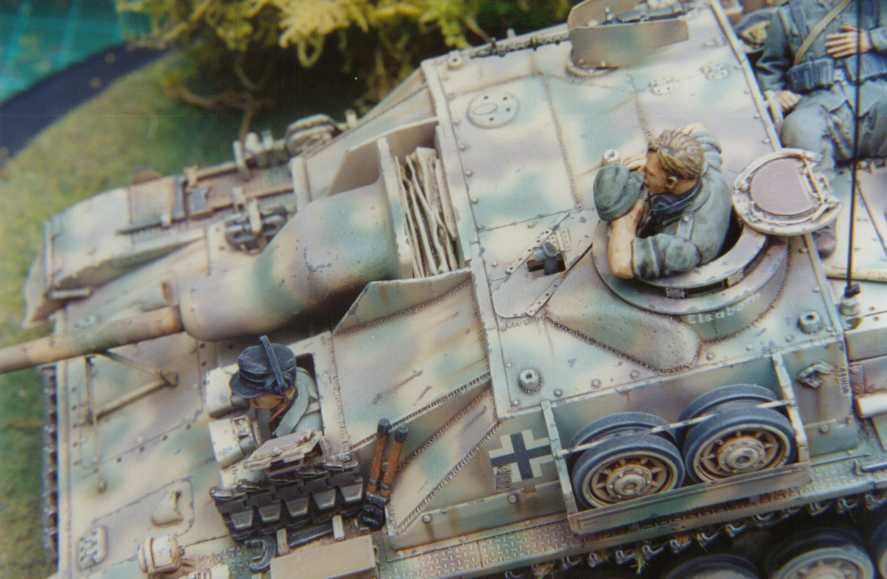
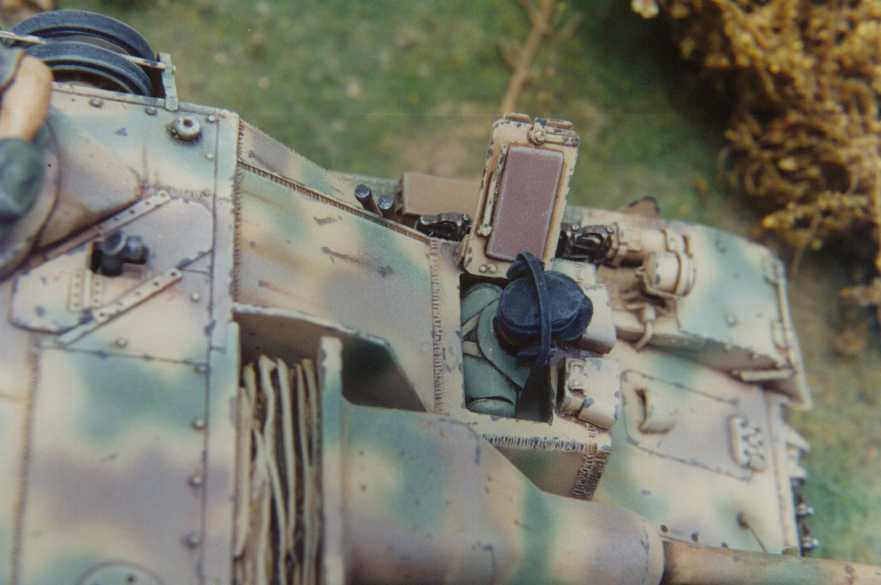
The next step was to glue the major components of the upper and lower hulls together. Before I did this I removed the front mudguards with a razor saw as I planned to replace them and this would be difficult to do after the major parts were glued together. I did use some different parts during this process. First of all is the roof of the fighting compartment. The pictures show that Elsabeth had a late style roof, with remote MG and the loaders’ hatches hinged left and right, not front and back. Luckily the late style roof is included in the DML kit (part No A 30*). Unfortunately the hatches them selves aren’t included so these were made with 20 thou car, detail with Aber hinges and handles. The drivers’ station is the later style, but once again this part is included in the kit, use part No J15* instead of Y6. The drivers hatch (No J25*) was detailed with a head pad made from 10 thou card, brass wire handles both on the inside and outside as well as some P & D bolts. The hinges for the drivers’ periscope visors were made from lead foil, cut and bent to shape and detail with P & D bolts. With the major components all together its time to start some of the more detailed work.
I decided to replace the kit front towing pintles with the better-detailed version from the Tamiya Mark IV On Vehicle Equipment set (Item No 35185). I added bases from 10 thou plastic card detailed with Punch & Die bolts. I also added etched chain to the handles from Abers’ chain set (35 A 16). The bracket for the spare track came from the On The Mark PzKpfw IV detail set (Item No TMP-3518).
The front mudflaps were made from lead foil taken from wine bottle. I used the etched parts from the Aber detail set as a template. The seam at the bottom of the guards was added using anglers’ lead fly tying wire. A quick word on the fly tying wire. As the name applies, it is a wire which is lead-based (although I would imagine it’s actually an alloy now but the name has just stuck) used to tie fishing flies. It comes in various thicknesses and is perfect for modelling. It bends into any shape and has absolutely no spring in it what so ever, so I stays in what shape you bend it into. Well worth tracking down if you can. I used the kit hinges although I added new ends from brass wire. Springs were also added, made from fine wire twisted around a 0.2mm drill shank. Bolts were added to both ends of the springs from the trusty Punch & Die.
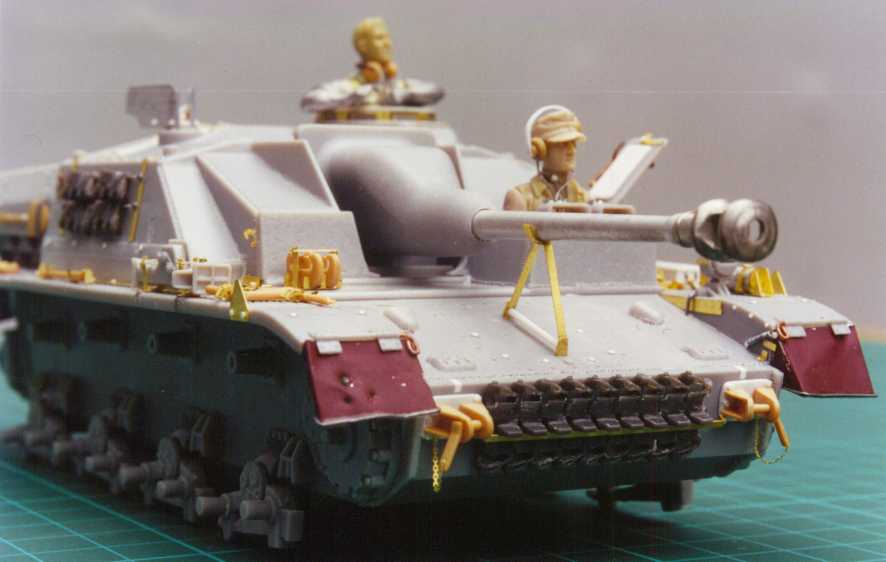
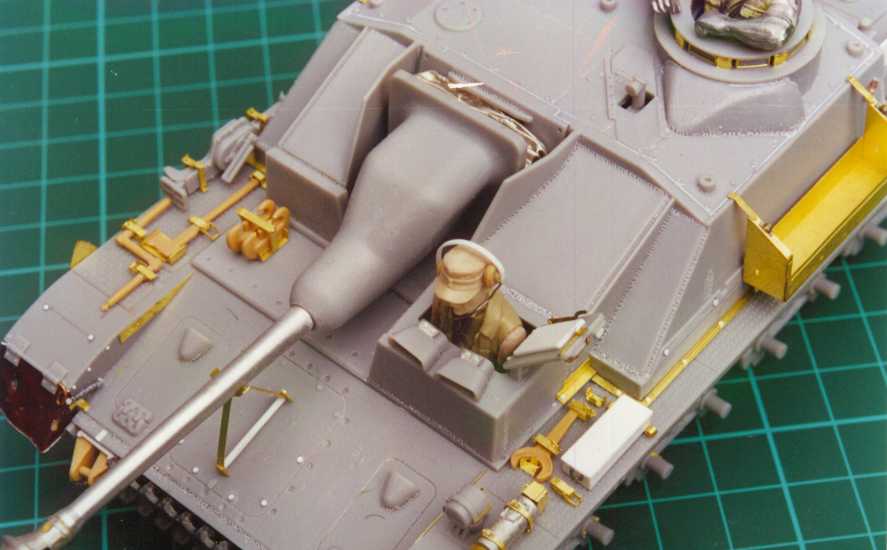
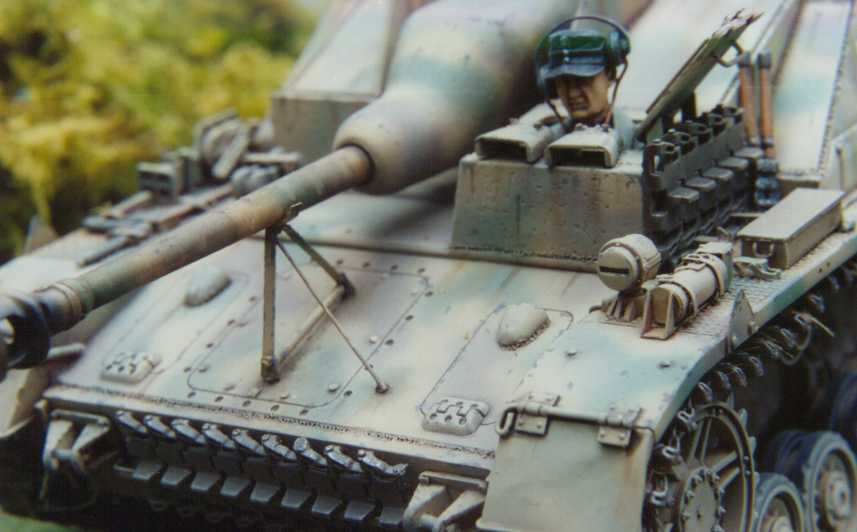
Next the gun was added. I replaced the gun barrel with aluminium one from Elephant. Stugs, both 3s’ and 4s’ had a bellowed shaped cloth that covered the gap between the gun mantlet and the superstructure to prevent dirt, water ECT getting into the fighting compartment. This was added using lead foil bent into shape and glued in. It’s around the gun that we encounter another one of Elsabeths’ unusual features. Some late Stug IV’s had a travel lock, similar to the one seen on late Stug 3’s but on this particular vehicle we have a strange “A” frame type of travel lock which also has what appears to be a release wire as well. I made the travel lock from brass strip and plastic rod. The release wire is just stretched sprue.
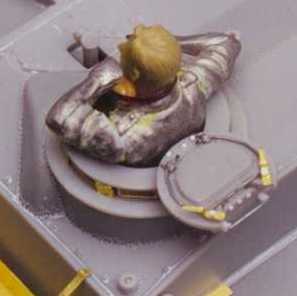
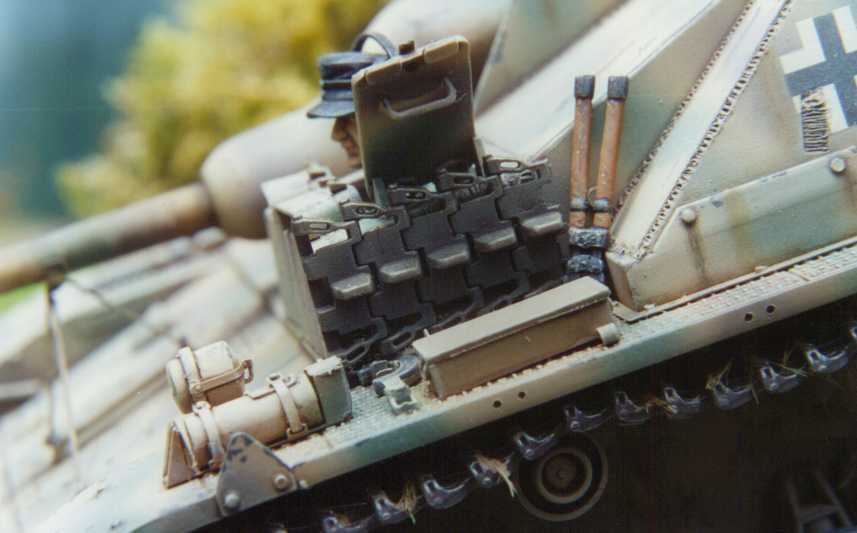
Next came the cupola. You can see the Aber etched added around the cupola. I did a bit of extra work on the hatch itself. I added the “U” shaped wire on its inner face. I’m not 100 % sure of its function, but I think it’s a sort of hinge, to take the weight of the hatch when it is being closed. If some knows please let me know. The locking handles are from Aber, detailed with P & D bolts. The hinged section, which the commander sticks the scissor scope through when the hatch is closed, has a grab handle added from wire and P & D bolts were also added.
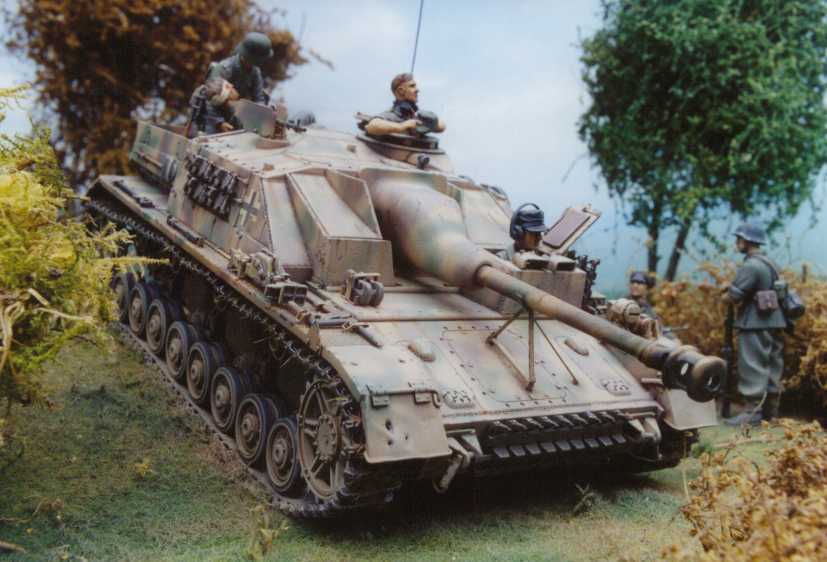
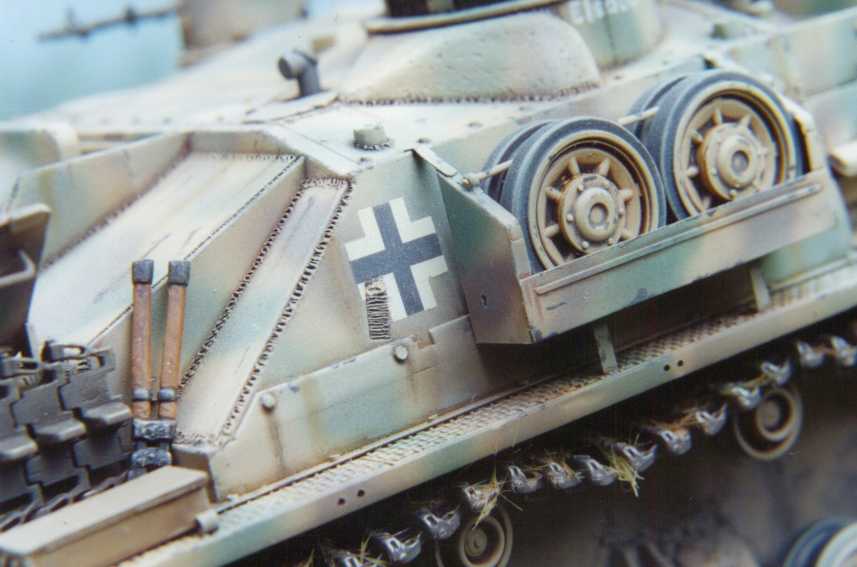
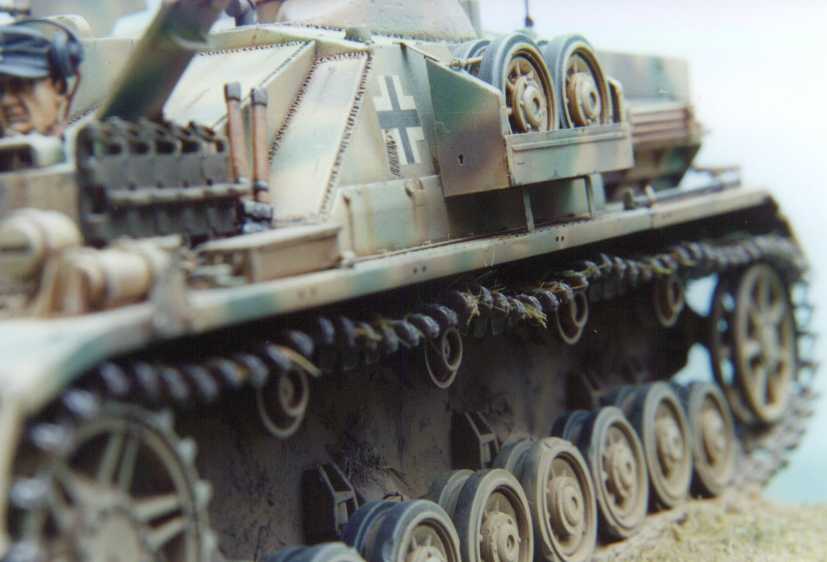
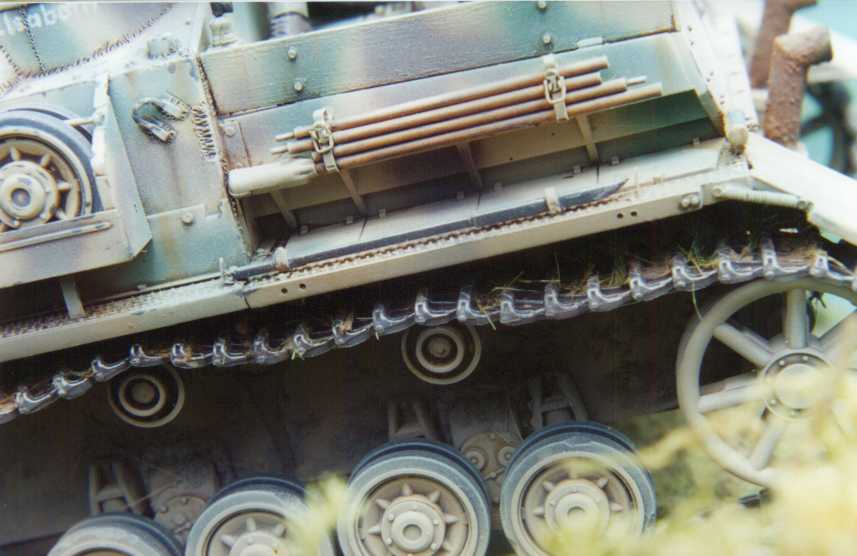
The next strange thing we come across is the storage rack around the rear deck. This is an unusual feature on Stug IV’s. I have only seen two other examples of Stug IV’s with storage racks, and these are the frame types, as commonly seen on Stug 3s. Once again I use a bit of artistic licence with rack, I can’t see a rack on Elsabeth but as the other Stugs in the picture show this feature once again it’s a fair bet my vehicle had the rack as well. I assumed that the rack would be made of wood, as the size is the same on all of them, and appears to be the size of a standard wooden plank. I used 10 thou plastic card and made securing brackets from lead foil, bent into a “L” shape and detailed with P & D bolts. To simulate a wood grain effect on the planks, I ran course sandpaper down the length of the plastic, which left a grain effect on them.
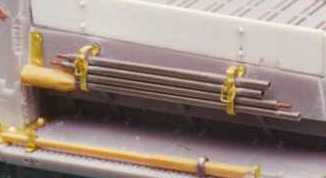
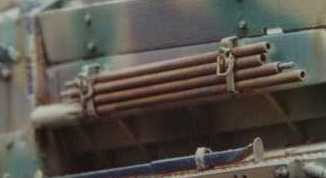
While on the rear deck there was a couple of other things I did. First of all I used the later style cooling water filler cover (C3*) instead of the recommended part (Y5) which is for earlier versions. I also added new grab handles on the rear deck, made from copper wire with the ends flattened with pliers and P & D bolts added. The rear mudflaps themselves were replaced with etched ones taken from Eduards’ etched set for the PzKpfw IV (35-016). The springs for the mudflaps were made from wire twisted around a 0.2mm drill shank and P & D bolts added to the ends. I replaced the tow cable hanging hooks at the rear with ones made from plastic card and coper wire as the kit part (F3) were far to large in my opinion. I replaced the gun barrel cleaning rods with some steel tubing examples from a Spanish company called Minimeca (3512). These are a great little product although I think they are no longer in business. I know Elephant also makes these items as well. The “pad” on the end of the cleaning rods was taken from Tamiyas’ On Vehicle equipment set. The retaining brackets for these are from the Aber set. *Insert image “con2.jpg” & “finish 15.jpg”
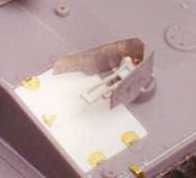
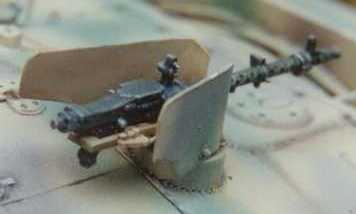
The next thing I tackled with the remote MG. The kit doesn’t come with this so I was left with a few option, try and scrounge one from some where (like a DML Hetzer, the late Stug IV ECT), try and get hold of the Show Modelling white metal version or scratchbuild one myself. You can see what option I choose. Most of the construction was done with plastic card, using the diagrams of a remote MG found on page 84 of Achtung Panzer No 5. The guns’ shields were made from some thin aluminium sheet I had and detailed with P & D bolts. The gun itself was from DML’s German Weapons set No 1 (No 6119). I removed the stock at the end and replaced it with a small piece of plastic rod. I also drilled out the gun barrel.
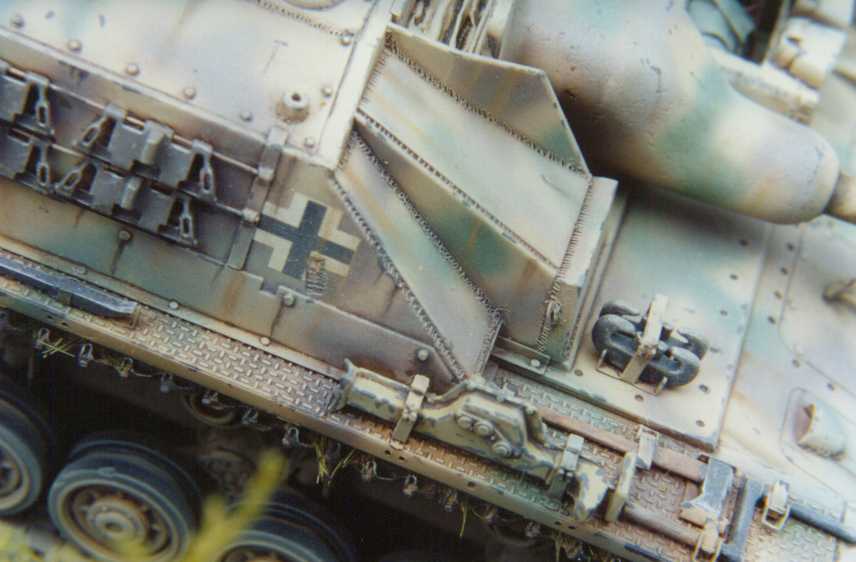
New “U” shaped lifting lugs were added to the rear sides of the fighting compartment. These were just copper wire with their ends flattened and bent to shape. The spare track bracket on the side was altered a bit. I used the vertical uprights from the Aber set. I then drilled the holes in the track links were the retaining pins would go. I used stretched sprues for the retaining rods and lead foil for the brackets that then held them in place.
All the tools were replaced with ones from the Tamiya's On Vehicle Equipment set with Aber brackets added. The jack is the kit item with just some wire handles added and the cranking handle drilled out. The fire extinguisher is the late type from Elephant (35.414) although I used the Aber etched brackets, not the ones that came with the Elephant set. The small box on the front fender was made with 10 thou plastic card, the hinges from lead foil and wire for handles on the ends. Well that pretty well covers the construction part of the model. Next we tackle the painting and weathering.
Painting and WeatheringThis is always a make or break part of a model. You can detail a model to the extreme, doing the most amazing scratchbuilding and converting but if its not painted and weathered well all that extra work can count for nothing. We are living in time now were we are being exposed to some of the most fantastic and realistic weathering finishes ever seen. Gentleman like Mirko Bayerl, Miguel Jimenez, Jean-Baptiste Velhac and Marijn Van Gils to name just a few have taken painting and weathering of a model to new levels, and given people a new bench mark in which to aim for (or slash their wrists in frustration) which ever comes first. I know there are people who do and don’t like this ultra "realistic" style of weathering, and I don’t want to get into an argument on what is right and what is wrong with the "realistic" weathering style. I unashamedly state here that I’m a big fan of this style. It appeals to my senses and what I like and this model represents my first real attempt at trying to achieve a similar style of weathering. Please don’t get me wrong, I’m not for the slightest minute comparing myself to the above mentioned "Demi Gods" of weathering. I’m just saying this is my first attempt and I will tell you how I went about it, using the some of the ideas and technics of the above mentioned modeller’s, modified to suit me to achieve my finished product.
My first task was to pre-shade the model. This is basically spraying a darker colour into all the joins, nooks and crannies. The idea of this is to darken these areas up so when you spray a light base coat over the top the dark colour “bleeds” through, creating shading effect and helping with the sense of depth. For the dark colour I used Gunze Tire Black (H77) thinned about 50/50 with Isopropyl Alcohol. I always use the Isopropyl for thinning the Gunze paints, which I find, works great. Try and work the colour into all the undercuts ECT, even around the running gear and suspension components.
Next step is applying the base coat. For this I mixed a 60/40 mix of Tamiya dark yellow (XF-60) and Tamiya Buff (XF-57). This was thinned to a 60/40 ratio as well. For Tamiya paints I make my own thinners, just a 50/50 mix of methylated spirits and water. I find it’s very well and is a heck of a lot cheaper than buying the proper thinner for the Tamiya paints. I spray the base colour on in light coats, gradually building it up and letting the dark colour show through for our pre-shading.
The next thing is the camouflage pattern. For this I used Tamiya paints again, Red Brown (XF-64) and Olive Green (XF-58). These were thinned 50/50 with the home made thinners. It’s a bit hard to decide which colours are which in the black & white pictures, and in the case of Elsabeth it's a bit harder still as the vehicles look like they have quite a lot of dust blurring out the underlying colour. So I freely admit that the scheme is a bit hypothetical. I basically just sprayed the two colours on randomly all over.
At this point I’d just like to express a few personal opinions on interpreting colours on black and white pictures. I have heard people argue the pros & cons of colours on German models and how this one has the right colours, and that one has wrong colours. I personally would question anyone who states that they can tell you definitely the correct colours of German vehicles during World War 2 especially from pictures. I will layout what I base my scepticism on.
First of all you have the production of colours during WW2. Paints were produced in various factories to RLM standards. But having said this there were many factors that would lead to a wide range of tones and shades (supply of materials, availability of materials, production technics ECT). You then have the application of the paints, especially the camouflage colours like Red Brown and Olive Green. These were supplied as a paste that was then diluted with what was available (water, petrol or in some cases not at all) then applied by airbrush, paintbrush, hand, mop ECT. So not only do you have the variation that could happen with the dilution of the paint, you then had the application of the paint itself which would determine how bright or dull it would appear. On top of that add the effects that weather has on paint. Consider that a military vehicle is going to be exposed to heat, cold, rain, sun, dirt, mud, dust, normal wear and tear ECT and all of this is going to have a dramatic effect on how a colour looks. And to think we are trying to interpret colours, with all of these factors from a black & white picture! Now add to this the dilemma we face with the art of photography itself. I will explain.
A little while ago Stefan DeMeyer put up an excellent post on the Axis Discussion Group on the vagrancies of photographs. He showed how different circumstances (exposure, reproduction, light ECT) can lead to colours looking different from shot to shot, although the pictures are of the same vehicle. I have below a colour shot of a Sdkfz 251 Ausf D.
It is an interesting picture for quite a few reasons. One because it’s in colour and there isn’t to many shots of German armour in colour especially later war vehicles. Secondly it shows the vehicle has a standard post 1943 three-tone camouflage scheme, but instead of the normal dark yellow, brown and green scheme we can see it is actually has two tones of brown. Now I will throw in a curve ball to this equation. I have also included a black & white scan of the same picture.
What do you see? There are three different shades of paint visible. Now if you hadn’t seen the above colour shot you would just assume that it’s dark yellow, brown and green right! Yet in this case we know that not to be true. So what’s to say that other pictures we interpret as dark yellow, green and brown aren’t different shades of brown or green on the dark yellow base coat. Basically what I’m saying is I believe it’s impossible for someone to be certain of a colour, especially interpreted from a black & white picture (even colour pictures can’t be taken on face value) given all the factors that conspire to make it appear something it may not be. Now there is a little scepticism with the picture I have shown above. I have spoken to a few people and its possible that the colour picture shown above has been doctored a bit, I’m not sure. But having said that the black & white picture is a direct scan of the colour shot so the arguments about colour interpretation are still applicable. So in my books if the colour is basically right (in other words not pink with blue spots) to me its good enough. Anyway time to get back to the model.
The next step was the weathering of the superstructure. First step in this process is applying the wash. For this I use artists’ gouache. The colour I used was Art Spectrums’ Van Dyke Brown (G35). I have found that when using gouaches it pays to use better quality ones. Windsor & Newton are another brand I would recommend. It’s the old adage, “You get what you pay for”. I make up a wash with the gouache thinned heavily with water and just a drop of dish washing liquid. This dish washing liquid takes the tension off the water and allows the mixture to flow a bit easier. I paint this wash over everything, making sure I get it into all the nooks and crannies of the model. Don’t worry about neatness, as all the excess will be removed in the next step.
Once the wash has dried (in about 1 hour at the most) the excess is removed with cotton buds (I believe they are called cue tips in the US). I simply moisten the end of the cotton bud, then rub it over the model, removing the excess gouache and leaving the wash colour in all the recesses. You will go through quite a lot of buds, I think I used about 30-40 for this model. I hear you say why not just use a piece of cloth, or maybe a tissue? These could be used I’m sure. But because I basically build 95% of a model before I start painting there are lots of little pieces that could be easily caught by the cloth or tissue and this could lead to parts being broken off or damaged. The cotton bud gives me a lot more control as well as being small enough to get into small and delicate places without causing any damage, most of the time anyway. This is also where the beauty of using gouache comes into play. Even though it is dry, the moisture on the cotton bud “activates” it again, making it easy to remove. It also tends to feather, which helps with the blending process as well.
Now that all the wash is removed we move on to the next step, drybrushing. I like to combine both oils and enamels when I dry brush. I do this for two reasons. First the paint doesn’t dry as quickly. Secondly the paint feathers and spreads better allowing for a more subtle finish. What I usually do is choose an enamel paint (in this case Humbrol) that closely matches the base colour. For this model I used number 72 (matt khaki drill). I then mix in white oil paint (I use Archivals’ Titanium white series 1) to lighten the enamels’ colour. I can’t give a ratio as I just go by looks. I keep adding white until it’s a light enough for my liking. Then using a good quality flat sable brush I just start drybrushing in a normal manner. It is now that you’ll see the benefit of my method. You don’t get that annoying build up or clogging I always seemed to get when I drybrushed with enamels or acrylics by them self. You’ll notice how easy it is to get a nice blended finish. This is done over the entire model.
Next is the paint chipping. For this I used Humbrol's Matt Tank Grey (No 67). This process is a lot harder than it looks. First of all it very hard to be random, or at least make it look random. Secondly it’s difficult to make the chip look like a chip of paint. It does take a bit of practice. I would also recommend looking at real life paint chipping and wear. Industrial or construction equipment is good to look at for reference. One thing I found important to do is regularly clean the brush (to stop paint clogging and drying) and to also regularly stir the paint. The more viscus the paint the easier to achieve small and fine scratches. At this stage I also went around a lot of the edges of areas susceptible to wear with a graphite pencil. This leaves a very nice effect of exposed metal. I concentrated on areas like the edges of the cupola. Next are the pastel chalks. I used a variety of different shades, browns, black, grey ECT. These were mixed into combinations to get the colours I wanted, then worked into various areas, mostly tho give the effect of dirt, oil, grease rust runs. This like the paint chipping takes practice, and I recommend you use a good fine tipped brush as well. Once again its hard to be random and once again the best thing I can recommend is that you look at and study real life weathering. Even looking at the way dirt and grime runs down the side of a building can be very helpful.
Now we move onto the lower hull, which has basically gone untouched til now. First of all I mixed up a batch of static grass, Spakfilla (a putty used for filling gaps and cracks in walls) and some Van Dyke Brown gouache. This mix is to be my mud and dirt. I just use a cut off brush and “stipple” this around the lower hull, taking care to place it places were mud and dirt would naturally gather on a tank like on top of the suspension components, around the base of the rear ECT. Once this is dry I then spray the lower hull my special dirt colour. I say special, as I have no formula for the mix. Its just different shades of browns, some black and I even think there is a bit of red in there. I just keep going until I get a colour that looks right to me. I then spray the lower hull with this colour. I also blend it up onto the superstructure as well. I actually dusted the entire upper hull with this colour, to tone down the base colours and to give the model a dusty look. I sprayed the tracks the same colour as well. When they are dry I just drybrush them with Tamiya Metallic Grey (XF-56). The wheels were also painted my dirt colour. I then painted the rubber rims with Gunze Tire Black (H 77). Once dry I then put Tamiya masking tape on the flat surface of the wheel (ie the part that touches the track) then dusted the wheel again with my dirt colour. When the tape is removed, you get the impression that the rubber is cleaner than the rest of the wheel, which it would be as it is being rubbed against the track so dust and dirt wouldn’t be settling. The drive sprockets, idlers and return rollers were all sprayed my magic mix, then their edges were give a worn effect with both Tamiya Metallic Grey and a graphite pencil. The entire lower hull, including the running gear was washed and drybrushed in the same manner as described a few paragraphs above.
The barrel was weathered a bit differently to how I normally do. First of all the soot deposits around the muzzle break were sprayed on using Gunze’s’ Tire Black again (a very versatile little colour). I gave the whole barrel a wash with Burnt Sienna oil paint, thinned heavily with mineral turpentine. The idea was to give the barrel a used look, due to firing of the gun causing heat to discolour the paint. It was also weathered with the pastel chalks as well. I added some chipping around the muzzle break with a Sanfords’ Prismacolour metallic silver pencil (No PC949)
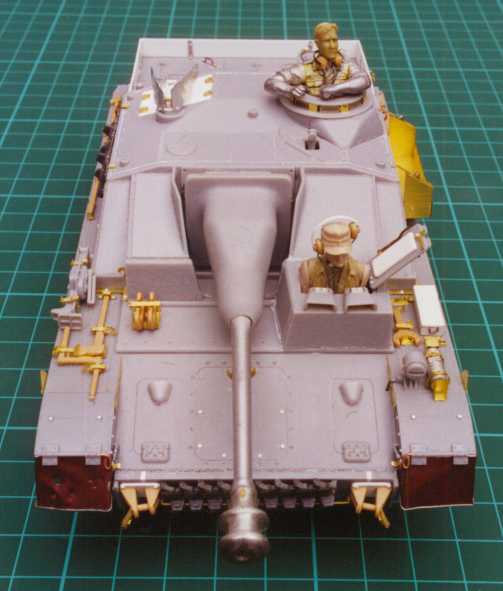
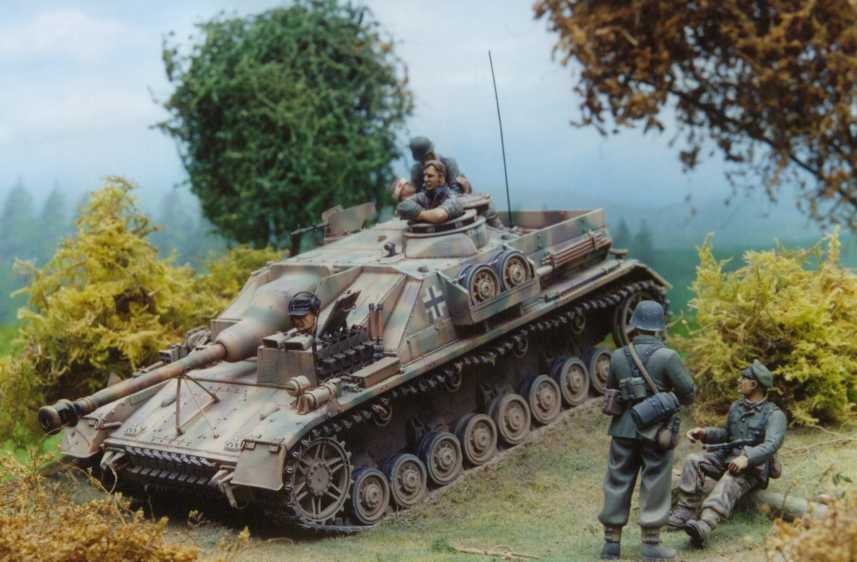
Figures Now we come to the part that I generally hate the most. I’m in a catch 22 situation as I like figures on my models. They help to give a sense of scale plus a human element to the model but I hate doing them. Hate is probably a bit strong. I find by the time I come to doing the figures, which is usually after I have finished the basic model that I am starting to run out of puff. So I probably don’t spend the time on them that I should and as such my figures will never be as good as some of the gentlemen that grace the pages of Missing Links. But for those interested I will describe how I do my figures.
One of the things I try to avoid when I put figures on a model is using the figure straight from the box. I try and modify them in some way, even if it’s as simple as changing the heads.
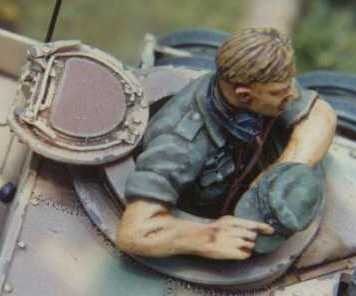
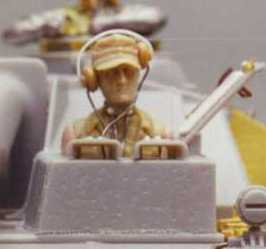
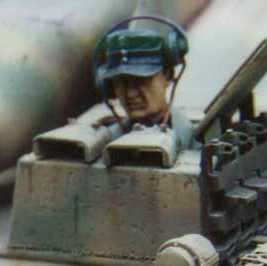
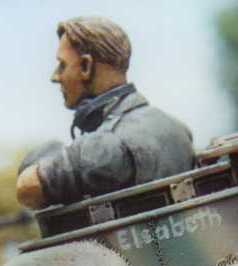
The first figure I will explain is the driver. The body of this figure came from Verlinden's German Engineers WW2 (No 676). The arms were from the spares box although I wouldn't really call them arms, they were chopped so I could fit the figure in the hatch and are more like shoulders. The head is a Verlinden item. The headphones are left over Tamiya parts with a plastic strip strap. The throat mike was made from disks made with the punch and die set and a lead foil strap. The wiring is anglers’ wire.
The second figure is the commander. He is an old Cromwell white metal figure I bought about 10 years ago. I think the set was called German Recon’ Vehicle Crew but I’m not sure. This figure had a new Verlinden head added as well as the communication gear added in the same way as the driver. The hat is from the spares box again.
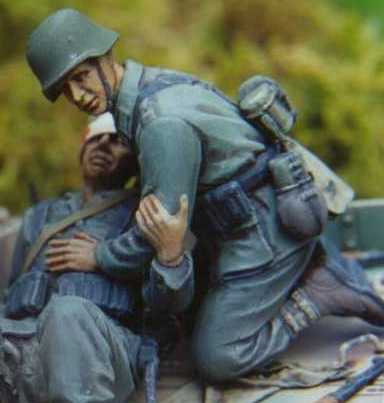
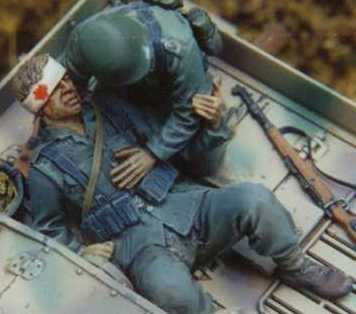
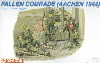
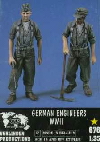
The guys on the rear deck are from DML’s Fallen Comrades (Aachen 1944) (No 6119). The guy kneeling is straight from the box, with no modifications. The wounded guy is a different story. First of all I have modified his right leg. In the original figure it was straight out but I wanted it bend so there was some major cutting and sanding to get it right. The foot was re-positioned and a new gaiter made from lead foil. All the uniform details were ground off with a motor tool and rebuilt using thinly rolled Milliput. The webbing was redone using Verlindens’ WW2 German Soldier’s Gear etched set (No 35032). The head is also a Verlinden item.
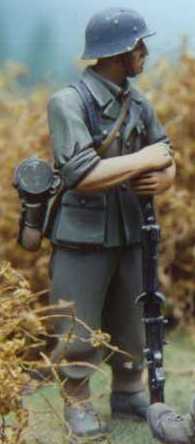
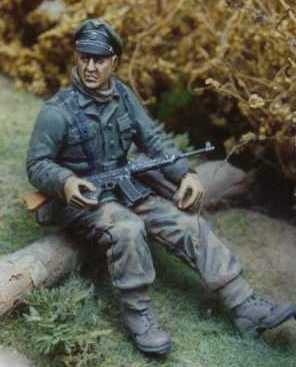
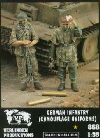
The seated figure on the ground is from Warriors (SS Panzergrenadier Ardennes Dec 1944 No 3 Item No 35015) slightly modified with a different Warriors head and new hands from Verlinden. The guy standing with the MG-42 is straight from the box and comes from the Verlinden set German Infantry in Camouflage Uniforms (No 868).
Next comes the painting. This will be hard, as basically I can't remember half the colours I used. I always use Humbrol enamels, as there are far easier to hand paint with than acrylics. I used various shades of greens and greys for the uniforms, as I wanted to give the look of different uniforms with different colours and shades. Unfortunately I don’t think that effect comes out to well in the pictures. I used the same technics described above for both the washes and the drybrushing. The faces were painted with Gunze flesh (H). I then applied a gouache wash. When it was dry instead of wiping off the excess, I blend and remove it with a very fine brush. The flesh areas were then drybrushed with Humbrol flesh (?) mixed with white oil paint. After all of this is dried I then applied a very thin wash of Burnt Sienna, just to give back a reddish tone to the flesh areas. Details such as buckles, buttons, badges ECT were picked out with the Prismacolour pencil again. I find this gives better control and allows for finer detailing. I also did the scratches on the various pieces of personal equipment with the pencil as well.
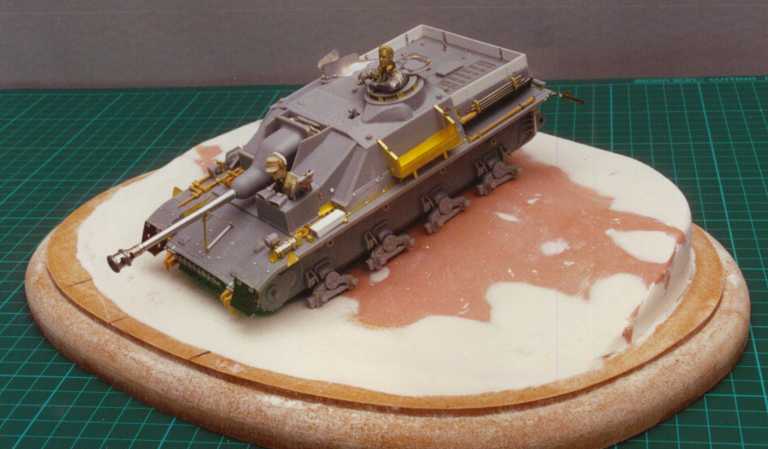
Base The base for this model went a lot further than I had ever planned it to go. My original intension was just to show the suspension articulated. But due to circumstances it progressed a little further than I had intended. A friend of mine routed me up a baseboard (thankyou Bob) but it was a little bigger than I had planned. But I though what the hell I’ll keep going. My next step was building up the groundwork. I made the ridge itself from Styrofoam, cut roughly to size. I then smoothed it all out with a combination of Auto Filler and Spakfilla. I had planned to just have the StuG and nothing else. But when I did test fittings there was a lot of space either side that needed to be filled. So I decided to add some bushes. I made these from dried plants roots, sprayed with contact adhesive and then I added a ground moss that I had found growing in my parent’s lawn few years ago when I was visiting them on holidays. Its great stuff and the colour that you see are its natural colours. I haven’t touched it up and it’s been out of the ground for 2 years now. Great stuff. Unfortunately my parents have since move and I only have a couple of bags left so I’ll have to hunt for another source.
I have to say that I had a lot of help on the groundwork itself, as dioramas’ aren’t my thing (Thankyou Barry Crook). We used railroad static grass, put down so it’s in clumps, which is how it looks in real life not nice and flat as I had originally had it. We used twigs and bindies for the various foliage seen around the ground. All this was blended in using my dirt mix colour and pastel chalks. I used static grass and pastel chalks, mixed into a paste with water to simulate clumps of sod caught up in the tracks while the vehicle was moving. Conclusion Well that about it. Four months work and we have a finished StuG IV. I must say I really enjoyed building this model. I love the subject and have relished the challenges building this particular vehicle has thrown at me. I have tried some new technics that have now opened the doors for me to strive forward into the great unknown (for me anyway). I have to say there is no looking back now. Happy Modelling
References
Achtung Panzer No 5:
Sturmgeschutz IV, Wydawnictwo Militaria No 94 Kits and accessories
DML StuG IV early type, kit No 9038 Aber Sturmgeschutz IV (Early), No 35 044 Aber StuG IV side skirt brackets, No 35 A44 Eduard Pzkpfw IV ausf H, No 35-018 Aber Chains, No 35 A16 Figures DML Fallen Comrade (Aachen 1944), no 6119 Warriors SS Panzergrenadier Ardennes, December 1944 No3, kit No 35015 German Infantry (Camouflage Uniforms), No 868 German Engineers WW2, No 676 WW2 German Soldier’s Gear, No 35032 |
|
|