
Painting Winter Finishes on Vehicles
Chris Leeman (photos by Barry Crook)
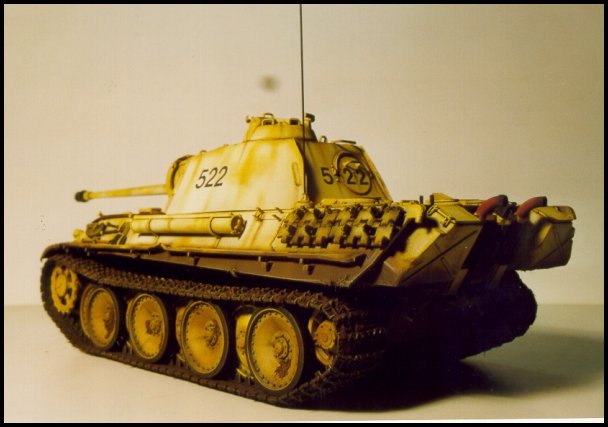
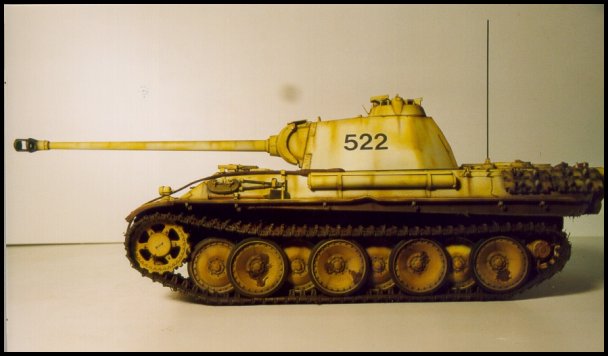
A little while ago I did an article on building the Tamiya Panther G and I have received a few enquires on how I did the winter scheme on the model. Even though I did mention how it was done in the original article (on Hyperscale) I thought I would go into a little more depth and explain my technique on how to achieve this finish.
Painting
The first step is to spray the model in whatever your base colour is going to be. In the case of the Panther I used Tamiya Dark Yellow (XF-60). I always spray with acrylics but if enamels are your preference that will do just fine. Once the base coat was dry I then pre-shaded all the nooks and crannies of the model with Gunze tire black.
For those who don't know pre-shading it's a technique in which a dark colour (usually a dark brown or black) is sprayed into all the joints, crevices and undercuts etc. of a model. It doesn't have to be exact but try and keep the spray width to about 5mm. You will see a lot of aircraft modellers using this method on panel lines and access panels etc. Usually you apply the pre-shading before you do the base coat of the model, building up the colour gradually so that the dark colour will show through your base colour. This gives a nice weathered/shading look to a model.
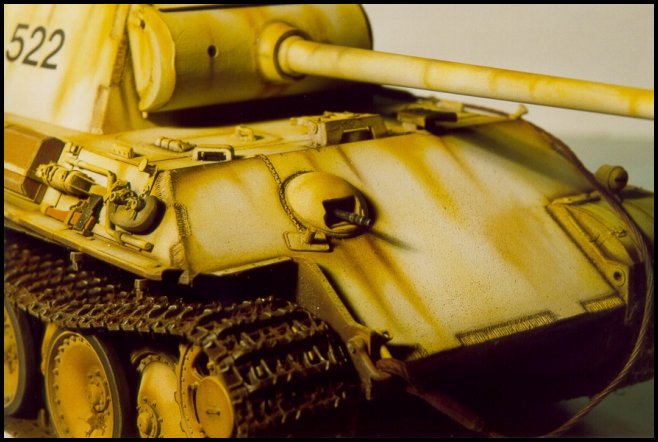
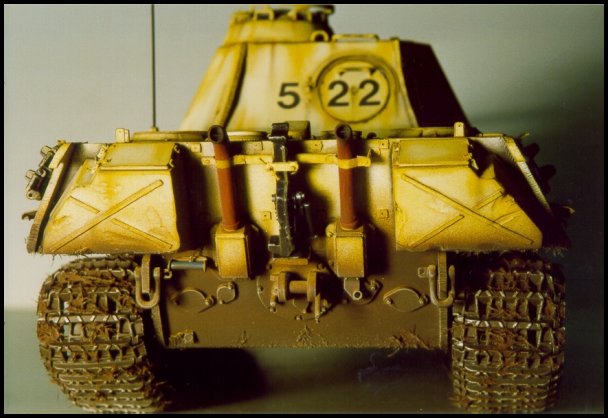
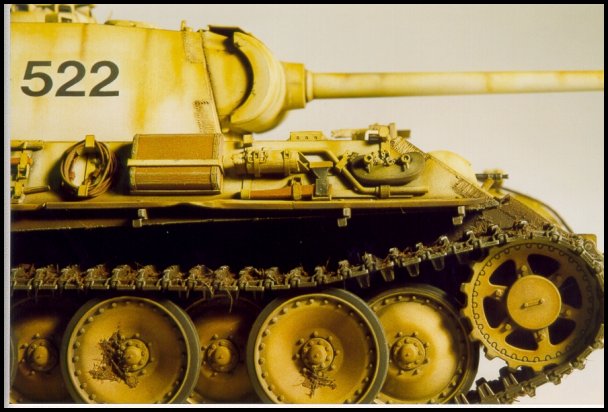
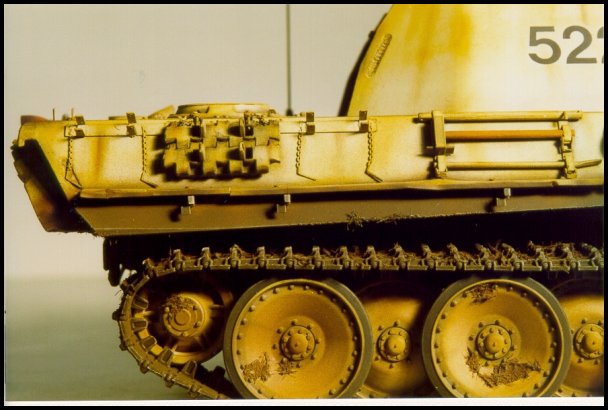
I did it a little differently on the Panther as I was going to have another colour going over the top of the base colour. After the pre-shaded colour was dry I then applied the Tamiya white (XF-1). Now don't apply this in a solid finish but try and do it fairly patchy, letting the base colour show through in some areas. Try and concentrate on letting the base colour show through in areas of high wear, ie around hatches, on edges and the top surfaces of the vehicle.
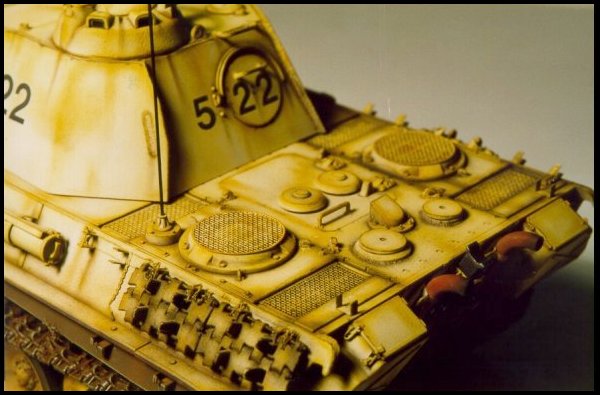
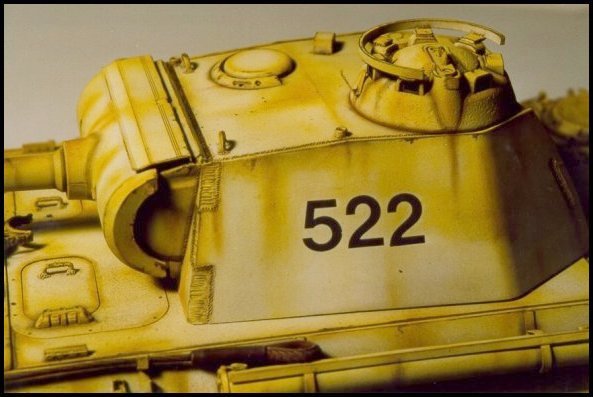
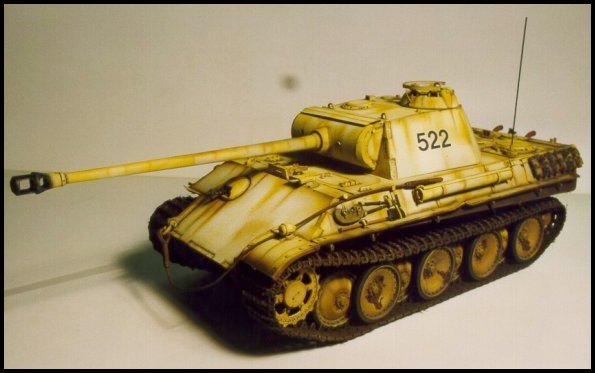
The next step after the paint has dried is applying the wash. I use water based gouache paints to do my washes. I find they are less messy and easier to remove than oil or enamel based washes. I mostly use Windsor & Newton gouaches. They are quite expensive but I have found using cheap gouaches can make it hard to remove the excess later. The colour I used for the wash was Van Dyke Brown. Apply the wash to all the joints, weld seams, undercuts and raised detail etc. on the model. Try and keep the wash fairly neat but don't panic too much. Once the wash is dry remove the excess with a damp, lint free cloth or as I prefer to use, cotton buds (Cue tips in the States!) moistened with your mouth. As I basically build the entire model before I paint it, I find the cotton buds far easier to get into small areas. If the cloth or cotton bud is too moist you will remove too much gouache and if it's too dry you won't remove enough. You will soon get a feel for what's' right. If you use the cotton buds you will go through quite a few doing a model. I use about fifty or sixty per model as they get dirty quickly and don't so much remove the excess gouache as spread it around. After I had finished the wash I applied the markings. I used Letra-set dry transfers for the numbers.
Once you have removed the excess wash the next step is dry brushing. For those people who aren't too sure what dry-brushing is, it's basically getting a colour that is a lighter shade of the base colour, putting it onto a flat sable brush, wiping off the paint until the brush is almost dry and then dusting it over the model lightly picking up all the raised details. Some people like to use enamels, some acrylics and some oils. My preference is a combination of oils and enamels. I find that oils due to their slow drying time and the fact they blend and spread better, are far easier to use than other techniques but what ever suits you go with it. I usually get a close match to the base colour in enamels, I then lighten it with white oil paint and then do the dry brushing. I did do it a little differently on this model as I wanted the drybrushing colour to actually be a close match to the base colour. I mixed up a close match using Titanium white and Yellow ochre oil paints. I can't give a mixing ratio as it was a case of trial and error until I was happy with the match. When doing the drybrushing try and work it heavily into areas of wear and tear, around hatches and raised detail etc. By now you should be starting to get a nice weathered effect coming through.
Pastel chalks
Once the oils have dried (leave it for a couple of days at least) you can then start with the pastels. Pastel chalks are available from most art supply stores and are great for doing weathering. They come in small sticks that you grind into a powder ( I just use a piece of coarse sandpaper) and then apply them to the model with a fine tipped paintbrush. They are great for doing streaking, shadows etc. For this model I used a combination of yellow ochre, dark brown, light brown and black as the main colours. Just grind up some small piles of each colour and get into it. You can use colours by themselves or mixing them together to get the desired effect and colour. For areas of wear I used mostly yellow ochre to enhance the appearance of these areas. I worked darker colours into all the nooks and crannies. Even though you have pre-shaded and washed these areas I feel the pastels give a better-blended feel to it. You can use a mixture of all colours to do the streaking. The effect I was trying to achieve was that the white wash had been applied a while ago and that elements had taken their toll. Most German white washes were a water-based paint in real life so it wouldn't stay on for too long. This is a fairly labour intensive process, it took me about a week to apply the chalks but it's not a thing you can really rush. Once all this was done I went over all the edges and major wear areas with a lead pencil to show where paint had been worn through. Even though the drybrushing and the pastels had toned down the numbers they were still a bit stark so I applied white pastels over the numbers.
Lower Hull, Wheels and Tracks
The next step is doing the lower hull and running gear. The wheels were painted and weathered as described above. The lower hull was sprayed in a colour I mixed using red brown, flat earth and black. The tracks were also sprayed this colour and drybrushed with Tamiya Metallic grey (XF-56). The inner surface of the idler wheel and the teeth of the drive sprocket were also painted in metallic grey. I then made up a mud mixture using Sellys spac-filler, static grass and coloured with Van Dyke brown gouache paint. This was then applied to the road wheels and lower hull with a short bristled brush. After this was dry I lightly drybrushed the lower hull and wheels with a mixture of Humbrol middle stone and Titanium white oil paint. I then put the tracks on and placed the mud mixture on the tracks as well. After painting in all the tools and fittings and giving the model a coat of Gunze flat it was finished.
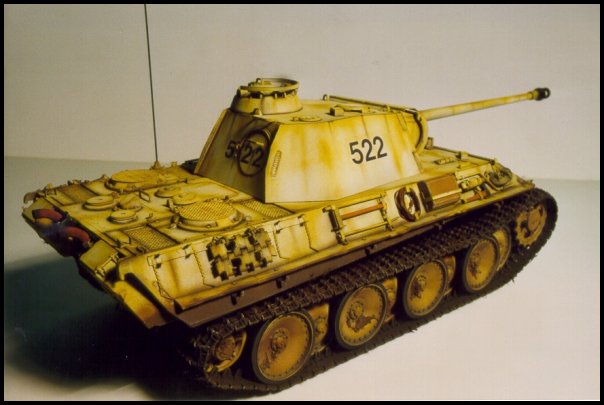
So there you have it. Yes it is a bit of a long winded process and I'm sure there is an easier way to do it (please let me know if there is !) but I feel the end results are worth the effort.
| Main | What's New | Articles | Reviews | Gallery | Think Tank | Contests |