History
June
22nd 1919 the treaty of Versailles was signed and
thus ended the First World War. The Treaty completely humiliated Germany
and set the stage for the next conflict… World War II . One of the many
conditions of that document was to forbid German development,
manufacture or operation of tanks. By the 1920’s the German Government
began to develop and even build prototypes of tracked vehicles.
The Basis for
Germany’s war doctrine called for rapid attack of light armor, supported
by Panzer grenadiers, air support. The 'Stuka' dive-bomber was the
backbone of the air support and the PzKpfw 1B Light Tank was the basis
for the armor attack. PzKpfw stands for Panzer Kampwagen and the 1B
stands for the first tank, second model that Germany put into production
under the Wehrmacht. These tanks were light, fast and easy to produce in
great numbers. Any World War II documentary of the invasion of Poland or
France will undoubtedly show footage of PzKpfw 1B Tanks rolling across
their borders. One of the main reasons for Germany’s superiority in the
in field of armor was that at least one four tanks had a radio. Thus
armor attacks could be made under general command.
PzKpfw 1B (SdKfz
101) was armed with two 7.92mm machine guns in a moveable turret. The
PzKpfw 1B (SdKfz 265) Befehlswagan (Command Vehicle) had a fixed turret
with one 7.92 machine gun mounted to the right. There was also a copula
that made observation possible for a field commander. Both tanks weight
in at around 6 tons and were manufactured by Krupp. There maximum speed
was about 25 mph and there range was 96 miles. They were used in all
German Theaters of combat from North Africa to Russia. However, before
they were even used in conflict, the need for a better-armed and armored
tank became evident. By 1940 the Pzkpfw 1B was German removed from
frontline service to other duties after serving the Third Reich well.
Introductions are
necessary
I must admit that
the idea of building the German "Command Tank" by Zvezda did not inspire
me to visions of grandeur. To tell you the truth, the only reason that I
began this kit was to try a few new techniques that I was wanting to
test and it had to be from the ground up. I had inherited this kit
through an auction on Ebay for a group of models and this one just
happened to be in the mix. Although it was a slow start, I began to
realize what a neat little kit I had in my possession.
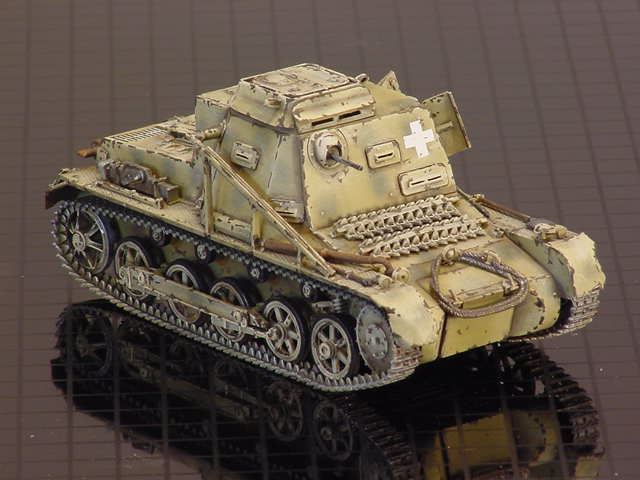
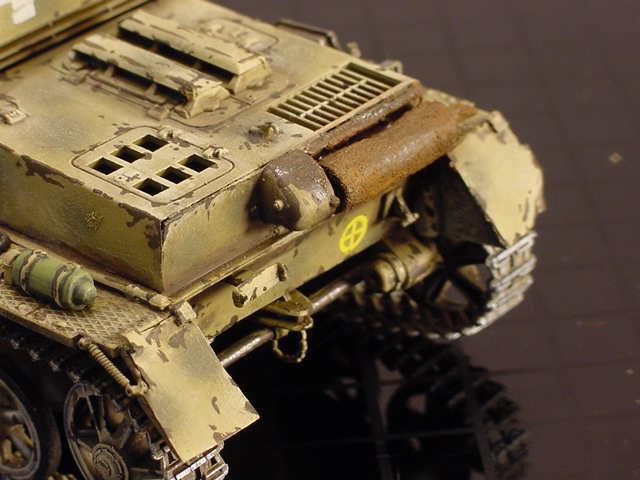
This PzKpfw 1B
Befehlswagan (the name is bigger than the tank!) is in Afrika Korps
colors. I’ve come to realize that my favorite theater of war for German
armor is North Africa. I know this because two-thirds of my collection
is in the desert scheme. The abuse the desert dishes out on metal
objects with heat, sunlight, wind and sand make weathering effects
really challenging and numerous.
Construction
Wheels wheels and
more wheels
Assembly began with
the road wheels that went together very smoothly. One of the best tricks
that I've learned about wheels is from Paine Shepard's book 'How to
Build Dioramas'. After you remove the part from the sprue (with cutters
and not by hand), attach the wheel to a mandrel of your Dremel tool and
as the wheel spins take a file and remove the burs. It's a nightmare
filing all those little round disk by hand. Thanks Paine.
Small
Considerations
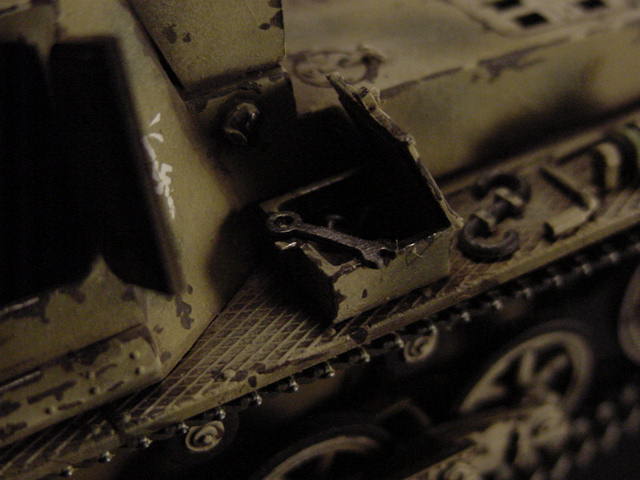
One side of the rear
axial was misplaced, so I replaced it with a piece of brass rod. The
cover to the muffler began to split as I was bending it so I removed it
and made the effect of the muffler more dramatic showing the rust
effect. The toolbox was left open with tools inside and a wrench across
the open box. The wrench came from Italeri's 'Tool and Shop' set and the
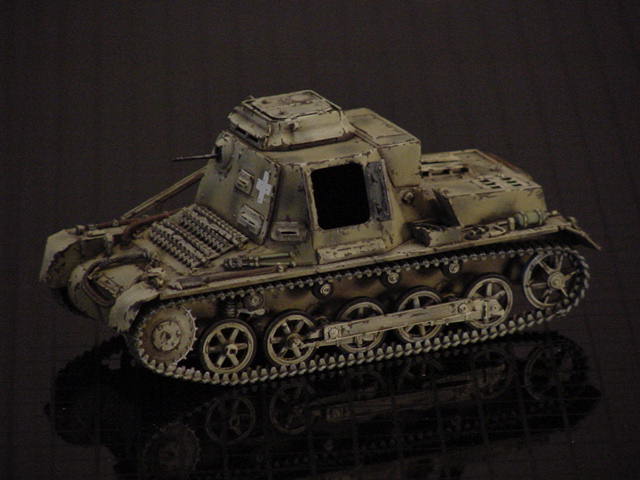
piece inside were various hooks that were extra for this kit. The Side
crew doors were also left open and I’m finishing the figure that will be
popping his head out of the hatch.
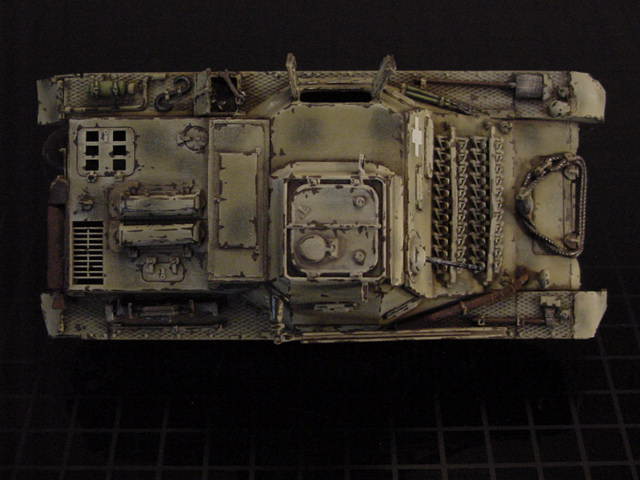
Dented Fenders
All four fenders
were replaced with brass foil. I don’t like to bend plastic fenders
because they usually look melted and not bent. Metal responds like metal
and when you bend it, it looks dented. As you can see, the extra effort
is worth the trouble.
Other than the
above, the kit was built out of the box. There weren’t really any
hitches to constructing the model and it was a real joy. It’s really
great when a plan comes together!
Painting
The first step in
painting for me is to spray the entire model with Poly S Black Brown.
This gives the base color something to grip and adds a rich tone to the
model. Next, I use Poly S German Armor Yellow over the entire kit,
leaving the crevices fairly dark for depth. Then I add the Poly S Dark
Green for the camouflage, which happens to be a leopard spot pattern.
This is left alone for at least 48 hours but usually longer. If the
paint has not completely dried it can be damaged by the wash.
Wash Out
I use the Dry Wash
Method. Instead of drenching the entire model with Burnt Umber and
Turpentine, I localize the wash to the areas that should be shaded. Use
a really fine tipped (00 Windsor and Newton) brush to apply the wash
solution of 30% burnt umber artist oil paint to 70% turpentine. Apply
the wash to all panel lines, recesses and all raised areas. As you bring
the wash to a raised area it will flow into the desired area and settle
leaving a nice shade in the right areas. It gathers area the base of the
piece that needs the wash. Then I let it set for 48 hours.
Dry as a Bone
The entire vehicle
was then dry-brushed using white acrylic artist paint to lighten the
base colors. Be careful with Artist oils for dry brushing. I’ve always
had a hard time with the build up of paint. Acrylics are thick enough
for excellent effects but don’t seem to accumulate. I like to use about
six or seven layers to bring out the detail but also to make the paint
look sun bleached. Each lighter color is almost unnoticed and the
strokes touch less and less of the model until only the very distinct
features are touched with the last application. The real key is to not
leave any brush marks.
Little Details
After the dry
brushing has dried, I paint the details. Always paint the entire model
after you attach the tools. The brackets will match the weathered model
and you can paint the tools on the kit. This really makes the tools look
like they’re really attached by those brackets and straps. Especially
after you add chipped paint and metalize the model.
Rust…What to do!
This is one of my
favorite tricks. Mufflers are fairly easy. Paint the entire muffler dark
brown adding baking soda by sprinkling it on the wet surface. It soaks
up the paint and adds texture to the exhaust pipe. Next dry brush using
a rust color. Then I take a 2B lead pencil and add some metallic
highlights. You can apply Elmer's glue and sprinkle it with the baking
soda and then paint, but I find this works as well and it’s one less
step. I used this technique on the rear and front exhaust. It was also
used on the cover next to the rear muffler with out the real rusty
effects. The final touch is the use of pastel chalk. I shave off a
little brown and ‘paint’ the powder on using on old brush. Then I take
bright orange pastel chalk and highlight it. This is the best rust trick
I’ve found.
Through the Ringer
I like this
technique also. But you have to really like this trick to pull it off.
Tanks are made for
abuse and tearing things up. In the process they receive a lot of
punishment themselves. As I said previously, the desert can be a cruel
mother (nature, that is) and her effects are a modeler's paradise. All
exposed areas on a fighting vehicle are subject to wear from the crew,
shrapnel, things being dropped, scrapes, etc… To show this effect, I
take a 00 Windsor & Newton with a black brown paint and begin to search
for areas of exposure. Along fenders, around hatches, corners that stick
out, towing hooks and brackets. There are thousands of places to add
these little chips and scrapes.
Each mark must flow
with a cause and effect. Why would this mark be here? What would cause
such a scrape? Try not to get carried away because once you start it can
be hard to stop. Just a few can be more effective than too many.
I always make the
shape irregular and I don’t let the color fade out. If you do it will
look ‘painted’. Try to place the scrapes in various spots so they won’t
look too organized and symmetrical. Remember: Everything occurs in
random order so don’t try to make it look too right.
To give it a real
metal appearance, I take a 2B lead pencil and hit the high spots on the
scrapes and chips. And around edges that could be worn.
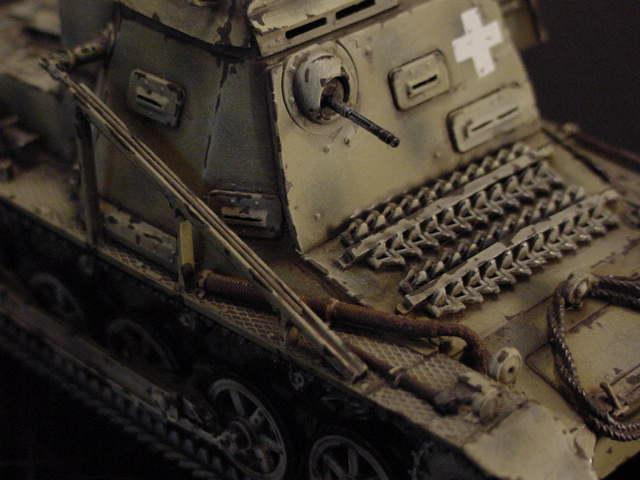
Halt! Who Goes
There?!
I used Verlinden
German Markings for the insignias. These are dry transfers and they work
beautifully. If you’ve never used them you’ll need to practice on a
piece of scrap, but it is really a worthwhile effect. Chips and
scratches are easier to achieve on the marking because they don’t tear.
Last but not Least
Pastels: The wonder effect! All I can say is that it's magic. I apply a
dark brown into the crevices and panel lined to simulate dust
accumulation and shading. Also a rust effect can be achieved using a
bright orange as mentioned above around small handles and hooks. Black
is excellent for the muzzle of a gun, fuel spills around fuel caps and
exhaust pipes. Pastels really seem to blend and tie the model together
so that there are no harsh contrasts.
Little is Much
It seems that the
big boy like the Tigers, Panthers and Jadpanzers get all the glory. I
must admit that I find as much if not more pleasure with their smaller
cousins. Some of the odd varieties are more obscure and take a little
more research that can be fun in itself. Every piece has a story to
tell; I guess it’s our job to rediscover their adventures.
References:
The World’s Great Tanks From 1916 to the Present Day By Roger Ford
1997
Reader’s Digest
Illustrated History Story of World War II 1978
Pictorial History of
World War II: The War In Europe Veterans' Historical Book Service 1953
A Century of
Warfare: Blitzkrieg 1939-1940 Time Life Video V660-06 1994
Photos by John Cochran
