StuG III Ausf G "Short Gun"
Jean Baptiste Verlhac
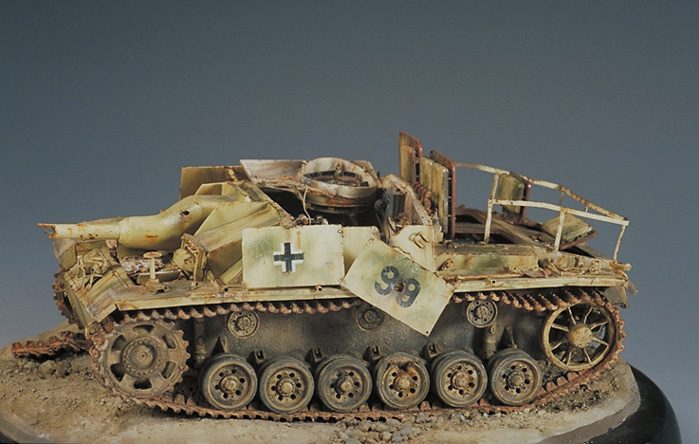
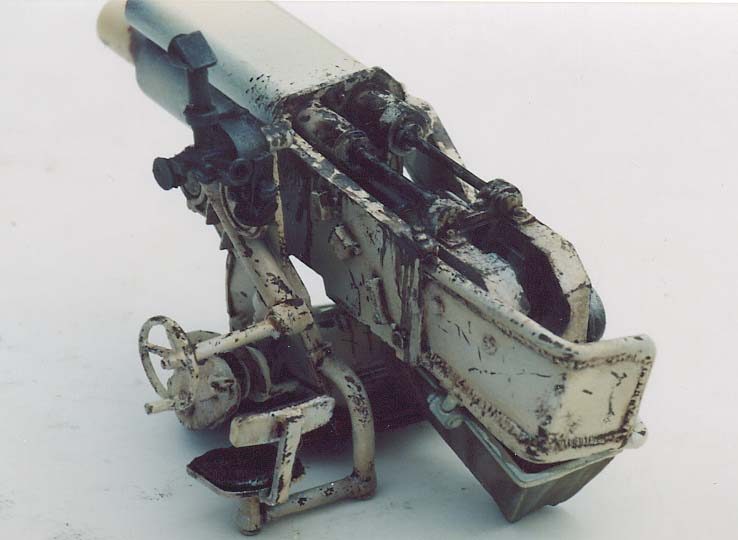
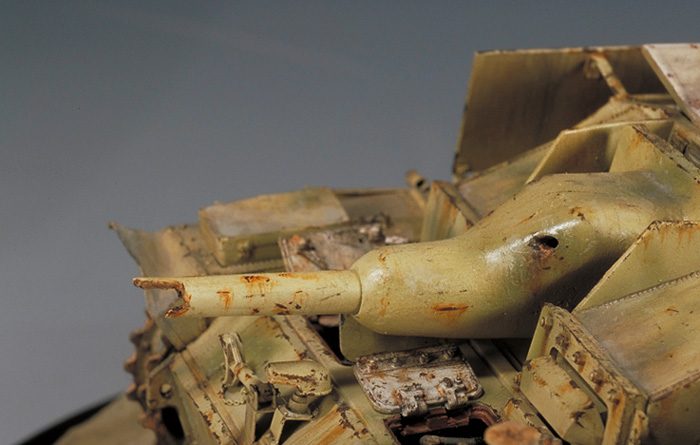
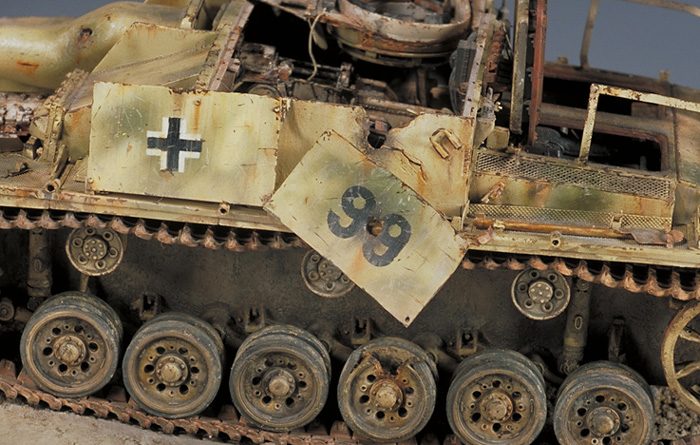
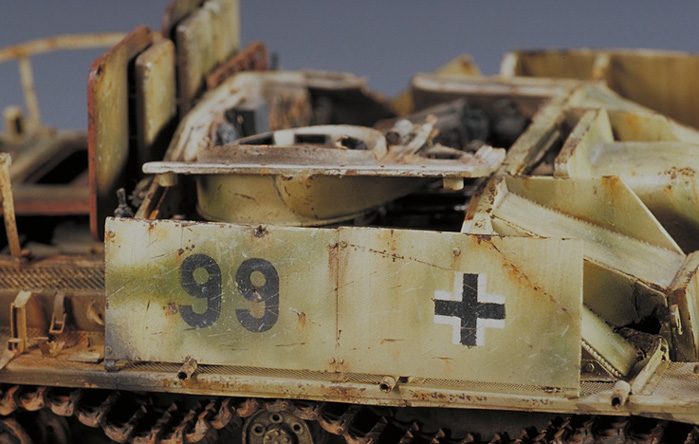
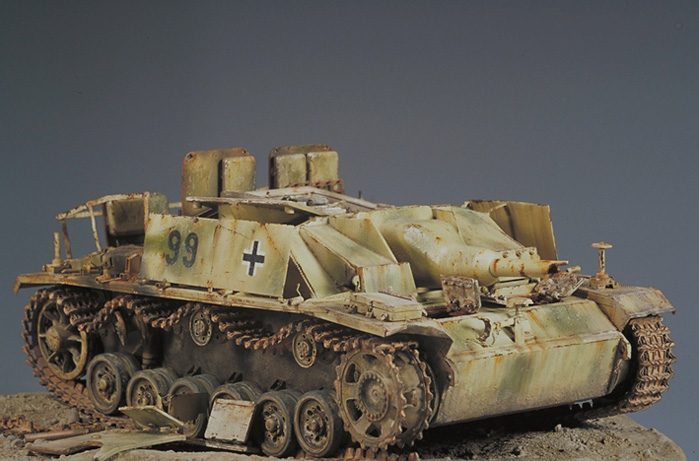
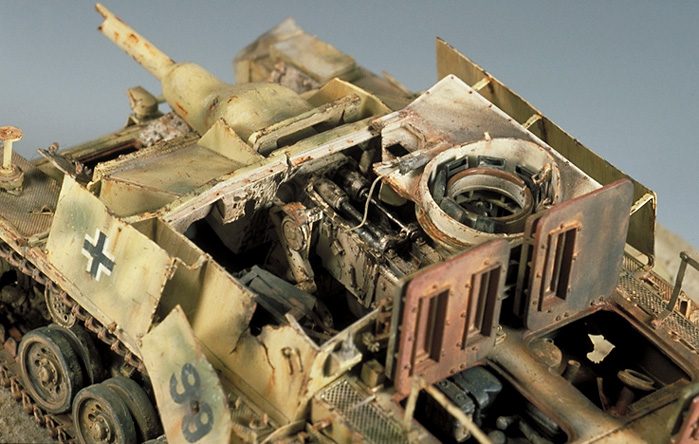
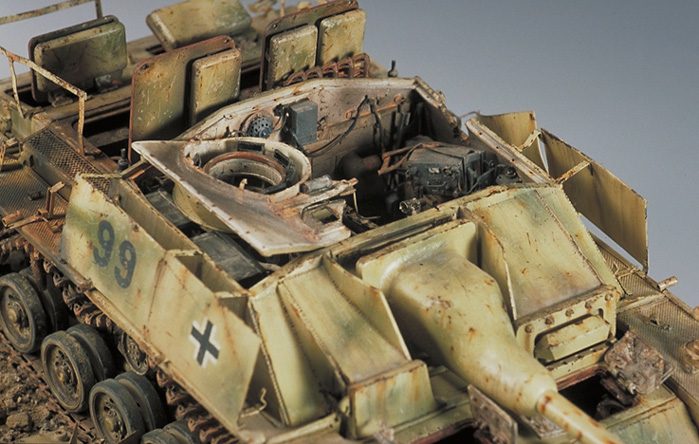
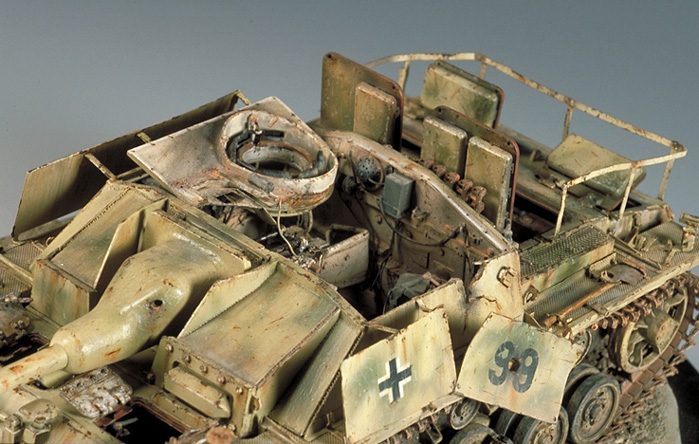
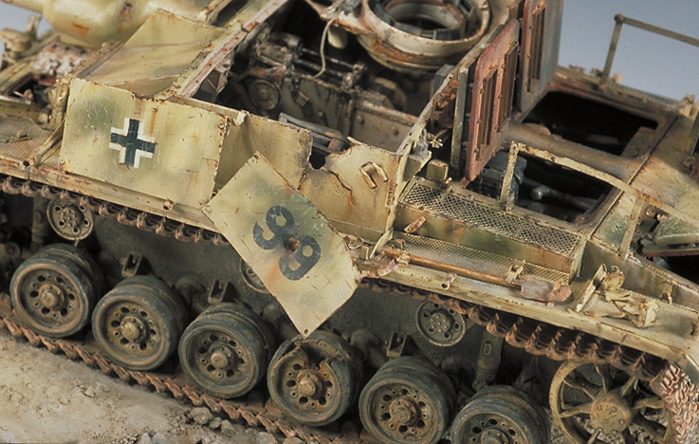
Casting: an actor with original skirtsBuilding and painting a wrecked tank require a lot of planning and documentation work. Indeed one realises quickly that areas that are hidden in a tank in an operating state will appear to the witness as soon as the shield disappeared. To tackle this subject I have consulted many wartime photography and even if they were not chosen, they are very interesting references to carry out structural deformations and effects of painting. Among all these photography, my choice was made on a Stug III G late destroyed in Korytna (Czechoslovakia) in April 1945. The photography, as well as a colour profile has been published in the Czech magazine HPM. This KO'ed Stug is interesting for several reasons: initially it preserved its two tone camo scheme (green and yellow) and is not completely burnt, moreover it seems that he received many shells, one of them has broken the tracks and another one exploded the roof of the fighting compartment. Curiously, its 75 mm gun of is broken (destroyed by the crew?) that inspired this title to me. Moreover it has rather original side skirts that are very similar to those of the Stug preserved at the museum of Kubinka, and I thank Oyvind Leonsen for having provided me valuable references as well as drawings. Two armour-plates are bolted or welded on each side of the fighting compartment by metal struts. The protection of the road wheels is ensured by four almost rectangular plates (on each side) which are fixed in a removable way on an angular rail welded onto the external edge of the mudguards. The destruction history of this tank is rather complex to reconstruct and one can imagine several stories. Indeed, if the photography is well examined, one can notice several impacts on the right side (the left side being the hidden face). An impact appears on the front right of the fighting compartment just near of the bolted front plate, it's easy to notice that a shell has broken the third return roller and the tank tracks, it is also possible that this impact may have started a local fire, the gasoline tank is located just behind. However the tank is not completely burnt, as only dark zones appeared around the engine desk, one can thus deduce from it that either the fire has been under control or the tank did not have more or a little gasoline. In the same way, the 75 mm gun is broken, an impact at this place being rather unlikely (that arrives nevertheless...) from where could it arise? Did the crew scuttle the gun? Lastly, and it is very important for the realisation of the scene, the fighting compartment was destroyed by an internal explosion that have flung the roof away, only part of that one resting on the fighting compartment.
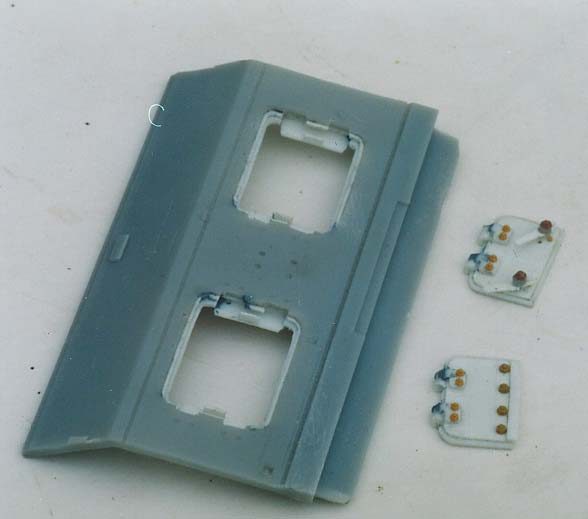
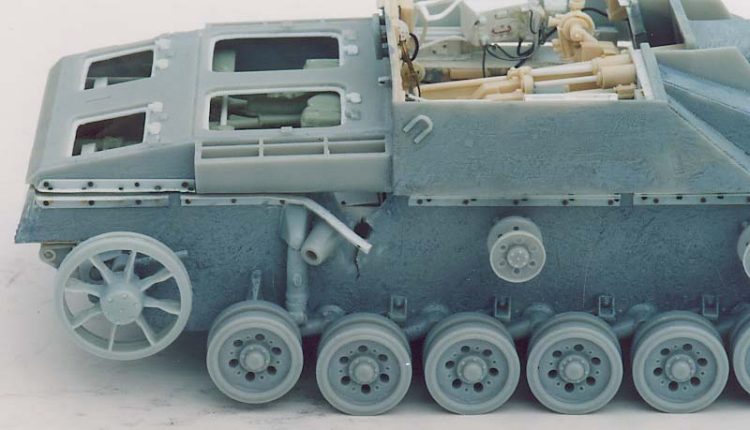
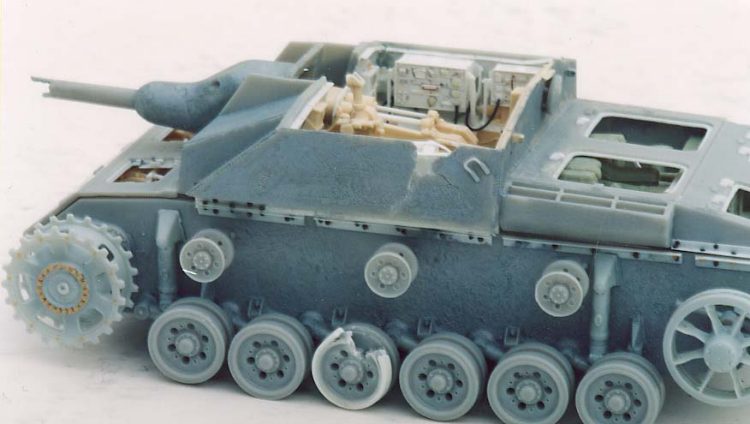
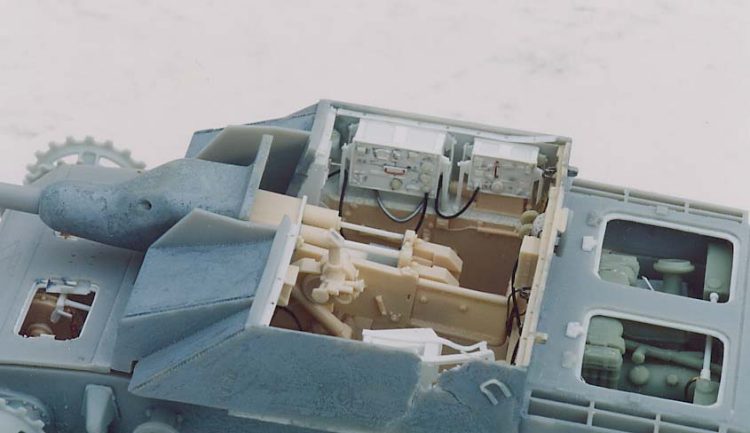
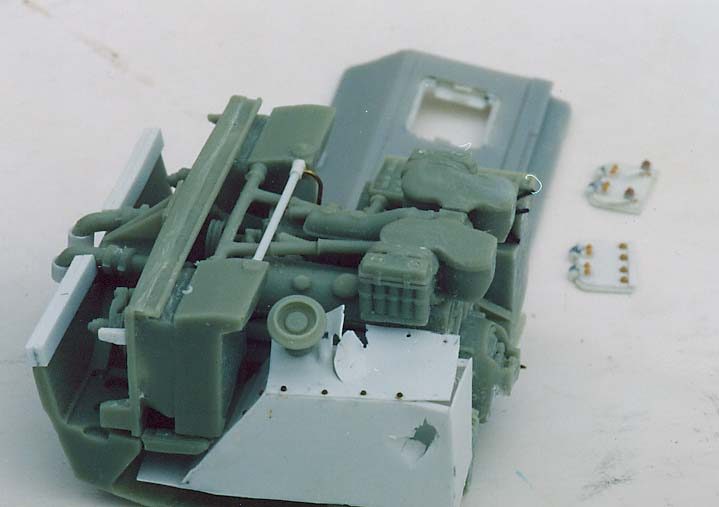
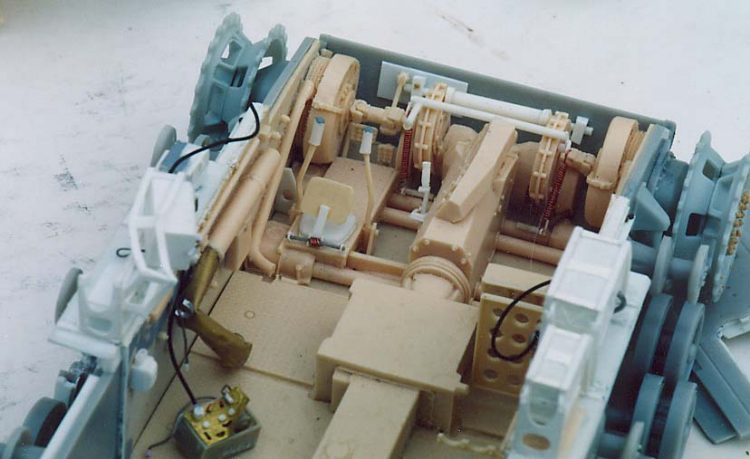
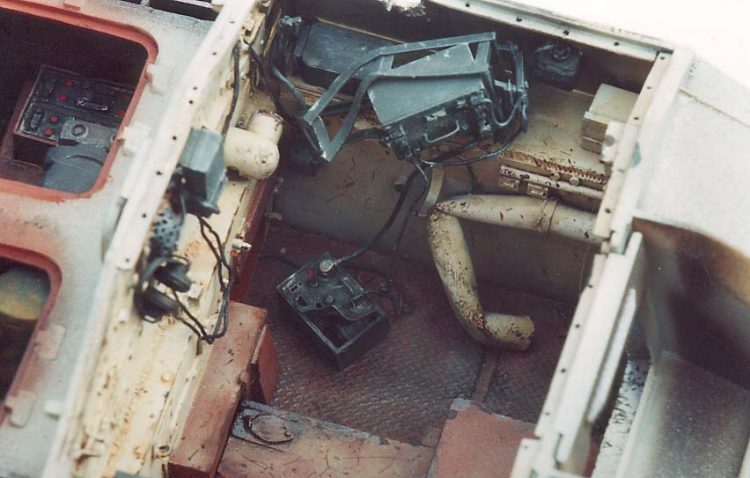
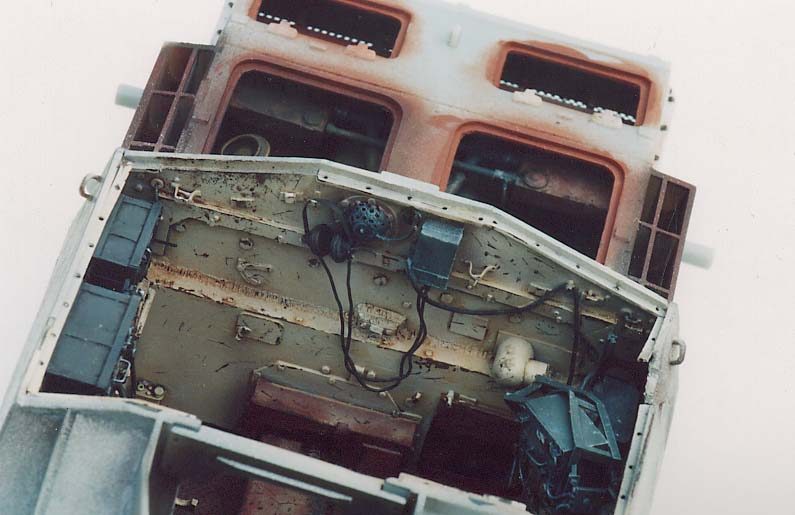
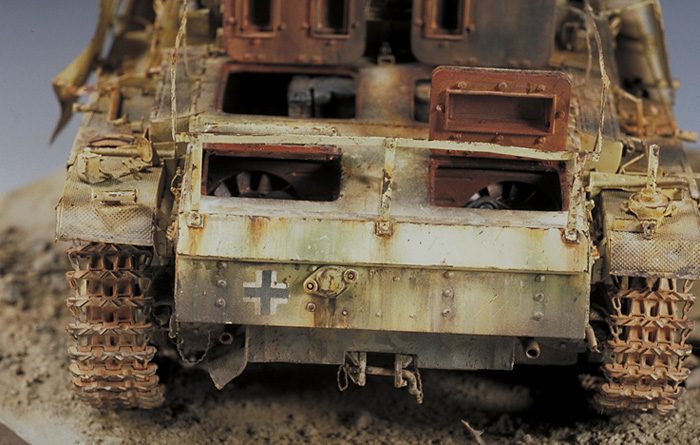
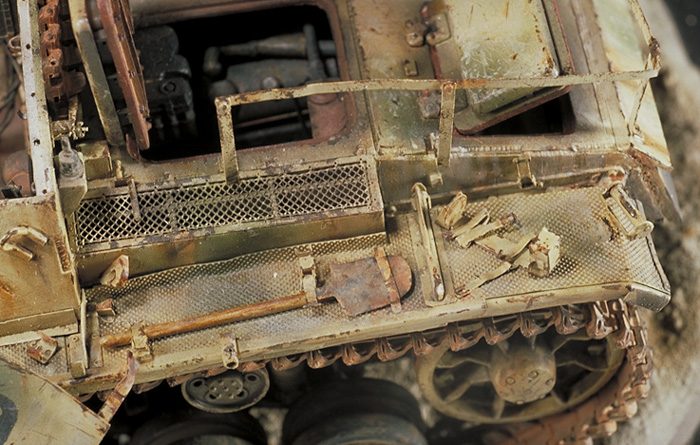
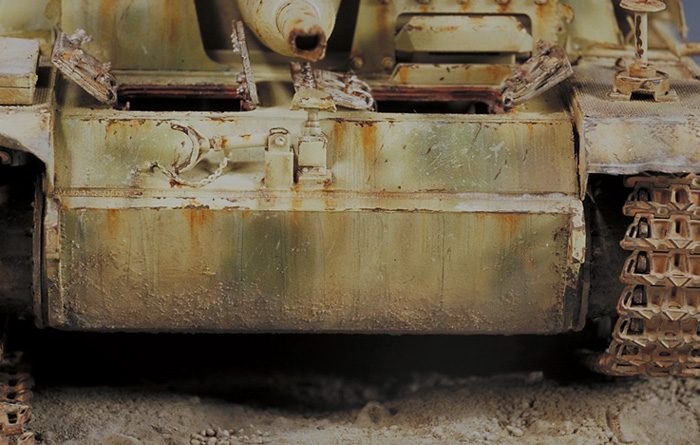
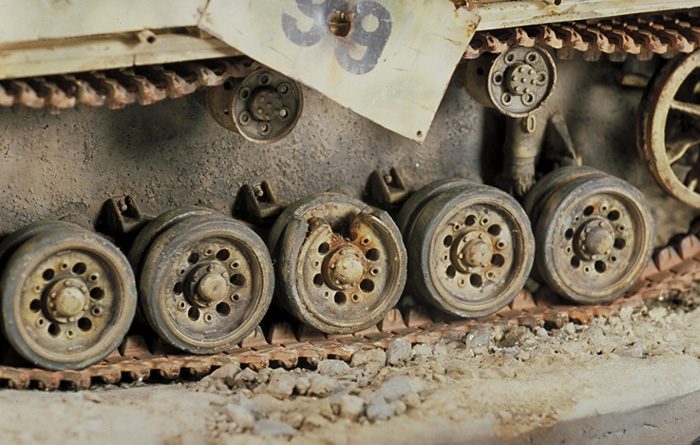
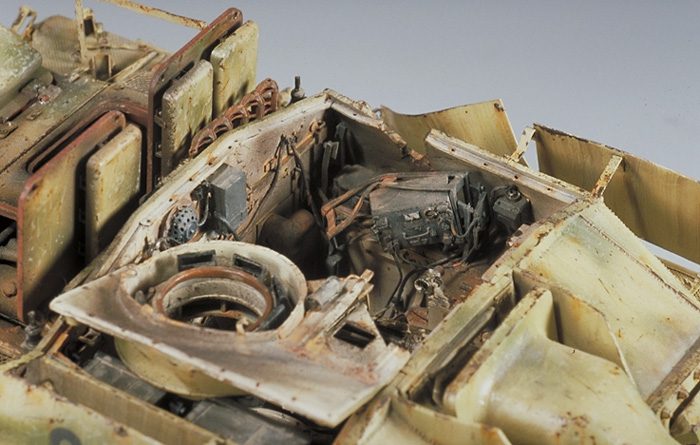
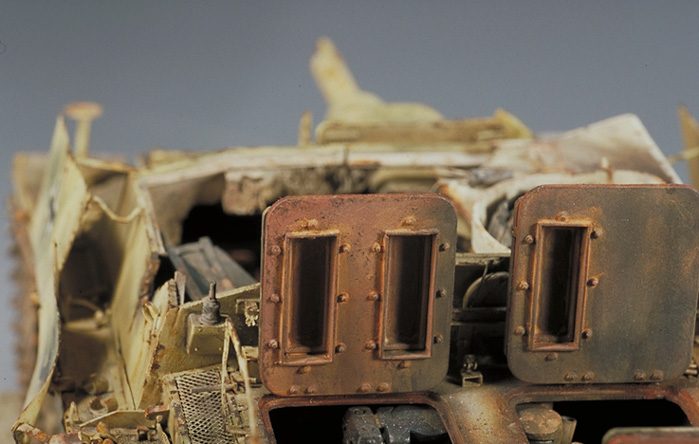
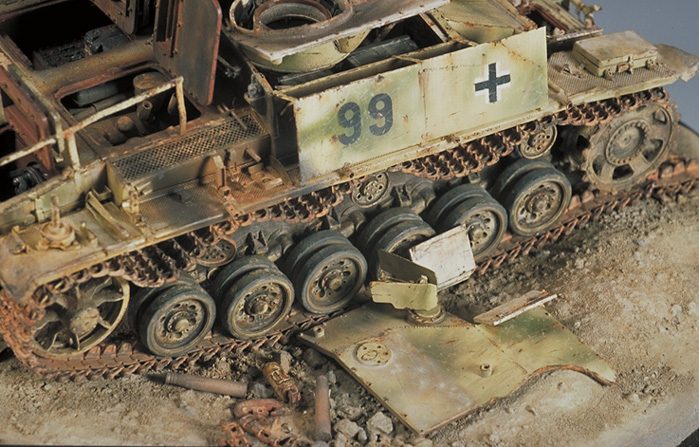
The reconstruction of this tragic event is not so easy to perform, for instance there is not any trace of impact on the right side of the upper hull except the small one on the front hull but it is not this impact which is responsible for the explosion (the damage would be also marked in this area). One can thus suppose that the impact at the origin of this explosion was received on the left side. But of other assumptions can be considered like scuttling... This rather extensive introduction seemed necessary to me in order to show that to tell a history starting from a single black and white photography, of average quality, could become a rather complex exercise. Nevertheless this tank was used to me as a basis to carry out some paint effects common to many destroyed or simply abandoned tanks. Accident while shooting The model depicted here is a Stug III Ausf G late with return rollers out of steel (without gum) and sprocket-wheel not equipped with the central mask covering the attaching bolts I've used the Revell model as a base for this work (it is a copy of the Gunze/Dragon model), the model represents a late Stug III and includes the steel return rollers, on the other hand the sprocket-wheel are relevant to an earlier model and thus must be modified. Various accessories have also been used in order to detail both the interior and the outside of the model. The price of the finished model increases in a vertiginous way with these additions but some of the aftermarket sets have greatly simplified the construction job. I've spent some money in the following products: Verlinden PzIII/Stug III engine, Gunze Stug III interior, Aber photoetched sets (the basic set and the mudguards) and a set of Modelkasten tracks. Finally it is possible to get the correct sprocket wheels as Modelkasten proposes an excellent reference (which I could get only when this project was finished). In spite of this investment it remains much extra detail to add. The fit of the Verlinden engine in the hull is very poor because it is almost 1 cm too high; it is necessary to shorten the air filters to be able to close the engine compartment. The firewall is done in plastic card as well as the gasoline tank (the original is from a plain block of resin. The fighting compartment as well as the transmission included in the kit Gunze adapt without too many problems in the lower hull it is just necessary to make dummy trials in order that everything fits with the Verlinden engine. Some parts of the resin kit were copied using styrene sheet because it is easier to reproduce the effects due to the impact of a shell. That includes to the sidewalls as well as the radio frames. The radios were also completely scratchbuilt because the details represented on the Gunze resin kit are very poor. In the same way, some lever, springs were added to the transmission and the front ammunition rack was done out of plastic. The gun was rebuilt in the maximum recoil position, the weapon having been damaged and the recoil cylinders emptied of their fluid. The most important extra detail work was done on the different hatches (transmission and engine). The front trap doors are moulded with the upper hull and it is thus necessary to cut out them and remake new ones with the shutting mechanism. In the same way the engine hatches received the addition of many bolts as well as the ventilation system. The inside of the fighting compartment roof received the addition of some elements cut off the Gunze resin part. I was wondering to know how the roof rested on the fighting compartment after the explosion. Cautious observation of the original photography revealed that the opening that could be noticed on the roof could not be the machine gunner hatch but more probably the commander hatch. Effectively, one can realise that it is probably in that area that the roof is more fragile since not only there is the commander turret but also the opening for the gunsight. I thus deduced that the part, which rested on the fighting compartment, was to be that containing the commander hatch. It is nevertheless necessary to reproduce all the interior of this area with periscopes. The interior will be painted before closing the lower and upper hulls but it is initially necessary to reproduce the attachment system of the two half-cases between them. They are joined by bolts fixed on two angular profiles. One will also reproduce the attachment system of the mudguards, those of the model have been replaced by Aber references. The outside is detailed with photoetched elements from Aber as well as plastic card. The road wheels are not aligned as this appears clearly on the photography (the ground is not flat). This operation requires a small surgery on the suspension arms, which are moulded with the lower hull, in order to reposition them differently. The area near the impact on the last return roller has been detailed, in the same way I had fun to reproduce an impact of small shell on one of the wheels on the left side. I have removed the rubber by fixing the wheel on a mini drilling machine and by taking off the plastic with a cutter, then I reproduced the damaged zone by sticking a new rubber belt. The area near the mufflers is also detailed with plastic card because nothing is represented in the Revell kit and this part is visible when the back engine hatches are open. The supports of the spare wheels are not fixed on these hatches, as it is often the case (this is very obvious on the photograph since these trap doors are half-opened). I thus consulted some references and although many modifications have been made on the battlefields, these supports are often found on the mudguards in front or behind.
The makeup is trickling down The interior is painted with red-brown primer colour (Humbrol 133+70 or 113) and one lets dry the model two days. Then the interior of the fighting compartment is coated with a mixture of Tamiya acrylics (XF2+XF60+XF57). The details are then hand painted with Humbrol paint (transmission, floor, seats, radio etc...). After a substantial period of drying one carries out the weathering of the interior. The dusty aspect of the floor is reproduced with acrylic washes and pastel powder suspension in alcohol. Then one carries out chipped paint marks on the area, which are used by the crew. The oil stains around the gun are reproduced with clear Humbrol varnish diluted and tinted with oils of black or dark green color. Once this work is completed one gives a little coat of black (very diluted in the airbrush) around the impact zone and the final weathering is done with powdered pastels. The two halves are glued together and the apertures are masked with Tamiya tape. The whole model is coated with yellow obtained by mixing the following Tamiya hues: white (XF2, desert - yellow (XF59) and yellow green (XF4). Then spots of green (a rather dark green according to the colour profile given in the Czech review: XF5+XF65) are airbrushed paying attention to vary the density of the colour within the spots. The burned areas are reproduced with various colours (chestnut, rust, orange and black for smoke), markings are applied using adhesive mask. After complete drying during several hours, filters of various tints are applied to the surface (refer to the article published by Miguel Jimenez MIG) in order to give depth to the model and a larger chromatic variety. One passes then to the ageing of the painting, which on this kind of model is rather long. The chipped paint marks arose from different sources. Some very light ones only removed the layer of dust upon the paint letting appear a clearer or darker hue, some more pronounced will removed the green colour and reveal the yellow underneath which is generally painted first. Finally more significant shocks let see either the red-brown primer or the metal. Very light coats of dust (Buff XF 57) are passed with the airbrush on horizontal surfaces and in the places where dust accumulates. This effect is reinforced with pastel powder diluted with thinner. The tools (or rather what remained) are painted with Humbrol paint for wood and metal, then the wood parts are treated with Windsor and Newton oils in order to represent the veins of wood. The tracks are painted with a black- brown colour (Tamiya) then of many juices with Vallejo tints (chestnuts clear, orange, beige, etc...) are applied.
Under the floodlights The base is a circular piece of wood on which one applies the ground with modelling clay that hardens in the air. The vehicle is placed on this base paying attention that all the wheels are in contact with the ground. The ground is then decorated with stones of various sizes glued on the clay. Gray-ochres tints are sprayed with the airbrush then the small details are painted with Humbrol (in particular one will endeavour to vary the colours of the bulkiest stones). In order to give more relief to the ground a very light wash is done with a brown-black mixture, the small details are then hand painted with Vallejo acrylic. Finally powder pastels are applied in order to give a dusty texture. I want to thank Miguel Jimenez MIG to have provided not only the reference photography of this Stug but also for his constant supports during this project.
The paper and French version of this article will normally appear in the N�48 issue of modelling Magazine Steel Masters References : Sturmgeschutz III Militar's kits Hors serie n�3 MK Editions Stug III Ausf G (2) G. Parada, Kagero Editions Sturmgeschutz III, Ledwoch , Wydawnictwo Militaria Stug III German assault Gun, Gray & Crosby
|
|
|