
Correcting Italeri's Panther Ausf. A
John Gray
Kits or Materials Used:
Italeri Panther Ausf.A No.270
Aber Panther A PhotoEtch No.35006
Jordi Rubio 7.5cm L/70 Aluminum Barrel
Anvil Miniatures Resin ‘ClickLink’ Tracks No.AM-35T06
Tamiya Panther G Roadwheels & Drive Sprockets
Cavalier Resin Zimmerit No.0105
We all know how this kit has been trashed on the Internet, and I must say for good reason. This said, it provides at least a good starting point for an accurate Ausf.A and built straight from the box, can still provide a handsome model. I have to also say out of the gates that I have already built the Italeri kit awhile back, when I first re-entered the hobby. I built it OOTB, including the horrible plastic zimmerit panels – it never occurred to me to at least sand them, and nick them up a bit – oh, well. As my skills have developed over the past couple of years, I realized I had to build it again, but would do a lot of things differently. Rumours have been circulating ever since the release of Tamiya’s Panther G series that they would follow up with an Ausf.A (and even a ‘D’), but thus far these have not materialized – and as a self-confessed Panther freak, I couldn’t wait any longer!!
I will work through the changes made to the kit, in the order they appear in the instructions. I did skip around at various times, adding PE, leaving certain suspension components off until near the end, etc. – but the following will give you a good idea what was done and why:
Step 1: (Lower Hull)
Not a lot to change here, although I quickly performed the following:
- added PE bolt plates to inner final drive mountings
- textured small track return wheels with a Dremel
- replaced rear towing shackles with spare Tamiya items
Step 2: (Hull Rear Plate)
Cavalier provides the entire rear plate in flexible resin, but it was too large so
there was some trimming required. In fact, so much that I used only the portion
between and below the stowage bins, leaving their mounts intact from the Italeri rear
plate.
Don’t be tempted to use Aber’s heat shields (mounted to the inside of each
stowage bin), as this is a feature of the Ausf.D, not the Ausf.A
Step 3-6: (Running Gear)
Only the inner 3 sets of roadwheels, as well as the idlers, were mounted at this time, to allow easier painting/weathering of the suspension later. The tracks were of course also left off for later. In hindsight, I should have left the idler mounts unglued to aid in better mounting the tracks….. The roadwheels used are the spare ‘dished’ set from Tamiya’s SteelWheel Panther – if you want to build a G, buy this kit – you get two full sets of roadwheels (one dished, the other steel of course) as well as periscopes for the cupola, and 3 full sets of the commander’s IR set – a terrific value, as the other two Tamiya G’s do not include these items. I must stress here that if you wish to build Italeri’s Ausf.A without as much work, do at least replace the roadwheels, as they are one of the worst parts of the kit. Their rubber portion is too wide, the lip that separates rubber from wheels sits to ‘proud’ of the surface, and the detail on them is very soft and inaccurate.
Also added at this time was the Cavalier lower hull side zimmerit. The Cavalier product, while not a perfect fit (surprising, given the package states ‘Fits Italeri Kit 270’), is a breeze to install. You simply sand lightly both the backs of the zimmerit pieces, as well as where you are to apply it on the tank, then use super glue (or 5-minute epoxy, as Cavalier recommends) to bond them.
Step 7: (Inside Lower Hull)
To Italeri’s credit, they do provide sponson bottoms as well as ‘boxes’
to blank off the engine deck openings (how’s that for a technical term?).
- added Aber’s schurtzen hanger mounting plates to the sponson undersides
- applied Cavalier zimmerit to outside of driver’s visor
- replaced hull mg with one ripped out of Tamiya Panther (I had one I was unhappy with,
and it suffered the indignity of having pieces torn from it continuously!)
- painted inside of parts 36B (boxes under engine deck) matt black
Step 8: (Upper Hull Zimmerit)
Hunk ‘o’ burnin’ zimmerit – the glacis piece only needed minor
trimming, but the upper hull side pieces were a bit of a pain. I centred them as
best I could, and left the trimming for later. The upper and lower hull were now,
very carefully, joined using Super Glue. I found that only the hull front needed
some filler. Also, I discarded Italeri’s schurtzen (supplied with or w/o
zimmerit coating), in order to better show off the track sag. (plus the parts are
very incorrect)
I also thinned the armoured periscope covers for driver/co-driver with a sharp knife
Step 9: (Engine Deck, Hull Rear, Upper Hull Detailing)
I decided against using the engine, although what is supplied is not too bad if
carefully painted and weathered. Part 55B (ventilator opening) was replaced with a
Tamiya part.
The following changes/additions followed:
- Cavalier stowage bins used, w/Aber hinges and 3pc latches. The latter seem a
little oversized, but still look terrific
- Used Aber stowage bin mounting brackets, which attach (3 each side) underneath the bins
- Between exhaust stack and stowage bin on the right, Aber’s amazing jerry can rack
was assembled. A fiddly bit, but well worth it once done (two racks are included, in
case you’re building an Ausf.D)
- A tiny part number was shaved off a scrap sprue and applied to the left side exhaust
mount
- Towing pintle replaced with Tamiya part, with Aber chain added to each side
- Jack was left off entirely, in order to show off the PE brackets better. If you
wish to use a jack, do not use the one from Tamiya’s OVM Set as it is too small for a
Panther jack. Instead use one from their Panther G or Jagdpanther
- Aber supplies beautiful PE parts in its Ausf.A set to make a jack yourself, but it
appeared very fiddly so I didn’t attempt it – DO keep all the leftover PE, as in
this case alone it will supply a highly detailed handle and base plate for the next jack I
need
- after a bit of sanding, part 62C (upper exhaust support) was acceptable, although Aber
does again supply this part in PE
- remember to drill out the bottom of part 64C (right hand exhaust), as this
piece is the starter crank support
- parts 69B are the driver/co-driver hatch catches, to hold them while fully
open. These were detailed with new bolt heads, and fine solder for the spring
returns
- parts 72C/75C (gun travel lock and top retainer chain) were replaced with a Tamiya
part – Grandt Line bolts were also added to the mount
- Tamiya’s OVM set suppled a new Bosch headlight, which was then detailed with Aber
parts and fine solder
- the fillets inside each front mudflap were detailed with Grandt Line bolts and
Tamiya towing shackles
- thin styrene strips were mounted to the front mudflap edges, to indicate the mounting
plates for the full front mudflaps as frequently seen on the Ausf.D
Aber supplies wingnuts (3 for each mudflap) for this area. Try to add these near
last, as I broke mine off several times!!
- Aber’s engine deck PE grilles (available separately as well as with the full Ausf.A
set) were used, and they are really nice. The round ones were a hair too big, but
not too noticeable
Step 10: (Port Side)
This consists of the port side OVM, which was almost exclusively replaced with the Aber
PE. The only kit parts used were for the gun cleaning rod tube and its ends, which
were sanded flush to accept Aber parts for the handles, etc A warning here that I
discovered too late – the kit gun cleaning rod tube is too long, and will interfere
with mounting the first row of spare tracks further aft on the hull side. I should
have sanded about 2-3 mm off of each end. Aber also supplies two 3part clasps for
each end. Also:
- Aber’s tow cable and towing clevis mounts (small rectangles of brass which Aber
asked to be rolled into tubes) were abandoned in favour of styrene tube, with notches cut
to accept the tiny retaining clips
- Of the port side OVM, only the axe was mounted – taken from the Tamiya OVM set
- A quick warning regarding the spare track retaining brackets at the rear hull sides
– many of the holes in the U-shaped brackets were too small to accept their retaining
pins. I would suggest they be replaced with very fine wire, which would also give a
better 3-dimensional look. I left mine as is for now, hanging loose at the hull
sides - I still plan to mount some Anvil or Friul spares in this area.
Step 11:
Starboard side OVM:
- All of Italeri’s parts were discarded here, in favour of Aber’s parts. I
left off all tools (except a Tamiya Panther towing clevis – these are also bigger
than the PzIV style), to show off the intricacy of Aber’s parts. My fingertips
still bear the scars off having glued them together about a dozen times during this
project!
- Also left off the jack block, but do not recommend this. Next time I’d leave
it on, to better support the delicate Aber parts that frame it. The PE brackets
pieces that hold the jack block total no less than 12!!
- Left off fire extinguisher, but Aber does supply a beautiful frame (which I used), as
well as parts to detail the extinguisher itself
Step 12: (Turret)
A temporary setback here had a happy ending, as I grew impatient for my Jordi Panther
D/A/G L/70 barrel to arrive, and ended up using Jordi’s muzzle brake-less L/70 for
the Panther F, to which I added a Tamiya muzzle brake. This all worked fine,
actually – and the length was correct. Further turret mods:
- Used Cavalier parts for turret front, sides and back (the resin parts are very thin
– to be handled with care – and after lightly sanding adhere very nicely to the
turret sides), and they also supply a full mantlet
- I left the rear turret escape hatch partially open, to show off Aber nice little latch
and hinge assembly back in there (Cavalier supplies the zimmerit-coated hatch itself)
- Added spare roadwheel (from Tamiya Ammo Loading Set) to turret side, below and behind
cupola – make sure you add a couple of bolts, to show that it’s attached!
Step 13:
More work on the turret:
- AA mg ring was sanded to a more scale thickness
- AA mg arm was detailed with bolt heads and locking handle on the mount and a few pieces
from the Aber set – the mg itself was left off though; if you wish to mount one, I
recommend one from Tamiya or Dragon
- MG ammo bag from Tamiya’s Panther G Late
- Close-In Defense Weapon on turret roof is Aber – a feature of later Ausf.A’s
- Main gun elevation stop added above mantlet
- Aber PE periscopes added around cupola (these are each supplied as multi-part assemblies
by Aber, but since I will crew the tank I decided only the outer portion would be seen,
and that’s all I used)
- Turret side spare track hangers sanded thinner
- Cupola and hatch were textured lightly with my Dremel; OOTB the cupola is too smooth
- Spare Dragon periscope added for loader
- Cupola was detailed with Aber hatch stop, direct sight
Also at this point I had to grind (Dremel to the rescue) off the raised lip both beneath
the turret, as well as around the turret ring on the hull top, as the Italeri turret sits
too high OOTB. This said, I still could not get it to sit quite perfectly level, so
ended up super glueing it in place.
Tracks, Painting and Weathering:
Anvil ‘Click-Link’ Tracks have been reviewed very favourably on the Internet
(TrackLink, et al.), so I decided to contact James Blackwell and order a Late Panther set.
These come bagged with port and starboard sides separate (with plenty of spares),
and the set also includes the critical track pin return plates for the lower rear hull
sides. Examples of these are given for both Ausf.A and Ausf.G. These plates
‘smacked’ errant track pins back into place as the track passed back toward the
idlers.
The links themselves truly do ‘click’ together, and even with the minor cleanup
I had to do (there’s a bit of flash, but it flakes off easily), each side only took
about 20 minutes!
The runs tolerate handling quite well. The guide teeth are molded hollow in place
already, too! Mine cost me $50 Cdn for the set, which included shipping from
Australia, and this only took 5-6 working days. Word is that Anvil will soon be
distributed through R&J Products (www.rjproducts.com).
Let me say quickly here that I made a ‘tool’ some time back which has greatly
aided in my painting and weathering. It is simply a scrap of wood, approx 2 x 8 x
�”, into the bottom of which I countersunk a wood screw, so that it points up out of
the wood strip. When construction in getting close to the point where handling the
kit will result in broken off PE bits and other frustrations, I drill a small hole into
the bottom of the hull and ‘screw’ my handle into the kit. I know this may
sound horrible, but once the finished kit is mounted on a display base or diorama, the
hole (less than �” in diameter) will be invisible. This ‘handle’
allows me to do all final construction, painting and weathering without fear of breaking
off parts, mucking up the paint, etc. I love it!
Painting began with an overspray of Tamiya Flat Black, to preshade the kit. This
was my first attempt at this, and I’m happy with the results – in my opinion it
does not replace washes, but helps to further accentuate panel lines and recesses,
provided you are careful when laying in your subsequent colours.
Before painting my base coat for the camo scheme, I stippled on some Green Putty (any type
will do, I just had the green type handy) to indicate mud, as well as a pinch of static
grass here and there. Once dry, I sprayed with Tamiya Dark Yellow, thinned with
Isopropyl Alcohol. I find that this helps the paint dry quite quickly, and the matt
ultra matt finish it leaves seems to take oil paint washes well. (The oil washes
also tend to take the finish to more of a satin one, which to me is more desirable that
completely matt) I tried to spray carefully in a ‘cloud’ pattern, making
my coats light to let some of the black beneath show through. Outer roadwheels are
painted separately – using a circle template to spray the inner wheel, once the
entire thing has been sprayed a very dark grey.
My camo was sprayed with Tamiya Deep Green and Red Brown, although you do have a wide
range to choose from here, as German camo colours were applied in many different ways,
both in the factory and in the field. How much or little the camo paints (supplied
in a paste form) were thinned when applied also greatly influenced how strong or subtle
they then appeared.
I have found Tamiya acrylics to tolerate oil washes very well, even when the first wash is
applied minutes after the camo has been sprayed. I continue to experiment with my
washes, but generally follow this routine:
- Thin initial wash all over, using mix of Black and Burnt Umber
- I use a small brush, to avoid having too much wash applied and surplus collecting where
you don’t want it!
- When washing the running gear, I lay the tank gently on its side, so the the wash will
stay in the recesses and around detail like bolt heads, rather than run down and collect
all at the bottom of roadwheels, etc I leave the outer roadwheels off during this
stage, in order to give them more attention, as well as allow access to the inner sets.
- While the first overall wash is still drying, a mix up a darker wash and apply it more
liberally around recesses, panel lines, bases of raised detail, etc until I am satisfied.
I find this much easier than applying too much wash, and having to wipe a lot off
I sprayed my tracks (off the tank) at this time, with a dark brown mixed from Tamiya Flat
Earth and Flat Black. Because it is difficult to spray into all the crevices of the
track (esp the outer side), I found it necessary to touch up the tracks once on the tank,
using a small brush – no big deal.
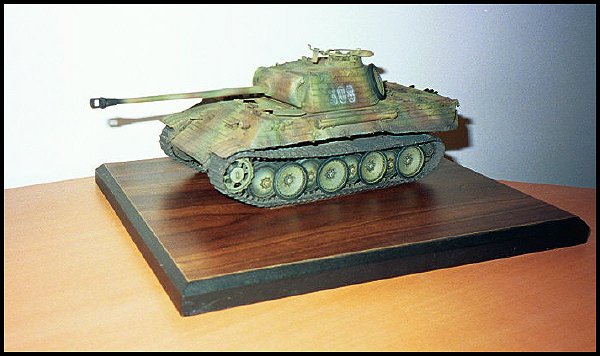
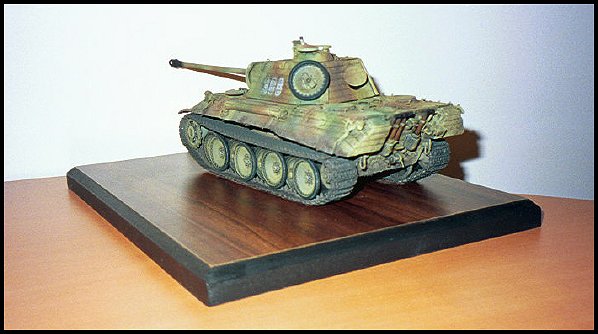
Marking were kept very simple, consisting only of tank numbers “308”, which
were sprayed on the turret sides, in white, using Stencil-It PE markings stencils.
These stencils are great, as not only are they very thin (unlike some Verlinden ones, for
example), but they also can be clipped apart for easier use.
I have greatly reduced the amount of drybrushing I now do (I use artists oils), for a
couple of reasons. First, it seems some of Japan’s better modellers (see Armour
Modelling mag, et al) are getting fantastic results using ‘paint chipping’
techniques. Secondly, I find that with careful attention during the wash stage, you
can make detail pop out so much in areas that drybrushing becomes at time unnecessary.
This is only my opinion, and I can only speak from the results I have attained of
late. I will say that when drybrushing a 3 colour scheme, I’ve had the best
results by drybrushing each of the 3 colours separately (all are easy to mix from oils).
I then run both a 9B and a Berol Prismacolor Silver pencil gently onto areas of
wear, like hatch edges, sharp corners on the armour plate, and especially on track teeth,
sprocket teeth, idler rims, outside of track faces, etc. Remember also that on the
Panther, the rims on the second set of roadwheels were highly polished, due to constant
contact with the track guide teeth. I find using pencils for showing bare metal is
preferable to drybrushing silver or gunmetal colours, as to me it is faster and more
realistic once done – again, just my own experience.
The last item of weathering was to apply brown and orange pastel to the exhaust.
All done!!
References:
“Panther Variants 1942-1945”
Osprey New Vanguard Series
By Hilary Doyle & Tom Jentz
Good little handbook, esp for some of the Panther’s more esoteric actual and proposed
variants. Contains brief sections on Ausf.D, Ausf.A, Ausf.G, Bergepanther,
Jagdpanther, Panther F, Panther II, Pantherstellung, as well as many proposed AA and
artillery variants based on the Panther chassis.
“Panther In Action” Armor Number 11
Squadron/Signal Publications
By Bruce Culver
Great all-around reference for those on a tight budget. Plenty of combat shots
(beware the accuracy of some captions, though), and some nice colour plates.
“Panther Model Fibel”
Published by Model Art
All text in Japanese, but very nice photos all throughout show finished and in-progress
shots of Early and Late Ausf.D; Ausf.A; Early, Late and SteelWheel Ausf.G, Bergepanther,
Panther F, etc. Also a couple of nice dios – the one featuring the Ausf.A in
Normandy was my inspiration for this project.
“Panther” Armor At War Series 7006
Concord Publications
By Thomas Anderson & Vincent Wai
Another inexpensive photo reference, with many nice colour plates. Beware the
‘doctored’ grainy photo claiming to show an IR Panther.
“Achtung Panzer No.4” Panther, Jagdpanther & Brummbar
Dai Nippon Kaiga
An absolute must-have for the Panther fanatic. In addition to some combat shots and
very nice comprehensive photo sections showing surviving Panthers in modern-day museums,
this book also contains pages and pages of detailed line drawings. These drawings
show every imaginable fitting and tool on all Panther Ausf.’s, indicating changes
between each Ausf. This book has grown dog-earred from use on this project alone!
“Panther in Detail”
Ryton Publications
By Bruce Culver & Uwe Feist
Though pricey (like Achtung Panzer, about $40 US/$60 Cdn), this book represents another
terrific reference work for the Panther enthusiast. Beautiful hardcover binding
contains over 180 pages of close-up BW shots (mostly from museums), some combat photos,
very nice colour plates, and a wonderful collection of 1:35 full-view line drawings of
each Ausf., plus Bergepanther. Another nice feature not shared by the other
references listed here are sections of combat reports by US Army Ordnance personnel,
stating the strong/weak points of the Panther series, as well as sections on InfraRed
capabilities, the Ardennes ‘Ersatz M10/Panthers’, development of the Schmalturm,
and much more.
| Main | What's New | Articles | Reviews | Gallery | Think Tank | Contests |