

Ųyvind Leonsen
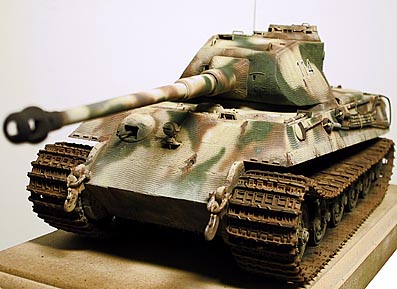
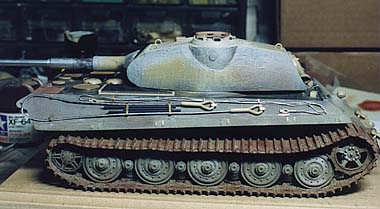
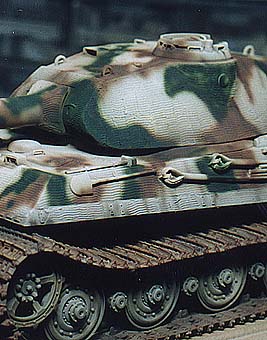
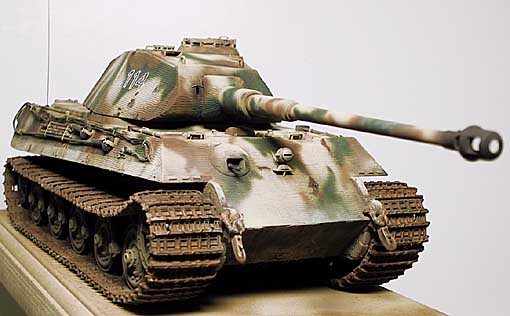
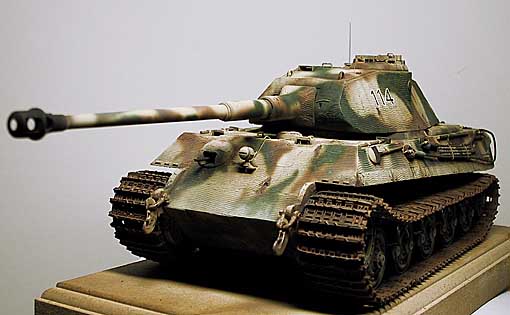
Tamiya“s 1/35 "Porsche" Tiger II painted to represent a tank from sPz.Abt 503, Normandy 1944.
This Tiger is a project I started on way back in 1996. After the initial buildup and applying of zimmerit, I got tired of the project, and put it on the shelf for quite some time. Then, when a competition drew near, I decided to start working on it again, in the meantime I had finished other projects. I had aquired some aftermarket sets since last time, and Friul tracks and The Show Modelling“s etched set was among them. I won“t go into detail in how to build the kit, as it is an excellent kit and it clicks together nice. I“ll go in depth on the painting primarily, and a bit on the modification issue step by step.
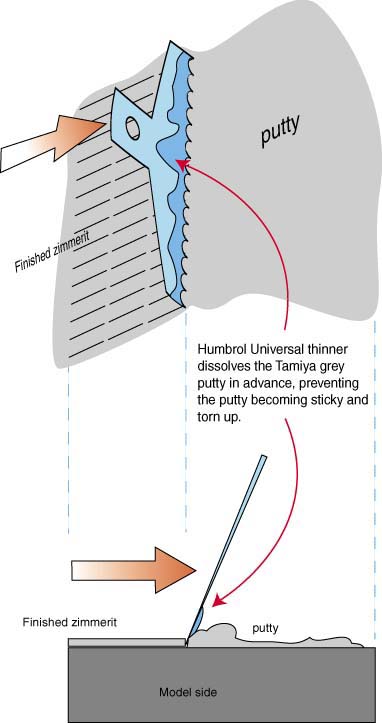
ZIMMERIT
Tools used:
Tamiya Grey putty
Humbrol Universal thinner
Tamiya zimmerit applicator
Apply Tamiya putty to a small area, about 2cm.x 2cm. and dip the tool in Humbrol universal thinner, then place the tool as per the drawing and push your way to nice ridges! Stop after every 4 rows and dip in thinner again and proceed as far as you can until you run out of putty, trim the edge of the last row and remove surplus putty, apply new putty and go on. Transistions between sessions can be smoothed out with a brush with Universal Thinner. See illustration.
TOWING CABLES:
The plastic ends were cut from the kit parts, the ends were drilled out and bicycle gear wire was inserted. This wire has some "spring" in it, but with superglue it eventually stuck...
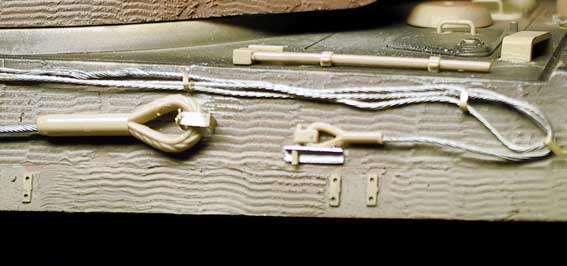
Close up of the towing/track cable and brackets.
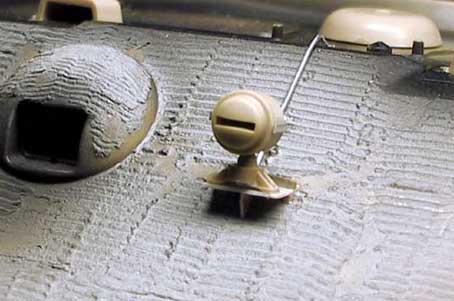
Ready for upper chassis undercoat. Etched and metal parts visible.
LOWER CHASSIS:
After the initial building the wheels were painted separately in red brown as well as the area with torsion arms and underside. The area where the torsion arms are attached got an almost black spray to create depth. Then the wheels were put on. I then painted the wheels a dirty buff color (kind of an overspray) and varied with lighter and darker shadese. Next step was to wash the wheels with Humbrol thinner with no paint to prepare the surface, THEN a wash of burnt umber oil paint and Humbrol Thinner was applied. After drying I drybrushed the wheels using white oil paint with just a hint of ochre oil color in it to accentuate detail. This creates a subtle effect, not too harsh. All this was done BEFORE the upper surfaces got painted. I paint the wheels and tracks before I apply the dark yellow+camo on the upper chassis+turret.
TRACKS:
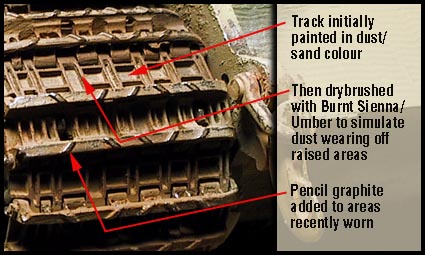
The tracks are Friulmodel white metal tracks. They were time-consuming to assemble, as there were some moulding flash present and the links didn“t fit perfectly together, Anyway, after a lot of work I was done, and they got a good layer of red brown Tamiya (XF-64 I believe) initially to hide the silver of the whitemetal. Then they got a layer of the same buff dirt color as on the wheels. After that, a burnt umber oilpaint wash (thinned with Humbrol Thinner) was applied, and left to dry. Then a wash of rusty and buff pastel chalk with Humbrol Thinner as medium is carefully applied to tie the colors together. At this stage I attached the tracks.
Next, I drybrushed with Burnt Sienna oil paint. This makes the tracks look as if they are dusty/dirty and that the dust has been worn off the high surfaces and remains in the recesses, see picture. This gives an impression that the color on the raised areas is the actual rusty track color. To finish the track off I used a 2B drawing pencil on the thread surfaces and parts of the track that are subject to constant wear.
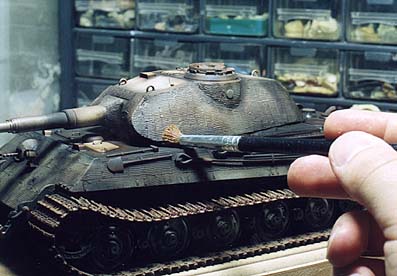
PAINTING, UPPER HULL:
I then masked off the tracks and wheels with tissue and tape and started painting on the upper surfaces. I sprayed the hull+turret almost completely with black+red brown, then I washed the upper areas with burnt umber oil paint this way everything gets covered with paint, after this is done I don“t need to worry about the primer coat of "dark yellow" too much in terms of coverage. Now I have a VERY dirty model that looks like it“s been driving through an oil tank and rolled in wet mud.
The dirty, grimy undercoat for the Dark Yellow.
After this I primed the tank wķth a very light yellow color mixed from(percentage is approximate, all are Tamiya acrylics):
Desert Yellow 70%
Dark Yellow 5%
Flat White 15%
This is a very light color, but I figured that a battle worn Tiger in Normandy would be sunfaded and dusty. Anyway it“s easier to darken a tank than to lighten the color afterwards. The dark basecoat previously applied also kills much of the lightness. I always thin Tamiya acrylic color with isopropyl alcohol. A few years ago I started using Tamiya Acrylics and have used it exclusively ever since.
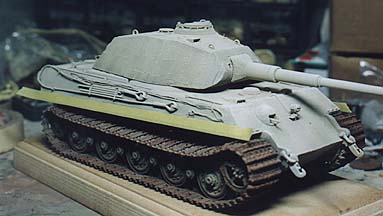
Fender areas masked off prior to camouflage application.
And so the camo colors were applied, I masked off the lower part of the hull sides where the schürzen plates would have been attached, and got to work. The brown is Red Brown with some Desert Yellow and Flat Black, but not much, just a hint of both. The green is Olive Green with a little Desert Yellow and Dark Green to kill some of the brightness in the Olive Green. all colors were thinned heavily and sprayed with the airbrush nozzle close to the surface to create as hard edges as possible. Then small vertical dirt-stripes and shades were applied with an airbrush after the scheme was complete.
The model after initial airbrushing is done.
A light overspray of heavily thinned Desert Yellow mixed with Matt Varnish was misted over the model. This is almost invisible, and I couldn“t see any difference myself... but it“s there... Then I prepared the surface with Humbrol Thinner again and gave the beast a burnt sienna+burnt umber oil wash. After application, I wiped the wash off the large flat surfaces using a wide soft brush.
After this was dry, I dry-brushed the whole tank with white oil paint with a hint of ochre oil color. some places I really rubbed the drybrushing in, mostly on the dark yellow areas. This ties the colors together and makes the paitwork look a bit worn. After this, I sprayed the lower chassis with the buff color I“d used on the wheels (I had mixed enough of this color initially in order to use it at this stage) to tie upper and lower hull together.
SCRATCHES, WEAR AND TEAR
Using the 2B pencil sharpened to a fine point, I applied the scratches around hatches, along with some chipping/dirt spots added with thinned Burnt Umber oil paint, just fiddling around until everything seemed OK. the chipped areas in the zimmerit got painted in red brown, shaded with burnt sienna at the edges and rust streaks added with washes and pastels.
The weathered tank with chipped zimmerit, chipped paint and dirt streaks.
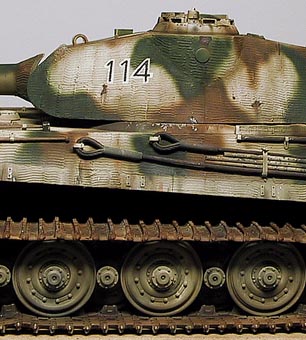
TURRET NUMBERING
This was a real problem, zimmerit and decals don“t mix (not that I“d have used decals anyway, I never get good results with decals....) so I had to find another solution. Sitting down by my Apple Macintosh I got an idea: I made the numbers in a vector drawing program, printed them on overhead foil, and cut out stencils for the numbers. First I cut out a stencil for the white area, and then a stencil for the black center, painstakingly attaching these with Tamiya Masking Tape and spraying took some time, but the results were good. The white was sprayed first through the mask, then the stencil for the black was carefully placed so that the black centres were nicely aligned. A big advantage is that the overhead foil is transparent, making alignment easier.
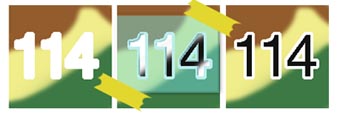
Stages in painting the numbers.
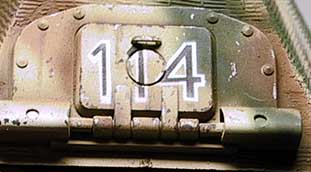
Rear hatch after painting.
FINISHING OFF
Some more dust was applied with pastels and a soft large brush, on-board vehicle equipment was painted and weathered using the same tecniques. The bare metal parts(axe and shovel heads) were painted matt black and then rubbed with the 2B pencil. I chipped the towing hooks on the front in particular, as I believe these got severly abused during towing. Not much paint left there...
More images of the finished model can be seen at: http://www.missing-lynx.com/gallery/german/olt2.htm
Well, that“s about it I think, mostly It“s a matter of just fiddling around until it looks allright at each stage, but the most important thing I feel is the paint shades, especially the dark yellow. The dark yellow often becomes, eh... too dark. And a too dark model just doesen“t look right in 1/35. Well, that was my second Tiger project, now I“m going to build the rest of the family members.
Kit: Tamiya 1/35 scale King Tiger Porsche Turret
Aftermarket sets:
Friulmodel King tiger tracks
The Show Modelling Tiger II set
Jordi Rubio gun barrel
| Main | What's New | Articles | Reviews | Gallery | Think Tank | Contests |