
Painting and Weathering
Adam Wilder

As scale modelers we all share a common goal. This goal is to build a model that accurately represents a scale replica taken directly out of its time and environment. As a result we spend long hours and sometimes lots of money upgrading and detailing our models. As we know this is only half the task. Realistically painting and weathering our models is the other half of obtaining this goal.
Military vehicles spend countless days in the mud participating in maneuvers and in combat. Within a short amount of time, they can get very dirty. In this article, I am going to discuss and demonstrate the painting and weathering techniques that I use to achieve a realistic weathered finish on my armor models.
All armor modelers have their own approach to painting and weathering. I myself have tried many techniques and read numerous books and magazine articles. I have studied endless photos and have asked numerous questions to other modelers. I have always put a lot of thought into the painting and weathering of each new model I construct, always trying to obtain a finish that I feel is an accurate representation. I know that I am always been excited to try something new if I think it may improve the realness of my finish. Over my last eight years of modeling, through trial and error, I have come up with a systematic group of processes for painting and weathering. I will attempt to convey these processes in order for you in this article.
As you go through the steps in each of the processes, you may notice some techniques already used and discussed in publications by other well-known modelers. Some of these steps I have adopted and others I discovered on my own over time. Some steps have been accomplished by combining their ideas with mine to obtain a desired result. I would like to credit Tony Greenland and Makoto Takaishi for some of their techniques that I have adopted. I would also like to thank and credit my friend Miguel Jemenez for his ideas and advice that I have also added to this group of processes.
This is a first
Other than a few small articles that I have written for my local International Plastic Modelers’ Society chapter, this is my first major article concerning armor modeling. In this article, I have taken steps to make it easier for the reader to understand. I used numerous pictures to aid in my explanations. I have also written my painting and weathering process in outline form, to make this article less daunting.
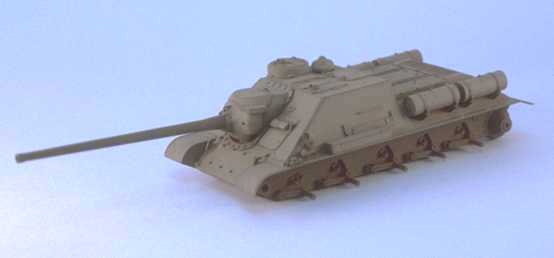
The example
The example I used for this article is DML’s SU-100. The kit is recent and assembles well (with minor corrections). A small number of brass details from a Royal Model set where used. The tracks are beautiful cast-metal pinned links from Friulmodellismo.
I have decided to make this model of the SU-100 appear as one did during the spring of 1945. This one is going to be dirty, letting me carry each step to the extreme to better demonstrate them for you.
As you will notice in picture number one, I have completed the kit but left the road, drive, and idler wheels separate. All the wheels and tracks for my models are kept apart during most of the painting and weathering. I do this for easy access of the lower hull and under the fenders during weathering. I glued the hubs to the wheels and left the wheels attached to the sprues to aid in airbrushing. Micro mask has been applied to the torsion bars and on the wheels to keep the areas to be glued free of paint. I detach, clean, finish painting, and then glue the wheels to the model after completing process "E", one of the final weathering process of this article.
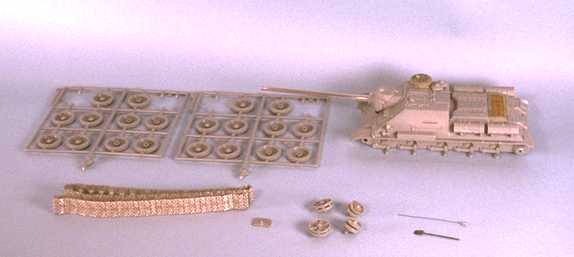
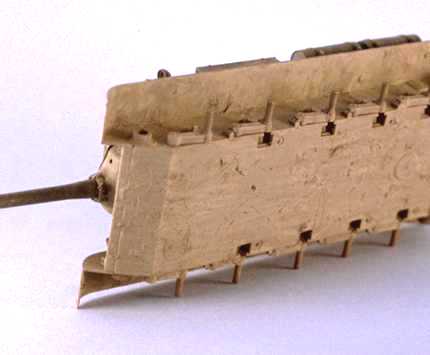
Picture 1
The unpainted model of the SU-100. Still separate are the running gear, antenna mount and treads. The wheels are still attached to the sprues, which will serve as good handles when painting. Note that I have already assembled the drive and idler wheels. As a result of their complex joint assembly, I felt it would be better to assemble them before painting. I still did not know at this point where I was going to place the shovel. Although not apparent in this photo, the Micro Mask had been applied.
Before we get started
I have outlined and explained all of the steps in each process with detail. The intensity in which the steps are carried out during each process changes with the time and location for each model I construct. Upon reading this article, you may decide that some steps are unnecessary for a finish you are trying to obtain. Increase or reduce the amounts of the steps I applied to match the age and location of your particular model. Feel free to take some of these steps and experiment with them; combine them with your own techniques and have fun. No matter the outcome, I hope this article proves useful to you. Enough of the talking already, let us get down to business.
Painting
The first three processes of this article will deal with painting the model. These process are pretty straightforward. If you have any questions, E-mail me at work: awilder@southworthproducts.com or at home: awilder@maine.rr.com
A) Airbrushing
Picture 2.
The model sprayed with the Tamiya dark green base coat then with a lighter shade of green. Although you are viewing a photo, you can still see the depth and scaled appearance added by the lighter over spray of green. The antenna mount has also been painted and over-sprayed. The wheels are sprayed only with a base coat. The wheels will be getting the brunt of the weathering, I felt it useless to waste valuable time over spraying them.
B) Applying a Wash
Over time a thin black film forms over vehicles that have been outside and open to the elements. A close look at railroad cars will prove this to be so. This film is what my black washes are supposed to represent. Washes also have other advantages. Applying dark washes is a way of blending steps one and two from process "A". It is also a way of bringing out details such as weld seems, bolt details, and flame-cut edges.
Picture 3
The SU-100 with a black wash of oils added. Note how the black wash settles into the seams, crevices, and corners bringing out detail. It also helps to blend the base coat of green with the lighter shade done in process one.
C) Adding Oils
This step is to give your base coat a semi gloss finish that will help add depth to the model. More important it will help to represent an appearance in the finished model that resembles painted steel instead of painted plastic. You can also use this step to manipulate your base color to a more desired color. It will also help to further blend the base coat with the over-sprayed areas from process "A". I use Winsor & Newton artist oils. Although expensive, all you will need is black, white, and the three primary colors along with a color wheel to aid with mixing the colors.
I use toothpicks to mix my artist oil paints. I open the tubes of paint and take out what I need with a toothpick. This allows me to carefully regulate the colors during mixing, adding small amounts at a time. I apply my linseed oil and varnish in the same manor. This may cause a bit of ambiguity during this article in regards to the specific amounts of paint, varnish, and linseed oil to add in each step. Over time and with practice, you will become familiar with mixing the paints to obtain desired colors and spreading capabilities.
I build a lot of Russian armor. With experience in have found that a light coat of red-brown oils over a base of Tamiya dark green gives me my desired result. If you where painting a German Tiger tank, you may be mixing an oil color that is quit different.
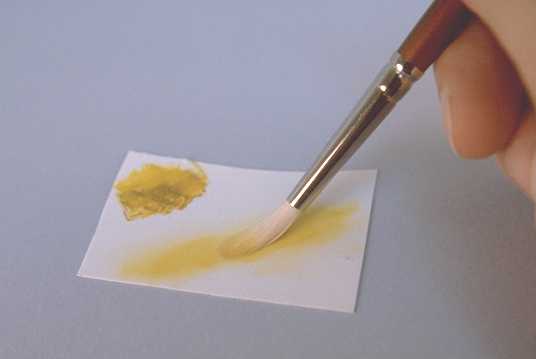
Picture 4.
The mixed color of artist oils along with the makeshift pallet of sheet plastic. Note how 99% of the pant is brushed from the brush before its applied to the model.
Picture 5.
The model with the base coat, lighter over spray, black wash, and oils. As a result of the Tamiya clear added to the base coat and over spray, and the varnish added to the oils, the model has a semi gloss appearance.
It is very important that your brush is completely dry of any brush cleaner during this process. Having the smallest amount of brush cleaner on your brush will keep the oil paints from adhering to the Tamiya base coat
Right as you start this operation you’ll begin to notice the brilliant color and look that the high quality artist oils add to the model. By spreading the oils in light amounts, your model is brought to life and the base and highlighted coats can still be seen through the oils. Although aesthetically pleasing, the model is currently unrealistic in appearance. Do not worry, this semi gloss appearance is exactly what we are looking for. Later as we start adding coats of earth colors and washes, the glossy appearance will be reduced to a convincing appearance representing painted steel instead of painted plastic. Remember, when working with oils, a little will go a very long way due to their extremely slow curing speed. This step can be carried further by mixing lighter shades of artist oils and painting over refined areas of the model. Although it may further enhance the base coat, the time of the over all painting process is greatly extended due to the extra time needed to let each coat dry.
Now would be the time to paint and add any stowage such as tools, blankets, barrels, and munitions boxes. The items kept on the outside for the most part would be just as dirty as the vehicle.
This will end the third part in the painting process. Now we will move on into weathering.
Weathering
What we must keep in mind…
I can say with confidence that nothing brings an armor model to life better then a good well-planned weathering job. Conversely, we must also realize that a bad weathering job can ruin a well-constructed model or a beautiful paint job. Weathering is a topic that is viewed with different opinions by all types of modelers. Some will argue that weathering takes focus away from the models actual details while others say that weathering can be used to hide mistakes (the second I will not deny). It is because of these reasons that the modeler must think and plan carefully. Planing carefully is essential in making a convincing weathered finish that is not overdone, fake in appearance, or disproportional to the model.
The first thing the modeler must do is ask him or herself the following:
Once we have answered the questions above, we must constantly remind ourselves of the following throughout each step of the weathering process:
Once we have considered the topics listed above, we can finally move forward with the first process of our models painting and weathering process.
D) Paint Damage and Bare Metal Exposure (Chipped Paint)
The first step of this weathering process is to replicate chips and scrapes on the vehicle. Chips and scrapes result from hits by artillery debris, trees, and other objects not cleared by the vehicle. This also includes any wear caused by the crew. Note that we will be calling these chips and scratches "taps and scrapes", due to the application of the paint during this process. To the existent of how much you decide to carry out the tapping and scraping step, depends on the age and location of your vehicle. Tapping and scraping would be essential to a scale model of an SU-100 involved in the battle of Berlin or a Stug III in the street fighting during Stalingrad. On the other hand, you would probably want to keep the tapping and scraping step minimal if you were modeling a Sherman running straight off the assembly line.
WARNING! Tapping and scraping is very easy to overdo. When you think you have done enough, you have probably done too much. Again, you must keep focused, conservative with the paint, and as random as possible. As soon as your mind starts wandering, you’ll start getting overzealous and carried away. I recommend a 10-minuet break every 15 minutes. I also keep the headphones and TV off during this process. Some may say that I am getting ridiculous but I have found that when rested and focused, I get the best results.
A lot of your taps and scrapes are going to be covered during the remaining weathering process. This step is still important because the taps and scraps that remain visible will add to the final result.
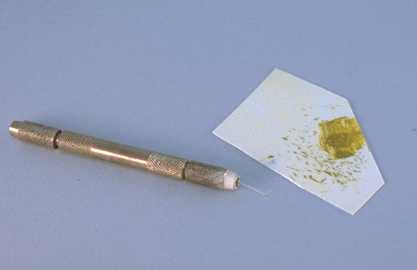
Picture 6.
The tapping and scraping tool consisting of your pin vise and a piece of stretched sprue. Note the small bend at the end of the sprue. The tool is next to the piece of sheet plastic being used as a pallet for the oil paint.
Once you have completed this process we will be ready to start applying the earth and dust.
E) Applying a Base Coat of Earth
Compared to the previous processes the following are a little less tedious and easier to apply. This is where your model is really going to start looking as though it has been outside on the battlefield. As in the preceding processes, it is important to keep in mind how long the vehicle has been outside and exposed to the elements. Although this step is easier to apply, one can still get carried away if he or she starts to daydream.
When you have intermittently sprayed your model to an amount you feel is sufficient, put it in a dust-free environment for one day. The following day, you will be ready to start applying washes.
F) Applying Washes
When applying washes, I like to use Humbrol earth enamels because they spread evenly when thinned drying to a matte finish. We want to apply extremely light washes. This makes it easier to control the amounts of thinned paint distributed onto the model. Applying two or three light washes also gives a more convincing scaled appearance when compared to one heavy wash.
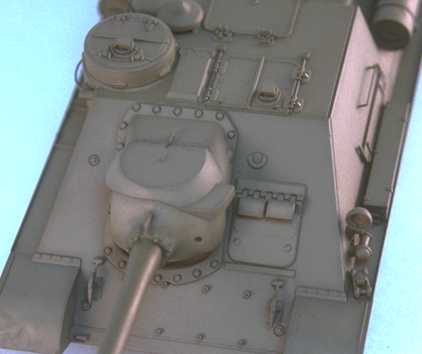
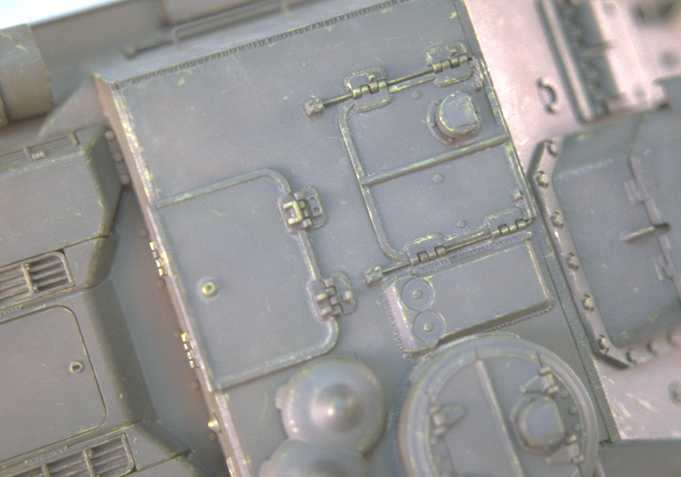
Picture 7.
This is an important picture. We can see the light green taps and scrapes done in process "D". Note the variation in their size and location. Also observe how I concentrated the taps and scrapes around the edges of the cupola and corners of the supper structure.
At this stage in weathering, the areas of airbrushed Tamiya earth from process "E" are still apparent around fenders and tie-downs. Remember that you want to airbrush your Tamiya earth lightly on the horizontal areas such as the top, heavier toward the lower parts of the vehicle, and a complete coat on the chassis starting from the fenders down.
Also in this picture the washes of light earth from process "F" can be seen. Notice how the model has lost some of its gloss as a result of these washes and has taken on a more convincing appearance of painted steel.
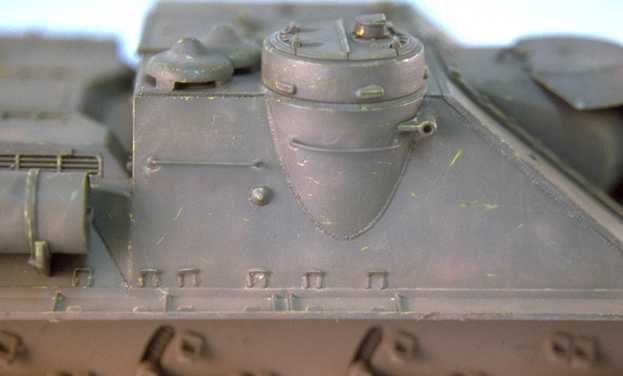
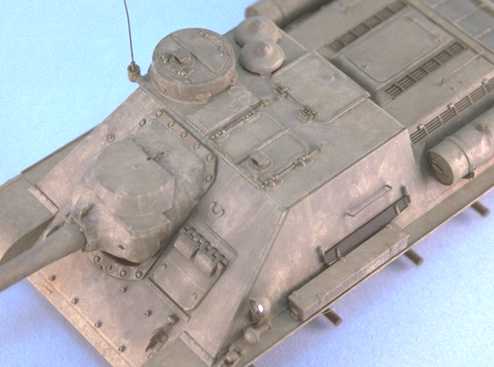
Picture 8.
Another picture of the models top during the same stage of the weathering process. You can see the faint areas of airbrushed Tamiya dark earth and the light earth colored washes. Notice taps and scrapes around the hatches and hinges. I also kept the taps and scrapes around the outer diameter of the vent domes. At this stage the taps and scrapes look rather brilliant and unconvincing. Do not worry, as we work through the rest of the weathering processes they will take on a more realistic appearance.
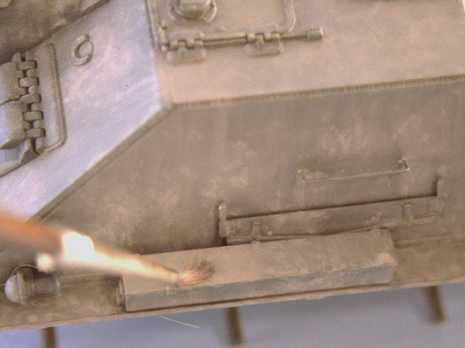
Before I start explaining you should be aware that process "F" could be long. The entire model should be done in one step to obtain the best results. You will not want to start until you have three to four hours. The first thing that I do is find one of my old no.00 brushes that is still in reasonably good shape. Take a sharp pair of scissors and cut the brush leaving the bristles about 3/16" long with a flat end.
Your result on the vehicles flat tapped areas will be a very unconvincing spotty appearance. Don’t worry, this is how it is supposed to appear at this stage. This appearance will be essential for process "H". After finishing this step let your model dry in your dust free environment for a day. We are now ready to move onto the final steps of our weathering process.
Picture no 9.
A view of the model’s top after completing process "G". Note the muddled appearance that is a result of tapping the Hombrol light earth with a round brush and thinner. This appearance will play an essential role in process "H". Notice how the taps and scrapes from process "C" are looking more convincing. View picture no. 10 for a side view of the thinned, light, streaked earth, added from steps 2, 3, and 5 of process "G".
Picture no. 10
A view of the chassis under the model with the coat of Tamiya earth, the washes, and the thinned Humbrol light earth from process "G". Note how the light earth is running lengthwise with the model.
This is a step that I think a lot of armor modelers overlook. Dirt and dust is washed away down the sides of vehicles but large amounts of dirt and dust collect on the horizontal surfaces. Whether you are studying new photos or old black and white pictures, it is easy to see this is evident. This dirt and dust on the vehicles top comes from constant stepping by the crewman and infantry, along with dust that’s been thrown in the air from traveling vehicles. This layer of dust is washed across the top of the vehicle from rain making an uneven layer of earth. This uneven layer of earth is what we will duplicate in this process. Before we start place your model on a flat surface.
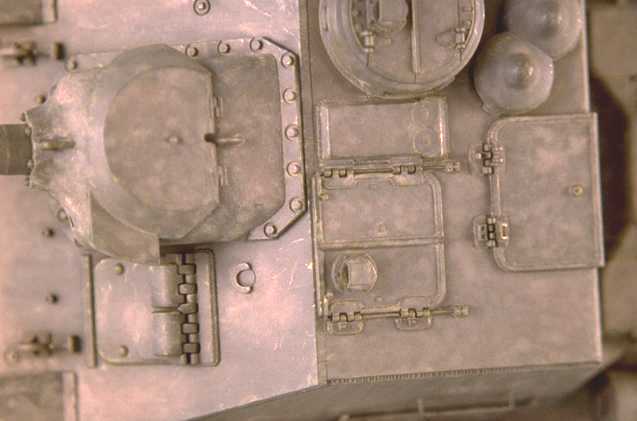
Picture no. 11
A view of the in-process application of the dust coat. The right side of the toolbox shows the muddled appearance of the washes and thinned light earth. The left side shows the carefully blended coat of earth and dust. Note how the base coat from process "A" and the muddled thinned light earth from process "F" are still lightly evident through the blended coat of dust. The top of the superstructure has already been completed. Now it is clear as to how the thinned light tapped earth from process "F", is working with the coat of dust. Together they give the result of a scuffed, tracked, even coat of earth and dust that has settled on the horizontal surfaces of the vehicle. Also evident in this view is some of the splattered streaked light earth also done in process "F".
Picture no. 12
The SU-100 with the blended coat of dust applied over all of the horizontal surfaces. Take a look at the cover over the gun mantel. Note the scuffed appearance and the extra streaks of dust running down its side. A number of extra faint washes where also applied to help bland the dust-coat with the rest of the weathering.
You may have already noticed the clean double handed saw mounted on the side. I did not realize until after process "G", that I had forgotten to paint it with a metallic color. I had to take some time and go back and apply processes "E" and "F" to make it resemble the rest of the vehicle.

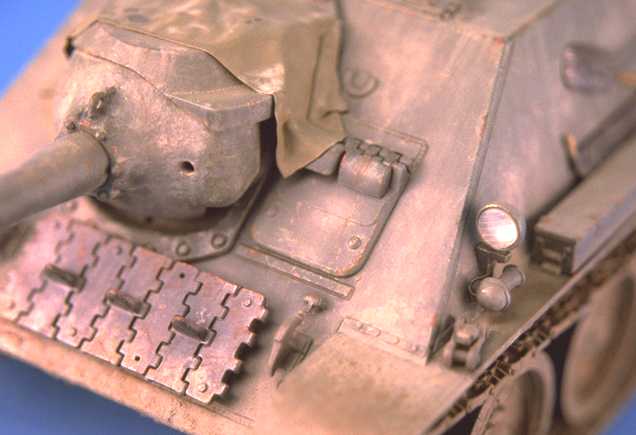
Picture no. 13
Another view of the model after process "H" has been completed. Note the downward streaks coming off the mantel and down the sides of the superstructure. Also take into account the chaotic earth on the fenders. Note how the base-coat now resembles painted steel instead of plastic. The darker sprayed coat of Tamiya earth is evident on the chassis from the fenders down.
Lets talk about our current location
Armored fighting vehicles are constantly walked on by their crewmembers and open to the weather. The base coat in step four of process "E" along with the muddled flat tapped appearance obtained in process "G", was to provide a base for process "H". Now we have a realistic coat of dust across all of the horizontal surfaces of the vehicle. Because of our chaotic finish from process "G", the coat of dirt and dust from process "H" has a slightly uneven appearance that would resemble constant walking by crewmembers and washing from the rain.
Now what we need to do is start adding a little more dark earth. Yes…. I
know…..how could we possibly need any more earth colors. Trust me, part "I"
is also an important part.
Over the old, dry, light layers of mud and dust, new mud is constantly being splattered from the movement of the vehicle and other vehicles nearby.
Picture no. 14
A view if the models underside. Note how we started the dark earth densely toward the bottom of the tank. We then lightened up as we moved up toward the fenders.
Process "I" plays an important part in achieving a realistic weathering finish. It gives further depth to the weathering making it much more dynamic. This is one process that I think is vital the overall finish.
At this point it may seem as though we have covered a lot of the timely work done in the preceding processes. On some parts of the model this will be true, but as for most of the vehicle, all of these processes are working together to make a realistic weathered result. After you have completed process "I", and the model has dried for 24 hours, we can finish attaching the running gear and tracks.
J) Finishing and attaching the wheels and tracks
Now that we have added all of our earth colors we are ready to finish and attach the wheels.
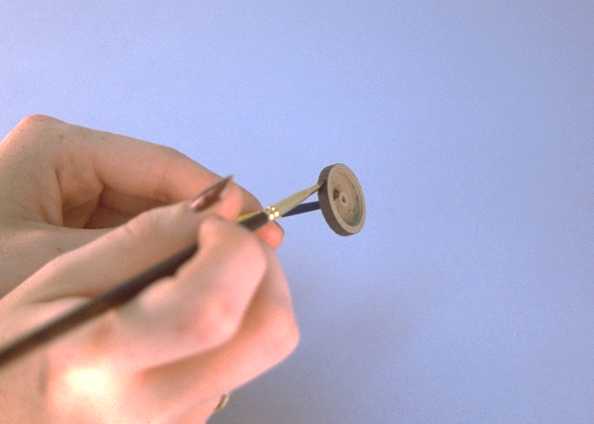
Picture no. 15
In this picture, paint representing the color of the outer rubber ring on the road wheel is being applied. Again note that we are only getting the part of the wheel that roles over the track. Notice the rod (in this case a paintbrush) is being used to position and rotate the wheel.
I would like to inform you that my girlfriend Andrea helped me with this photo. Normally I do not wear nail polish.
K) Finishing up
These are going to be the final steps in our painting and weathering process. They are relatively short but still a little tedious.
Picture no. 16
The size of the rust steaks relative to the scale of the model is very important. Note the small accurately scaled streaks of rust running over the periscope cover. Also see the small areas of rust on the corner of the superstructure, around the corner of the drivers door, and on the flat bar welded directly beneath.
(These lighter areas represent new layers of rust forming over the older layers.)
Voila, you’re done. Lets discuss a couple more photos of the finished subject.

Picture no. 17
A rear view of the finished model. Note the small streaks of rust coming from the hinges. On our left-hand side the rust has washed down onto the tubing that would house the wire for potential smoke discharges. Notice the spec of lighter rust over the darker rust on our right-hand side muffler protector. Large amounts of rust have been added to the metal strapping holding the external fuel tanks in place. These light gage metal straps get bent and scratched due to the mounting and dismounting of the cylindrical fuel tanks.
Also note the dark earth from process "I" that has been sporadically painted to the rear fenders and lower rear plate. It is evident as to how much more dynamic and realistic different colored coats of mud make the finished model appear. The exhaust was airbrushed with a flat-black paint then brushed over with black oil pastels.
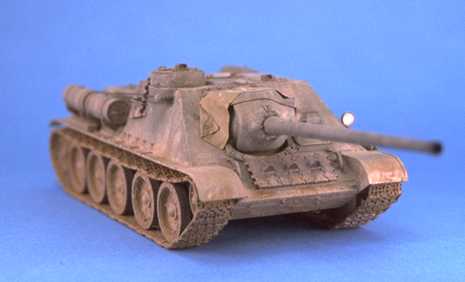
Picture 18
The finished model.
Lets quickly review….
This is basically the outline I follow for painting and weathering my armor models. I started with airbrushing on the base coat and lightly adding the oil paints. The oils where added to give depth to the base coat and altering the base color if desired. Moving into the weathering part of the article, I outlined the complete weathering process. We talked about duplicating scratches and chipped paint in the base coat, which resulted from use in the field. We then discussed the different steps for adding earth colors and finished with some minor touch up techniques such as adding rust and blending it with the rest of the weathering job.
I cannot stress the importance of deciding on the conflict, location, and age of your vehicle before you start. It will help you determine the extent as to how you carry out each step used in each process.
Other areas of interest concerning the finished SU-100
Small details where added to further enhance the realness of the finished SU-100. Details such as stowage can help to further enhance the models theme, time, and location. They also give the model character making it appear inhabited and used.
The spare track links located on the hull front ware included with the DML SU-100 kit. The links on the side of the superstructure where left over from the frulmodellismo set. These spare tracks where airbrushed with a base coat of Tamiya flat black than intermittently over sprayed with a light coat of rust. Red-brown filters where added to help further achieve an appearance representing large ingots of steal open to the elements.
Filters are thinned coats of paint (5 % to 10% paint and 90% to 95% thinner) applied with a brush to alter and help enhance a base color achieving a more realistic appearance. After you dip your brush into the mixture, you carefully ring out any excess pant from the brush onto the side of the jar holding the filter mixture. You than brush on the filter with a damp brush instead of a soaked brush as with a wash.
Filters have a similar purpose as the light coats of artist oils used in process "C". For a better understanding of filters, keep an eye out for Miquel Jimenez’s article "The Filter", that will soon be appearing on Missing Links (if not already). Following the application of the filters, the tracks where glued in place after the completion of process "E" and weathered equally with the rest of the vehicle.
The shovel’s handle was painted with a light tan enamel base. Small red-brown lines where then painted to represent the woods grain structure. After the red-brown had dried, three to four light coats of Winsor & Newton burnt-umber where painted over the handle. Remember to give each light coat time to dry before the next is added. The end of the shovel was painted in the same manor as the spare track. The shovel was then glued in place after process "E" with the spare track, and also weathered with the rest of the model.
The spare cylindrical fuel tank came from another DML SU-100 kit and slightly reworked. I weathered the spare fuel tank completely separate from the model then carefully tied it in place after process "J". The crew of the SU-100 most likely obtained the spare tank sometime after the vehicle was issued to them in the field. I weathered the tank in a fashion that would make it appear newer than the rest of the SU-100. The rope used to hold the fuel tank in place is thread purchased at a bead and necklace store. I carefully airbrushed the thread with a buff color before using it to attach the fuel tank. When adding the final coats of light earth to the model in step no. 8 of process "K", they where equally applied to the attached rope and external fuel tank.
Remember…..
Now that I have briefly explained the final add-ons, all the details for the finish of the SU-100 have been discussed. Yes, this is a very long set of processes for achieving the finish of a model. Although long, all the processes are straight forward and will simply require a little time and thought. After this set of processes is used on a few models, they will start to become routine; reducing the time needed to complete them. The most important thing to remember is that the realness of your model’s finish will start to increase. Let me repeat myself by saying that adding after-market detail sets to improve the accuracy of a scale model is only part of the task. Carefully planing and adding a realistic weathered finish will make your detailed model much more exciting and rewarding. Please trust me on this. Thank you for taking the time to read this article.
I would like to thank…
I would like to thank my girl friend Andrea Browne, and my Parents Gail and Jeff for there help with editing. Andrea’s patience concerning the long hours that I needed to build the SU-100 and write this article is also greatly appreciated. Last but not least, I would like to thank Phil Cormier for the added machining of the Jordi Rubio aluminum gun barrel.
References:
Thank you again for taking the time to read this article.
Until next time……
Adam N.P. Wilder


| Main | What's New | Articles | Reviews | Gallery | Think Tank | Contests |