AFV Desert Finishes and Weathering
Techniques
by Ron Puttee
1. Preparation
Ensure the model is free from 'greasy' fingerprints. Any parts not needing
painting at this time should be masked (eg open hatches/interiors should
have cotton wool blanking inserted which if manipulated carefully will
prevent damage to any internal detail).
If applicable, the turret should be separated from the hull to allow
easy handling during painting. Also undersurfaces and those hidden nooks
and crannies need a coat of paint too. Otherwise, ensure the model can
be picked up for painting without affecting surfaces. A simple tissue
can be used to handle the model without leaving grease marks or blemishing
the already painted surface.
TIP - Care at every stage will provide you with a better
result - short cuts only tempt disaster. Believe me experience tells!
Ensure any details that can't realistically be added afterwards are attached
prior to painting (eg. rusting effects on exhausts obtained by using Liquid
Poly and baking soda, or the wonderful world of damage, dents, nicks,
surface texture, bullet and shell hits etc.).
TIP - Remember LESS IS BETTER! Overdoing weathering damage
is easily done and next to impossible to remove!
2. Pre-Shading Primer Coat
The decision on what colour to use as a primer coat is essential to
the final result, no matter how much covering up you might try to do later.
Have plenty of reference available. It is invaluable when attempting
to get the final shading, colouring and weathering just right. If colour
reference is available for the subject you are modelling, ensure you refer
to several sources, as the variations in printing of photos can easily
give an artificial look and feel to the vehicle. Obtain the best estimate
of what the vehicle should look like and use your instinct and judgement
on which shade to trust in implementing it onto the model. If no reliable
reference is available regarding the colour of a vehicle or ID numbers,
record your best estimate of how you think it should appear.
If you are doing a vehicle with a lighter overall
finish, your primer colour needs to be lighter than if you are doing a
darker finish. However, in both cases the primer colour needs to be significantly
darker than the primary colour, eg. when modelling an Allied Gulf War
vehicle Tamiya XF-52 Flat Earth can be used, whereas when doing a German
WWII North African scheme XF-10 Flat Brown is more appropriate.
TIP - I prefer not to use black as it produces contrasts
that are too harsh as well as a somewhat stark and sterile overall look.
Spray your choice of primer coat, though not too wet. Several light coats
are better than one heavy wet one. A wet coat also increases the risk
of glossing especially with acrylics, not to mention the chance of burying
detail and unsightly paint runs. To reduce the risk of glossing another
tip is to add a modicum of flattening agent to each colour, eg. Tamiya
X-21 Flat Base for acrylics. The flatter the finish the better. It is
easier to simulate a semi-matt finish if desired from a matt surface,
than by using semi-gloss paints to begin with. No matter how well a vehicle
is finished/weathered using a semi-gloss medium it will invariably look
too glossy in miniature - so I try to avoid this.
Aha! I hear you say - how are you going to prevent silvering of decals?
Patience all will be revealed!
OK, you have carefully achieved a nice even flat coat of your choice
of primer colour but, unless you sit on the right hand of God, you will
notice blemishes, a gap, fingerprints, glue marks, whatever - now is the
time to rectify them.
You'll be keen to keep going; but don't! Fix all of those annoying little
blemishes now, give it to a friend to check out it if necessary - I have
plenty who are more than obliging just for the chance to pull an impending
'masterpiece' to pieces! Dont be afraid, its part of the healing process!
TIP- By the way, ensure you include the interior surfaces
of the open hatches with your primer coat as the dimensional effect of
pre-shading applies equally to internal surfaces.
3. Base Colour
Study your references - very rarely is the primary colour of a vehicle
ever 'authentic' straight from the tin or bottle. Mix and match is the
key and don't forget to keep some of that carefully mixed base colour
for later touching up if necessary.
TIP - Record the contents of the 'mix' once you
have settled on the correct shade, as you may need to paint another or
similar vehicle in the future.
Technique: Apply progressively lighter coats working up to the
corners and edges, gently applying slightly more intense colour to the
centre sections while less at the edges. Allow more primer coat to show
through in the areas that would not get full light in normal daylight,
eg. undersides of mudguards and tracks which can be left as primer coat
at this stage. The open flat surfaces of the vehicle that obtain the most
light should be given a fair depth of this primary colour.
TIP - I found that after some practice it was easier to
paint up to a line, corner or edge than applying a thin fine line of darker
colour later.
4. Interiors
Carefully apply successively lighter coats to the exposed interior on
hatches, etc. using the same principle. The newer generation of airbrushes
such as the Aztec series make it far easier to airbrush areas which were
once a paint brush only job.
5. Decals
Prior to applying decals I paint vertical surfaces with clear flat enamel
usually Humbrol. However, acrylic can be used. If using enamel over acrylic
ensure the acrylic finish underneath has cured for several days first.
You'll notice that as the clear flat dries it will darken slightly. This
is OK as the natural fall of light generally causes vertical surfaces
to be darker than the horizontal surfaces.
TIP - Hedge your bets and always trim excess film
from the decal right up to the coloured edge using a new sharp blade to
ensure no film is visible.
Decals can now be readily applied to the surface. I find 'Mr Mark Softener'
from Gunze Sangyo to be an excellent product for settling decals down,
even over the most undulating surface. Don't panic when applying it as
your decal will wrinkle severely prior to it hugging down to a 'painted
on' finish!
Additionally, 'Mr Mark Softener' hardens the decal to the point where
once set, it will accept light sanding which can prove useful at times
when the light overspray (described in Step 7) becomes a bit overdone!
TIP - I have also found that using this product seals the
decal sufficiently - eliminating the need for a clear overcoat.
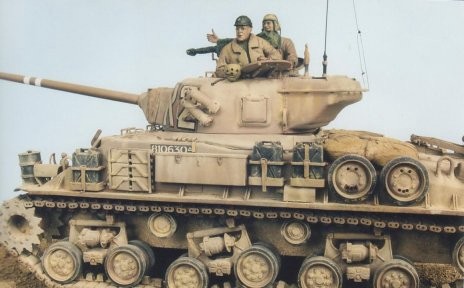
6. Detailing
This is the time to apply detail painting to tools, headlights, taillights,
aerials, stowage, fittings etc. Then apply paint chipping to all susceptible
areas, access hatches, and wear areas where the crew would walk on the
vehicle and where external, as well as internal, loads are fitted and/or
removed.
TIP - Use a darker colour to achieve chipping and wear
in small amounts and apply with a fine pointed 00/01 brush. Remember to
concentrate chipping and wear to edges and hatch surrounds, while lessening
the chipping and wear away from such edges. However, the random spot can
be added here and there. Start by applying a little at a time, as this
effect can be very easily overdone.
I use a darker primer colour for these chips, as this is the general
rule on most fighting vehicles, eg. Gulf War AFVs were mostly dark green
underneath, while German WWII vehicles were oxide red.
Applying the above technique to my Gulf War M1A1 mine-plow, allowed for
these levels of wear - light tan topcoat, dark green base coat at the
edge of chips, then a small amount of shiny natural metal.
A small amount of natural metal can be sparingly applied to the most
prominent areas of wear if desired, but it's almost always surrounded
by small traces of primer chipping.
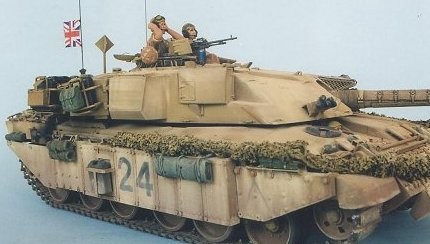
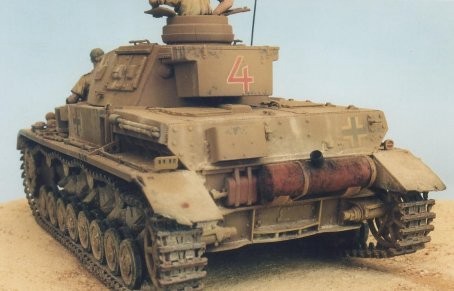
7. Blending
Photo 6 Apply a very light 'dust coat' of a light tan or grey
over all painted detail, including decals, this technique can also use
the lighter of any camouflage colour used. This will reduce the amount
of contrast between the various details; improving the realism and making
the vehicle appear 'washed' with daylight as would be expected in the
bright desert environment.
NB - This blending is equally important with multi-colour camouflage
schemes where dusting over the entire vehicle improves realism dramatically
and ties in all the colours.
8. Finishing
Study the vehicle in reference photos - look for any colouring highlights
on specific areas. Apply a small amount of drybrushing using a similar
lighter colour. Generally, I use enamels for this step by picking up some
of the thick pigment at the bottom of the tin with a flat brush, removing
all but a trace by 'pre-brushing' onto a rag or paper, then applying very
gently to catch highlights and raised areas.
TIP - This process is generally most effective around
the wheel rims where the wheel nuts and higher surfaces protrude above
the desert groundwork accumulated on the wheel hubs, and on any additional
surfaces that might reflect natural light, eg. top surface of gun barrels,
etc.
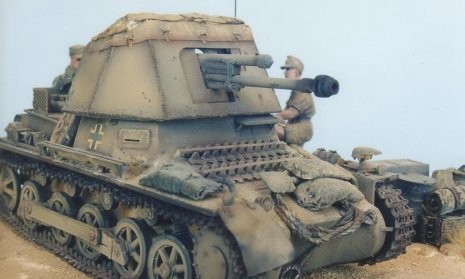
9. Pastels
These are one of the most important tools for achieving a realistic,
weathered and dusty desert campaign vehicle finish.
Good quality artist's dry pastel chalks are powdered by rubbing them
on wet and dry sandpaper before being applied to the kit with a wide flat
brush to all surfaces. Use the edge of the brush and apply to corners,
edges or concentrations of dust as it falls down the vertical hull sides
or glacis plates.
Concentrate dust on hull sides, tracks, horizontal fenders, and especially
around the mudguards and rear of AFVs.
TIP - Use lighter coloured pastels for dust and surface
fading and darker tones for accentuating crevices, joints and perforations.
Be sure to apply dusting in natural patterns where dust would logically
accumulate or fall due to weather and movement.
Pastels can be applied with equal effectiveness to figures too, by matting
down any shiny clothing!
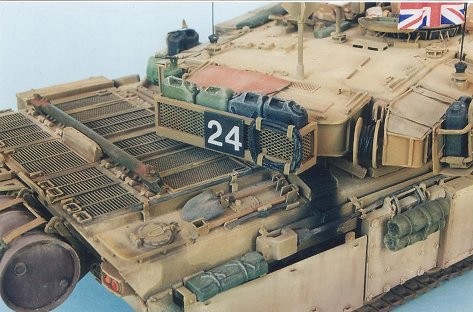
10. Final Touches
It is the finer details that I find completes a model and gives that
extra level of realism - some examples are listed here:
Applying the 'Rustall' process to exhaust pipes and mufflers. Don't apply
copious amounts of rust to desert vehicles as moisture there is usually
at a minimum.
Add black pastel to gun muzzles and exhausts. If the exhaust lies over
the hull as it does on some modern AFVs, apply a light touch of matt black
with the airbrush. Don't forget APU and NBCD pack exhausts also on modern
AFVs.
Use lead pencil to highlight vision block glass; exposed metal on high
wear areas, and metal tread bars and grousers on tracks. Sand really polishes
high wear areas on drive sprockets and track links to a mirror finish.
Apply pastel dusting equally to exposed stowage.
Add very minor surface rust to spare tracklinks stowed on the vehicle.
Apply light drybrushing to the rubber track pads (if any), on modern
AFV's to simulate wear. Most have internal pads that the road wheel tyres
run on, which will need painting and fading.
For desert softskins add mud/dust in a rotating spray pattern to duplicate
the application of it on the real vehicle.
Apply black/brown washes to the fuel filler caps and for residual spills
down the sides of vehicles, which can look very authentic if applied sparingly,
especially when it washes away the pastel dust in the appropriate areas
as per the real thing.
Try a mix of burnt umber oil paint with a dash of silver enamel for machine
gun barrels.
A good way to accumulate built up dirt and dust in wheel arches and mudguards,
etc. is by using dabs of clear matt and applying suitably coloured railroad
groundwork material to it.
Conclusion
So there you have it - painting and weathering desert theatre AFVs in
10 easy steps. Happy modelling.
|