
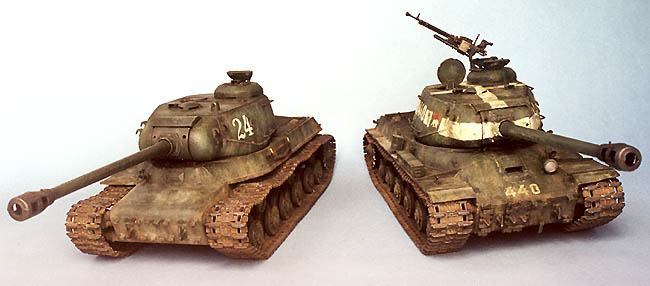
The Stalin Brothers
Antonio Martin Tello
Introduction
The history of the development of the IS tank series has already been related with detail in several books and web pages (see references), and thus, just a brief historical note will be given here.
The tank battles of 1943 made evident for the Red Army the necessity of new designs, especially in the aspect of the main gun. The t-34 was a reliable machine and it was decided to continue its development, upgunning it, which eventually led to the t-34-85. However, the KV-1 series tank did not perform very well against the new German tanks and thus it was decided to create a completely new heavy tank. In fact, preliminary work on a new heavy tank was already underway at Chelyabinsk. This design used several components of the KV-13 universal tank, a project dropped soon before, with a new turret able to accommodate a new, more powerful 85 mm gun. Some of these new turrets were adapted to the KV-1s, in production by then, as a provisional solution to increase the firepower of the tanks sent to the front. Around 130 of these tanks, named KV-85, were produced between September and November 1943.
The new design of a heavy tank for the Red Army was named after the Soviet leader Iosef Stalin. At the design stage, a 85 mm gun was considered enough to arm this new tank, and thus, the production of the IS-85 started at Chelyabinsk. However, soon afterwards this decision was reconsidered since the standard medium tank, the t-34 was upgunned to the 85 mm gun, and the now defensive role of the Wehrmacht made necessary a more powerful gun in order to break through the German defences as expected for a heavy tank, and a 122 mm gun was chosen. For this reason, the production of the IS-85 was cancelled at the beginning of 1944 after around 100 IS-85 had been completed, and the production of the IS-122 was started at the end of 1943.
Towards March 1944 the tanks were renamed, with the IS-85 becoming the IS-1, and IS-122 becoming the IS-2. The main disadvantage of the new 122 mm tanks was that its D-25T gun has a two part projectile and, due to the its big size, just 28 of them could be carried. Also, the AP performance of the gun was not optimal, but it was consider sufficient by the designers.
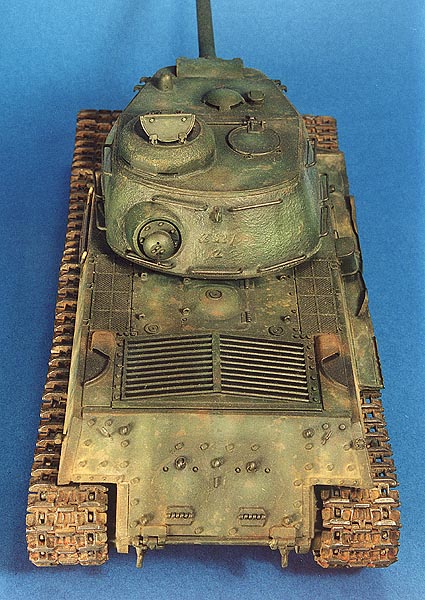
Also, it was detected that the front protection of the hull was insufficient against the last generation of German guns. This lead to a redesign of the shape of this zone of the tank. From summer 1944 the upper front plate was a straight plate inclined at 30 degrees, instead of a stepped one. Also, the thickness was augmented till 120 mm. The new tanks are usually known as IS-2m, but this seems to be a western designation, not a Russian one (which seems to be IS-2 mod. 1944). There were two subtypes of this improved and reinforced nose found in IS-2m. The tanks built in the Chelyabinsk factory had a one piece, cast nose, while the IS-2 built at the Ural Heavy Machine tool (UZMT) plant as a two pieces, welded nose.
Several others modifications were introduced and found in these IS-2m, such as widened gun mantlet or a slightly different arrangement of the periscopes on the turret roof.
The IS started to be delivered to the heavy tanks regiments in February 1944 and it was very popular among their crews. Along the t-34-85 the IS-2 tanks represent the typical image of the armoured Soviet power during the last year of the war. Photographs of IS-2 taken during the Reichstag fighting in Berlin are among the most famous WWII icons. Eventually, also other armies of Eastern countries under the control of the Red Army, such as the Polish or the Czech received IS-2 and used them against the Germans.
The IS-2 was the depart of a long career of Soviet tanks designs which can be traced even till the present. The direct heir of the IS-2, the IS-3 was not used during WWII, but was publicly presented during a victory parade held in Berlin in September 1945, shocking the Western allies and influencing the tank design during the cool war period. The IS-2 itself was in service in the Soviet Army during manoeuvers until the eighties, and the official order to remove the IS-2 from service was only issued in 1995!.

The Models
Dragon has in its catalogue four models of the IS tank series. Three of them are in their 39-45 series range: Catalogue no. 6012 is IS-2 (or IS model 1943). No. 6018 is a IS-2m ChKZ type (or IS-2 mod. 1944) as produced in the Chelyabinsk factory. No. 6052 is a IS-1, and finally, in their Korean War series, no. 6804 is a IS-2m UZTM type, also perfectly suitable for the WWII period. All the models share a common lower hull, running gear and tracks (of the link by link kind), varying their upper hulls, turrets or gun according with the version. In the IS-2m UZTM type (the one in the Korean War series), a 12.7 mm DsKh heavy machine gun for the commander's cupola is included.
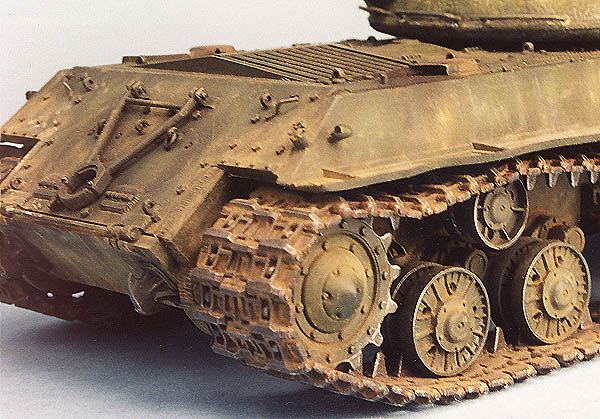
The quality of the kits is overall good, but they have a common fault: There is almost no room for the tracks between the return rollers and the fenders. In fact, the upper hull should be around a couple of millimeters higher. This flaw was discussed somewhat some time ago in the modelling internet forums, and several solutions were proposed. In general, most of them suggested to add some plastic strip between the upper and lower hull to act as a spacer. Well, in my models I chose not to correct this part, since I thought it could be somewhat complicated and I wanted to focus my effort on the painting and weathering work.
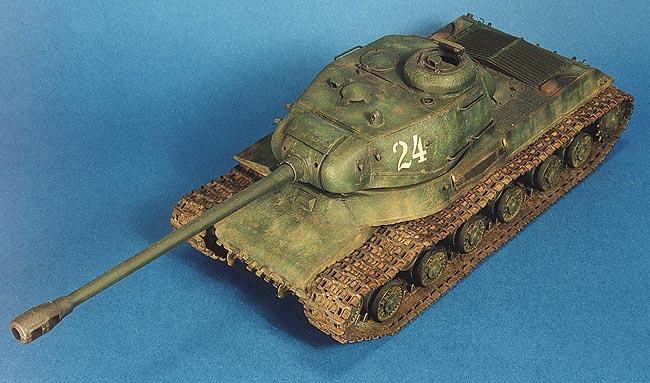
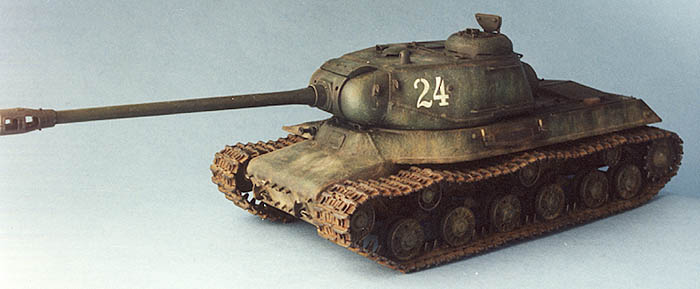
IS-2 model 1943
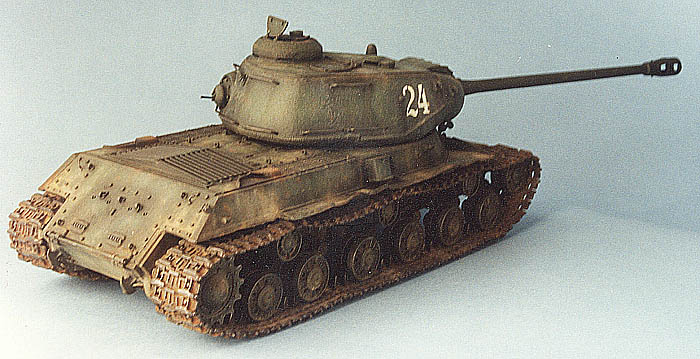
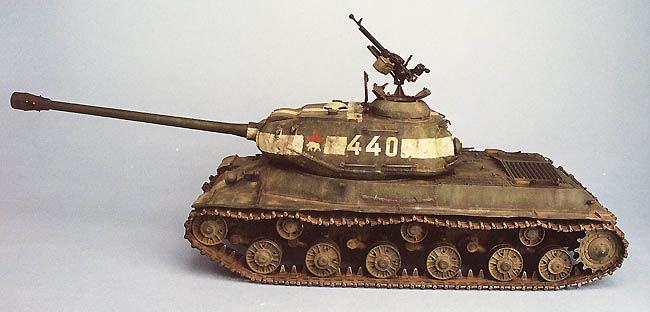
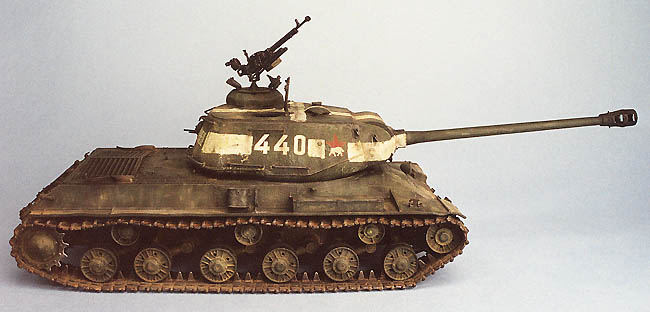
I used Dragon kit no. 6012. I wanted to represent a Stalin tank during the 1944' summer. Being six months old, it could be consider a veteran, a survival of the spring and summer Soviet offensives. Looking at pictures of the Stalins in action, it can be seen that many of them have a distinctive beaten aspect. The fenders seem to be the parts more prone to suffer damage, or simply to disappear. In many cases, no external fuel drum deposits are carried. Headlamps have gone away, and no tools, towing wires or external equipment are visible. Also, the gun travel lock at the rear of the vehicle is not present quite frequently. This is the look I wanted for my IS-2 model 1943.
Fortunately, to eliminate things is easier than to add new ones. Armed with a hobby knife I removed completely the left fender and the front and rear section of the right one. In the remaining section of the right fender, some damage was simulate by heating the plastic and deforming it. A fine strip of lead foil was added in the edge and also bent. I filled with putty the marks for the fuel drums supports, four at each side.

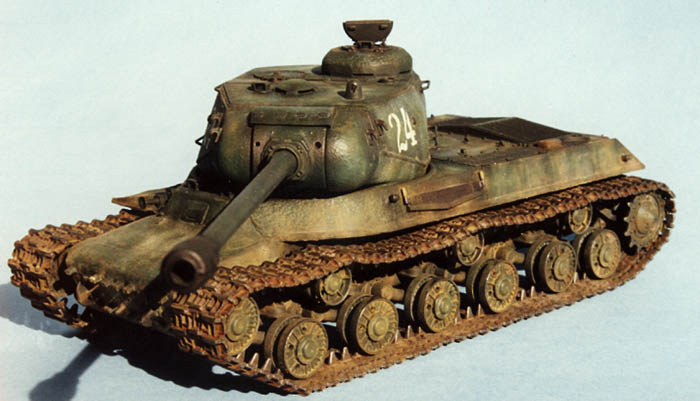
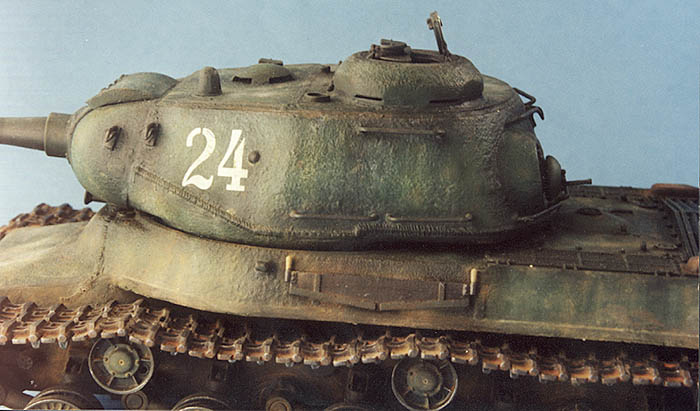
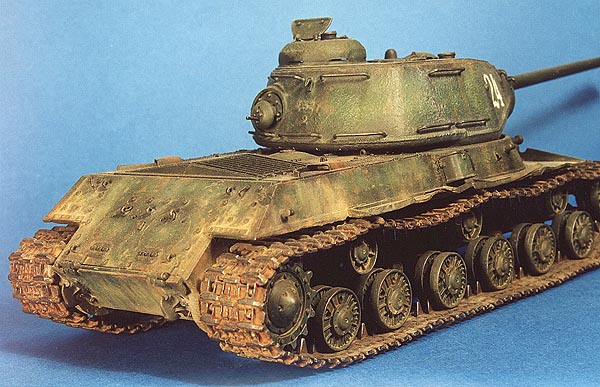
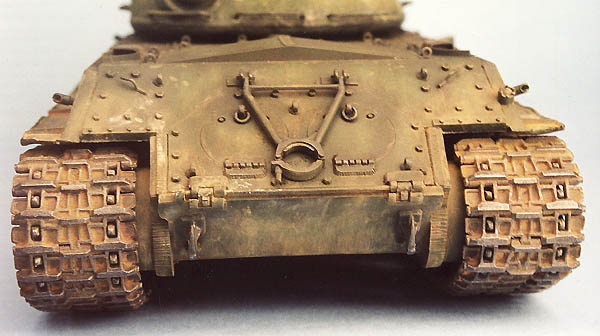
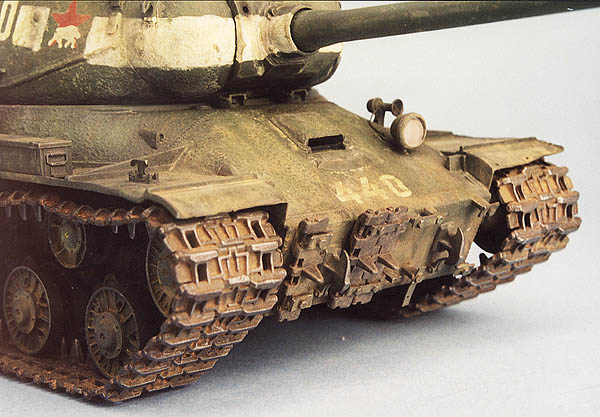
In this photograph of IS-2, the stepped shape of the front upper hull and the narrow gun mantlet are evident. The left fender was entirely removed, as it was the front portion of the right one. Also note the supports of the spare track links on the frontal plate.
With the fenders removed, the union of the lower and upper hull parts is especially noticeable and especial care must be given to hide the joint. Also, on the left side, were the fender is completely off, a weld seam, were the cast "nose" joins the body, was added made with putty slightly diluted with acetone, carefully deposited with a thin brush, and retouched later with a knife blade.
The headlamp is not added, and in its place a small strip of plastic marks its support. On the other hand, the siren is retained. The spare track links on the lower front plate were not included, and thus, their supports, quite visible, were added by using thick plastic card cut in small rectangles. A hole was drilled in each of these, to simulate where the retaining bolts were screwed. For detailing this part, there is an invaluable, and famous, photograph of a Czech IS-2m entering in a liberated city, without spare links and the supports quite well visible.
At the rear plate, two hooks made with wire were added, simulating the hooks for the towing wire. Small rings were hanged from the rounded lifting eyes of the small rounded hatches.
The turret is quite straightforward. The rough cast texture is well done here, as in the glacis of the tank. Just the base of the bracket which retains the external bar of the gunner's hatch was sanded down. A little bit of work has been done in the gun muffle brake. A weld seam was added around, since the original item was done of two welded halves. Also, the retaining screw was added with a small piece of stretched sprue. The rear machine gun had its barrel drilled.
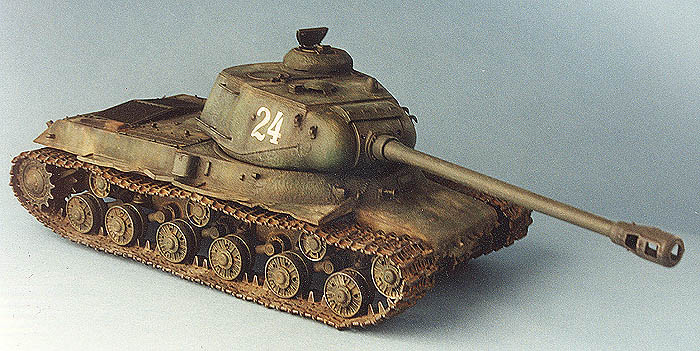
IS-2m UZTM (model 1944)
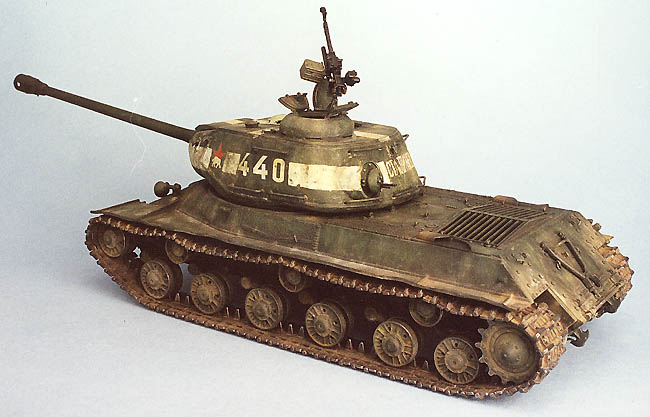
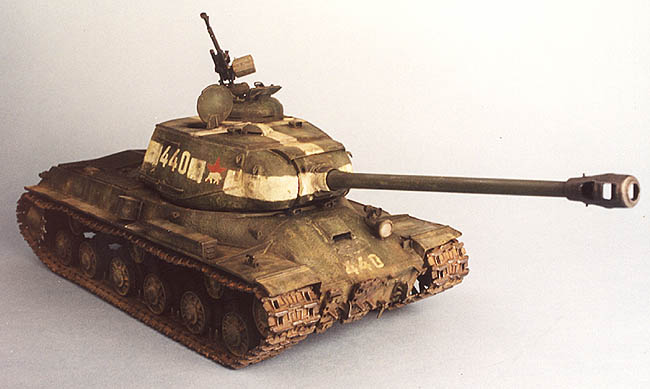
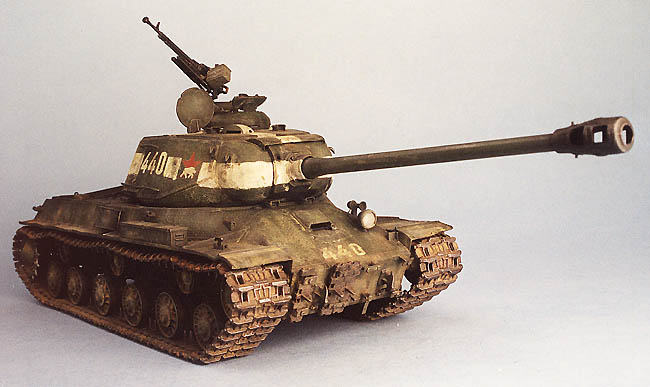
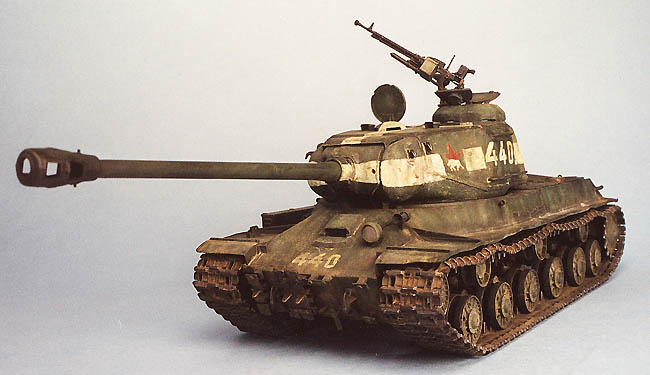
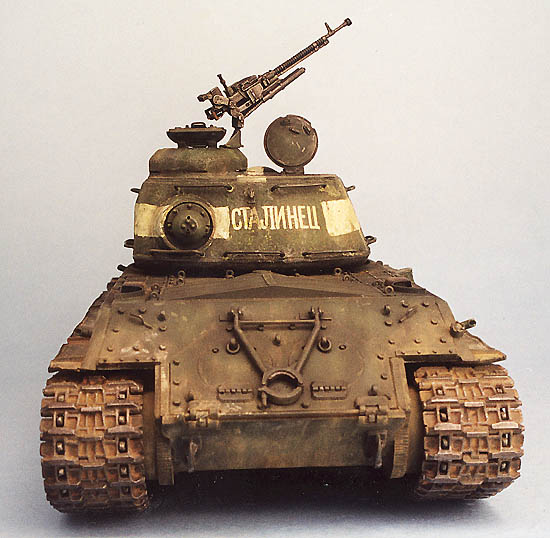
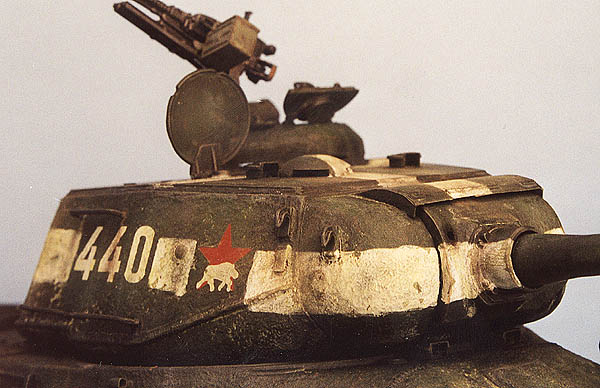
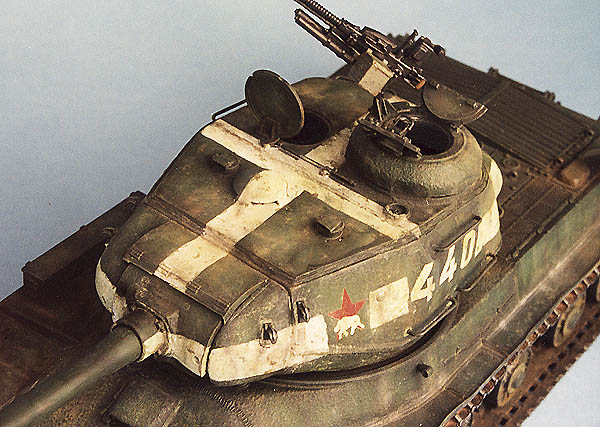
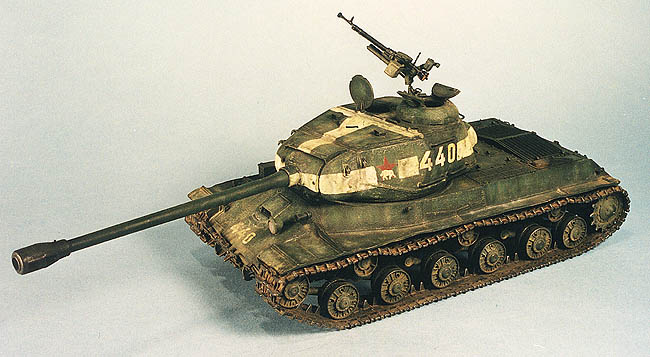
For this model I used Dragon Korean War series, no. 6804 kit. I have build it as one of the tanks participating in the Berlin battle. The aerial identification white stripes in the turret are typical for this period. My IS belongs to the 104th Guards Heavy Tank Regiment, 7th Guards Tank Brigade, the famous "White Bears". This nickname was gained after their Arctic campaigns in the far north of Finland and Norway, and a white bear on a red star was the symbol of this unit. There are quite a several pictures of IS-2 of this Regiment in particular, and of IS-2 during the Berlin fighting in particular. I have based my model in the look of these tanks.
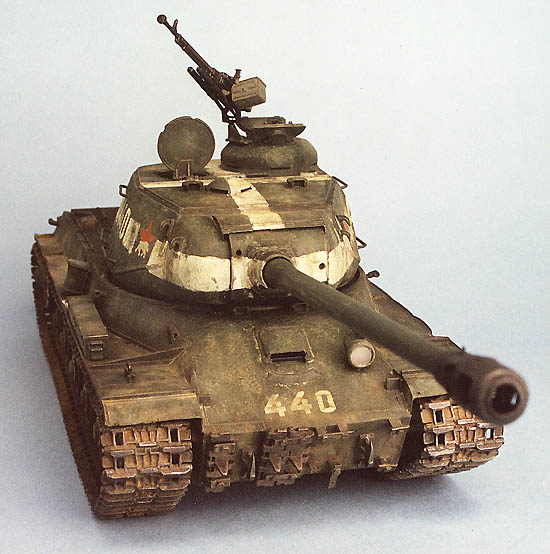
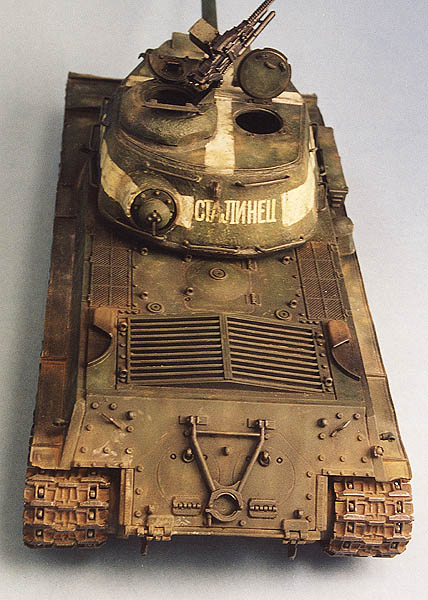
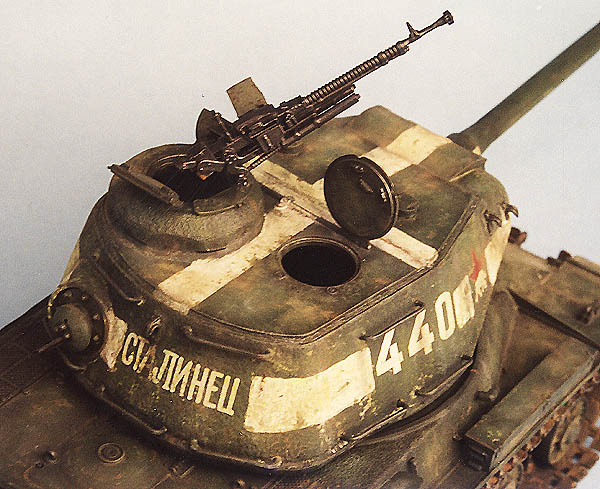
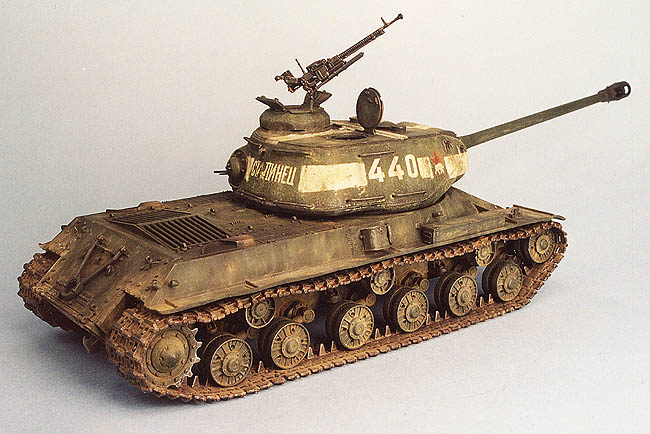
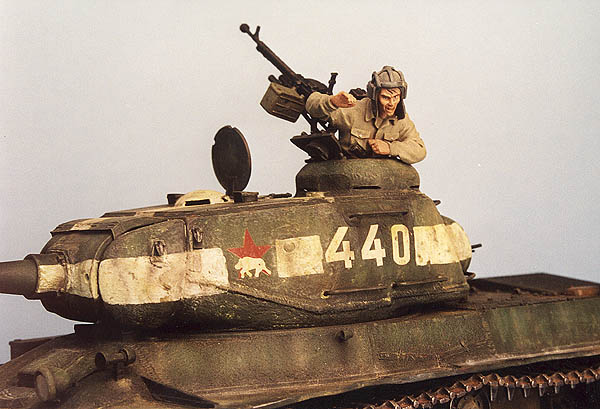
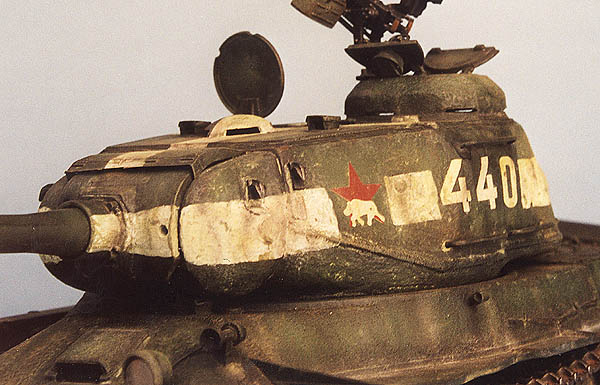
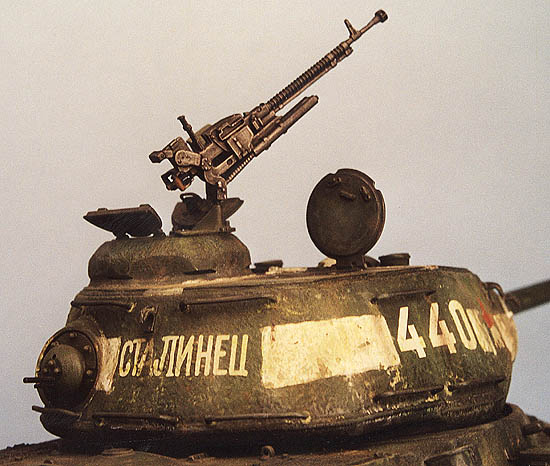
The heavy machine gun in the commanders cupola was seen on some IS-2m towards the end of the war. The white stripes on the turret, especially in the roof, were intended to avoid misidentification by allied pilots looking for German targets. The number in the front hull was typical of the "white bear" Regiment.
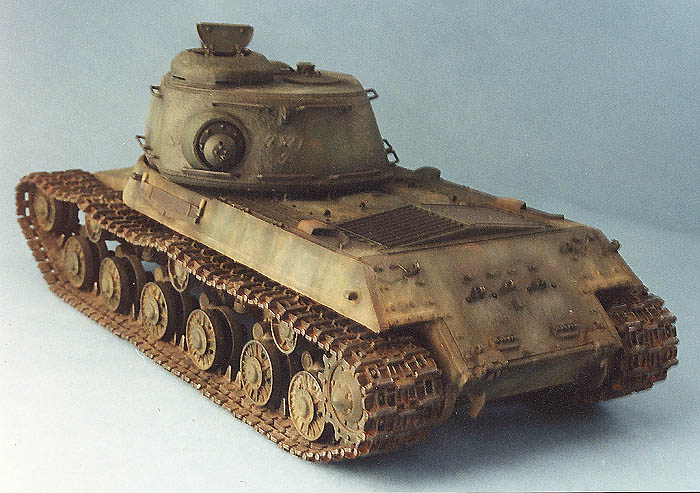
I removed the front and rear fenders, and simulate some damage on the remaining sections. the edges of the fenders were sanded down until they are thin enough. On the front, I remade completely the spare tracks supports in similar way than for the IS-2 model (see above). I used plastic card for the retaining clamps. The bolts were cut from the kit spare track link parts. The siren was detailed by drilling a hole, and the headlight support was remade with lead foil. Also, a piece of transparent plastic was included for the glass. Wiring both for the headlight and siren was added. The rear plate were detailed in a similar way than for the IS-2, with the addition of the gun travel lock, which attachment to the plate was somewhat detailed.
The work in the turret was essentially the same than for the IS-2. Only the inner side of the commander hatch periscope has been added, since it is visible here. I used a resin copy of a German periscope and some wiring to get a somewhat decent result.
The tracks
As I said before, the tracks are of the link by link type. Due to the commented problems with the very scarce room between the return rollers and the fenders, the approach I usually take, that is to paint the tracks separately and install them once the painting of the tank is almost completely finished, can not be used here. Thus, I use two different methods with the Stalins, but I think there is at least a third better one. I'll tell you the three all.
In the IS-2, I simply put the tracks before painting the model. The fit of the track is good, and the separate link tracks allow the possibility to achieve a nice sagging effect. The bad news arrive when you have to paint the track. It is much more difficult than to paint them separately, and you have to be careful not to paint the surroundings. I avoid this method if I can find an alternative. So the alternative I thought for the IS-2m was to mount four sections for track (upper part, with the sagging look, plain lower part and two rounded parts for the drive sprocket and idle wheel), paint them apart, paint the lower hull with the running gear (before I glued it to the upper hull), fit the tracks, and then, continuing the building process. When this is finished, it is necessary to cover the tracks and running gear while you paint the rest of the tank (with masking tape, for example). I do not like this method either, since I like to paint my models when they are completely built (except the tracks). Well, after the two Stalins were completed, I found out a better way (well, at least I think so). It would consist in not to gluing the sprocket, idler and return rollers, but just fix them in place with Maskol (a masking fluid which can be easily removed when dry). Then, I would make four sections for track, as in the IS-2m, take them out and finish the building process. After painting of the model and the tracks would have been almost completed (separately), I would remove the not glued wheels, install the tracks in place and finally, glued the removed parts, this time for good. Well, if any of you try it, let me know if it works.
In any case, the painting for the tracks were similar for both models: first, a base coat of matt black (with a brush and Humbrol enamel for the IS-2 and with the airbrush and Tamiya acrylic for the separate sections of the IS-2m) was applied. Following that, they received several washes of Humbrol enamels and oils of brown and reddish tones. Finally, they were drybrushed several times with a mixture of black and silver enamels, each time richer in silver and of less intensity in the application. The tracks were finally treated with pastels at the same time than the rest of the model, in order to blend them better with the rest of the vehicle (see below).
Painting the brothers
The base coat is airbrushed with Tamiya acrylics diluted with isopropyl alcohol in a ratio 25% paint and 75% solvent. The base color was dark green for the IS-2 and black green for the IS-2m. Both models were "pre-shaded" with their respective base colors. When this was dry (almost instantaneously) I gave a coat with a mixture of the base color and olive green in the center of the panels and surfaces, allowing to the previous color to show in the edges or lines of the model. A third airbrushing was done with pure olive green and a last one with a mixture 70% olive green and 30% dark yellow. At this moment, the model had some zones very contrasted, with a lighter color in the center, and a gradation towards the darker base color in the edges.
Next step was to mark the profiles and lines airbrushing a very diluted (more than 90%) mixture of black and matt earth, more of the first colour than of the second. With this mixture, some vertical lines were also made on the sides, front and rear plates, to simulate dirt. It is important to dilute quite a lot the paint and to be quite subtle. It is better to give several quick airbrush strokes if you want to mark more a line, than to use less diluted paint or to move slowly the airbrush.
Now, the decals. The IS-2 only carries the turret digits, of "Soviet style", which were borrowed from the decal sheet of Tamiya's t-34-85. The IS-2m carries a more elaborate set of marks, including turret numbers, the red star with white bear of the 104th Guards Heavy Tank Regiment, the same turret number repeated on the glacis and a patriotic slogan in Russian (which reads "Stalinetz") in the rear part of the turret. All the decals, except the slogan, came from the sheet supplied in the box. The slogan was also borrowed from a Tamiya t-34. The number 440 was transformed from the 404 supplied in the box, because there are several photographs of this later, so, in order to avoid to be catch in a mistake, I decided to build the more anonymous 404.
First, I applied gloss varnish on the zone where the decals had to be. After dry, I cut the decals on the paper with a x-acto with a new blade just until the printed area, eliminating all the surrounding film. After some few minutes in water, I slipped the decals into their position, which previously had been wetted with Microset. I removed the excess of liquid with tissue paper and applied more Microset on the decal. After some minutes, with a brush I damped the decal with Microsol. Sometimes, the decals wrinkle, but there is no problem. It is better not to touch the decal while it is wet, because it is very fragile. Let the decal to dry completely and apply a coat of matt varnish on the zone to protect the decal, and to eliminate the glossy look of the previous varnish.
On the IS-2m, the white stripes in the turret were painted with Humbrol enamel with a brush. I was considering to use the airbrush to do it, masking previously with tape the rest of the turret, but looking at photographs of tanks with these bands it is quite evident that they were painted very (sometimes very very) roughly, perhaps in a hurry or, more likely, by their own crews, and obviously some of them were not particularly gifted with artistic talent. Thus, the stripes were hand painted and several applications were necessary. I did not care to achieve a perfect finish. I preferred a rather crude look, sometimes with no straight borders or signals of brush strokes.
I made some chipped paint. There are several kinds of scratches. Some were made with the base color lightened, as if the outer paint was chipped off, and a previous coat arose. Others are made with dark brown or reddish brown colors, simulating the bare, slightly rusted metal. Since I wanted to give to the IS-2 a more "worn off" look, I painted more of this rusted chipping than in the IS-2m. In all cases I used a thin brush, and made small, irregular dots, or lines. I insisted along the edges, hatches, tool clamps and were I thought it was more likely the paint was chipped off or simply worn out, such as the zones were the crew would climb up and stand. I also did some chipped paint simply with a well sharpened soft lead pencil, specially were the surface should look shine because the frequent use, such as handles or the edges of the hatches.
The following step was the oil washes. First some general comments about this technique. I use Humbrol enamel thinner as solvent since it dries fairly quickly, does not produce these glossy stains and dilutes the oils perfectly. About the oils, I think that the brand is not very important, neither the exact tone or colour. As a general rule, I deposit a small fraction of the oils on a tissue paper and wait for 15-30 minutes. Some of the greasy components of the oils (responsible for the "oily" glossy stains) are absorbed by the paper and this does not affect to the pigment. I wet a zone of the model with clean Humbrol thinner and then apply a very small quantity of oil directly on the model, blending it quickly, or I dilute previously the oil in more thinner and brush this on the wet surface, dispersing it. I never use a general wash, but small washes of several shades in small zones. In my opinion, the trick is that the oil has to be blended with the surroundings (no hard edges should be visible), and to achieve subtle tonal variations in different parts of the same zone, for instance the side walls.
In both models, I started with a white oil wash. As always, it is better to do it very smoothly twice tan one with the brush heavily charged of white oil. The white colour gives some dusty and degraded look to the paint. After that, I tried yellow in the IS-2m... And I did not like the result. A couple of green tones followed, and finally, several shades of ochre and browns. With burnt umber I marked some recesses and details, but avoiding to leave a very dark ring around the nuts and other raising details. Then, I drybrushed very slightly (very, very slightly) some details with a mixture of Humbrol olive green and dark yellow. It should be so subtle that you almost shouldn't notice it.
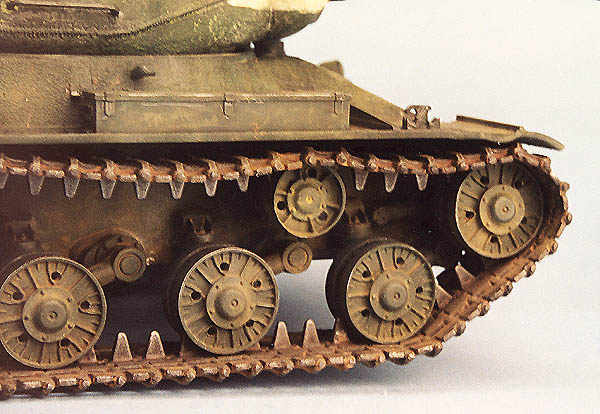
The oxide in the exhausts were achieved with a base of an reddish brown enamel and several oil washes of different shades of brown and ochre. The glasses of the periscopes were painted in very dark green, and then with gloss varnish. The surrounding areas of the muzzle brakes openings were airbrushed in matt black, and then, drybrushed with graphite powder. Something similar was done in the exhaust mouths. The teeth of the drive sprockets were slightly drybrushed with a mixture of silver and a little bit of grey.
And now, the pastel chalks. Before that, I put the tracks in their definitive position in the IS-2m. I used several shades of pastels basically a very light beige, olive green, a couple of ochre, a medium brown, a red brown, and black. With a knife I deposit a small amount of powder from the pastel stick on a small dish and a pick it with a small brush. Then I applied the brush on the model, but just in small, irregular areas. If necessary, the operation is repeated. Again, the trick is to create small subtle chromatic variations, trying not to hide too much the previous work. On the horizontal surfaces, such as turret roof, I mainly used lighter shades to simulate dust and dirty caused by the crew. On the lower parts, a bigger brush can be used. The tracks receive a generous amount of pastel, almost a dry wash, and after that, the excess was removed from the outer details with the finger. The outer details for the links were highlighted with a soft lead pencil, "drawing" directly on them.
The MG in the commander's cupola was the final touch. It is a small kit in itself, with several parts nicely detailed. It was slightly modified to backdate it as a WWII weapon (I think), sanding the upper part till it has a rounded look (the original, which I believe is a post-war model, has this zone squared). The MG was painted in matt black, and later brushed with graphite powder. Very light and subtle touches of a mixture of black and silver, drybrushed, completed the weapon itself. The ammo box and the mounting was painted in dark green, and some chipping was made here.
Conclusion
To model two versions of the same subject at the same time is something that I do from time to time. I did it before with a pair of Jagdpanthers (early and late), a pair of Jagdpanzer IV, Panzer IV... It is quite interesting since you realize better the differences between two, apparently, very similar models. In the Stalin brothers, I wanted to catch the look of the Soviet heavies in their unstoppable advance towards Germany. In the war time photographs, these tanks look dirty, dusty, sometimes tired, sometimes frightening. Well, is up to you to decide if I managed to get the idea. I'm quite happy with the results, and with the opinion of a friend of mine, excellent modeller, who described the Stalin brothers as "atmospheric".
Click the thumbnails below to see larger pictures of the IS-2
Click the thumbnails below to see larger pictures of the IS-2m

References
"IS-2 Heavy Tank, 1944-1973", by S. Zaloga and P. Sarson. Osprey New Vanguard no. 7. London (UK) 1994.
"Stalin's Heavy Tanks, 1941-1945", by S. Zaloga, J. Kinnear, A. Aksenov and A. Koshchavisev. Concord Publications Company. Hong Kong 1997.
"T-34, KV". Model Art. Japan 1989.
The Russian Military Zone web page
| Main | What's New | Articles | Reviews | Gallery | Think Tank | Contests |