
Dragon T34/85 model 1944
Mario Ales
1-Historical background.
The T-34 is probably one of the most famous tanks of WWII together with American Shermans and German Tigers and Panthers. After the first encounters with Tigers during January 1943,and intelligence reports of the new Panther tank, it was clear to the Soviet High Command the necessity of a substantial improvement of the T-34.
This was better understood after the wild Kursk battles, where the russian tanks were easily penetrated by the heavier german guns,while the russian F-34 gun could not pierce the thicker enemy armour unless at close range.
After rejecting the unsuccesful plan of the T-43, a simply uparmoured version of the T-34, the GKO (National Defense Committee) decided to start a new project to upgun with an 85 mm gun the T-34 whose teething troubles had been finally solved.
Three different teams worked at the project,resulting in three prototypes which proved to be a failure mainly because of a two man turret too narrow to accept the new larger gun without seriously restricting the crew’s freedom of movement. Further studies led finally to a three man turret, which could easily accomodate the gun.
Production started on January 1944,with the first tanks receiving the D-5T gun,the same used on SU-85s,which, from March 1944,was replaced by the more efficient ZiS S-53, resulting in the definitive T-34\85 model 44, produced in nearly 50,000 units up to May 1945. The T-34\85 entered service in the spring of 1944 with the 1st Guards Tank Army and immediately showed its superiority in gunpower,armor and mobility when facing Stugs III and PzKpfw IV.
But,despite the more powerful gun and the advantage of the new three man-turret which at last freed the commander from being the loader too, the T-34\85 wasn’t still a really match for Tigers and Panthers,as the ZiS S-53 could not easily penetrate their thick frontal armor, even if someone can argue that these German beasts were heavy and not medium tanks according to Soviet standards.Nevertheless its great number made it possible to simply overwhelm the enemy from battle to battle till the final and most merciless one in Berlin.
After the war, production continued up to 1956 with progressive changes and improvements.The T-34\85 equipped all the ex Warsav-Pact countries and was exported to several other foreign countries.It has taken part in almost every post WWII conflict such as in Korea, Vietnam, Angola, Middle-east and so on.
We have also seen some model at work during the tragic war in Bosnia.
Really a longeval project, nothing to say!
2-The model
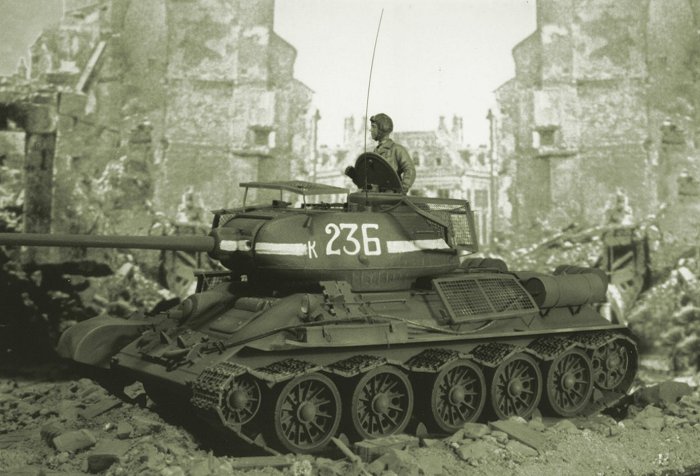
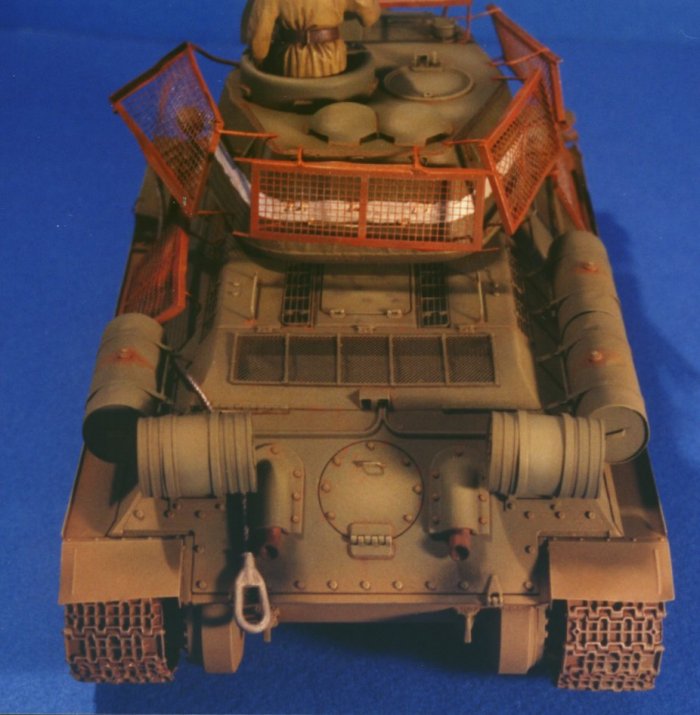
Several years ago, when I bought the Squadron Signal book dedicated to the T-34 in action,I saw the photo and the colour table of a tank during the battle of Berlin,covered with bed springs for a premature detonation of panzerfaust’s shaped-charge warheads, really deadly during street fighting.So, when finally Aber released their sets dedicated to the T-34 comprising a fret with the bed springs, I decided to go for it. Nowadays when I want to buy a plastic kit I need to consider two important things:its quality and my budget.
Infact if I have a well detailed kit, but I am lately forced to buy expensive aftermarket working tracks,turned barrels, resin conversions and photo-etched frets,the expense becomes almost unsustainable for a common modeller like me,seriously hampering my hobby. Bearing this in mind I started to search for a good kit.
There are several manufacturers producing T-34\85 kits:Dragon, Zvezda, Tamiya, Maquette.I chose the Dragon’s one for two reasons.
First it is the most accurate kit in terms of dimensions.For example you can refer to the special issue n�4 of Military Modelling Vol.28 n�12, where, in an article by Mr. S.Zaloga, there is a table with measurement comparisons from which you can easly see the precision of the Dragon’s kit.
In second place the kit is so well detailed that it can be assembled straight out of the box and still obtain a superb model. But most important to me is that apart from the necessary photoetched parts, it does not requires the expensive aftermarket details such as working tracks and turned barrel, keeping the price into reasonable limits. The only problem is that probably it is out of production. I found mine in an Austrian shop via internet,so if you find one grab it: it is a good investment.
T-34\85s were built by several factories, mainly Zavod nr. 112, Zavod nr.174 and Zavod nr. 183 resulting in minor building differences.
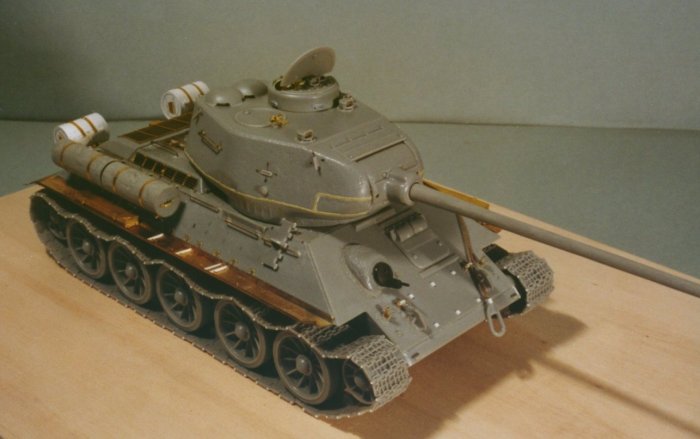
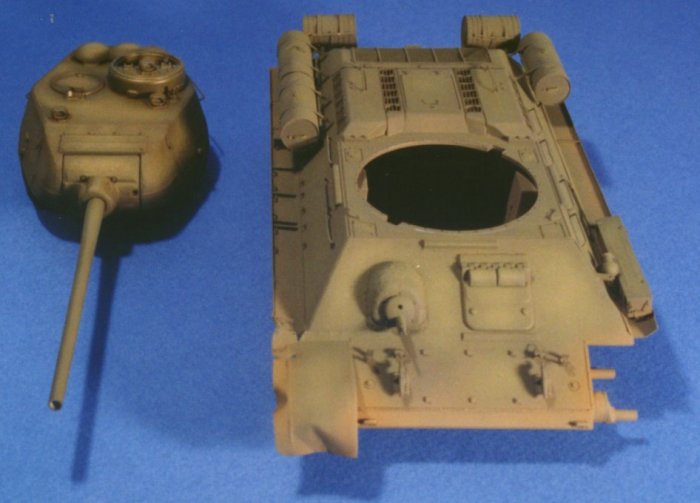
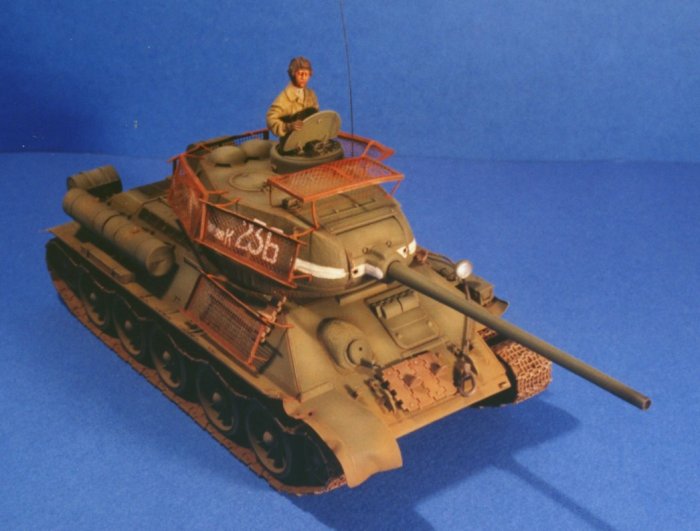
The kit depicts a middle-late vehicle with a "flattened" turret marked by its tipical welding seam between the upper and lower turret halves, to distinguish it from "composite" and " angle-jointed" tanks.
It has the late ZiS S-53 gun, late Mk-4 periscopes, turret mounted radio aerial, double mushroom vents back on the turret and single commander’s hatch. It also features the square front fenders of late models, that I decided to substitute with the round ones ,and the late perforated wheels. Strangely the kit has the electrical conduits leading to the MSDh smoke cannisters,but misses the cannisters themselves. Finally,at the end of assembling, I was left with a few extra parts for my spare box, according to the good Dragon tradition.
3-Aber Photo-etched parts
To super detail my model I decided to use the photo-etched Aber sets mainly because I think they are the best and most detailed on the market at a reasonable price.
I used the following sets:
-35045- the main fret,
-35A45- the fenders, with the choice of square or round front fernders,
-35A46- the side fuels tanks and smoke cannisters,
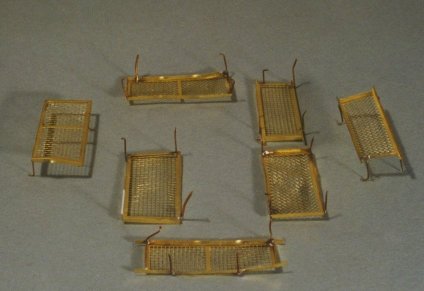
-35A50- the bedsprings.
Probably these sets are not for the beginners.
Infact the level of detail of these brass sets is incredible, with a great number of the smallest pieces I have ever seen such as working hinges,retaining chains and pins, rivets, latches, engine grilles and so on. Every working detail such as the spring-opening mechanism of the commander’s hatch is reproduced down to the single spring, and it is working too. So it is required a great attention when gluing or soldering them for not ruining them irreparably. The only real drawback is represented by the instruction sheets,probably too crowded with drawings and sometimes misleading.
Finally it is needed a lot of care when handling these microscopic items to avoid loosing them in the kit part’s heaven or modeller’s hell as I name it:the floor under the workbench.
4-Running gear
The perforated wheels are really well detailed down to the lettering showing the size of the tires!
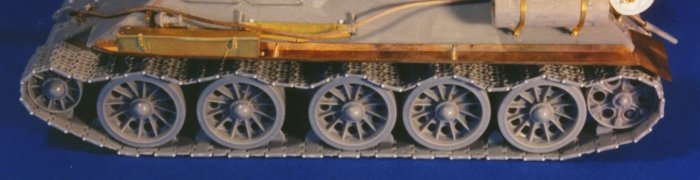
The tracks are represented by single links.I think this is the best solution because it is the only way to achieve the right slackness. Every track requires 74 links, and it can be very useful to make a dry-fit test before gluing the links and the adjustable idler wheel, to give the right sag to the tracks. They have a very good surface detail with the two holes in the plates without tooth and are very similar to the old non-working Modelkasten tracks.
Neverthless, when I cut them from the sprue, I noticed that it was almost impossible to clean from the moulding line the links with the pins without damaging the same pins.So I was forced to file the pins away and make new ones with the punch and die set.
It was a very tedious job to make and glue more than 320 pins.I made it in two evenings resulting in a splitting headache, but the result repayed for the effort, mostly because I was not forced to buy the expensive aftermarket working tracks.
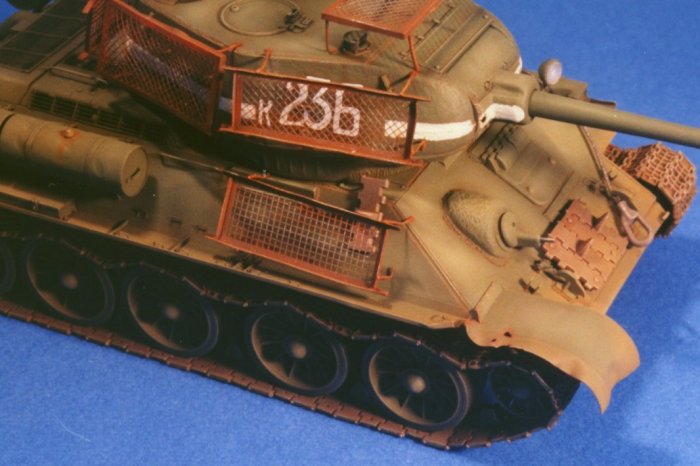
5-The hull
The hull required a moderate amount of work. First of all it was necessary to scrap the moulded fenders, to install the brass ones.Before shaping the fenders, it can be useful to heat them red cherry and let them cool slowly.This will soften the brass, making it easier to bend them and to add battle damage.
Then came the most difficult job of the entire project:to replace the kit’s engine grilles whith the photo-etched ones.
The Aber parts are really excellent, but very difficult to handle without breaking.The real problem is to bend correctly the frame of the grilles giving the right shape and size.Two or three mistakes and you’ll break the frame as I did.If it happens, do not worry.Infact you can replace the broken brass part with a 0,25 mm Evergreen styrene strip one millimeter wide, wich has just the right dimension.After several attempts I finally managed to do it, and I must admit that the result is terrific.
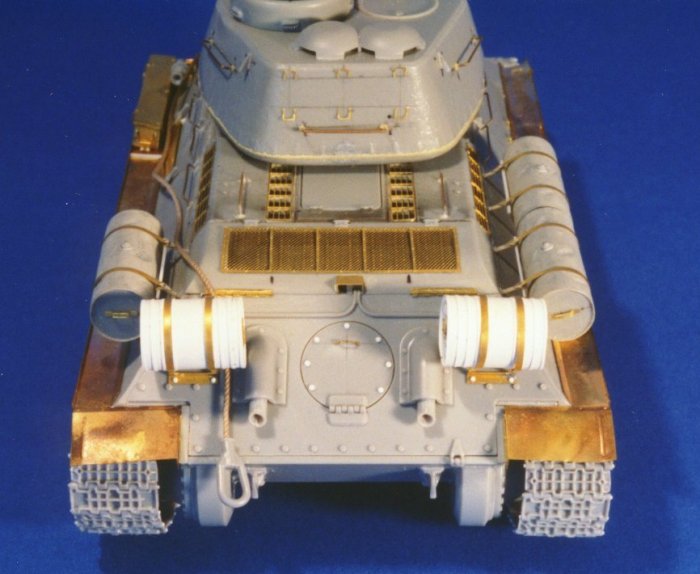
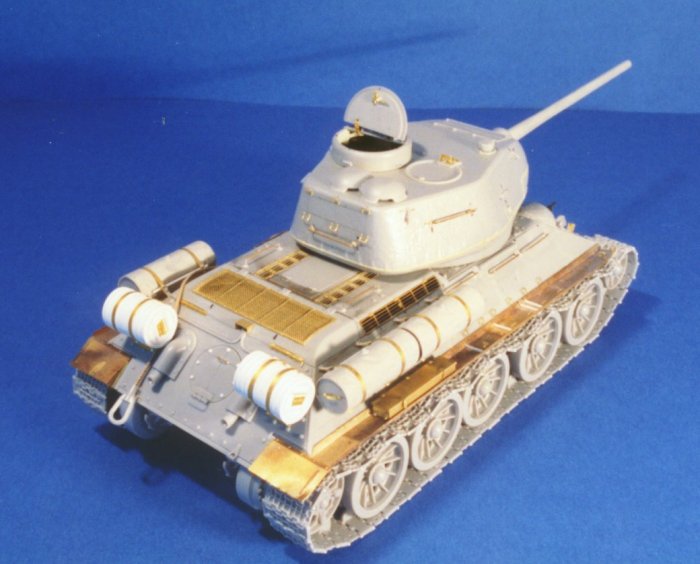
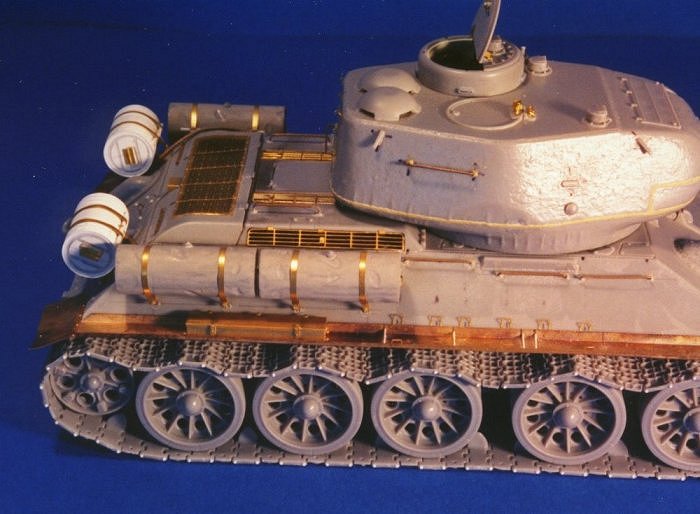
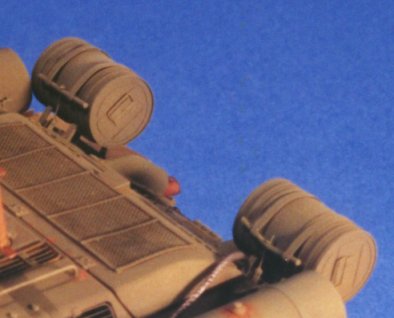
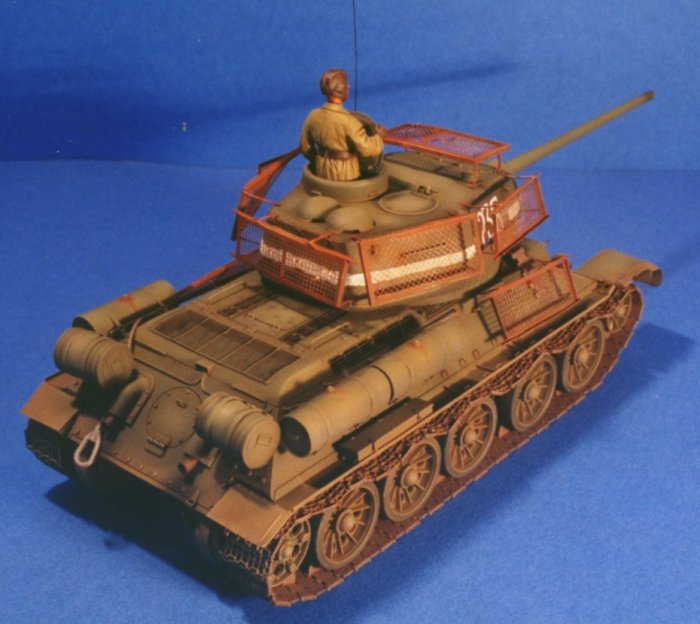
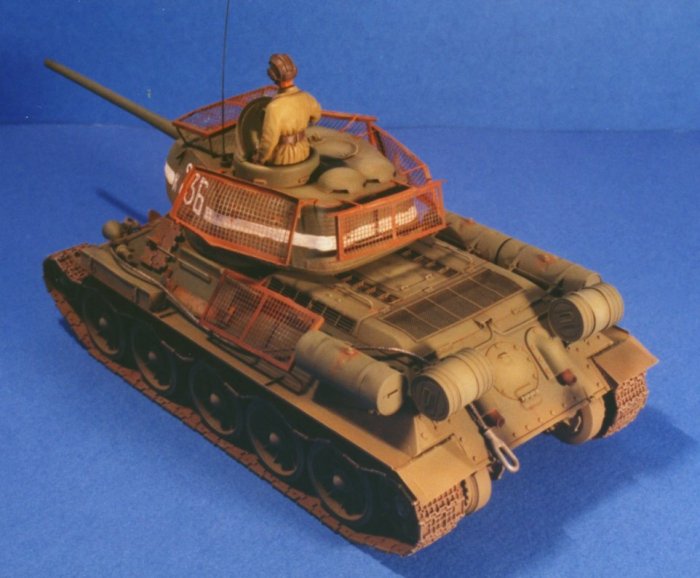
I replaced the kit’s tie-downs with the Aber ones, and made new handles with brass rod. The back engine cover received the new photo-etched mesh with frame, the two working hinges and the cover over the electrical conduits slot. Strangely, the kit’s rear circular port misses the seven rivets that I made with the hexagonal punch and die, and added a new brass handle too. I decided to use the kit’s fuel drums as they are well detailed and require only a good filling and sanding to obtain a nice look.Then I placed them onto the model using the Aber supports and straps.
The photo-etched smoke cannisters are rather difficult to assemble, so I decided to scratchbuid them,using the Aber ones as templates.

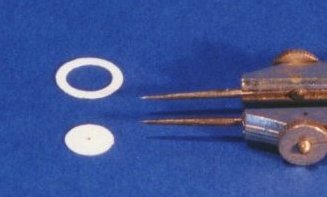
I used a 10 mm brass tube covered with 0.25 mm plastic card, detailed with 0,25 * 0,5 mm Evergreen plastic strips and the Aber handles.To build the sides of the cannisters I found really helpful to use a modified tool:two dividers with one of the two points beveled to a cuttig edge.This permits to cut rings and circles of almost every size, smaller than those I can achieve with the classic Olfa cutter.
Again I mounted them using the photoetched supports,straps and locking mechanism.
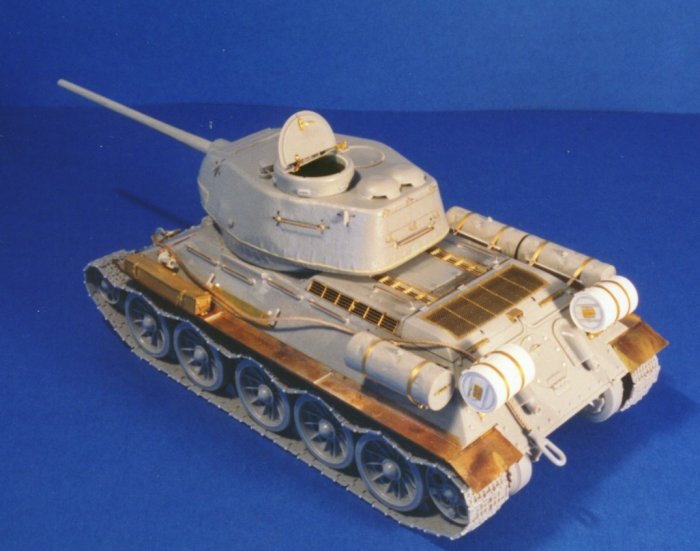
I assembled the two bed springs by soldering them for greater strenght and left them apart till painting was done. The front plate needed the Aber latches for the towing hooks and a new tamiya machine gun, as the kit’s one was broken. Finally I added the last Aber details such as fender stowage boxes, saw, horn and lamp supports.The kit provides a well detailed clear piece to make the lamp glass, relieving a poor Italian modeler from searching for the always hard to find MV lenses.Thanks Dragon!
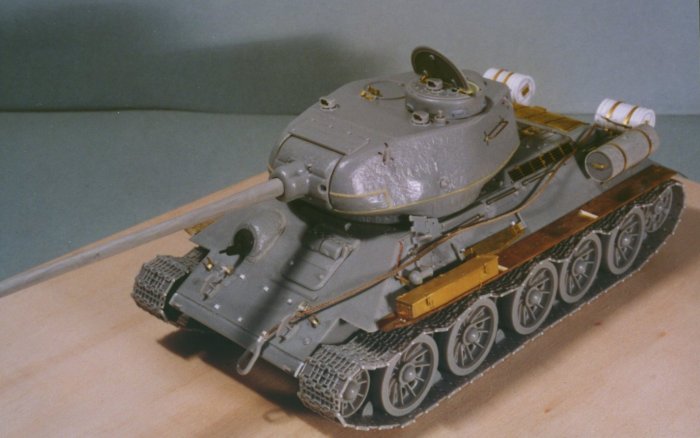
6-Turret
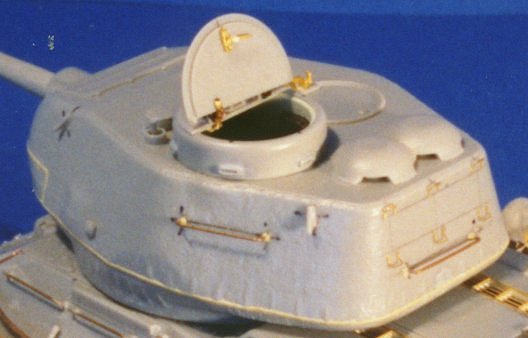
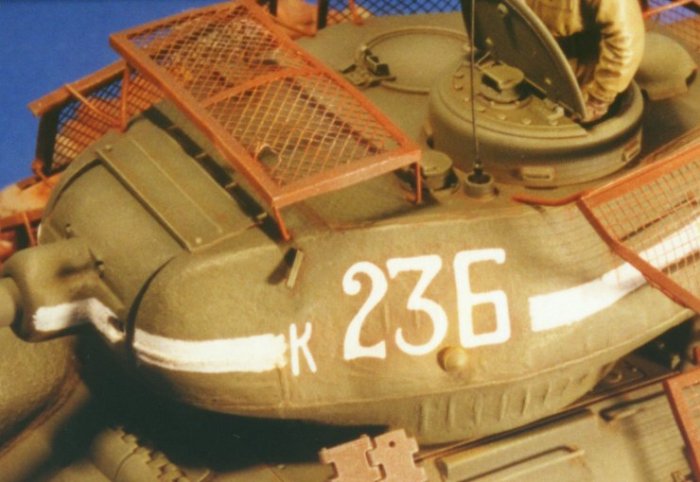
The turret has a beautiful surface casting detail, and needs only few improvements.First of all it is necessary to add the welding line between the upper and lower halves.Usually I use a thin rolled line of Milliput worked with an X-Acto blade.Then ,when dry, I give a final texturing with a rounded dental burr in my motor tool set at very low speed.
The same was done to achieve the welding beads on the various handles. I made new handles from brass rod and added the six Aber photo-etched tie-downs. The two hatches requires only new photo-etched stops, latches and spring-opening mechanism. Then I decided to add the six commander episcopes even if they are almost invisible when the figure is put into the turret. Luckily the gun was not warped despite of its length, and I could assemble it with minimal filling and sanding. Finally I assembled the five bedsprings, replacing the photo-etched legs with brass rods of different size for a more realistic look, and soldering them for more strenght.I left them off till painting was done for ease of handling.
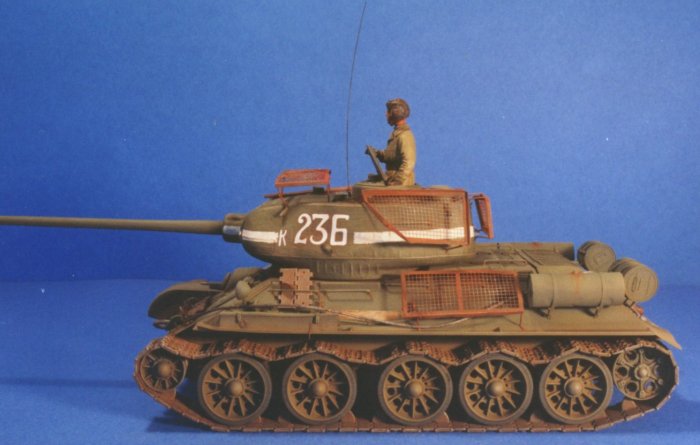
7-painting
Russian tanks were usually painted dark green,with an optional white-wash during the winter months.Mimetic schemes were extremely rare, so I had only one choice to paint my T-34:green. From the modeller point of view it is not really important which kind of green to use, because it is well-known that because of weathering,climatic conditions, supply difficulties,seldom two tanks of the same platoon had the same shade of color.So I feel free to use wichever green I like to obtain the best final result. Personally I use Humbrol enamels with an airbrush, so I will refer constantly to them unless differently specified.
I did not use white or grey undercoating, but I started by airbrushing a darker shade of the base color, in this case matt 66, as any flaw can be easly corrected at this point. Then using a lighter shade like matt 114, I oversprayed the whole model, insisting on the flat plates and raised areas.Lastly, I repeated the process using matt 86 slightly lightened either with matt 72 for a faded look or with matt 84 for a more bleached looking.
At this point,setting the airbrush to the finest line possible,I resprayed all the panel lines and recessed corners with the darkest colour to enhance the difference among different areas.This gives the first and most important (to me) shading to the model. The lower hull and runnung gear were oversprayed with matt 29 followed by matt 26 and matt 72 on the raised areas, to give a dirty looking to the model.
After twelve hours I sealed the entire model with an overspray of satin acrilic paint to protect the paint during the following steps of weathering: washes. For the washes I used oil colours of different shades to break the shape of the model and improve its look :a very dark brown like Vandyke brown for the running gear,a mix of burnt sienna and burnt umber for the hull and turret to give a rusted appearance and black for the engine deck.
After the washes were completely dry I started drybrushing.It’s imperative to use the best flat brushes even if expensive to obtain the best result. The main body was drybrushed with matt 86 lightened with matt 72, the lower hull and running gear with matt 26 lightened with white. I added a drop of matt aluminium to the drybrush mixture on the most raised areas like rivets and handles to give the impression of worn-out paint.
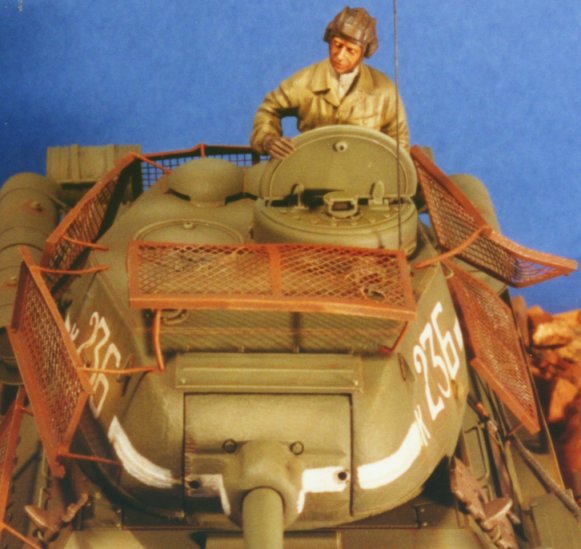
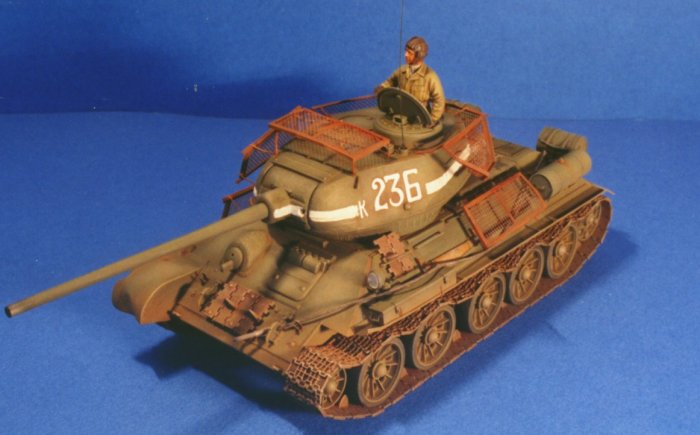
If you like chipped paint you can add a few spots with a pointed brush using aluminium for a shiny appearance or burnt sienna for a rusted looking as I did. The tracks, as well as all the rusted items like the bed springs,were painted matt 98, washed with burnt sienna and drybrushed either with aluminium or matt 100 for a more or less rusted looking. The white turret band was roughly hand painted like the real one, while the tactical number and letter came from the dry transfers Verlinden sheet n�288 dedicated to the russian tank slogans.
Finally, as tanks during street fighting were usually covered with a great layer of dust,I used several shades of pastels on the lower hull and running gear to give this appearance to my model.
8-The figure
I like to add one or two figures to my models,as they give life and help to better appreciate the size of the vehicle. Unfortunately, it is rather difficult to find a good Russian or French, Italian,Japanese etc… figure in a sea of german tankers and panzergrenadiers. Anyway, I found a stock Verlinden figure from its Russian tank crew, with the rigth arm replaced by one taken from a surrending Iraqi, to obtain a good fix into the turret.
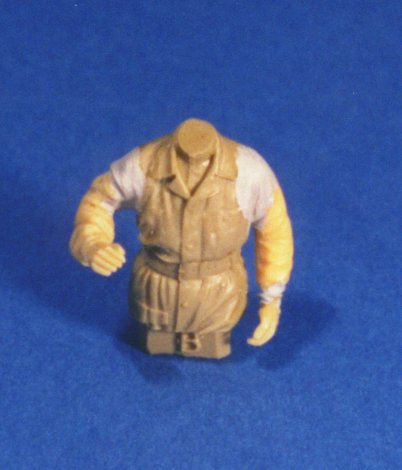
The tanker is shown wearing an overall and a leather tank helmet.The overall could be black,grey or khaki as a result of several manufacturer or lend-lease supplies. For the skin tones I used oil colours over an undercoating of matt 63: burnt sienna for the base and shadows,followed by cadmium yellow and white for the highlights,raw umber for the beard, and a touch of cadmium red over cheeks and lower lip,all using the wet on wet technique.
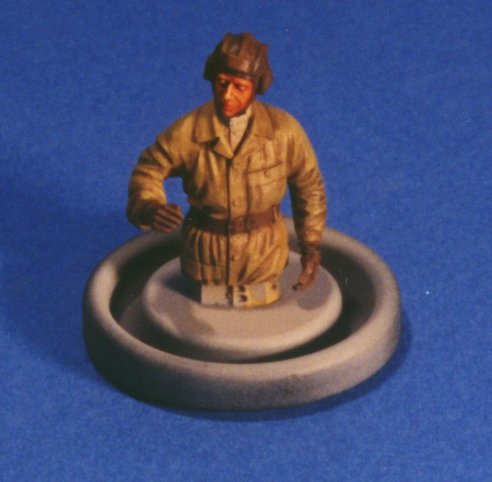
I painted the overall matt 84, the shirt matt 72,the gloves, helmet and belt matt 170.The shades where blended to the still wet base, mixing the base colour with raw umber,while, once dry, the highlights were obtained drybrushing a lighter shade of the base colour.All the leather items were washed with black and then drybrushed with raw sienna,burnt sienna or raw umber to obtain different shadings of leather.
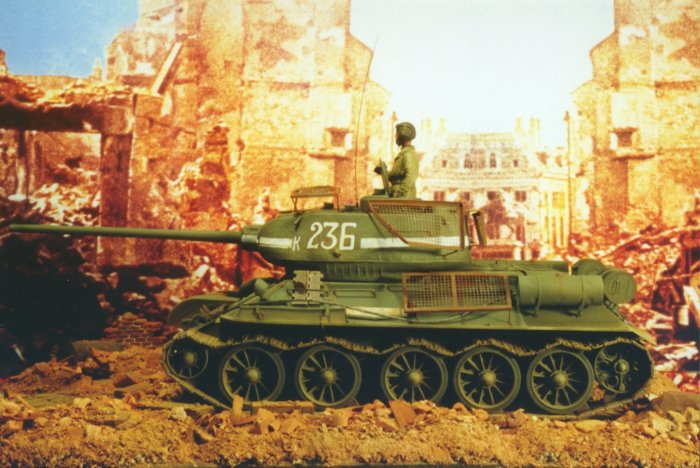
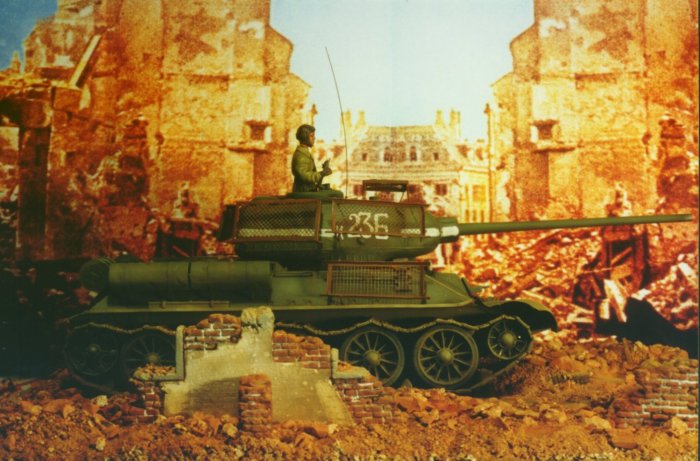
9-Groundwork
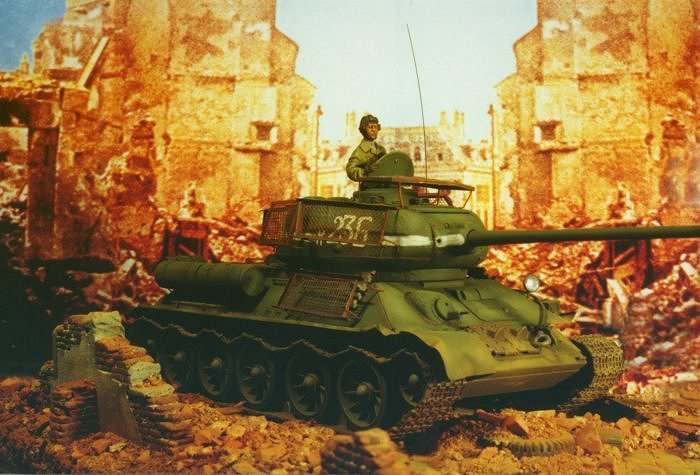
At this point I needed to put my tank into a scenic setting.
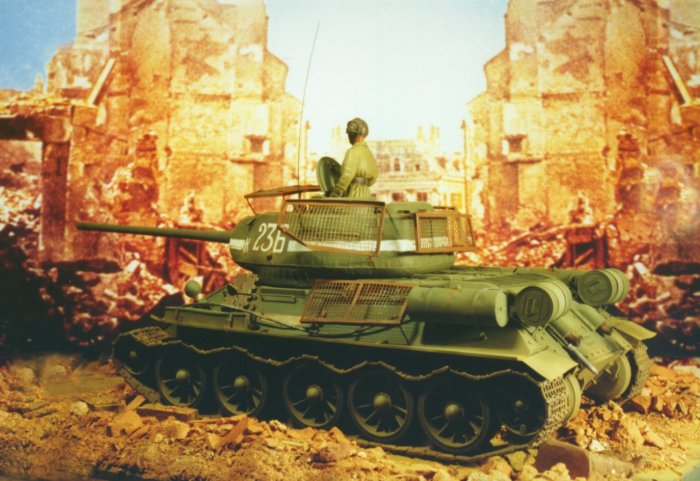
I decided for a ruined section street during the last days of the battle of Berlin according to the photo in the book. For the road section I poured out some plaster into a rectangle defined by four balsa beams four millimeters high,obtaining a slate that I carved with a pointed blade and textured with a brass brush.The same for the ruined wall sections, using this time a ten millimeters balsa beam.
For the groundwork I used Perma-scene, a material I found during a journey in the U.S.A..It has a very coarse texturing and I find it ideal in urban scenes where a lot of rubble is required. I added some commercial debris,a few items such as barrels, crates, rounds etc…, and then I painted, weathered and dusted the whole thing the usual way.
For the photographic background I used a picture found in an old magazine.I scanned it into my computer,adapted it with a photo-retouch computer program (Pait Shop pro 6) and printed it on photographic paper. Finally a self-made wood base and a glass display took care of my T-34\85.
References and availability.
-T-34 in action:Squadron\Signal Publications,INC.1115 Crowley Drive,Carrolton, Texas 75011-5010. U.S.A.(higly recommended)
-Russian T-34 battle tank:Schiffer Publishing, Ltd.77 Lower Valley Road,Atglen PA 19310.
-Dragon Models Ltd.,603-609 Castle peak Road,Kong Nam Industrial Building,10\Fl.,Tsuen Wan,New Territories,Hong Kong.
-Aber:40-060 Katowice ul. Fliegera 8\6 Poland.
-Verlinden Productions,Inc.,Lone Star Industrial Park,811 Lone star Drive,O’Fallon,MO63366 U.S.
-Perma-Scene: Permacraft Products Inc.,P.O. Box 81142, Cleveland,Ohio 44181,U.S.A.
| Main | What's New | Articles | Reviews | Gallery | Think Tank | Contests |