
The 88 mm Flak 36 in 1/72
Hasegawa kit MT-38
By Stephen Brezinski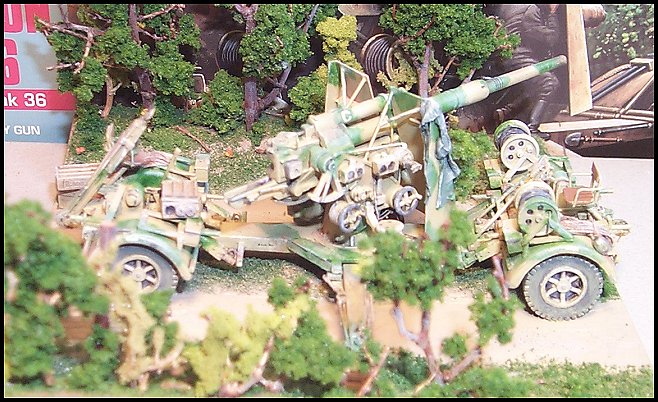
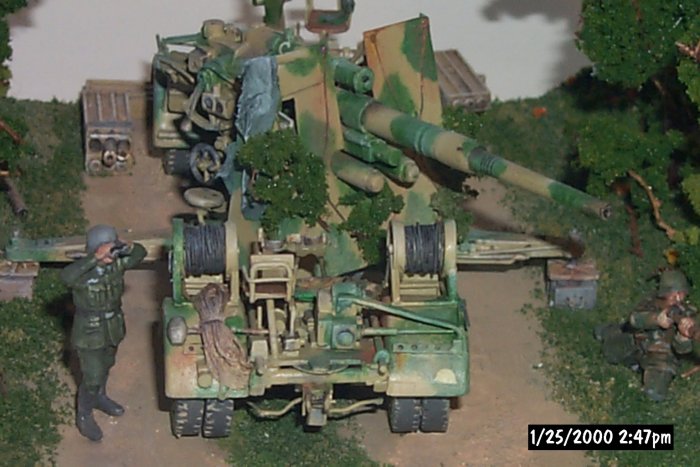
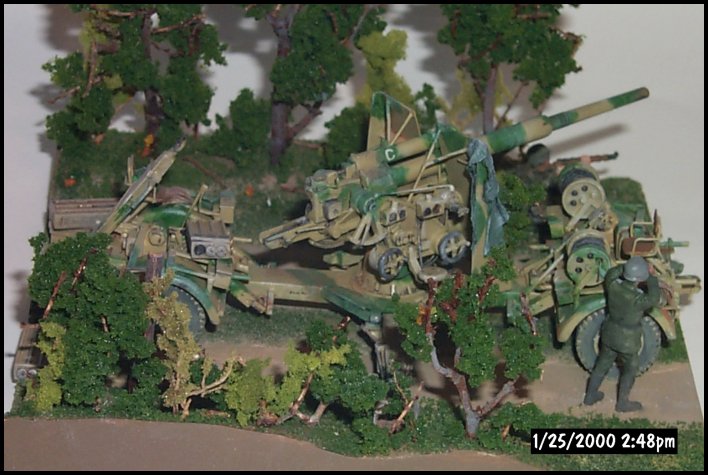
Completed Hasegawa Flak 36 in front of very nice box art. The box art gave me inspiration for the base & display.
I
n 1999 Hasegawa released a number of enhanced and modified older kits to bring new variants of their original releases (thank you Hasegawa). Examples include the Panther w/ steel wheels, the Panther Ausf F with a new turret, and this Flak 36 kit: a variant of the Flak 18 kit (Kit #MT-10) with a new gun barrel.For historical background, the origin of the Flak 18 88-mm gun dated back to WW 1 as an answer to higher flying and faster aircraft. Famous as an anti-aircraft gun, it is even more famous for its use as an anti-tank weapon. Its use in a ground role as an AT gun and artillery piece is so well documented already I shall not go over its history any further. This is also the same weapon (in modified form) that armed the Tiger Ausf. E and Ausf H [Tiger 1].
In reading this article remember that I make no claims to being an expert on artillery pieces so please forgive any misnaming of parts and details.
The kit: This Flugabwehrkanone (Flak) 36 kit consists of about 90 light gray styrene parts including the barrel for the Flak 18, four ammunition boxes, six figures, and ammunition. The shells for the kit unfortunately are the bottleneck type like used in the Tiger Ausf E tanks, and should be the longer straight rounds. The Flak 36 version differed from the earlier Flak 18 in having an easier–to-change three piece gun barrel, new cruciform platform and two new trailers, the Sonderanhaenger (or Sd.Anh) 202. While Hasegawa gives you a new, additional, Flak 36 gun barrel, they opted not to issue new trailers (one at each end of the cruciform platform) to produce a correct Flak 36. As the barrels were interchangeable this does not really pose a big problem if you wish to build it out of the box. At Aberdeen is an example of a Flak 36 barrel on a Flak 18 carriage & Sd.Anh 201 trailer. Overall Hasegawa put out a nice kit with clear directions, good fit, and clean crisp molding with little to no flash. Unfortunately the kit lacks much detail and could stand some correcting of the detail it has. As I already have a Flak 18 I opted to go thru the work to convert it to a factory issue Flak 36.
Resources: In upgrading this kit there are so many small, though detailed changes that I cannot go into all of them in this article. I recommend that you seek good photos showing close-up details of the mount and attachments. References I found helpful were Schiffer’s hardcover book The German 88 Gun In Combat by Janus Piekalkiewiscz [which focuses on the Flak gun’s AT and ground use], photos of the three guns at Aberdeen Proving Ground, and the kit instructions of Tamiya’s 1/35 scale Flak 36/37 kit. Schiffer also publishes at least one inexpensive softcover book on the 88 gun. At George Parada’s Achtung Panzer website there is also an excellent section on the Flak 88 with photos of a restored Flak 36 and Sd.Anh. 202 trailer, that I wish I had when I was building this kit. I have noted so many slight variations in details of the actual guns in photos, that I would not worry if something wasn’t exactly as one photo or expert claims it is.
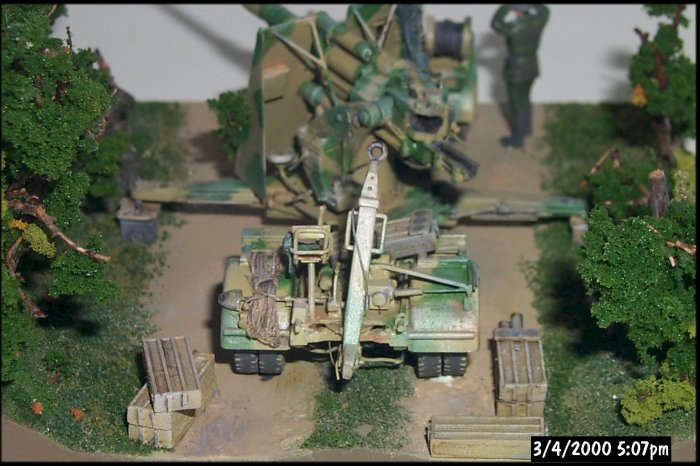
The Trailers: As the Flak 36 had the same Sd.Anh. 202 trailers fore and aft, I had to steal a single-axle 4-tired Sd.Anh 201 trailer from a Flak 18 kit. Be aware that the Flak 18’s Sd.Anh. 201, and Flak 36 Sd.Anh. 202 trailers were not interchangeable between the cruciform mount of the two guns. In other words, you could not pick up a Flak 18 carriage with the later 202 trailer. If you study the trailers at Aberdeen you will quickly see why. Except for the communication-cable spools I discarded most of the fittings. Scratchbuilt with styrene card, brass, and wire were the towropes, storage boxes, communication-cable spool frames, hand tools, ropes, fender supports and crew seats. As I was building two identical trailers I could have built just one of each part and resin-cast a second for exact copies, though most parts were simple enough to construct and only a few of each were needed. Two gun-crew members road on the trailers so the seats are critical to a convincing model and were made with plastic card and brass wire (see photo).
The Gun: using your references, the gun should be detailed with the appropriate elevation and traverse indicator gages, the recoil slide opened/hollowed out, assorted levers added and the barrel drilled out, etc. A solid recoil slide seems to be a bane of most small-scale artillery kits.
Cruciform Platform & Carriage: As I mentioned earlier, the Flak 36 cruciform platform was also changed from the earlier one for the Flak 18 though you can use the one enclosed as a start. New stakes for the outriggers need to be scratchbuilt from styrene rod & strip. The stakes were to be driven through the ends of the outriggers to secure the gun to the ground. I attached them to the sides of the outriggers as I modeled my gun deployed on its trailers. I also had to scratchbuild and resin copied the ground pads. A storage box and standing platform were added around the pedestal base.
Shields were added to the 88 in 1940 but guns seen in 1945 could still be seen without them. The kit shield is okay but a wee bit thick and was replaced be one constructed out of plastic card using the kit part as a template. Do not forget the viewing port for the gunsight: the door that swings up to the side and having its handle on the backside. If you add a shield remember to construct braces going back to the gun carriage (see photos).
Painting: Prior to a finish coat in Poly-S acrylic Depot Buff RR color (convincing dunkelgelb color), I gave a light coat of gray enamel primer for the metal parts and to bring out defects in the finish. On top of the dunkelgelb I added a camouflage scheme of green stripes, simulating a summertime scheme to match the display base. Rather than use an airbrush though I tried painting the pattern with artists oils (the creamy stuff that comes in a tube) and a fine, soft brush. I think the artists oils worked out well, getting fine lines and realistic feathered edges. What I do not care for is the brightness of the color. To try and mute this brightness down I gave the model a light coat of diluted tan paint to simulate road dust.
The Display: When I started this kit I wished to depict a rear guard action for retreating German forces in Rumania, 1944. The base of the display starts with a 0.2 sheet of styrene, primed, and built up with hard foam pieces and Sculpta-Mold (kind of a shredded paper mache material). A little white glue and brown acrylic paint was added to the molding material to improve adherence to the base and dull its whiteness. After a coat of earth colored paint, model RR flocking created a spring or early summer grass texture on an unimproved country road. Trees were created using small twigs and sapling roots dressed with model RR Clump Foliage from Woodland Scenics Co. The base and subject were finally coated in Poly-Scale dullcoat and a light dusting of pastels.
I painted the gun’s camouflage so it would blend well into a small grove of trees next to the road. A friend (and honest critic) of mine states that the camouflaged gun blends too well into the groundwork. My reply is "that’s what it is supposed to do"; even though he is right in that it does not enhance the model display. A few 1/72-scale Airfix & Revell figures were added in order to give a better sense of scale. The Hasegawa crew figures are rather poor and it is hard to find replacements. Eventually I will turn this into a mini-diorama in combination with a Hasegawa SdKfz. 7 prime mover halftrack kit.
Overall I recommend the kit. A beginner can build a good-looking kit out of the box and a master can go crazy with detailing.

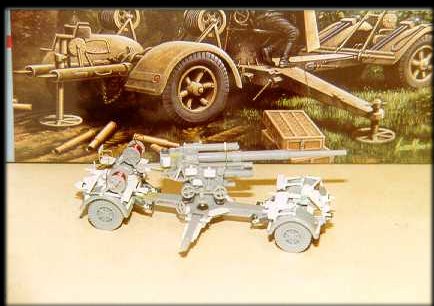
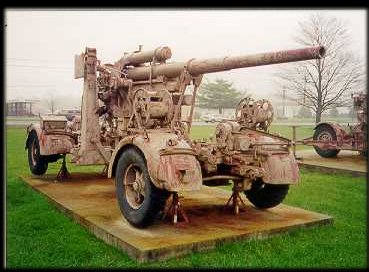
Good view of a Flak 36 carriage and Sd.Anh. 202 trailer at Aberdeen Proving Ground in Maryland, USA. It has the Flak 18 barrel though and is missing the inner tires. Note details of the trailer fittings, square ground pad, outrigger, and no shield, etc. (all photos by S G Brezinski.)
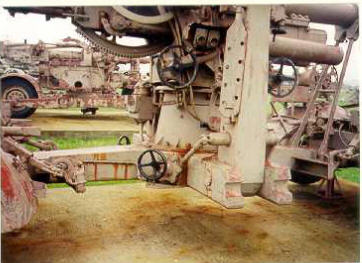
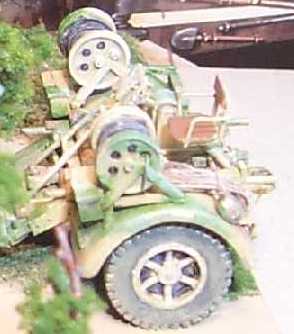
Side of the Flak 36 cruciform carriage and outrigger. The perforated item on the side of the outrigger is the ground stake. The black wheels in the lower center are for lowering the outriggers. At the right is a good view of the gun’s travel lock also. Also note realistic rust & weathering.
| Main | What's New | Articles | Reviews | Gallery | Think Tank | Contests |