
M25 Dragon Wagon / Panther Ausf. G
Antonio Martin Tello
Sgt. Johnson, 464th Ord. Evac.
1. Dragon Wagon
1.1 A little history...
The North American observers who accompanied the British troops in their campaign in North Africa noticed the lack of a specialised vehicle able to recover and transport AFVs immobilised, either in combat, or by mechanical problems, which in turn had the unfortunate consequence of leading to the loss of numerous tanks that had to be unnecessarily left behind and/or destroyed. From this, there arose the requirement for an all-terrain vehicle, able to transport and recover all US vehicles then in service, in particular the M4 Sherman.
Several companies, some of whom specialised in the manufacture of heavy machinery for mining and quarry work, presented and displayed their submissions. The design that was finally accepted, and that entered service in the middle of 1943, was baptised the "M25". It consisted of a tractor - M26, constructed by the Pacific Car and Foundry company, and a trailer - M15, constructed by the Fruehauf company. Due to its purpose and its imposing size (17.48 meters in length), the total assembly received the nickname of the "Dragon Wagon".
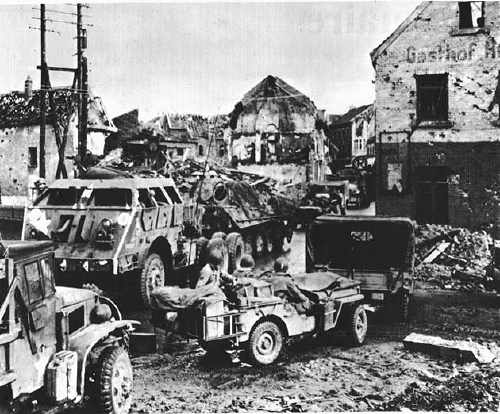
Great idea for diorama. Who'll be first to try it? Notice that the Dragon Wagon in this shot is the same one that I've modelled.
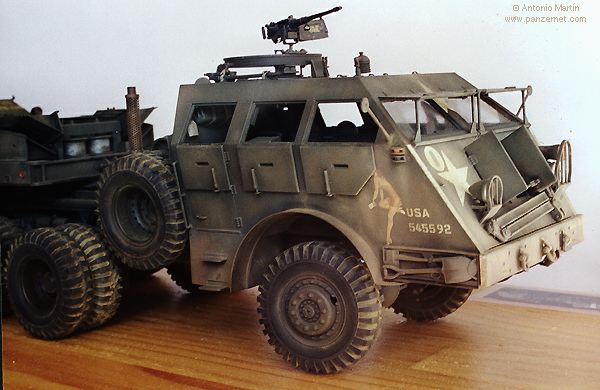
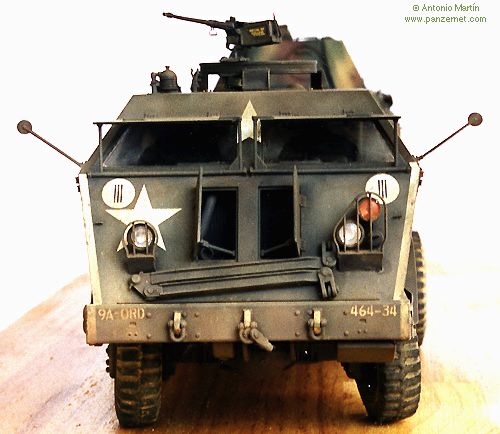
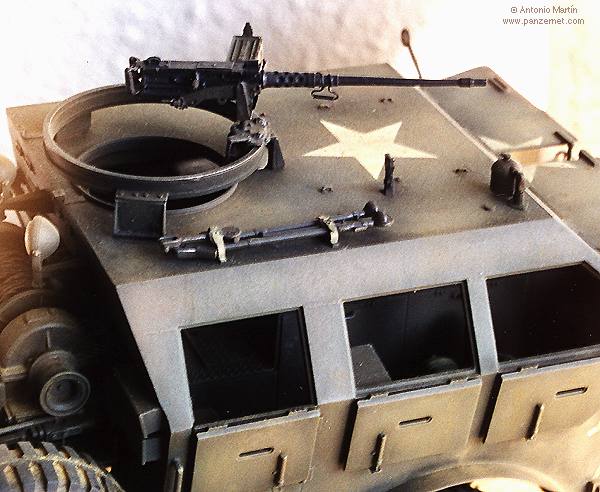
The 6x6 M26 tractor had an armoured cab that protected the crew of 7 from small arms fire arms and artillery fragments. The 60 cylinder motor provided 240 HP. It possessed three winches, one at the front that could drag 18 tons, and two behind the cabin, each with a capacity of 30 tons. In the cab roof there was a slide ring installed on which a .50 cal. HMG could be fitted. In addition, the crew had personal armament like Thompson machine guns, M1 carbines, sidearms, hand grenades and flares.
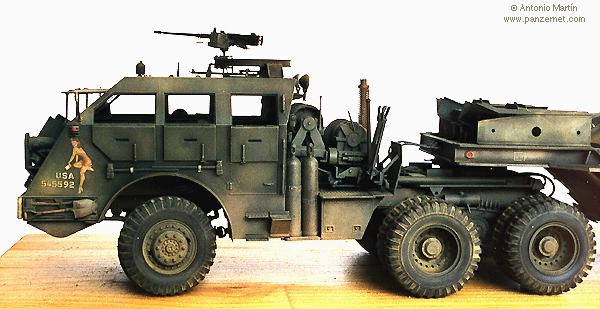
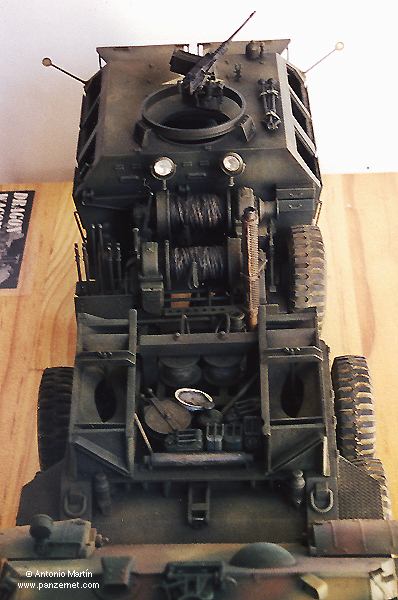
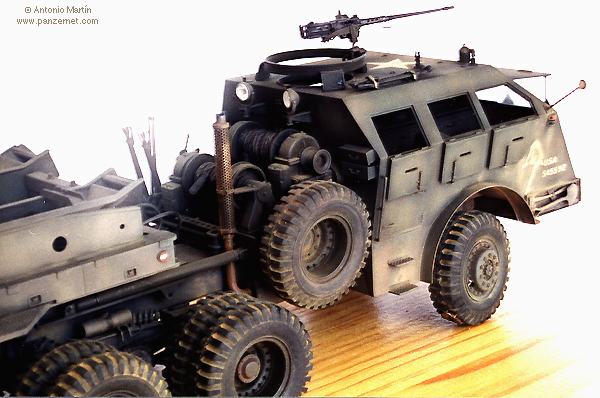
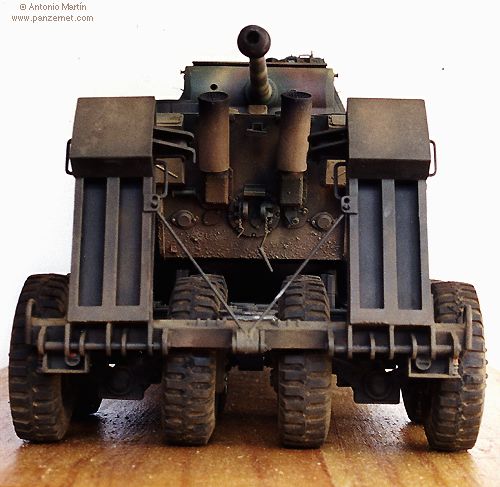
The crew also had tools to carry out their recovery work: Complete welding equipment, an air compressor, chains, tow ropes, 10 and 20 ton hydraulic pulleys... etc. A small crane could be installed behind the cabin to lift light loads, or to change a wheel. In addition, at the rear of the prime mover was a folding A-Frame structure which could be erected and locked in different positions to facilitate dragging recovered vehicles.
The weight of the M26 tractor was 21 tons, and its fuel consumption astronomical at more than a litre per kilometre, even on good roads. The main problem of the M26 was that, due to the weight introduced by the armoured cab, the front axle was prone to failure, and the front tires were rapidly worn. These disadvantages, together with the fact that the Dragon Wagon was rarely used in the recovery of vehicles actually under enemy fire, led to the construction of another version with a normal, unarmoured cab called the M26A1.This new vehicle weighed 1.5 tons less than its predecessor. Altogether, 753 M26, M26A1 and M26A2 were constructed until 1945 (the M26A2 was externally identical to the M26A1 but with a slightly different electrical system).

An M26A1. Notice the unarmoured cab.
The M15 trailer could take a load of up to 40 tons. This was sufficient to support to the Sherman, the main "client" of the Dragon Wagons. The weight of the trailer was 17.5 tons, and relied on two folding ramps to load the vehicles. The rear wheels could be moved horizontally (by increasing the length of the axles), to facilitate the loading of vehicles with different widths as well as the use of steel ramps which fitted over the rear tyres preventing damage.
Later, with the introduction of the M26 Pershing "heavy" tanks into service, two more versions of the trailer were made, the M15A1 with an extra ramp and the wider M15A2. These two new versions were additionally reinforced, being able to transport a theoretical weight of 45 tons.
The operational life of the Dragon Wagons extended to the Korean War, and even during the '60s, the US army still had them in its inventory. In addition, a certain number of them were sold to diverse countries like Japan, Belgium, Austria, Italy, France, Spain and Turkey. Also, a number of Dragon Wagons had use in civilian life with their armour and military modifications removed, transporting 'special' merchandise.
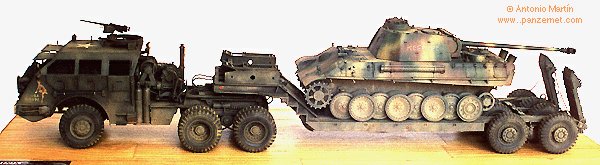
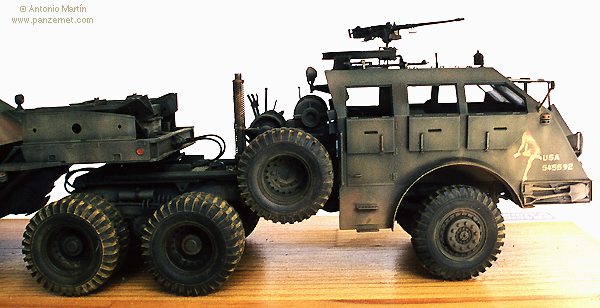
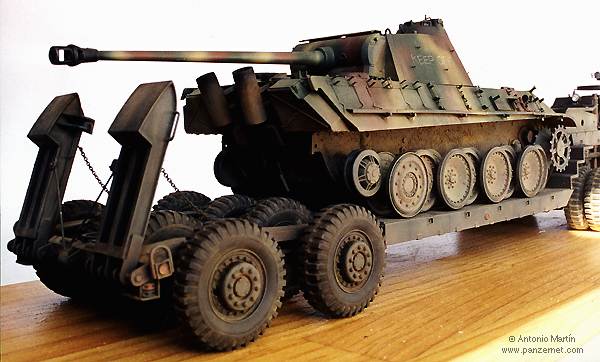
As I have said before, the main load of the Dragon Wagons was the Sherman, but other photos of these vehicles exist with varied cargos: Priests, two Stuarts simultaneously, bulldozers, Churchills... and Panthers - although this tank exceeded the theoretical weight that the M15 trailer could support. The most common images of the Dragon Wagon and captured Panthers are those showing the M26 tractor just dragging this German tank, not carrying it (as is shown here on my model).
Perhaps the most unusual load carried by the Dragon Wagons was the 125 LCM landing craft of the US Navy, that were transported by highway from the coasts of the English Channel to the borders of the Rhine river in March of 1945 which along with other means, allowed the allies to cross this vital river into Germany.
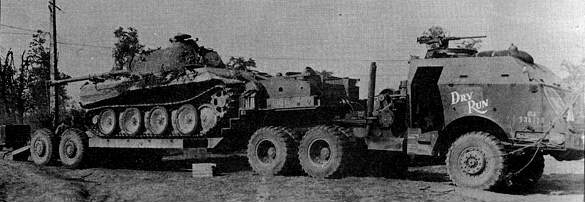
"Dry Run" is an armoured cab Dragon Wagon that carries a Panther Ausf. A on its trailer.
1.2 The mother of all scale models.
In late 1998, the rumours became reality... In order to celebrate its 35th anniversary in the business of 1/35 scale military vehicle models, for Christmas 1998 Tamiya released the Dragon Wagon, a 40 ton U.S. tank transporter (kit no. MM230). The adjective that can best describe this kit is "spectacular", or perhaps even "magnificent" is more appropriate! Anyway, enough rhetoric. But it is certainly a case of an impressive subject being done remarkably well in model form. Its superb quality, once again confirms Tamiya's place at the top of the manufacturer's tree of plastic scale model makers.
When one opens the box, it contains 17 sprues (with more than 600 pieces), some of them doubles, plus the cabin that comes as a single piece, and the two upper and lower halves of the trailer. Of the 17 sprues, one is transparent, containing the windshields and light lenses, and another one is chromed, containing the interior shells of the lights. This chromed sprue is a new development in scale military vehicle models, although it seems to be long established as common place in civi car and truck models.
In addition two metallic plates and the screws to hold them are provided to reinforce the trailer, along with several metal rods for the axles, other metallic pieces that are used in the folding ramps of the trailer, very fine (excellent quality) chain, nylon thread to make the tow cables in the winches (a generous length), more steel rods, fine wire, fine rubber tubing, and the inevitable poly-caps.....I've surely left something out. Ah yes, the tyres. 19 great quality, flexible and hollow rubber tyres, similar to those used in the large scale Tamiya radio control cars.
A decal sheet is supplied with stars and markings for 5 options, 4 for US army in WWII and 1 for a post-war Japanese army vehicle. You will imagine that with all this contained within the box, the instructions must be comprehensive. Indeed they are, literally a 28 page "book" is provided, which contains a brief history of the Dragon Wagon, along with two wartime photos and sketch information on the methods used to load and unload tanks on and off the trailer.
The kit provides four figures that sit within the cabin, in fact they are the same two repeated bodies with optional arms. To me they are the only weak point of this kit. It is a real shame that Tamiya, the bench-mark in quality scale vehicles, makes such mediocre figures. And I don't just single these examples out specifically, but in regard to all Tamiya figures in general. In this field, Dragon clearly leads. Anyway, in the instructions is a reproduction of a scale "Yank" magazine (that I believe was the official publication of the American army at the time), that can be added to one of the figures posed reading it.
1.3 Assembly.
I am not going to bore you with the details of the assembly of the Dragon Wagon, because the kit is practically out of the box and I do not have photos of the model prior to painting to support me. I am simply going to present general hints, and those specifically affecting a couple of steps that can require a little more care, and also on a few points where I have replaced a kit part with a better alternative or added something that is missing.
I have basically followed the assembly sequence in the instructions. Since the interior of the cab is visible if the front and side armoured visor plates are left open, as is the case with mine, it is necessary to paint the cab interior before attaching the rear wall and roof piece. This is probably the only step which requires a little thought in the assembly sequence. I chose to attach the rear wall of the cab (piece K8) to the chassis first, and not to hold it with sticky tape to the single piece cabin as is indicated in the instructions. I then mounted all the details on the interior of the cabin, including those that go on the ceiling, side and rear walls.
I replaced the jerrycans with Italeri ones, and changed the handles in the side ones on the covered motor with others done in wire. Though, these "improvements" are barely noticeable once the cab is enclosed. I painted everything and put the recommended decals on, and once I had finished I covered the windows and blanked off the circular man hole opening in the roof for .50 cal ring from the inside with masking tape to avoid any overspray on the already painted interior, prior to airbrushing the outside of the kit. I applied the tape so that it was easy to remove it from the edges with tweezers. Later I stuck the cabin to the chassis and the already attached rear wall. This way, it made the assembly and painting of the interior easier, and I then puttied the join of the cabin roof with the rear wall before beginning the exterior painting.
In general, with the object of facilitating easier painting, the kit can be put together in three subassemblies, tractor, trailer and winches. Tamiya suggests to hold some of photo-etched pieces supplied in the winches and the mesh covering the exhaust pipe, using the fine wire that it provides, to keep the curve, but the cyanoacrylate will do the same without needing this.
The piece which I just mentioned, the p-e mesh that covers the final part of the vertical exhaust pipe (a2), was one of my major headaches. This piece must be wrapped into a cylinder, using a rod of the right diameter provided in the kit. The Tamiya photo-etched parts are quite thick and stiff, so it is not easy to form them. Aside from a pair of unfortunate incidents with the mesh (that I will not detail here, suffice it to say that my small daughter participated in them...), after several attempts that did not take the form I wished, it occurred to me to wrap it around a soldering iron, to hold it with wire and to warm up it for short while. This trick did wonders, it was coiled and looked slightly beaten, as well as ready to be glued in place, although I must admit that this last operation was far from easy for me!
The kit's rubber tyres have the disadvantage of possessing conspicuous flash down the centre around their diameter. In actual fact, in real life any new tire has this flash, so if one wants to represent a Dragon Wagon which has brand new tyres, one does not have any problem. However since new tyres are somewhat rare on a wartime vehicle, I decided to eliminate the aforesaid flash. In principle several methods exist. To sandpaper is one of them, but to sandpaper rubber is very difficult and a lot of work (mainly as there are 19 large wheels!). I read that the flash could be cleared with a utensil used in the manicure of fingernails. As my knowledge of manicure is somewhat limited, I used a gadget that seemed that it would serve me in a similar manner, although I believe that the result, although fast, is not very satisfactory . Later, in the recent article in Military Modelling (Vol.29 No.3 March/April 1999), about the Dragon Wagon, the author shows a photo of another tool, different from that which I used. It seems to be that it is a pair of pliers cut with a flat edge on one of the sides. One assumes that THIS, is the manicure tool? With respect to the quality of the wheels, they seem very good to me. They correspond to the type seen in the drawings that are commonly seen on the vehicles in the wartime photos, although I have seen other Dragon Wagons preserved today with other tyres.
Also I have read that somebody mentioned the tyres lack the manufacturer marks and sidewall numbers as is seen nowadays on any vehicle. I ignored this if it indeed was on them. There is also talk of a company that is either contemplating, or has already released, a set of resin wheels or tyres onto the market to replace the kit's but I don't yet know who this is, nor the details of these tyres or their overall quality.
Since the head lights are behind brush guard grills, it is impossible to put the chromed plastic lenses and the transparencies in once the model is painted. So I attached these pieces before painting, and covered them with Humbrol Maskol. I did the same with the windshields. For the chromed bodies and clear lenses of the lights on the rear of the cabin, nothing prevents them being put in after painting, so that is what I did.
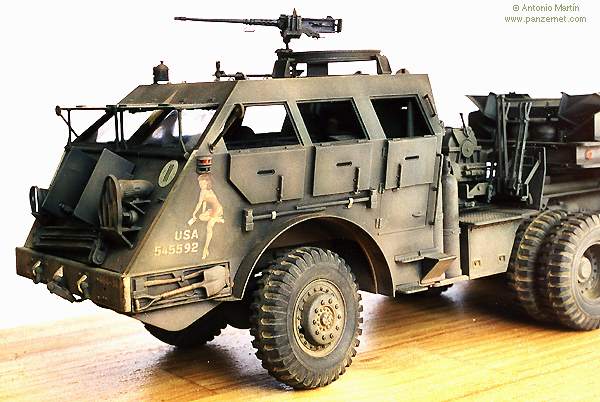
The only major addition I made to the Tamiya kit was the substitution of the .50 cal machine gun on the cab roof for the excellent quality Verlinden one in resin and photo-etch (ref. VP 372), which only needed the addition of the cocking handle with fine wire.
To finish of, the only homemade improvements in the assembly of the kit were:
- the addition of lead strip to simulate the retaining straps of the mallets in the left part of the cabin
- the use of some fine wire to simulate tie down points that hold the straps around a canvas tarp
- the addition of lead strip and photo-etched buckles to simulate the straps securing the tripod of the .50 cal MG on the cab roof
- addition of a rudimentary system of wiring in the lights
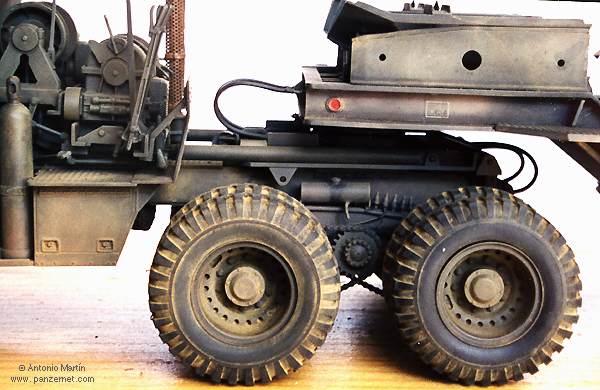
- addition of a variety of very fine wire pins in the folding drag bar at the front part of the cabin and to the oil reservoir tanks just above the chain drives of the back wheels of the tractor. This unusual rear wheel chain drive system was very peculiar and it needed a regular deposit of oil on the chain to keep them constantly lubricated.
A final word of advice: paint the rear view mirrors and keep them aside and whatever you do, DO NOT stick them on until the end, otherwise you'll break them off repeatedly during the painting, as happened to me on numerous occasions! :-)
For the detail freaks, Eduard has released two photo-etched sets for the Dragon Wagon. One contains doors and the folding armour plates over the windows and the other, general details.
1.4 And now... how do you paint a half a metre long model?
The painting options for the Dragon Wagon are somewhat limited. You can either paint it Olive Drab...or Olive Drab. I decided on the former! The challenge that is presented in undertaking painting a kit of this scale and complexity such as Tamiya's Dragon Wagon, was made worse in my case by the fact that this was my first scale model to be done in OD (although I am sure that it will not be the last ;^D).
For the base colours I applied Tamiya acrylics with an airbrush. I began with a base mixture of 50/50 Olive Drab (XF-62) and Dark Green (XF-61). Believe me, to paint a consistent layer of this base colour over such a large model took quite a long time and almost a jar of paint! Later three shades of lighter oversprays were applied. First with pure Olive Drab, second with OD mixed with a touch of dark Yellow (XF-60), and third with this previous mixture with Buff (XF-57) added. Finally, I darkened the recesses and panel lines (doors, lines in the trailer etc.) with a wash of very a very diluted dark brown colour, also doing vertical streaks for weathering effects.
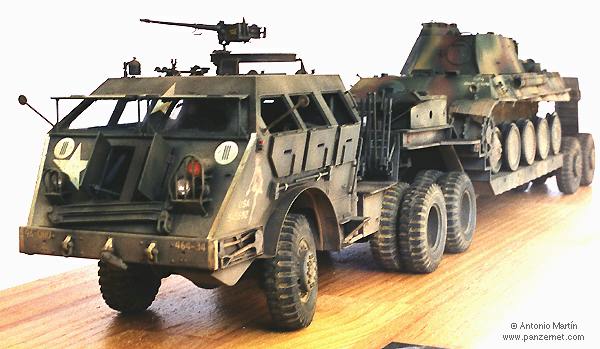
Now the decals. After airbrushing the corresponding sections with Tamiya gloss varnish (X-22) and letting it dry, I applied the decals. I chose those that I guess will be most popular for this kit, the ones belonging to a vehicle of the 464th Ordnance Evacuation Company, which has the Vargas pin-up girl "nose-art". All the decals are excellent, and the one of the girl is no exception. The white width/night convoy strips on the edges of the cab are also decals, though in the case of the ones on the mudguards, I chose to mask and airbrush them instead. The decals were treated using Microset and Microsol in the usual way. After leaving them for a day to set I applied a coat of matt acrylic varnish (Microflat), over the decals and those areas that were still shiny from the previous application of the gloss varnish.
Next colour variations or "selective discolouration" (for want of a better term ;^D), was applied to the surfaces using multi-colour washes. That is to say, on a surface wet with turpentine spirit, small points of different oil colours are applied at random (several tones of green, ochre, brown, black and white), and they are diluted and blended further with more turpentine spirit. For those more hidden areas or corners, I worked with darker colours, so I didn't just make a single one-colour wash of Burnt Sienna or similar in the recesses. This something that I do not like too much, as to me it seems as unreal as drybrushing with stark, light colours. I use the term turpentine spirit in a generic way. In fact I proved several things: white spirit, and heptane for my taste dries too fast to work, but Humbrol's enamel thinner I believe is the one that works best, as it doesn't leave pools and dries in a reasonable time. (I very subtly drybrushed the edges and detail highpoints with pure Humbrol Olive Drab (155), but I think the effect is barely noticeable.
I made small spots and scratches with varying shades of colours including dark browns, and OD (pure and lightened hues), as well as various greens to simulate discolouration & worn paint as subtly as I could (though perhaps too subtly, as it is almost not discernible). Then I airbrushed a very diluted mist of dark yellow over the whole model in a cloud form especially to the lower areas, to simulate dust, followed by Tamiya Flat Earth (XF-52) to the lowest sections. I painted the tail lights and reflectors in red and black following the instructions.
And finally the phase for employing the pastel chalks arrives. I used different tones of brown ochres and generally apply them with wide, soft brushes over the whole vehicle then more specifically using firmer brushes, by grinding them into the lowest parts. I do this to the windshields and lights too, which have already had the Maskol removed. On the glass of the windscreen I used a mask done with sticky tape to simulate the area swept by the windshield wipers. I treat the nonskid surfaces specially with darker colours. The pastel sadly covers a good part of the previously applied subtleties obtained from the wash and drybrushing and other "wet and dry" techniques, but in short, what other way is there to get a realistic effect?
The last step is a small touch I do using a lead pencil, on surfaces and edges to simulate worn or bare metal. Again also very subtle.
The wheels are weathered with pastels. A generous layer is applied, and then the excess is blown off and a finger (dampened if necessary) is run over tyres so that the tread that contacts the road is left relatively clean, but still with accumulated mud and dust in the cracks. The idea being that this Dragon Wagon has done many kilometres with its heavy load on sealed roads after recovering it.You be judge if I have been able to capture that effect effectively.
...and Voilŕ, I finally finished... in three long months.

2. Panther
2.1 A Slightly Rare Panther...
There are many books that have been dedicated to the PanzerKampfwagen V Panther, and probably still many more to come, so I didn't have to look too hard for information on this famous "big cat". In the Panzerfile section of the Spanish PanzerNet site you can find more detail info too. Here I am only going to focus on the peculiarities of one version of a late war Panther which I wanted to represent on the back of my Dragon Wagon.
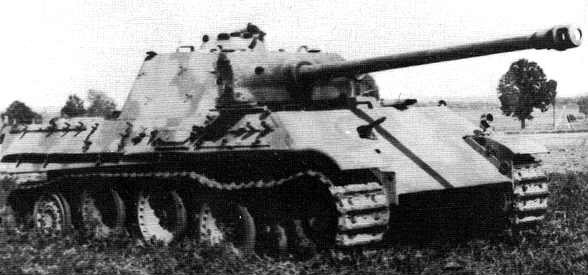
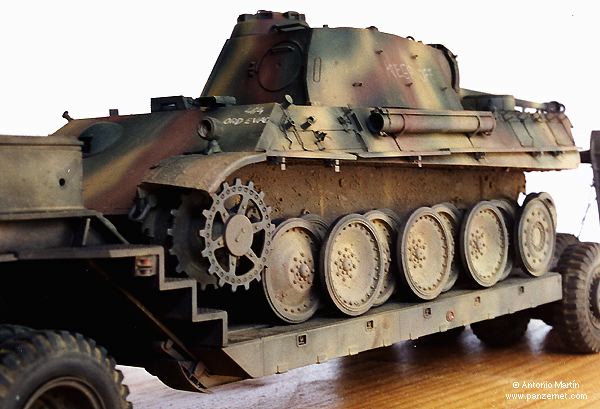
One of these "rare" Panthers. The steel wheel on the last axle is seen clearly. Also note the foliage rings on the sides of the turret and the lack of the anti-aircraft machine-gun rail on the commander's cupola.
In the last few months of the war, the German war industry suffered constant bombings that considerably limited their productive capacity. Nevertheless, in spite of this, fair numbers of Panzers continued leaving the production lines. Sometimes due to the necessity to only use available materials and components, some "non-official" characteristics were seen. Thus, in March and April of 1945, MAN, one of the companies in charge of the manufacture of the Panther, constructed an indeterminate number of Panthers with a peculiar feature. Namely, the last double wheel pair on each side were of the pressed "steel" rimmed type, and not of conventional form with steel dish and a rubber tyre. This type of steel wheel had already been trialed on a batch of about 24 Panthers with all steel wheels constructed by MAN in September of 1944.
In the production and evolution of the Panzers in the last stages of the war, a tendency existed to replace the rubber-tyred wheels with all steel ones, as occurred with Tiger I, and Tiger II. It seems that this was to be the fate of the new model of the Panther, the Ausf. F, that was to begin in May of 1945, and which anticipated the complete installation of steel wheels as soon as circumstances allowed.
Nevertheless, the reason for the use of just one steel wheel on the last axle position of the running gear of this batch continues to be a mystery though. I'm not sure whether it was done just due to the pressing circumstances of the war leading to rubber shortages coming into play, or was merely an option trailed to see if any improvement in ride or reliability could be obtained on the wheel which bore the greatest stress of the weight of the engine above it, and maybe had the most tyre failures? Perhaps the MAN plant were simply using up stocks left in the warehouse from the "experiments" of the previous autumn '44 run? I am personally inclined to go for this last hypothesis
The photos that exist of these Panthers show additional characteristics especially in the turret, typical of the vehicles constructed in the last months of the war. The most conspicuous external details are the presence of 5 small "hoops" welded to each side of the turret in two rows, with purpose of holding branches as camouflage. Other notable features are the absence of the ring for the anti-aircraft MG in the commander's cupola, and the presence of a cylindrical support post in its place, as well as the presence of bolted plates on the turret roof and mantlet sides to fix poisonous gas detection panels to. All these modifications were officially ordered in different directives issued by the German High Command.
A wonderful example of a turret of this type is the one that is installed in the prototype of the Panther II preserved today at the Patton Museum at Fort Knox U.S.A. It is seen well photographed in Achtung Panzer 4, dedicated to the Panther (note: this turret is not the original one of this Panther II, which never had one fitted. It was a late G turret installed after the war by the Americans).
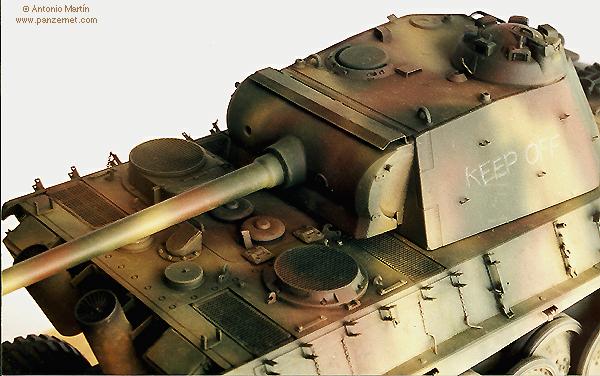
Other notable modifications are also seen on standard late model Panther Ausf. Gs, such as the "chinned" gun mantlet, raised engine deck fan housing/crew heater, and the tubular vertical flame-suppressing exhaust pipes...
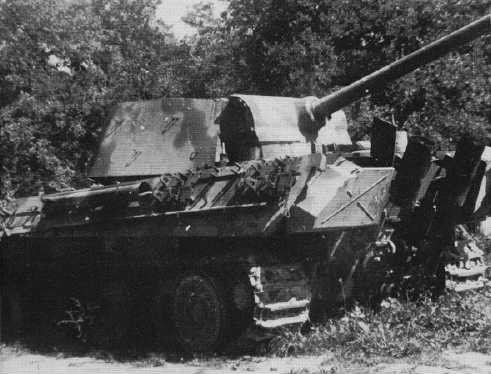
On this Panther the features of final type can be seen, such as the twin tubular vertical flame-suppressing exhaust pipes. Again, the foliage rings on the turret are clearly visible.
2.2... and now a slightly "rare" scale model...
For a Panther fanatic like me, the release of new scale models of the Panther on the market is always good news. Nevertheless, when Shanghai Dragon chose to release its two Panthers Gs, I first thought, "why? Why not do a better Ausf.A or D??". Tamiya had already "won" the market in Panther Gs with three scale models in which all the versions are practically covered. Therefore, what possible new development could Shanghai Dragon offer us?
The two scale models from the Shanghai branch of Dragon are however a little peculiar. The one that I have used (Night Fighting Panther, reference 9045), corresponds to a final Panther G with the chin, the high fan, and flame trap exhausts, ... (as I've already described), but in addition three infrared sight assemblies are supplied. One to install in the cupola for the commander, another one for the gunner and third for the driver.
It seems lately that the infrared equipment which the Germans developed during the later stages of World War II and its presumed use, especially in the Panthers, is proving very popular with modellers. Although this equipment indeed existed, and was even produced in fairly high numbers, it is not clear whether it was actually used in combat in any significant numbers. It seems that information exists on their use in Hungary in 1945, but the details still remain murky.
It has been said that there were two possible configurations of IR-equipped Panthers, the Ausf.G with a single commander's IR sight and rebuilt Ausf. Ds with the three viewfinders... in short, the system supplied with this Shanghai Dragon G kit. So with this 3 sight setup installed, it makes this G kit slightly doubtful.
The other Shanghai Dragon Panther G (Command Tank reference 9046), is the same scale model without the IR equipment mounted, and with the change of the conventional wheels to a full run of steels plus the command aerials and commander's "broomstick" cupola scope. I added these features to my kit from scratch since I do not have this second kit". We have another problem here, since the only Panthers to receive all steel wheels, as already I've already said, weren't late Gs, but earlies in September 1944.
If I am to be sincere to you, I'd say buy the Shanghai Dragon model version with the IR gear because it seemed extremely attractive to me. Yes, I have been a victim of the marketing of the Chinese house... In addition to the Panther G I wanted the infrared equipment to put into a future Panther A/D project (if a good kit of it is ever released), since it seems this configuration was more probable. Nevertheless, after the initial impetus of the new purchase, I must say that I am not displeased with my buy.
The obvious comparisons are odious, but inevitable. Which Panthers are better? Those of Shanghai Dragon or those of Tamiya. Without a doubt...Tamiya's! But the difference is not much. The Tamiya kits have the refinement and already "legendary" ease of assembly, but also some omissions. Shanghai Dragon's have perhaps a little less finesse, but they still go together well (remember that they are from the old Gunze Sangyo High Tech kit moulds), they offer link to link tracks of acceptable quality, as well as a pile of leftover pieces, some very usable. Also they are much cheaper, by almost half. Of course it has its problems, some of which I will comment on ahead. Let us just say that maybe a 9 goes to Tamiya's Panther, and a 7.5 for Shanghai Dragon's.
2.3 Assembly.
Like with the Dragon Wagon, I am not going to you to bore with the tedious step by step account of the assembly, but I will simply give general pointers and indicate the difficulties I encountered. Aside from the Shanghai Dragon kit, I have used the photo-etched Aber set for Panther G (reference 35024). The quality of this set is excellent. In my limited experience with the such sets, Aber is without a doubt one of the highest quality makers around. It offers an enormous amount of parts, (perhaps too many!), since some are clearly useless, or impractical (for example, the periscopes of the cupola of the commander) or simply aimed at deranged minds (eg. those who can actually make the travel lock securing chain workable by inserting stretched sprue rod into each of the tiny individual p-e links of the 3 row bicycle style chain)!! Apart from this, the set is magnificent. Special care has been given to the front mudguards and, like always, to the mesh for engine deck grills - the only ones that I have seen with an amazing etched effect, simulating the woven relief of the real life interlaced wire mesh!
When we open the box we're confronted with a number of sprues in the typical light gray colour of Dragon. Several of these sprues come from other kits in the range, like the Panther II, or the Jagdpanther. The parts box will receive a good feed again with all the leftover parts. In addition, there are three sprues of transparent plastic for the infrared equipment, yet they must be painted in any case. The instructions are correct and easy to follow.
First step in the assembly process is the lower hull of the chassis. This is comprised of the torsion bars which are not separate pieces like in the Tamiya kits, but moulded on. This is a relatively important problem. If the model sits flat on a base, that is to say, with straight wheels and tracks, this point is practically inappreciable. However, it will present a real problem for dioramas where the suspension is desired to conform to the irregularities of the land.
The second problem is also in the hull. In the nose it lacks the external transmission housing plates, with its six bolts. This is a serious and recurrent omission in Dragon Panther chassis'd models. I made these with plasticard and bolts removed from leftover parts from Dragon's Panther II. Soon after I realised though, that one of the sprues in the kit has moulded bolts that can be cut off and used for such purposes. While I'm going through the negatives, a quick comment on the last minor problem with this kit: It is missing the three small strips at the outer side of the engine deck, by the circular fan housing. (see drawing 75 of page 42 in the Achtung Panzer no.4 on the Panther to see what I'm referring to). Though these pieces are very easy to remake with plasticard.
I finished the kit according to the instructions, apart from all the tool brackets and the chains that come in the Aber photo-etched set. I filled the locator holes for the unused kit pieces as well as the kit skirt mounts with putty. I replaced some parts such as the driver's episcope sunguard, the gun travel lock and the ventilator cover under this with Tamiya ones leftover from their Jagdpanther in which they are leftovers, since they seemed of better quality to me.
The drivers' episcopes next to the ventilator cover under the travel lock, as well as those of the radio operator's and gunners' (in the turret roof), come in a single piece with the corresponding armoured protectors moulded on. I replaced these periscopes with others in resin and remade the guards separately with heavy plastic strip. Also, I added the episcopes to the commander's cupola (these also are omitted in the Tamiya Panther Gs, all except for the steel wheel version which does have them). The gun barrel was replaced with a turned aluminium one, mated to the kit muzzle brake, which was drilled out to fit the end of the barrel that must protrude a little on the inside of the rear. The gun cleaning tube, on the left side of the hull is also of turned aluminium, hollowed at its ends for the caps.
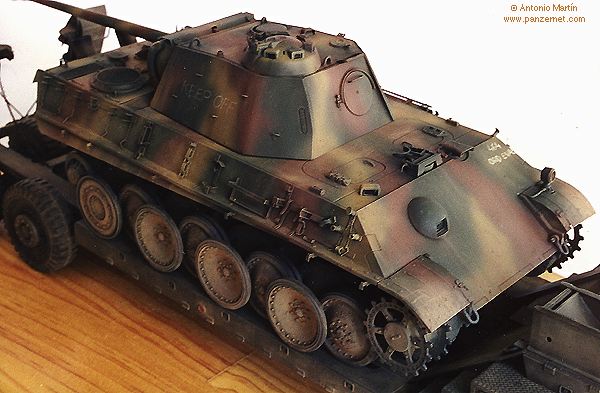
In the turret, I replaced the handle above the escape hatch at the rear of the turret roof with thin wire bent to shape and with the ends flattened with pliers. I added the five rings to each side of the turret with fine wire, using Tom Jentz's Germany's Panther Tank a Quest for Combat Supremacy, as a reference. Similar information about this very late turret, with corresponding drawings and photos seen with it on the prototype of Panther II at Fort Knox can be found in the Achtung Panzer no. 4 on the Panther. I omitted the anti-aircraft machine-gun ring on the commander's cupola, filling up the corresponding holes in the scope guards. In addition, and based on the photos that I've just mentioned, I added small rectangles of thin plasticard on these guards (in theory, they were what the machine gun ring was formerly welded to). The new type support post for the machine gun was made from a piece of electrical wire and its plastic cover.
I left the wheels unattached to facilitate the later painting work. The steel wheels come from the Tamiya kit (so the spares are needed from two of them to give you enough and still leave both the Tamiya kits with a full set each).
I began to add the Aber photo-etched parts. In general, you only have to follow the instructions. As I mentioned before, their p-e set are very complete! I only replaced the pins at the ends of the small securing chains on the spare track brackets with fine wire.
Thats basically everything. In preparation for the painting process, I applied a mixture of bicarbonate and putty thinned with acetone, using a large brush to simulate dried mud stuck to the hull. "Our Panther" was left by the crew due to a minor mechanical failure, or due to lack of fuel. It does not carry any tools, these have either been taken by the crew, the American recovery unit, or by the local civilians who highly valued such items and put them to good use in the post-war period.
The tracks of the Panther have been removed by the Americans which was a common practice, because it facilitated easier dragging and loading and also helped reduce the weight on the already overloaded trailer of the Dragon Wagon.
2.4 Paint!
The Panther is painted in the classic three tone scheme. The colours are Tamiya acrylics. I began with a base mixture of 50% Dark Green (XF-61) and Olive Green (XF-58), and over this added two further shades of colour, the first with pure Olive Green, the second with Dark Yellow (XF-60). Then I applied the dark brown camouflage in with Red Brown (XF-64) and over this I lightly added a touch of the same colour lightened with Flat Earth (XF-52). I airbrushed dark yellow over this camouflage colour in the same way as the dark brown, which was then lightly oversprayed with a mixture of dark yellow and Buff (XF-57).
The weathering aspect of the painting is similar to the Dragon Wagon. A very thinned dark brown was airbrushed on around edges, as well adding subtle vertical streaks. Multicoloured oil washes, and pastels were applied matching each lightened camouflage colour tone. In addition rust stains were added in brown with a mostly orange-ish centre (for oxidised rust). The exhaust pipes received a washing of brown oxide and the ends airbrushed black, as was the muzzle brake of the gun.
After this phase, the kit was airbrushed with Marabu MattLack, since the washes had left shiny patches. Lastly a mist coat of very diluted Dark Yellow mixed with Matt Earth was airbrushed over the lower half.
The pastel weathering phase was especially intense on the lower hull and wheels (only painted green, with the tyres in very dark brown), by using chalk dissolved in isopropanol (the acrylic paint thinner), on some areas. In addition, I tried to create chunks of dirt with chalk on the vertical and inclined surfaces.
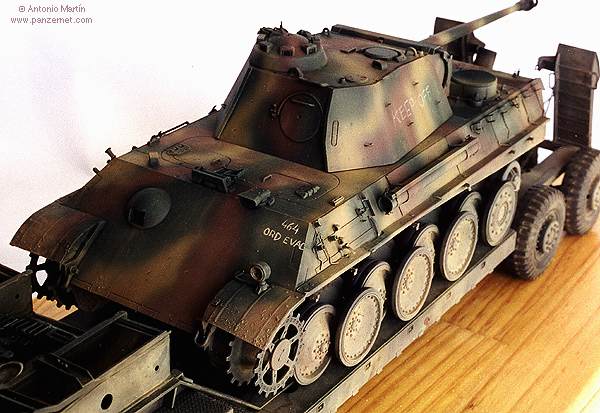
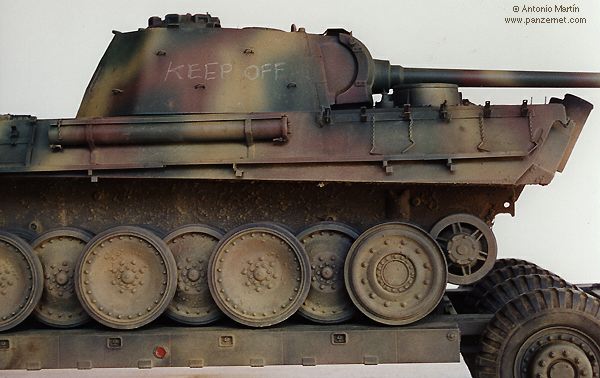
I tried to emulate chalked-on writing in the "KEEP OFF" warning, so drew it on the sides of the turret with a schoolkid's white colouring pencil, before employing the pastel. The "464th Ord. Evac." sign on the front of the Panther was painted by hand with Humbrol enamels, and it is based on a similar one seen in a photo of a captured Sturmtiger.
Lastly,I added scratches on edges and here and there using a lead pencil to simulate bare metal. The glass periscope lenses were painted in very dark green followed by a gloss varnish.
As they say in the cartoons..."yibbida, yibbida that's all, folks!"

Acknowledgment: This article is dedicated to the people of PanzerNet who gave me the Dragon Wagon Model as a very unexpected Christmas gift. Also, I would like to thank all the contributors and visitors to PanzerNet for their loyal support.
3. References:
| Main | What's New | Articles | Reviews | Gallery | Think Tank | Contests |