
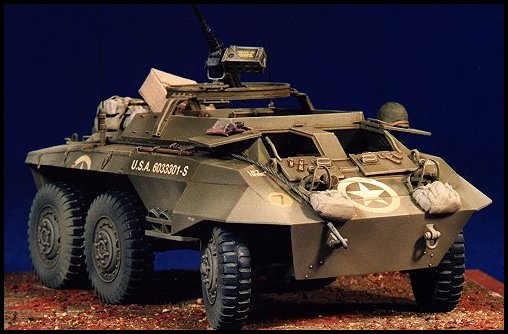
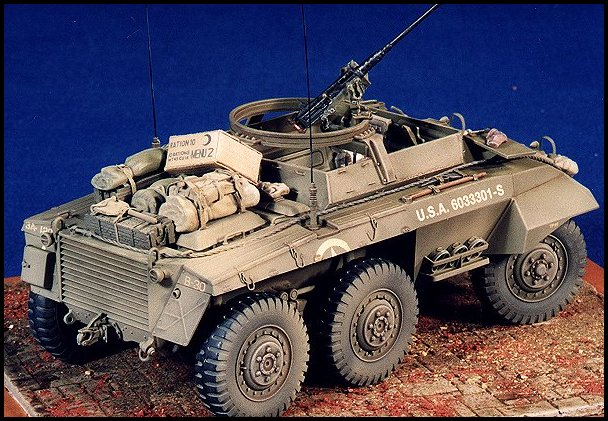
Tamiya #35234 M20 Armoured Utility Car
Terry Ashley
The Kit:
Following on from their earlier release of the M8 Greyhound (Kit No.35228), this new kit
is a logical extension from that kit.
Indeed the M8 kit was set up for easy conversion to the M20. As a consequence the
M20 kit is identical to the M8 except for the upper hull and interior, as per the real
vehicles. Moulded in the same olive drab plastic a new sprue is included with all
the new parts. It is good to see Tamiya have not just replaced the turret and called it an
M20, but have done their homework and made the required changes inside as well. This
includes a new floor, rear and side bulkheads as well as the long crew seats.
As the two vehicles have the same hull, I used the Eduard M8 detail set (No.35200) to
detail the kit. Other details were
added using thin wire and card.
Construction:
This begins with the underside drive train and suspension. This was built as per
instructions except for repositioning the angle of
the front wheels for a bit of animation. This required careful removal of the front axle
stubs using a fine razor saw and re-gluing
at the required angle. The steering arm (part B46) had to be altered accordingly. I left
the exhaust and muffler off until after
painting, the exhaust pipe was also drilled out.
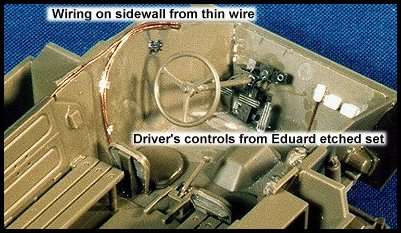
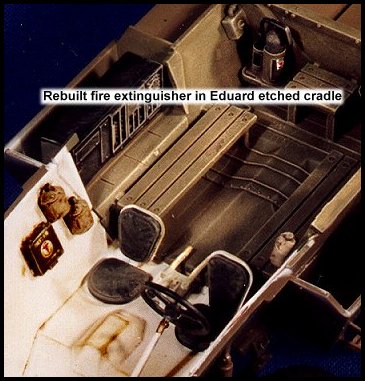
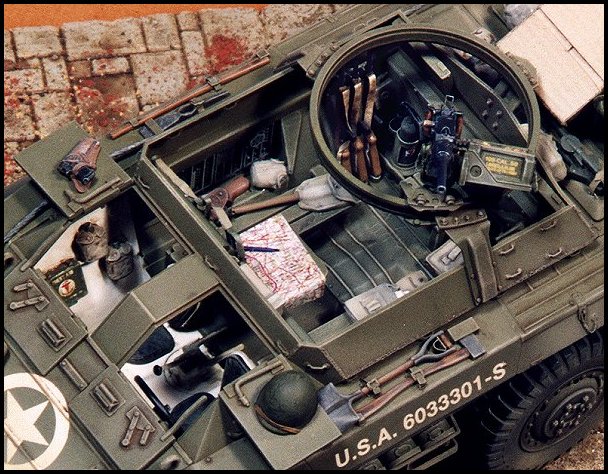
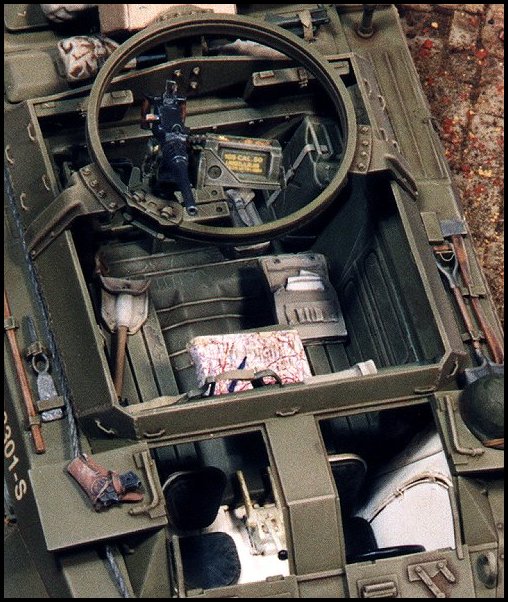
The interior is next. The new rear and side bulkheads are added along with
the crew seats. I replaced the fire extinguisher with
one made from plastic rod, re-attaching the kit handle to this and mounted in the Eduard
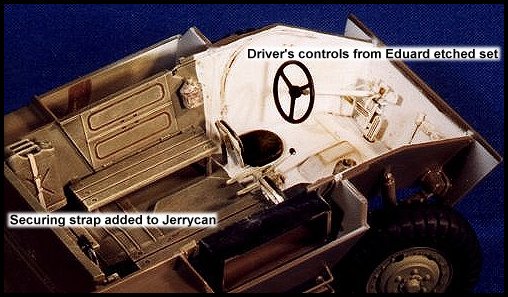
etched item. The driver's station was
detailed using the Eduard foot pedals, instrument panel and handbrake. Two prominent wires
on the sidewall next to the driver
were added from thin wire. The jerry can had a retaining strap added from the Eduard
set and the filler cap replaced.
The superstructure is provided in three major sections to give the correct angles to the
side plates. The insides of these parts
can be easily seen and needed some cleanup and extra detailing. The new lower section
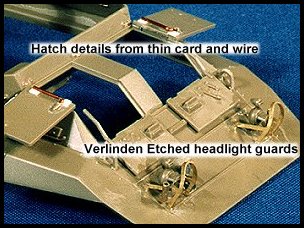
(part F11) which includes the driver's
compartment hatches of the correct shape (they are different to the M8). The locating pin
points on part F11 were removed,
this still left the hole for the pins on part F26 to locate but left them flush.
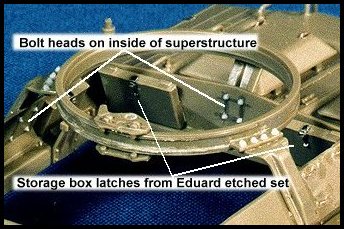
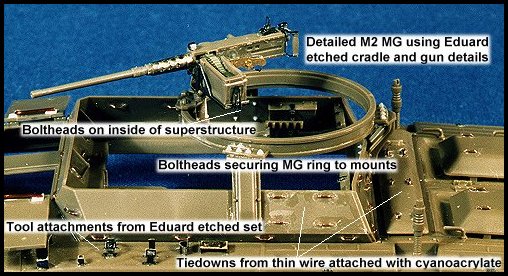
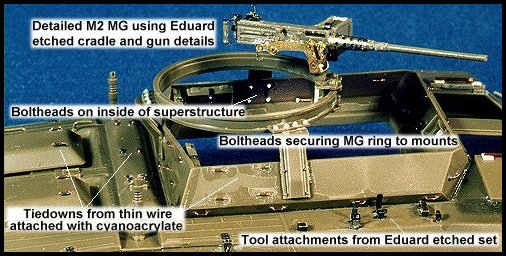
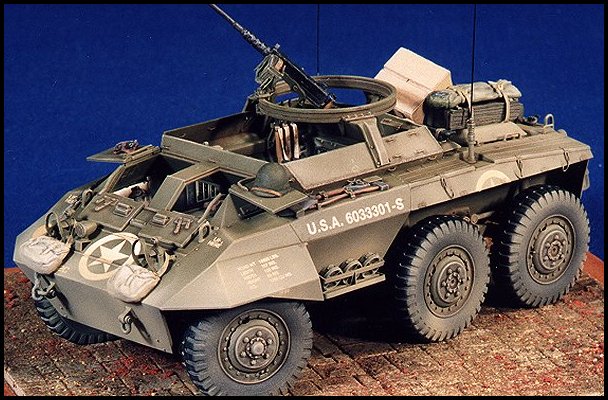
Bolt heads were added on the inside to correspond to the bolts on the MG ring mount on the
two sides and rear plate from
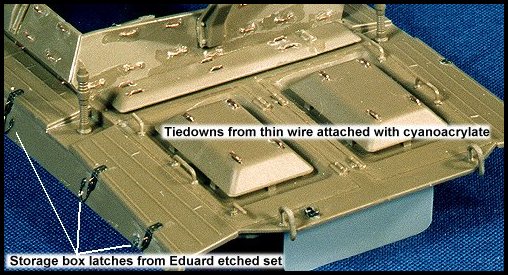
Grandt Line items. There are a number of tie downs on the inside of the sidewalls and
front plate, these were added from thin
wire attached with thick cyanoacrylate, the resulting "blob" of cyanoacrylate
represents the weld securing bead. There were
also 23 tie downs around the outside of the superstructure added in the same manner. The 4
storage boxes on the inside walls
had their latches added from Eduard items. The rear plate is attached last and needed a
small amount of filler on the side joins.
This is not due to any poor fit but because these join lines are not present on the real
vehicle. Finally weld seams were added
along all the external plate join lines of the superstructure. These were added by running
a small bead of undiluted white glue
along the plate joins with a sharpened matchstick. When the white glue is almost dry, use
the matchstick to add texture to the
weld seam. The bolt heads securing the MG ring to its mount were also added from Grandt
Line items and the MG mount
had the handles added from thin strip.
The upper hull had all the tool attachment points added from the Eduard
set, as were the securing points for the rear side
storage boxes. The two crew hatches had the inside handle replaces with thin wire. The
head light guards were replaced with
guards from the Verlinden M4 detail set. The guards in the Eduard set are the wrong shape
and simple don't fit. The mount
and front screen on the siren were also from the Eduard set. Another 14 tiedowns were
added on the rear hull in the same
manner as above. It should be noted that the tiedowns on the engine intake covers are only
on the M20 and not present on the
M8. The fit of these parts is spot on and required no filler (other than as mentioned
above).
The wheels have air valves added from thin wire and were lightly "flattened" on
the bottom by sanding on a flat surface to give a
nice 'sit'. Reference to pics show that there is no side bulge to the tyres. The wheels
were left off until after painting, this is made
easy by the now familiar Tamiya 'Poly caps' for attaching the wheels.
The M2 machine gun was detailed using the Eduard set. The gun mount (part E3) is for post
war .50 cals, this being replaced
with the etched metal cradle. The ammo box cradle is also replaced with the etched item,
as is the cooling jacket on the barrel,
the sight and firing handle mounts. The barrel was drilled out and small etched chains
added on the cradle.
As mentioned the fit is brilliant allowing you to concentrate on either a 'quick build'
OOTB or add detail without having to waste time filling poorly fitting parts.
Painting and Finishing:
The interior is painted and weathered before the top hull is attached. There is some
debate as to what colours are used on the
interior of these vehicles. The instruction call for the entire interior to be Olive Drab
but I have seen shots where the front
section is white with only the exposed center section OD. I chose this scheme, spraying
the front interior white, masked this off
and spraying OD to the rear section. Because the vehicle is so open careful masking is
required from the inside of the top hull
before it is attached, as well as from the outside. Some thought must be given as to how
you will remove this inside masking
after painting.
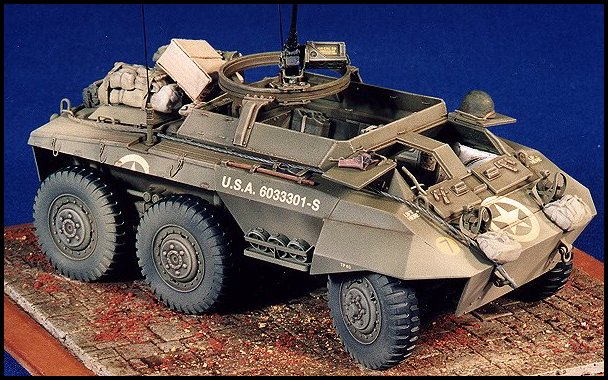
The exterior was airbrushed using Humbrol Enamels 155 Olive Drab. There
are markings for three vehicles on the decal
sheet, two U.S. Units (2nd Armored Division, 82 Armored Recon Battalion, France 1944 and
807th Tank Destroyer
Battalion, Germany 1945) and one Free French unit (5th Armored Division, 2nd Dragon
Regiment, France 1944). I choose to
use markings from the Decal Star M8 dry decal set (No.D-007). Being dry rub-on there is no
delay waiting for a coat of gloss
to dry. The star on the rear deck was cut into sections before applying. The quality of
these Decal Star offerings is superb and
go on very easily with only light pressure need to 'transfer' from the backing sheet. The
big advantage of dry rub-on decals is
that as soon as I finished applying them I could spray the overall coat of Matt Varnish to
seal the paint and decals before the
weathering process begins. I use 'Wattyl Estapol' Matt for the final coat. This is
designed for wood floors and dries very flat.
Given 48 hours to dry it is rock hard and great base for weathering.
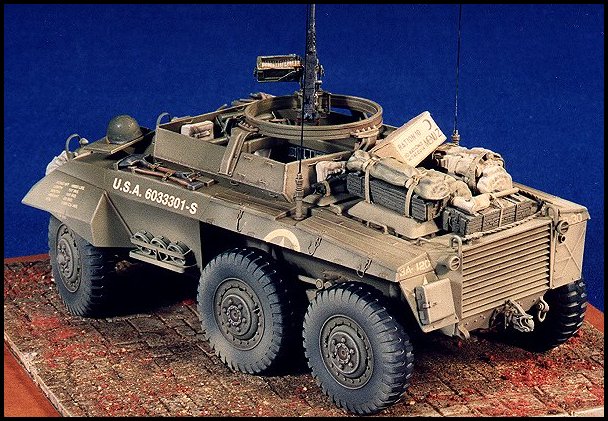
Weathering began by adding a wash of thinned Raw Umber oil paint. I use Humbrol thinner
for this, as it is a nice 'mild'
thinner. Once the wash had dried I lightly dry brushed with lighter colours to highlight
the detail. The dust effect was lightly
airbrushed over the desired areas. After spraying the 'dust' on the tyres, I used a tissue
lightly moistened with thinner to remove
the dust from the tyre faces, still leaving the dust between the tread blocks. After
all paint had dried additional items of personal storage inside and out was added.
Conclusion:
Another superb kit form Tamiya, everything we have come to expect from them these days.
Easy of construction, plenty of
details and well engineered. I personally like the M20 over the M8 as it looks sleeker
with it's low profile minus the turret.
The model will eventually find a home in a diorama with Tamiya's brilliant Dragon Wagon in
the near future.
References:
US Armored Cars in Action: Squadron Signal Publications
D-Day to Berlin: Squadron Signal Publications
Armor in Korea: Squadron Signal Publications
Armor in Vietnam: Squadron Signal Publications
Panzer Magazine: March '89
Ground Power Magazine: No.035 4/97
Heavy Metal: Arms & Armour Press
AFV Interiors Web site.
For more great models from Terry Ashley, please visit Perth Military Modelling Society.
| Main | What's New | Articles | Reviews | Gallery | Think Tank | Contests |