|
|
| Home > Think Tank > German WWII > Flak – from a modeller's viewpoint (part I of II) |
|
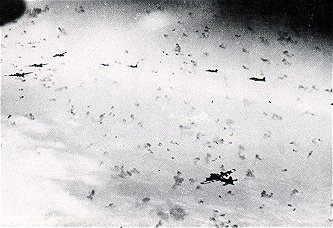 |
(Left) Figure 1. 'Flak so thick that you could walk on it' – a common remark by American aircrews late in the war. |
Tactical use of anti-aircraft guns
Anti-aircraft guns are deployed around an area vulnerable to aerial attack. Such an area could be static (a factory), or moving (a truck convoy). The area around a vulnerable point is divided into three circles – from outwards:
1. Preparatory zone.
2. Line of bomb release.
3. Vulnerable point (the target).
It is important that the anti-aircraft battery commander places his guns in such a way that he can prevent the attacking aircraft from crossing the line of gun/bomb release. Alternatively, if that is not possible, he must ensure they disrupt the attacking aircraft so that its misses its target.
An anti-aircraft gun can be used tactically in two ways, either against ground targets as a ground support weapon or against aerial targets as an anti-aircraft weapon.
Against ground targets, it can be bought into action using direct fire or indirect fire. Direct fire means that the target is within visual range of the gun. Indirect fire means that the gun is firing in an arc into a non-visible zone calculated by the commander (for example, over a hilltop or a forest). Indirect fire can only be done with non self-destruct ammunition.
Against aerial targets, it can be bought into action as a barrage weapon or by using direct fire. Barrage fire means that the gun/guns are firing into a specific area or 'box' of airspace. The box is predicted by the gun/battery commander to be at the same height as and within the plane’s flight path. Direct fire means that the gun is aimed directly at the enemy aircraft (or in its flight path depending on the angle and speed of the enemy aircraft).
Flak units
The basic German Flak unit was divided into four main types: Schwere (heavy 8.8cm–12.8cm), Leichte (light 2cm-5cm), Gemischte (mixed with both heavy and light guns) and Scheinwerfer (searchlight) units. These were further sub-divided into fully motorised, semi-motorised or static units.
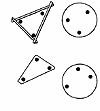
A standard heavy Flak unit (Zug) consisted in 1939 of four guns, a power unit, rangefinder, sound locator (not always) and a searchlight unit. The guns were laid out in the corners of a square, with the power unit and the rangefinder in the centre. There was at least 50m between the guns and the rangefinders to protect the operators and their delicate instruments against the muzzle flash and blast. In 1941, the number of guns was changed to six guns, which were laid out in a circle, or a circle of five with the sixth gun in the centre. The power units and rangefinders were still placed in the centre or as in the latter layout slightly to the side of the guns. From 1944 onwards, two units often worked together with a single power/rangefinder unit in the middle of the group (see Fig.2 below).
In 1942 radars were introduced, and in 1943-44 8 guns became normal. Batteries using both radar and searchlights together were to be found often with the searchlights linked to the radars. The searchlights were always placed quite a distance from the guns, as they were an attractive target for Allied turret gunners. From 1944 until the end of the war, several heavy Flak units were bought together to form the so called Grossbatterien of 16 to 24 guns. Sometimes up to 32 guns were seen.
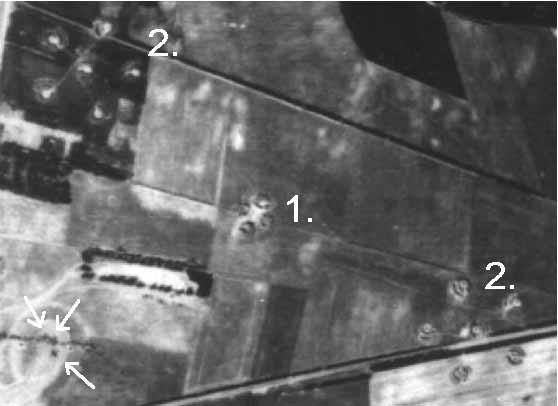 |
(Left) Figure 2. Two power, two predictor units (1.) and two six gun batteries (2.) situated in a heavy Flak battery at Fliegerhorst Grove (today Karup Air Station) Denmark April 7, 1945. Note that the top positions are empty while the lower ones are occupied. However, they could easily be dummy guns. Also, note the three parked fighter aircraft in the lower left corner. |
A standard light Flak unit (Zug) consisted of three guns. In 1940, these were usually laid out in a triangle about 50-75m apart and each gun had its own commander. In 1944 this was reduced to 30m apart, with a single battery commander situated in a small dugout in the middle of the triangle. The triangle was laid out with the apex towards the vulnerable point.
(Left) Figure 3. Light Flak battery at Einsatzhäfen Rye, Gl. Ry Airfield Denmark November 6, 1941. The small dugout 'horseshoe' is the gun position, while the larger square one is the crew hut. The squares in the fields surrounding the positions mark the boundaries for the barbed wire fences. |
Self-propelled Flak
Mobile Flak like the tracked Wirbelwind or other wheeled Flak vehicles were primarily used to protect moving vulnerable points like truck convoys or larger travelling units like Panzer divisions or infantry divisions. Again the purpose was for the battery/gun commander to place his gun(s) in such a way as to prevent the attacking aircraft from crossing the line of bomb release or from strafing (engaging ground targets with its guns); or alternatively, if this was not possible, to distract the attacking aircraft so that it missed the vulnerable point (target).
If a self-propelled Flak gun was intended to stay for a longer period in the same position and if it was soft-skinned like a truck, the entire vehicle was often dug in so only the gun and the top of the truck's cab was above ground, or a small wall of earth, wood, stones or other suitable materials were erected instead.
Preparing the Flak gun for action followed the below order:
1. Remove the tarpaulin and the muzzle cover.
2. Dismount the gun from its carriage*.
3. Level the gun.
4. Unlock the travel locks.
5. Install the sighting mechanism.
6. Prepare the ammunition.
7. Load the weapon.
[*Most of the towed German Flak guns could be fired from their carriage in emergencies. However, it affected their accuracy considerably.]
After engaging the enemy, the following order was observed:
1. Unload the weapon.
2. If necessary, clean the gun and the bore.
3. Repack the sighting mechanism.
4. Repack unused ammunition.
5. Lock the travel locks.
6. Remount the gun on its carriage.
7. Remount the tarpaulin and muzzle cover.
If a heavy Flak unit worked its guns in cooperation against aerial targets, it was also necessary to synchronise/aim the guns before they could be bought into action. Depending on the situation, all the expended cartridge cases were recollected for later reuse.
A battery‘s war diary
One of the daily duties of the battery commander, amongst other paperwork,
was to keep and maintain the battery’s war diary. Below is a page
from the war diary of one of the German 416 Inf. Division's 3.7cm Flak
36/37 positions. This particular position was one of three that guarded
the airspace around their divisional HQ at Silkeborg Bad in Denmark in
1943.
| Datum Und Uhrzeit |
Angabe des Ortes, Wind, Wetter, Beleuchtung, Seichtigkeit der Luft, Mondschein usw | Vorkommnisse |
| 16.5.43 | Keine besonderen Vorkommnisse. | |
| 17.5.43 1524- 1532 |
Bedeckung:10/10 Wolkenhöhe:200 m Sicht a.b.:10 km Wind.WSW 4 |
Eine von Süden nach Norden fliegende Mosquito kam nicht in
den Bereich unsere Kampfmittel. Bereitschaftsgrade: bef. v. Ugruko 1524 Uhr Flakalarm 1532 Uhr Kriegswache Ruhe. |
| 18.5.43 | Keine besonderen Vorkommnisse. | |
| 19.5.43 1300- 1320 1415- 1442 |
Bedeckung:6/10 Wolkenhöhe:3000 m Sicht a.b.:15 km Wind.N 3 |
Um 1300 Uhr überflog eine Feindmaschine den Flakbereich in
8000 m Höhe. Kurs Ost. Keine Kampfhandlungen. Eine von Norden nach Süden fliegende Feind-Maschine über Silkeborg (1415) kam nicht in den Bereich unserer Kampfmittel. Bereitschaftsgrade: bef. v. Ugruko 1300 Uhr Flakalarm 1320 Uhr Kriegswache Ruhe. 1415 Uhr Flakalarm 1442 Uhr Kriegswache Ruhe. |
| 20.5.43 | Keine besonderen Vorkommnisse | |
| 21.5.43 | Keine besonderen Vorkommnisse. | |
| 22.5.43 | Keine besonderen Vorkommnisse |
Field fortifications
If a Flak unit was intended to stay in a certain position for several days or longer, the crews usually started the construction of fieldworks for protection of both the gun and the crew. Naturally, the longer the crew stayed in one position the better it was constructed.
The Germans used four different terms to describe the deployment of their Flak guns:
1. Feldmässig. The gun is deployed on an open road
or in a field without any construction around it, if the situation requires
it to stay on its carriage.
2. Feldmässiger Ausbau. The gun is taken off the
carriage and a berm of earth, sand, snow, stones, sandbags, logs or similar
is erected around the guns position.
3. Verstärkter Feldmässiger Ausbau. A parapet
of wood, timber, light concrete or bricks is erected around the gun's
position. Extensive work is also put into sheltering both the gun and
the crew against attack and the elements.
4. Ständiger Ausbau. The gun is placed in a fully
fortified position either on a heavy concrete gun platform or in a bunker.
How the gun was deployed depended heavily on materials available, which could be affected by shortages or distances to available material.
|
|
|
|
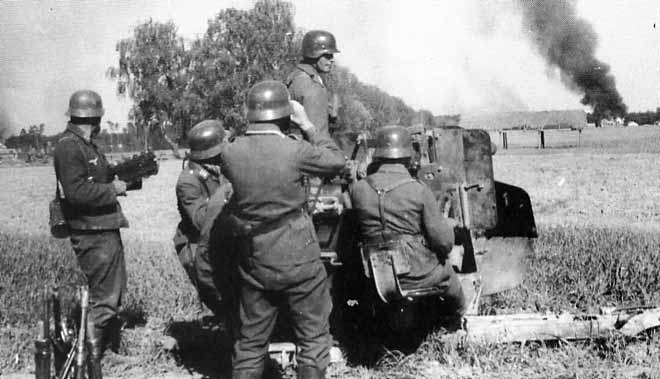
Figure 4. 3.7cm Flak 36/37 gun in a 'Feldmässig' position |
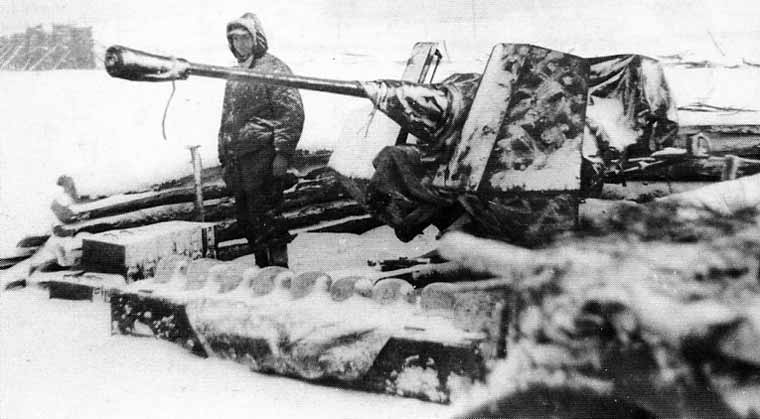
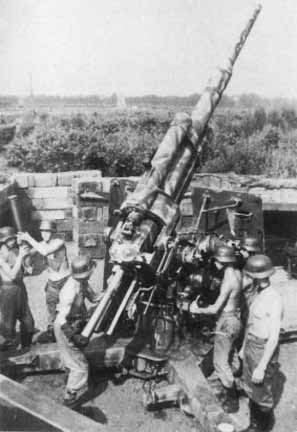
Figure 5. 3.7cm Flak 36/37 in a 'Feldmässiger Ausbau' position |
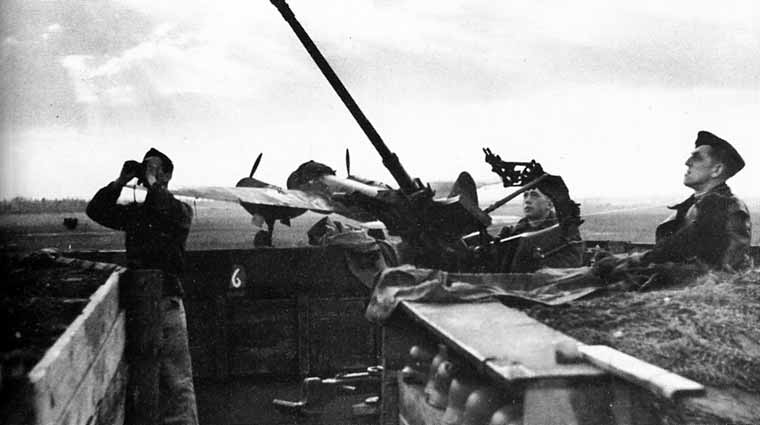
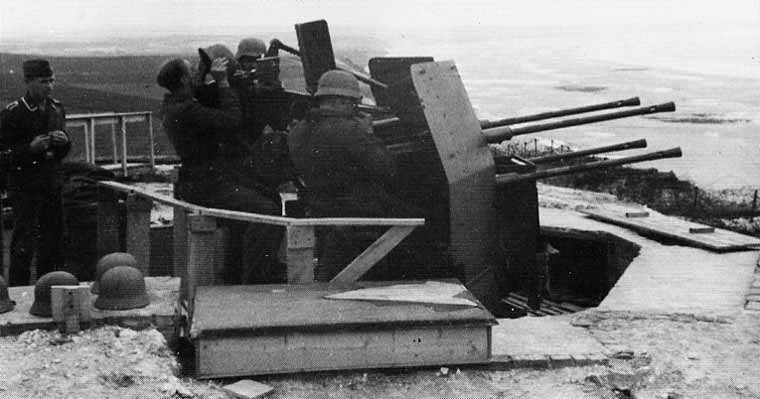
Figure 6. 2cm Flak 30 gun in a 'Verstärkter Feldmässiger Ausbau' position |
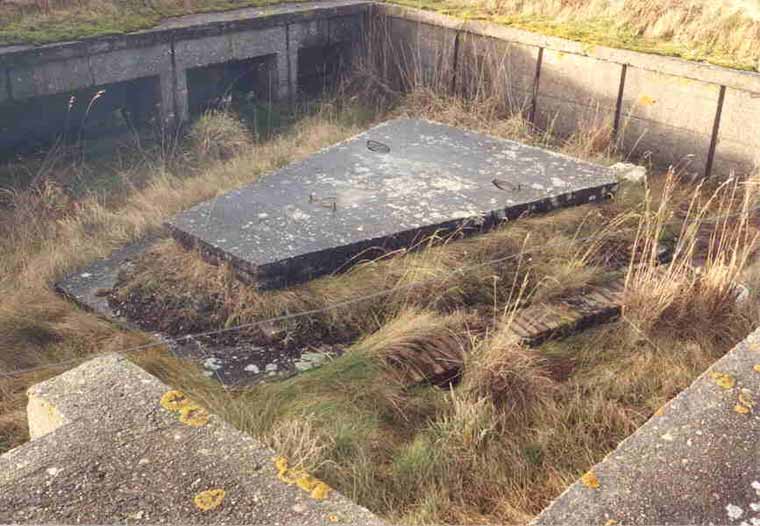
Figure 7. A 'Ständiger Ausbau' position for 2cm Flak 30/38, Hanstholm Denmark, 2002 |
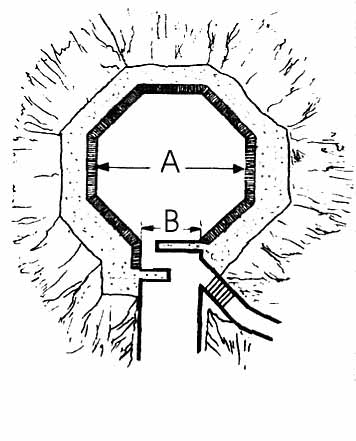
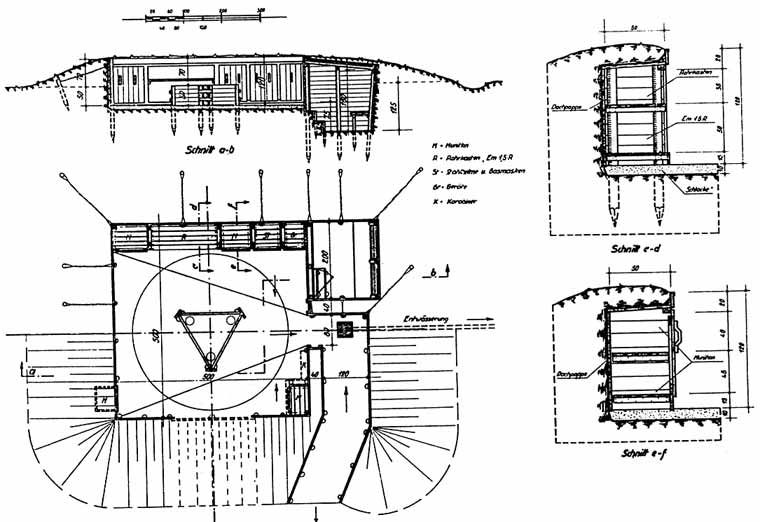
The design of a Flak field position
|
|
(Left) Figure 8. |
Note that in the centre of the 2cm–3.7cm Flak gun positions, including the 2cm Vierling, there was a raised centre platform. The platform could be made of wood, bricks or concrete and the height was 30–50cm. For 4cm guns upwards, the floor was flat. The purpose of the platform was to bring the gun a little higher up so the high walls could be maintained, giving added protection to the gun crew and at the same time allowing the gun to engage targets coming in at low level or ground targets.
In some of the larger Atlantic Wall Flak bunkers, you can see a large raised circular gun platform in the middle of the position. This was a standard constructed platform to accommodate all types of Flak guns, searchlights and sound locators.
 |
(Left) Figure 9. The raised centre platform for a 2cm Flak 30. |
 |
(Left) Figure 10. Different layout types for the raised centre platform: Top 2cm Flak 30/38, Bottom 3.7cm Flak 36/37. The height of the parapet was: 2cm–4cm = 1.2m, 8.8cm = 1.4m, 10.5–12.8cm = 1.6m. All positions had a sump or rainwater drainage. |
 |
(Left) Figure 11. Verstärkter Feldmässiger Ausbau Flak position for 2cm Flak 30/38.
|
What was placed in the position beside the gun?
The ammunition for the gun was often stored in recesses build into the parapets (Fig.7) or in closets placed in the corners of the position. For single round guns, the recesses had shelves in them like the ones used to store wine bottles. For automatic guns, they contained either preloaded clips, magazines or new ammunition boxes. Hinged doors or a removable wooden board covered the front of the recesses to protect the ammunition against the elements.
On or above the doors, there were often written in chalk or paint the type of fuses that the ammunition within had – e.g. Zt.Z (Zeitzünder) or A.Z. (Aufschlagszünder) - time fuses and percussion fuses (percussion fused means that it has to hit something to detonate, time fused that it detonates after a specific amount of flight time). The reason was to prevent any shells falling to earth and harming friendly forces or civilians. Often the projectiles had both types of fuses.
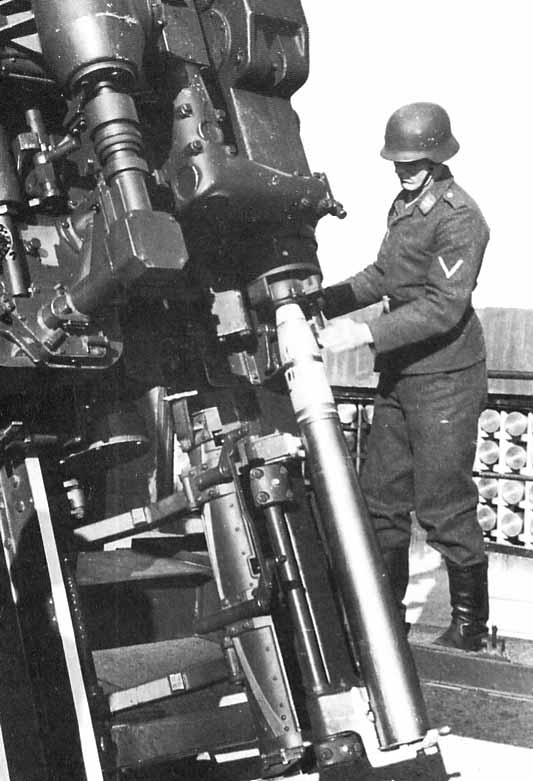 |
(Left) Figure 12. Automatic fuse setting before loading it into the chamber on a 12.8cm Flak. Note the stored ammunition in the back. |
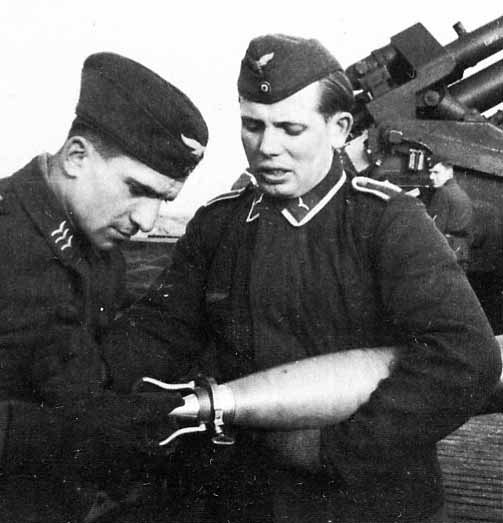 |
(Left) Figure 13. It could also be done manually with a fuse setting key. Two men are holding the 47.7kg cartridge, while a third is setting the fuse. In positions for the automatic guns, there were also metal containers marked “Rohrkasten” or “2 cm Flak 38 Rohr-Waffe Nr 8461” (for example) on the lid in white or black letters for the spare barrels. Other wooden or metal boxes/containers might contain extra parts, spares or tools for the guns. |
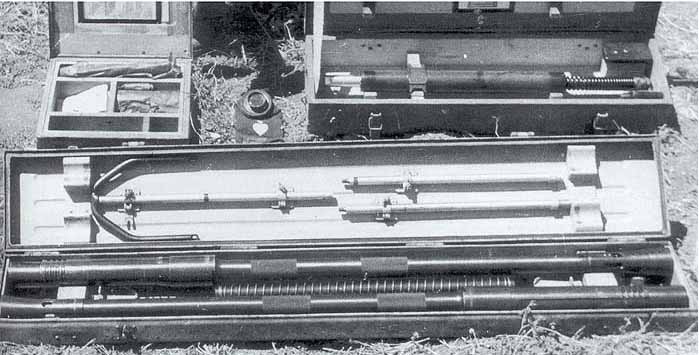 |
(Left) Figure 14. The metal container for the 2cm spare barrels (Rohrkasten): two of the tool/spares boxes can be seen above. |
A wooden crate to store the gun's tarpaulins when they were not covering
the gun might also be found. Often the tarpaulins were just thrown on
the parapet. There were also wooden racks for gun cleaning equipment like
oil, grease and cleaning rags, and a field telephone. On top of the rack,
the gun crew’s helmets could be stored when they were not in use.
This rack also contained the metal container for the stereo rangefinder
until the winter of 1944/45, when the automatic guns started to use tracer
ammunition to establish the range to the target instead. There could also
sometimes be a rifle stand for the crew’s personal weapons in the
position.
There could also be a protective deflection bar in wood or iron placed on the top of the parapet. The purpose of this was to prevent the gun crew from hitting other Flak positions or other friendly installations nearby in the heat of the battle.
As an aid to the gunner and the commander the numbers 1-12 (in clock fashion) were often painted on the inside of the parapet. Number 12 was set at North to help locate the target. The targetting command was given like in an aircraft – 'enemy aircraft 12 o’ clock high' – thus noone had any doubt where they should start looking for the enemy. (Fig.6).
Often there was also painted profiles of prominent landmarks on the walls with the exact range to those landmarks painted beside them. This helped both the gunner and the commander to calculate the exact range to the target. Boards on the walls with aircraft silhouettes or technical data about the gun's ballistics were also common.
 |
(Left) Figure 15. Note the deflection bars on both sides of this position. |
During daylight hours there was usually one watch guard with binoculars on duty in one or more of the positions. In the event of an attack, he would first sound the alarm; then he ripped of the tarpaulins and unlocked the gun. By that time, the rest of the gun crew should 'hopefully' have arrived.
The alarm (Flak alarm) for specific areas in the predicted flight path of enemy intruders was often raised in advance by telephone or radio from command and control headquarters.
If the Flak position was placed in an occupied area or areas at risk of enemy ground action (including partisan/freedom fighter actions) a perimeter defence was also constructed. Often this consisted of an extensive trench system with large amounts of barbed wire or even landmines.
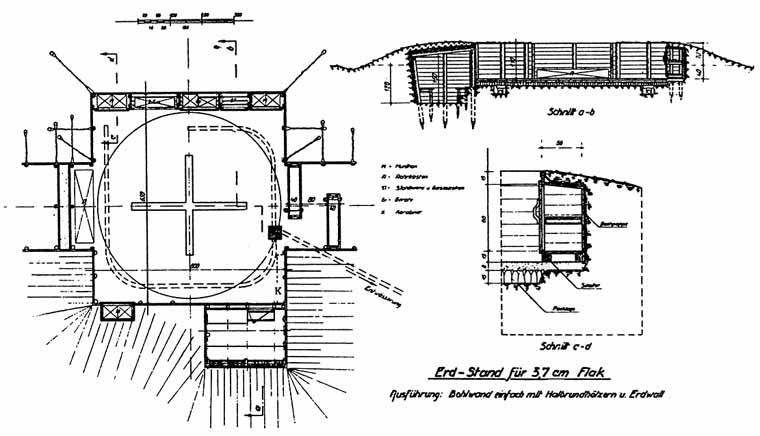 |
(Left) Figure 16. Verstärkter Feldmässiger Ausbau position for 3.7cm Flak. |
What else to take into consideration?
1. The gun had to have a free and unobstructed field of fire. I have read on several occasions, that if a large tree or an entire tree line was in the way, a round or two from an automatic cannon quickly took care of it.
2. The ammunition, the clips and magazines were always to be kept in pristine condition, and not lying around in the sand or mud. Quite often, it was unpacked, cleaned with oiled rags and then repacked/reloaded. New ammunition for the automatic guns did not arrive ready to use in clips or magazines. A certain amount of clips or magazines belonged to the gun and they were refilled after use.
3. Spent cartridges were removed as soon as possible by the crews operating gun areas. Often they was just shovelled up or thrown out of the position as soon as there was a lull in the fighting. After combat was over, they were collected for reuse.
4. When the gun was not in use it was protected against the elements with tarpaulins, muzzle covers etc. Depending on the situation, the whole position could also be covered with camouflage netting/material, but this was not to hinder the operation of the gun.
5. In battle, all personnel had to wear their steel helmets. When they were not in use, they were placed in a row on top of the parapet or in a special place close to the crew’s entrance to the position.
6. There was always a gun blast/muzzle flash safety area around larger guns. This was 30m from the centre of the gun for guns calibred 8.8cm and upwards. Everything unprotected outside the parapet up to a range of 30m could sustain serious damage if the gun fired below +5. The crew shelters for the larger guns were therefore always placed some distance from the guns.
7. The opposite applied for automatic guns. The 'Gruppen Unterkunft/unterstand' crew shelter was always placed only a few meters from the guns to reduce reaction time. If it was placed outside of the parapet, it was often shielded with an earth wall reaching up to or just above the windows. (Fig.3)
8. There was always an opening in one or both sides of the position (depending of the size of the gun's carriage), making it possible for the gun's carriage to deliver or remove the gun. The opening was closed with removable walls in zig-zag pattern, so the position could still be enteredt but at the same time preventing someone from shooting down the length of the position. (Fig 8 and 17).
 |
(Left) Figure 17. Note how the entrance behind this 8.8cm Flak gun has been closed with removable walls. |
9. The position was very seldom dug into the ground. The walls/parapet were erected around the gun position.
10. The whole position was camouflaged so it could blend in as much as possible with the surrounding terrain. If paint was used the colours also reflected the surrounding terrain.
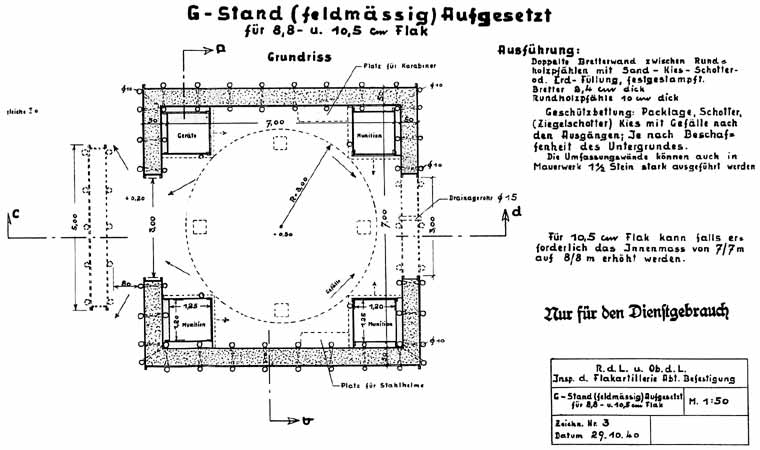 |
(Left) Figure 18. Feldmässiger 'Ausbau' position for 8.8cm–10.5cm Flak guns.
|
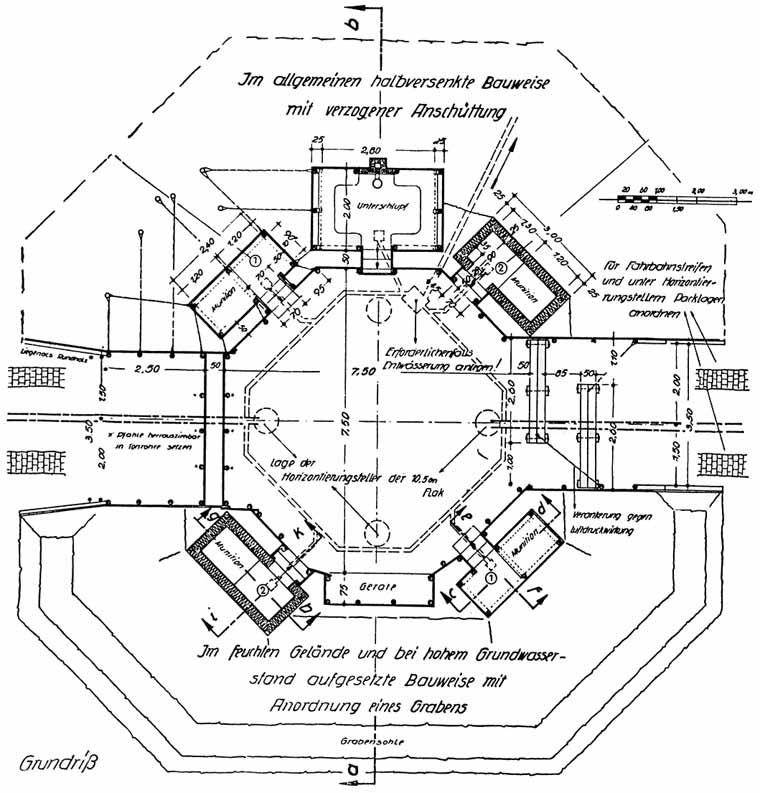 |
(Left) Figure 19. Verstärkter Feldmässiger Ausbau position for 8.8cm–10.5cm Flak. The position for the 12.8cm Flak guns were similar, just a bit larger. |
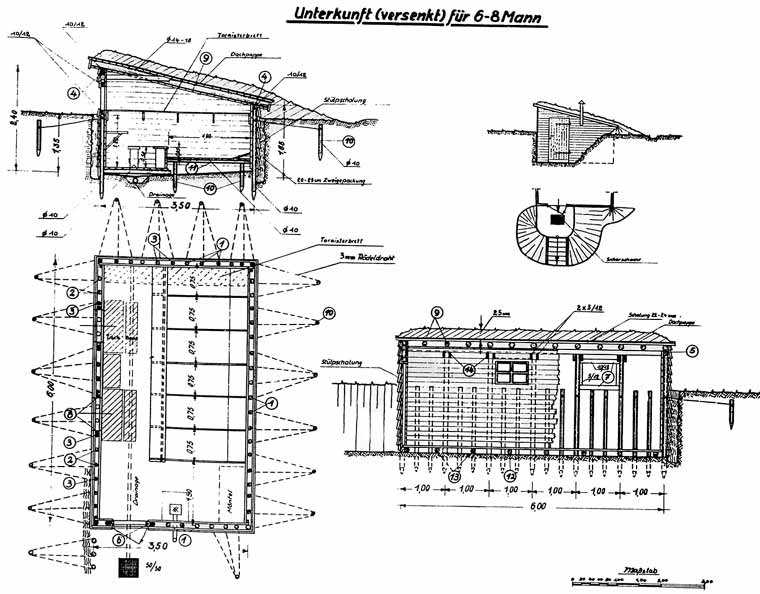 |
(Left) Figure 20. Basic layout of a crew shelter.
|
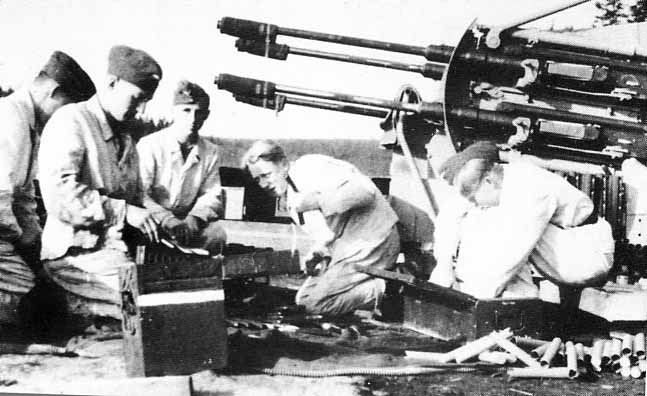 |
(Left) Figure 21. Reloading of magazines.
|
[Part 2 of this article examines ammunition details.]
Dan Mouritzsen, 2003.
| |
|
Home |