| |
Dragon M1 Panther II Mine Detection
and Clearing Vehicle (3534)
by Frank De Sisto
1/35th-scale plastic and metal. Contains: 316 (including 13 clear) styrene
parts, one bag of “Magic Tracks”, two sheet styrene parts,
three lengths of chain, one wire cable, one fret of photo-etched brass,
four decal schemes and eight pages of instructions in 16 steps. Price:
unavailable.
The Abrams MBT series has been a staple of most kit manufacturers since
the vehicle first saw service. Tamiya has issued four versions (M1, M1A1
with mine plough, M1A1 and most recently M1A1/A2). Academy released an
‘A1 and recently also re-released it with some much-needed improvements
(see this site for a review). AMT/ESCI did an M1 and an M1A1, which are
best ignored. Italeri recently released an Abrams, while Trumpeter has
actually released a Panther II. DML has also had several variations prior
to this release. Forget ALL of them!
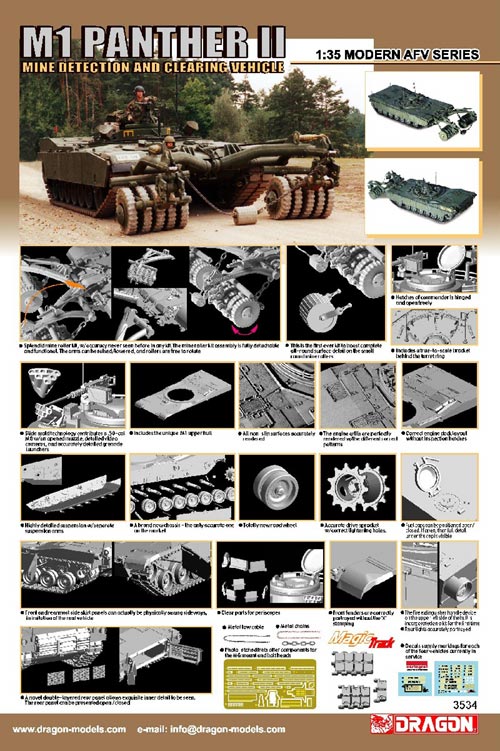
This kit has all of the things that an Abrams kit has been lacking, and
all are in the same box. For instance, the hull simply eclipses all that
have come before. It includes the one main item that no manufacturer has
ever made any attempt at properly portraying: a proper rear engine deck.
This includes separate left- and right-hand doors with full internal baffle
detail, which can be shown opened. On these are installed separate grills
for the proper appearance. The tail-lamps have separate armored sleeves,
separate lamps and clear lenses. The hull top features several key items,
the most noteworthy being the non-skid texture common to modern AFVs.
There is also separate fuel filler caps with detailed orifices should
the modeler desire to show them opened. The removable engine access section
is separate, so that an after-market engine may be installed. The tool
locker lids are separate as are the two front fenders (which properly
lack the “X” stamping). The drivers hatch is properly configured
(and includes clear periscope inserts), while the hatch coaming itself
is depicted, correctly, without a raised edge. The separate head-lamps
have the proper early-style guards as well as separate clear lenses. The
hull side features the small circular port as well as the small rectangular
fire extinguisher opening with pull-handle. Near the front fenders, there
are also the L-shaped torsion springs molded in place.
The lower hull features complete and correct details including separate
suspension arms, separate mounting system for the side skirts and even
sheet styrene to fill in the sponsons. Also included are newly-tooled
road and idler wheels, as well as new drive sprockets with mud chute/lighting
holes and choice of two different, separate outer sprocket tooth rings.
The individual-link “Magic Tracks” depict the so-called “Big
Foot” type. The side-skirts are beautifully rendered, include properly
placed and detailed hinges and can be shown opened. To the tops of the
skirts are added photo-etched weather strip details (including separate
bolt heads; good luck!) that were only previously available as an after-market
item. In short, the detail is as complete as one could ask for.
There is no “turret” in the conventional sense on the Panther
II. In its place is a large circular plate with a commander’s cupola
from an M113 mounted centrally. The cupola mounts a .50 cal. M2 heavy
machine gun that features a pre-drilled bore using slide-molds, as well
as alternate parts for the gun and ammo box cradle (either plastic or
photo-etch). The cupola also features clear periscope inserts. There are
smoke grenade launchers either side of the cupola, as well as antennae,
remote-operation video camera, metal wire tow cable, “bustle rack”
and other smaller details.
The second most impressive item in this kit is the mine roller assembly.
It is broken down to 117 styrene parts, and also uses some of the provided
metal wire, as well as the sections of chain. It is completely operational
and can be raised, lowered or removed. It is a very complex molding, but
test fitting indicates that with care, it will do what DML says it will.
Speaking of test fitting, I cleaned up and assembled several of the main
components in preparation for this review and here’s what I have
found. There are a couple of small problems due to the complexity of the
kit’s rear end. For instance, there is no positive locating tab
to aid the modeler in precisely aligning the rear plate (B24) with the
upper hull rear edges (A1). This in itself would not be a big problem
except for the fact that the lower hull on my sample was warped (actually
slightly twisted). These two factors will make a precise fit a bit of
a challenge for the modeler. Another glitch concerns flash in one of the
openings for a periscope in the driver’s hatch. It is actually not
flash, but nearly solid plastic. Cleaning it up will be a chore, especially
if the modeler wishes to maintain the integrity of the details around
the opening. Other parts such as the separate plate for the upper engine
deck (B26) will require careful clean-up of its edges in order to properly
fit. Likewise the circular plate upon which is situated the commander’s
cupola will need some careful clean-up in order to fit snugly over the
turret ring opening. The main arms for the mine rollers (C11, 12, 13 &
14) will need attention where they join because they have some complex
angles and curves. You can’t just
slap them together! The central
“dog-bone” comes in four parts (D16), which will require extra
care in assembly in order to get rid of the seams and not damage the dimples
on the surface. The two lids for the tool lockers (G13 & 14) have
their handles molded in place. These should be replaced with resin after-market
offerings. The individual-link tracks each have two knock-out pins that
need cleaning, as well as a single sprue point to remove and clean up.
They fit together quite well using friction, but should be fixed with
cement after being fitted to the tank.
The instructions are in the conventional line-drawing style we have come
to expect from this manufacturer. They are clear, but in some cases “busy”,
so care must be exercised by the modeler. I especially appreciated the
plan view of the hull for the placement of the photo-etched weather strips
and bolts, although I’d replace the latter items with styrene bolts.
Also very convenient was the call-out of the proper number of tracks for
each side of the model; they differ due to the staggered positions of
the suspension arms. The decal schemes accurately cover all four of the
vehicles in service, including two in Germany and one each in Kosovo and
Iraq. In that respect, DML’s sister group, Concord Publications
has a very fine reference book, “Assault”, Volume 8, with
a pair of very useful color photo reference articles by this kit’s
technical advisor, Ralph Zwilling. See this site for a review of the book’s
contents. The decals themselves (from Italy’s Cartograf) are cleanly
printed, are in perfect register and feature excellent color saturation.
Color notes are keyed to Gunze and Testors’ Model Master paints.
This kit offers the possibility for a back-date to a “slick”
M1 by using the proper turret from the original Tamiya kit, or an IP M1
by using a highly-modified turret from the Academy kit. I suppose what
is most exciting about this kit is that DML has also announced forthcoming
M1A1 AIM and M1A2 SEP kits, both based on this new tooling. I can’t
wait!
Highly recommended.
Reviewer’s note: It must be noted that as of May, 2005, I am working
with a DML subsidiary, Concord Publications, on several forthcoming books.
Nevertheless, I will continue to strive to maintain my integrity as a
reviewer.
DML kits are available from retail and mail order shops. For details
see their web site at: www.dragonmodelsltd.com.
|
|