
JB Models Light Tank Mark VI
Ian Hanratty
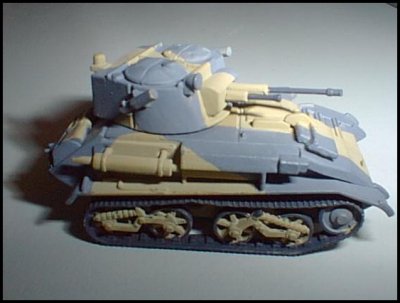
This model like all the other kits from this manufacturer is moulded in a light grey soft plastic. the kit comprises 33 parts. the box also contains an instruction sheet and a very well laid our decal sheet. The kit gives you the choice of building any one of the three main variants of the mark v1 light tank, and includes alternative parts for each variant. the kit built straight from the box will give you a basic representation of the vickers light tank mark v1.
The hull is devoid of all rivet details which is a shame as the real vehicles were built using riveted construction and the hull and turret were litrally covered in rivets, the kit scales out okay in overall height and width with the hull being about 2mm short at the lower rear plate, but as I used a photocopy of Ken Musgrave's plan published in Military Modelling in June 1986 I am not 100% sure of the accuracy of the photocopy plan, as phototcopied plans are not accurate.
The model looks okay sitting side by side with a Cromwell Models Vickers Light Tank Mark v1. The construction of the hull is of the flat pack type and is straight forward, however note that the first stage of the instruction sheet is printed in reverse, also note the different parts needed to build the different versions. I had to use a little filler on the joints and the grooves that are on the hull sides and roof, i do not know what they are supposed to represent but assume they are supposed to be the armoured plate joints these are just a little heavily done. the rest of the hull and turret construction presented no problems, just take care when cleaning the parts up as the plastic is very soft. Use the back edge of a knife only. Notwithstanding the above minor criticisms, J.B Models are to be congratulated for producing a world war two british light tank in injection moulded plastic at a very affordable price. Well done
Lets now take a look at how to detail the basic kit, and produce one of each variant. with a look at some conversions that are possible on this vehicle.
First the hull should be built up as per stage one but leave off the armoured louvres for the engine deck. fill in the joint gaps and grooves, rescribe the plate gaps as necessary. if you choose to open up the drivers hatch do so at this stage. If you choose you can replace the detail in front of the drivers hatch. use either thin plastic card or brass stock, use photos to help in this area also replace the handle at the front of the engine deck.
If you decide to add the rivet details to the kit, which in this scale would be almost invisible using any plans or photographs you may have. mark out the position of the rivets, you could try any of the following methods:
1) Try adding a dot of lighter coloured paint than the main colour in the relevent positions. I tried this method out on the review kit and was resonably happy with the result, I used a cocktail stick to add the paint. When the rivets were dry i applied a thin wash of dark brown water colour paint to tone down the rivets.
2) For this method I drilled out the marked positions and then inserted 10 thou. plastic rod which is glued into position, trimmed to length. when all the rivets where finished on each side I lightly sanded the side to get them all level.
3) You could shave the rivets of a donar kit, such as the Airfix World War One or Grant kits them glue them into place, when each rivet is in position go over the row with liquid glue this will help to seal then into place permanently.
4) Using a punch and die set make rivets and glue them into position as above this works well in the larger scales but rivets made this way maybe to large for 1/76th scale. unless you can alter the size of the smallest punch.
5) using a hot needle or pyrograuver insert the tip into the plastic and pull it out immediately, this will leave a tiny hole with a small plastic collar around it, fill in the centre of this collar with a tiny drop of super glue.
Once the riveting of the hull was finished I made new trackguards / infantry rides from metal foil cut from a old pie dish that was flattened out after being washed out properly. this foil is thinner than brass shim and accepts paint easily when primed with halfords acrylic primer.
Modelling the Vickers Light Tank Mk VI
To make a Vickers Light Tank Mark VI make the following alterations:
The basic mark v1 hull was very similar to the Vickers Light Tank Mark V but with a redesigned turret. Build the hull and detail as above, then cut out the gap at the front of the engine deck this measures 0.5mm x 2mm.. next alter the front suspension to the earlier style by removing the track return roller from the hull side, as per on the Airfix bren gun carrier and remount it above the front suspension arm attached to the top of the arm. On the roof of the turret remove the curved angle iron ridge between the two hatches, and replace with a straight one. the curved angle iron ridge was only fitted to the mks v1b and mkv1c tanks. Use the two piece armoured louvres but either thin down or replace the hinge detail. Use the hexagonal commanders cupola.
Modelling the Vickers Light Tank Mk VIa
For the Mark VIa carry out the above modifications to the hull and turret, but do not alter the suspension, as this mark was identical to the mkv1, but with the repositioned return roller. Both of these vehicles were armed with the 0.3 " besa m.gs.
Modelling the Vickers Light Tank Mk VIb
The mkv1b was very similar to the mkv1a but with detailed changes to improve production. these include the following points. a one piece armoured louvre over the engine deck. a round commanders cupola. On the vehicles sent to India for tropical trials were fitted with locally produced semi-circular hatches, with a periscope on the front hatch cover.
Modelling the Vickers Light Tank Mk VIc
The mark v1c was externally similar to the mkv1b but with the following differences, no commanders cupola, as per the indian trials tanks. 15mm and 7.92mm besa m.gs. wider bogies, and an improved engine. Both the mkv1b and mkv1c have the smaller single armoured louvres.
Painting notes
The Vickers Light Tanks were in service before world war two, and some may have served in the middle east and in india, along with the earlier marks of the light tank family. I am unsure of the colours of the pre war period in India or the middle east, British armour was first in action with the British expeditionary force in france during may 1940, the vickers light tanks where crewed by members of the royal tank regiment, and the imperial yeomanry force.
In BEF service the vehicle would be painted in the g3 middle bronze green no. 23, - g4, deep bronze green no. 24 scheme, but recent research by M.Sammer, has indicated that the lighter colour may have been g5 light bronze green no.22. painted in a disruptive pattern, the next theatre of operations that the light tank served in was the middle east, here the schemes ranged from plain light stone no. 61, and portland stone no.64. to the very colourful caunter scheme, anyone wanting to paint their vehicle in this scheme is recommended to read M. Stammer's series on the caunter scheme, recently published in Tankette volumes no. 33/6.
Light tanks also served on Malta, on Crete and in Greece, as the vehicles deployed two the latter to fronts where taken from the western desert force, they would have been in either light stone no. 61, or the caunter scheme. the malta scheme was portland stone no 61, with a disruptive pattern resembling a stone wall porbably painted in light purple brown no. 49.
For those interested in British Army colour schemes I would recommend M. Stammers British Army paint chips.
| Main | What's New | Articles | Reviews | Gallery | Think Tank | Contests |