CHIPPED PAINT
FEVER
These days, the medium modeller feels that he must to
finish their models with a lot of paint chips distributed
all over the vehicle. His main motivation is to think
that if his model presents some of them it will looks
more weathered and, therefore, more real. And this small
effect is turned into a pitiless crusade that many times
ends in a big paint chip with a tank and not on the other
way around. And most times, the modeller doesn't even
know what colour to use, what shape to reproduce or where
that effect must be located. This last point will become
the main key to reproducing chipped paint effects, even
more than to know if we should or not to put some chipped
paint effects on our vehicle.
The paint chips are just like the inner rings on a tree,
through which much information is transmitted to us about
that armored car or vehicle. We can't put rusted chipped
paint effects to the hatches of an operating Sherman,
because with all the handling done by its crew, it would
never be rusted. Likewise, we could not paint the same on
a M113, as its alluminium hull does not get rust.
But chipped paint goes beyond a rusty or worn surface.
The paint chips can be shown in a great number of ways,
like small dots, longitudinal scratches, scrawls, layers,
etc. And each one represents a moment and a little piece
of the history of that vehicle. Thus, the first thing we
sould have to do is to think this stage correctly. We
must start by asking by ourselvels why we want to
reproduce chipped paint effects, where are going to be
located and to check all of this with graphical
references. These do not have to be from the same vehicle
necessarily but we need a valid reference to follow. If
we are using b/w pics, then we are in trouble as we do
not know what the correct colour to use is, or if we are
looking a real chipped paint effect or just grease or a
water stain. Only the experience and looking at
equivalent colour pictures -in example, Desert Storm Op.
ones are excellent- will give us the correct answer.
Many known modellers drag a routine in the creation of
chipped paint effects. They use the same mechanical
technique and the same colours on any kind of vehicle,
without realizing that the materials and the interaction
of the colors is different in every case. The interaction
of a color is the influence of one color on another,
something which tends to alter its final result. For
example, a dark brown paint chip over olive drab will
appear almost invisible, but on a desert vehicle, the
contrast will emphasize it and it looks almost black. In
the following reference table that I have prepared, some
examples of the most characteristic paint chips effects
on different surfaces are shown.
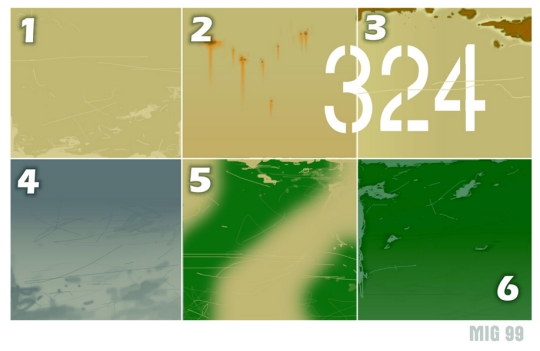
1.-
When we want to represent a subtle paint chip, caused by
the vibration of the vehicle or a small scrape, then we
can appeal to these primer chipped paint effects. The
paint is lost at its last and newest layer but there is
no exposing of bare metal. Then the previous layers of
paint reaches the surface that, in many cases, can be a
primer which is red, gray, etc, but almost always the
vehicle tends to have been repainted with the same colour
and the paint chip can be done with a lighter shade of
the base colour. This is a very easy to reproduce paint
effect and we do not take too much risk on our model as
it is easily corrected if we were wrong. We must give all
of our care to where to paint them and which shape it
will present. We must avoid regular, rounded, homogeneous
or repetitious shapes. It is better to make some small
paint chips beside a larger one and we have to make them
in a way that always they are coherent to some structure
of the vehicle, an edge, a volume, an opening mechanism,
etc. We should never paint them on hidden or protected
areas away from the effect of hits or friction.
2.- The drained rust chipped paint
effect is one of the most used whose results are always
quite good. It give an aged character to the vehicles, as
these types of paint chips are present after a long
period. With orange enamel we will apply some paint chips,
with diverse size, enrich them with some fine vertical
lines in their lower part that we will stump later with
the help of thinner and a clean paintbrush. Once dry, we
will apply a centered dot of darker brown colour in the
previous orange chipped paint. This example is very
useful to make non working or abandoned vehicles.
3.- This is the typical deep chipped
paint effect and it is same that can be seen both in the
desert or in Russia. It is an older paint chip when
compared with the ones above, so we can cover it with
dust or a light layer of mud. It is accomplished
inversely that the previous. First we apply the darker
colour, and we enrich it with some small dots around it.
After that, and always in the center, we apply the
ligther orange colour, but without covering the darker
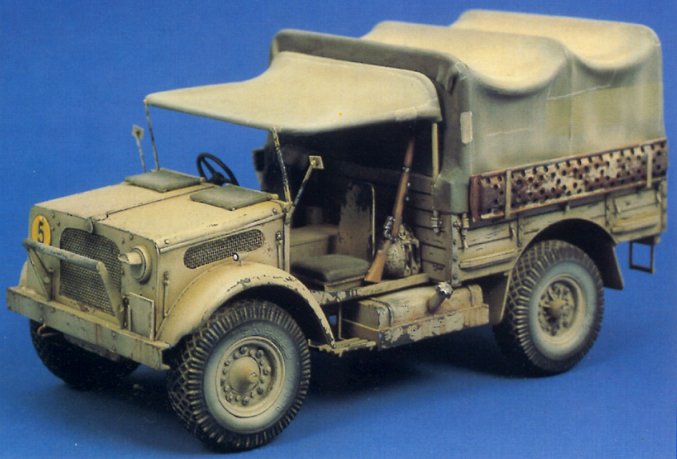
base colour on the edges. In the desert Chevrolet truck
different examples of this chipped paint type can be seen.
Also it could have been done only with darker colours as
in the Pill-Box Panther, so we can achieve older and
still wet rusty chipped paint. Keep in mind that a paint
chip may present different colours if it is dried or
still wet, newer or older. A new and dry paint chip will
looks orange but an older and wet one will look red brown.
4.- This example it is not a real
chipped paint effect as it is produced by the rubbing of
objects on a dusty surface. We can imagine a small
vehicle, a Panzer Grey Horch, in example, in the warm
russian summer. The vehicle is taking more and more dust
but it is forced to be hidden in a small forest. The
undergrowth rubs on its dusted surface and this ends
chipping off the adhered dust. Also its own crew will
cause those frictions and superficial wearing. Now we
repeat the action. Another dusty road day and again the
friction. The different layers are one over the others
creating a kind of transparencies. We can simulate this
gray base colour effect, applied with a paintbrush over
the dust.
5.- Chipped camo schemes. Many
camouflages were applied at the front. Sometimes with
good quality paints or with any other one available.
These improvised colours do not tend be as resistant as
the factory applied colours, so they were easily chipped.
This was very common in late war vehicles, or in both
desert or winter camo schemes. We can reproduce them as
in step #1 now using the base colour over the camo one.
In this example, the base color is sand while the camo is
green. When the green paint is chipped off, the previous
sand colour reaches the surface. Take care. these effects
should be done in the very early stages of our painting
works, even before the apliying of filters and washes.
6.- And, finnaly, the usual paint chip
that has been well spread by Uncle Verlinden during his
more creative period. The metallic paint chip. Perhaps
this is the most difficult to reproduce, as a wrong
application or chioce of the colour can make our model
looks like sci-fi 23rd century Warhammer armour. We can
think again of a M113 in Vietnam. In the jungle the hull
was heavily clawed by the dense undergrowth. The crew was
always riding atop their vehicles to avoid mines and they
were contributing to these polished surfaces. We can try
to use a little amount of Humbrol Silver enamel and to
mix it with a little of Olive Drab, and then to directly
draw the paint chips. The result can be outstanding when
controlled, but it's best to be careful than than try for
too much. We must to try to perfectly outline the cutting
edges. These zones present very fine and polished chipped
paint effects. And remember that there is a very easy way
to reproduce them. with a pencil !!
The chipped paint world it is a wide field and we could
devote a whole modelling life to research them. It is an
apparently insignificant effect, but it gives real life
to a model. That it is, perhaps, the reason that it is so
wanted by modellers. But they enclose many more mysteries
than we can imagine, and many times the best and most
realistic chipped paint effect we can obtain it is made
by mistake. When we are painting them on a model, it
tends to increase in size, so it's hard for us to apply
them in a coherent way over all the surface and not get
out of control. I recommend you to paint the main "structure"
of all of them not too close to the model so you do not
loose the perspective and the scale. And after this, we
can start to detail them or to make small dots around
these main chipped areas. Anyway, do not be afraid to
make bigger chipped paint areas. This is very usual and
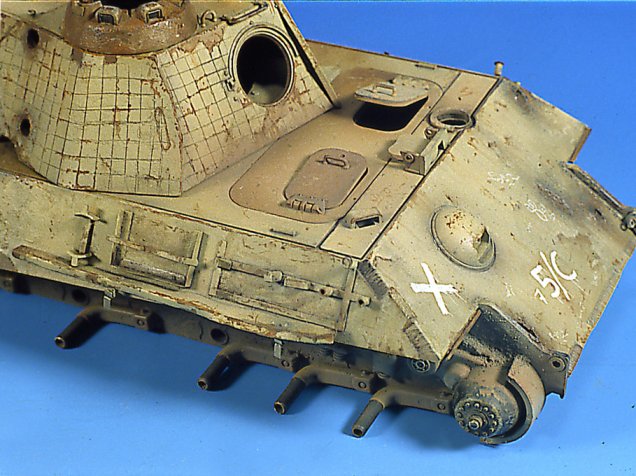
you can always hide them with the dust work. You can see
this on the M88 pics. Notice how the chipped paint around
the MG cupola is almost covered by dust while the other
areas closer to the most beaten zones are clean.
And some last advice. Always look at reality, at that
caterpillar bulldozer that it is working close to your
home, at an old road sign, at the chipped paint of your
own car... and if you look at them closely and with care,
even you will find the way to reproduce them.
MIG - 1999
|