 THE FILTER
There are some techniques that would not work alone, by
itself, In other words, they can not be used as a final
result because or they do not complete any acceptable
finish or they do not represent any complete finish
concretely. That is what happens with the filter. if done
alone, the rest of the project as a whole would still be
incomplete The filter is technically a complement - just
another brick- that is used with other primary techniques
as one more step in that complex painting construction
making a final result. But as a brick that it is, we do
not have to forget that some buildings are made of stone,
cement or wood and therefore the filter brick is unneeded.
WHAT IS IT?
Around 1992, there was a need to classify a paint effect
that modelers didn't always understand and even today is
usually confused with washes or rain marks. The filter
had the purpose to give a most real aspect to a surface,
to help enrich it and to give it depth, working in such
way that a completely flat colour base acquired realism
with the simple application of the filters. In addition,
filters modify the original paint tone of the model with
high precision, achieving colors that would be almost
impossible to obtain by simply mixing paints.
WHAT DOES IT SYMBOLIZE?
The textures, the objects, the matherials have, by itself,
some own characteristics, independient to the
environmental effects, that normally are unnoticed by
most modellers as many times is tended to represent only
the weathering effects instead the original texture. In
example, a metallic painted surface is not shown to our
human eye just like a plastic painted surface. The
resulting texture, to the margin of the mud, oxides,
dirts, etc. is clearly different to each other. The
filter, most concretely, tends to represent that small
difference of texture and chromatic wealth, in a very
subtle way, that will cause that a metal surface looks
closer a real a metal surface and not a wooden one.
Also we can understand it as a simple colour filter, as
those which are used in photograph to modify the general
tone without modifying the contrast or the shine.
HOW IS IT MADE?
A filter is very simple to execute, but first one needs
to have a good understanding of the correct materials and
tools to use. Most important, one must be able to
identify the proper circumstances to use filters and
which surfaces should have filters applied.
a) Over a matt surface, the
filter will dry quickly and perform with 100%
effectiveness. On a matt surface one must note that after
the first filter, you will not be able to alter the base
color any further with additional ones. In this case it
is more useful to make only one or two filters.
b) Satin surfaces are ideal for
filters. They are perfect because the filter will dry
rather fast and numerous layers of different colors can
be applied until the desired effect can be achieved.
Satin surfaces will also give a metallic texture to the
filters as it does the base color. A maximum limit of 10
or 12 filters will be viable using 4 different colours.
c) Only the glossy surface puts
our limit to the edge as the filter may become into a
wash, because the filter will not cover by equal the
surface due to its shine and it will tend to be
accumulated in grooves and seams, in the same way of
washes. The drying time will be very slow and hard to
control. You will need to monitor the surface until the
filter dries. On these brillant surfaces only one or two
filters will be useful. More filters may dirt our surface
and destroy the desired effect.
In order to make a filter, we must apply a diluted layer
of color. The color must be diluted with 95 to 98%
thinner and 5% to 2% paint. With this ratio of thinner to
paint, we will effectively be able to apply our filter.
After the first filter is applied then dries, the surface
will appear almost as nothing has been done. One way to
see the difference obtained by the filter will be to
leave a part of the model untouched. When the filter is
dry, compare the untouched surface to where the filter
has been applied. Filters should be applied with a smooth,
round, number #6 or #8 brush. You can use Humbrol paints
for filters and even oils if you want to give vividness
to the surface. Pure turpentine spirit can be used as
thinner but never use hard thinners or dissolvent because
it will eat the base paint. The essences of turpentine
are excellent if we are familiar with using them and we
are aware of the results. For beginners, I recommend a
normal turpentine spirit which are sold in drugstores and
supermarkets. Petroleum essence will probably leave fewer
marks, but with the time we will see how those filter
irregularities are interesting too.
First, dip the brush
into the container containing the transparent mixture of
5% paint and 95% of turpentine spirit. Lightly wipe the
brush on the side of the container leaving it damp but
NOT SOAKED, then immediately apply it onto the surface of
the scale model. Brush so that the mixture extends
uniformly. It should take about 30 or 45 seconds to apply
a filter to a 1/35 scale Sherman and about 10 seconds to
the same AFV in 1/72. This is important because we want
the drying to be uniform.
We would have a beer,
to take a break playing out most addictive computer game
or surf the web looking for scale models until the filter
is completely dried (1 or 2 hours), before apply the
following
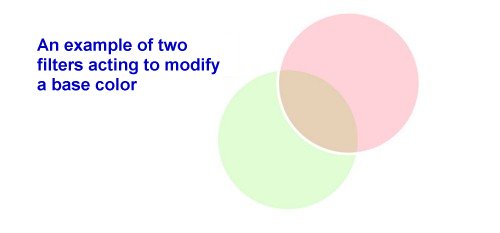
We can combine different colorus, ligther or darker,
shades of blue, green, or orange colors. The original hue
of our vehicle will not change, but as we apply our
shades, they will give a surprising result, modifying the
vehicle to our desired color with much precision.
TRICKS
It is almost impossible to end up with an undesired
effect because the filters that we apply are in such
light shades. Choosing the turpentine spirit is what you
usually should be careful of. I recommend that you buy at
least two or more different brands of turpentine spirit
and test them on some trial pieces of painted plastic or
a couple of old models. Once you have decided on which
turpentine spirit gives the best results you will be able
to use the bottle on the next 30 models that you build.
Around three years ago I purchased two 500ml bottles of
turpentine spirit. The first one never fully dried
leaving me with a sticky film on my test model but the
second one, however, gave me the best results.
Unfortunately I am unable to remember the manufacturer
and the supermarket where I purchased the second brand.
Now I will need to find another commercial brand of
turpentine spirit that gives me the same results to
replace the one I am using now.
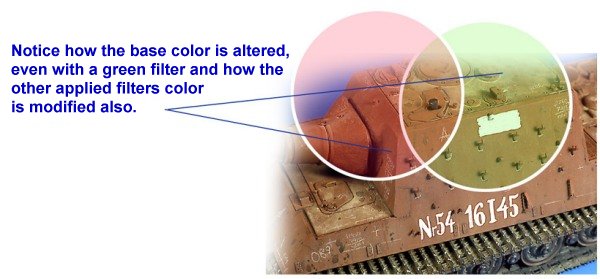
USE IT TO...
Filters are used to enrich very monotone and uniform
surfaces, to satin excessively matt colours or to modify
also colours that are very difficult to obtain using
mixtures. Suppose that you want to make a sand colored
vehicle that has a slight greenish tint. We can apply our
basic sand colors and then let it dry. After the sand
color has dried we can add green filters and create our
sand colour with the desired greenish tint.
BE AWARE!!
We must be careful. If we mix a filter that exceeds that
delicate ratio of 5% color or if we don't brush the
excess mixture off the brush onto the container, we will
end up with a result that resembles that of a wash and
the Know How Series #3 about the washes would have no
sense !!.
The filter is a fundamental step for most of the scale
models I do. The filter is an important part of our
weathering process and it plays about a 5% role in the
total modeling process. Before finishing I would like to
say that I'm debating on possibly changing the name of
the filter to the "5% technique". We hope that
it will create less confusion between filters and washes.
MIG - 2001
|
