
M88A1 Medium Recovery Vehicle
Theo Naus
History
In the late fifties the US Army was looking for an replacement for the M47 Medium Recovery
Vehicle. They turned to Bowen-McLaughlin-York (BMY), who had a design based on the M48 MBT
on the drawingboard. In 1960 3 prototypes T88 were build, and after approval 10
testvehicles were build. The final order was for 1075 vehicles to be delivered between
1961 and 1964. The vehicle was designated M88 Medium Recovery vehicle. The M88 was capable
of recovering all of the vehicles in use at that time by the US Army, including the M60
MBT.
Eventually the US Army was thinking of replacing the M88. They wanted a vehicle using
the same engine as the M60 MBT, the Continental AVDS-1790-2DR diesel engine. They also
wanted to replace the hydraulic system, operating the whinch, crane and spade. After
testing the M88 E1, they decided to send all the M88's back to the factory for an
upgrading to the new standard. At the same time - 1975 - the Shah of Persia was
looking for a recovery vehicle for his army. He didn't want upgraded old M88's, but new
vehicles. So with his funding BMY was able to open a second productionline for the
new M88 A1. The US Army was now able to acquire new M88 A1's without having to pay the
developmentcosts. Between 1977 and 1989 another 3042 vehicles were bought; 876 upgraded
ones and 2166 new ones.
The introduction of the M1 Abrams meant the end for the career of the M88 in the US
Army. Two M88 A1's are needed to pull one Abrams. And the brakes of the M88 A1 can't hold
an M1 slipping away.
For the future BMY is working on an M88 Improved Recovery Vehicle. It is hoped that this
will prolonge the usefullness for the M88 for several years. M88's are used by
Egypt, Germany, Greece, Israel, Jordan, Norway, Pakistan, Portugal, Spain, Taiwan and
Thailand, to name but a few.
Technical data.
| crew | 4 |
| armament | 0.50 M2 HB machinegun, 2x 5.56mm M16, 2x .45 M3A1, 10x LAW |
| Lenght | 8.267 mtr without blade |
| Width | 3.428 mtr |
| Heigth | 3.225 mtr incl machinegun |
| Weight | 50.800 kg |
| Ground pressure | 0.74kg/cm2 |
| Engine | Continental Diesel M12, aircooled AVDS-1790-2DR, 750 BHP at 2500 rpm |
| Speed | 42 km/h on the road |
| Range | 450 km |
| Fuel | 400 gallons |
| Obstacle clearance | 1.066 mtr |
| Width of ditch | 2.61 mtr |
| Grade-ascending ability | 60 percent |
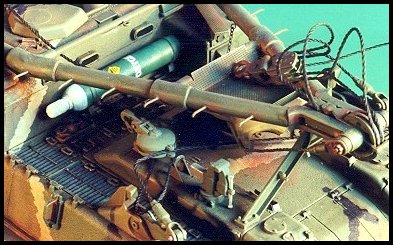
The M88 has two winches; one for lifting and one for pulling. The first one has a 5/8 inch 400ft long steelcable, runnig over the A-boom, with a 50.000lbs hoisting capablilty. The second, main whinch, has a 1 1/4 inch steelcable, 200ft long with a 90.000lbs pulling capability. The four-man crew consists of a driver/crane-operator, a mechanic, a rigger and the commander. On the right rear of the hull there is an auxillary power unit (APU) used for loading the batteries and for several other functions when the main engine is off.
The kit.
The M88 A1 kit is by AFV Club (AF3508). The box has several sprues, a decalsheet for two
American versions, one Chinese and one German. And there is sheet of etched metal.
AFV also do a kit of the M88, as used in Vietnam (AF35011). Main difference
is the APU on the right rear. There are several add-ons you can use. Eudard do
a set of etched brass (35098). AFV has a kit for replacing the track called "M48
& M60 Track workable" (AF3505). These tracks can be used for American vehicles
untill the end of the eighties. The German firm MR Modellbau have a set for the interior
of the M88 (MR-31).
Following the instructionsheet, I have some remarks.
Step 1. Drill out B7 if you want to move the A-frame later on. Drill three oval
holes in D7 and D8. The holes keep the drivewheels free of mud.
Step 3D. Align A81 and A82 with the edges of A73. Place them after A67 has been
glued to the hull.
Step 4. A31 needed some putty to fill the holes. The steps have been replaced by
wire. The A-frame was left off the model untill the end. It is not placed in step 5.
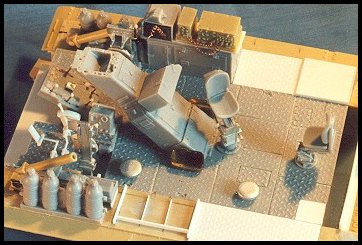
Before you begin at step 5 the interior has to be in place and painted. A few remarks on
the interior. MR's set has all the parts for an interior, in resin and metal. The
instructions are in bookform. All the parts are numbered. It pays to study the drawings
closely. Some off them aren't that clear. The book "M88A1 Armored Recovery
Vehicle" from the Museum Ordnance Special series, Darlington publications, comes
in very handy when building this model. The photo's taken at the POM-site in Coevorden
were very helpfull as well. In my kit a lot of the resin parts needed cleaning up. I
suspect they were using old molds when casting mine. MR uses a soft kind of resin, so
watch out with new blades!
I also added some extra cables and the pedals and gearshift for the driver.
Step 5. Don't fill the seam when joining A3 and A4 to A60. It is supposed to be
there. B39 doesn't need glue. They jam just enough to keep the spade in place.
Step 6. Drill out A22, it is the exhaust for the generator.
Step 9. There are chains runnign from part L to the A-frame.

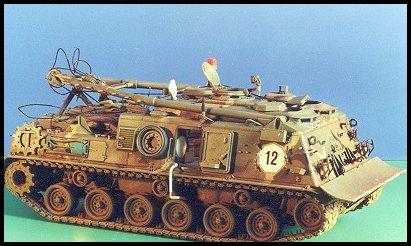
I've have painted my M88 as a vehicle taking part in a Reforger excercise during the 1980's. This means MERDC-schemes. The MERDC-program dates from 1972. The Army wanted a camouflage system making it difficult detecting vehicles with the human eye or infra-red equipment. For every vehicle, from motorbike to tank, a pattern was developed. In 1973 it was used for the first time, and it became a standard for the entire US Army. Each pattern was made up of two major and two minor colours. There were eigth seasonal variations. Switching from season to season, only one of the two major colours had to be changed.
In the 1980's American vehicles left the factory painted Forest Green. It was up to the troops in the motorpools to paint them in the appropriate scheme, according to the manual. Usually this meant, if it looks good, it must be good. So deviations from the manual were normal. Ideal for the military modeller! I usually work like this. I spray all the seams black. Then I spray all the panels in the base colour, making sure the black shines through. Next I spray the panels in a lighter version of the base colour. Finally I ad the camouflagescheme. The MERDC-schemes have small lines in the minor colours. In the motorpool they are usually applied by brush. On the workbench you can do the same.
After the model has dried I spray it with clear varnish. This provides a good base for the decals. After the decals have set I spray the entire models with a matt varnish. Then comes the drybrushing and weathering.
References.
M88 A1 Armored Recovery Vehicle - Museum Ordnance Special No. 1
Modern American Weapons
M48/M60 Patton MBT
Military Modelling 12/95
Tank 117
TM M88
Tamiya Model Magazine jun/jul 95
| Main | What's New | Articles | Reviews | Gallery | Think Tank | Contests |