|
Jagdpanzer
38(t) Hetzer, Mid Production |
Tamiya, 1/48 scale |

|
| by Brett Green |

Tamiya's
1/48 scale Hetzer is available
online from Mission Models
Introduction
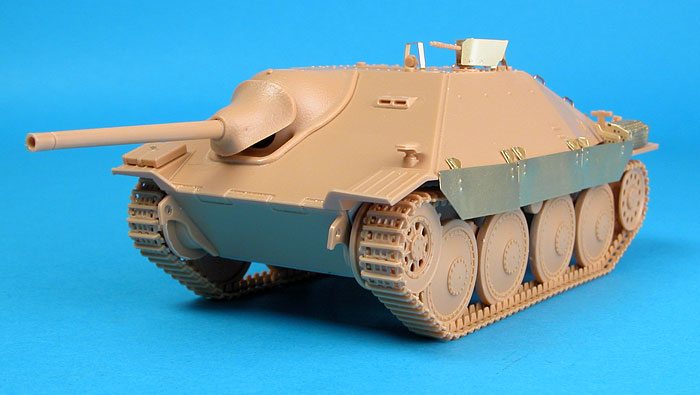
Tamiya's brand new 1/48 scale mid-production Hetzer features good
detail, superb fit, link and length plastic tracks, and separate
hatches to permit the installation of crew figures.
In common with
Tamiya's earlier 1/48 scale armour releases, the lower hull is
supplied as a single, solid metal casting. This certainly lends
weight to the overall model, but with the fixed suspension and the
link and length tracks, the model would look exactly the same
weight with or without the cast hull. The front and rear of the
metal hull are covered by plastic pieces - certainly of benefit as
this will enable consistent surface texturing.
Tracks are
supplied as link and length in solid plastic. The track sprue
incorporates a clever assembly jig for the top run, which ensures
the correct curve is achieved for the drive sprocket. When this
section of track is glued in place, it acts as a guide for the
remaining track sections.
All tools are
separately moulded in this release. They are quite well detailed
even in this small scale
Inevitably, in
this scale, some of the parts will appear slightly overscale or
simplified, but they remain quite acceptable in my opinion. If you
want to lift the level of detail and finesse, there are already
several photo-etch detail sets available (including the Hauler set
that I used on mine).
Construction
There is almost
nothing to say about basic construction except "fast and easy".
Construction
took almost no time at all, especially with the very simple running
gear of only four road wheels and one return roller per side.
Fit of all
parts was uniformly excellent. No filler was required anywhere. The
tracks were especially noteworthy. They were an absolute pleasure to
assemble, and lined up exactly to the last link. The only area that
I tweaked was to smooth the curve of the tracks in one place on each
side. I slightly bent the first link of the bottom track run upwards
on the port side, and the rear link of the bottom run upwards on the
starboard side.
I estimate that
basic construction, including removal and cleanup of parts, took around 5 enjoyable hours.
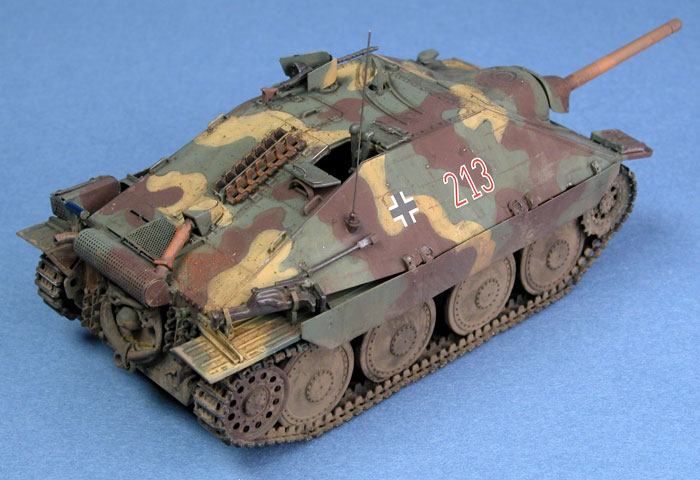
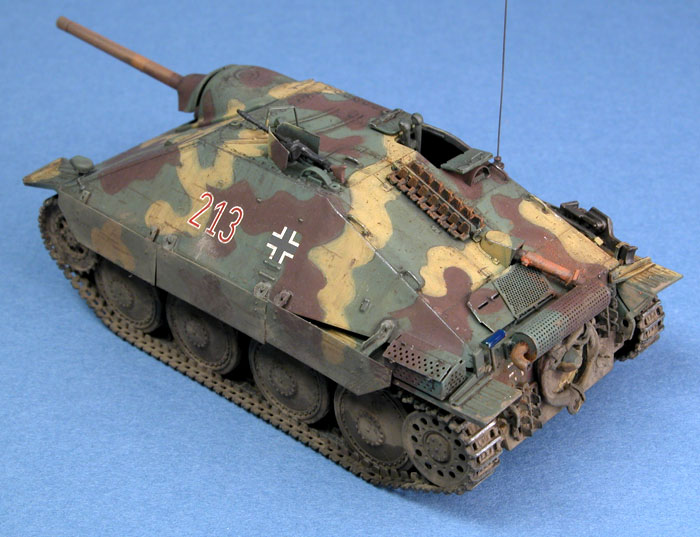
Hauler's Photo-Etch
Hauler's photo-etched
fret for Tamiya's 1/48 scale Hetzer looked impressive. However, it does not
matter how sweet a photo-etched fret looks behind the cellophane.
What counts is how it works on the model.
The Hetzer presents
some particular challenges for an all-injection kit. The real
vehicle featured thin skirting and machine gun shield, perforated
toolbox and exhaust heat shield, fine handholds. All of these detail
areas are somewhat compromised on Tamiya's kit.
Hauler's Hetzer
photo-etch set represents especially good value, as it includes the
Schurzen, the distinctive perforated toolbox, a lovely,
delicately detailed mount and guard for the remote control machine
gun, the exhaust heat shield plus various tool shackles, straps and
hand holds.
At first I thought
that I would simply install the tool box, grille and exhaust, but
the remaining photo-etched parts were just too tempting.
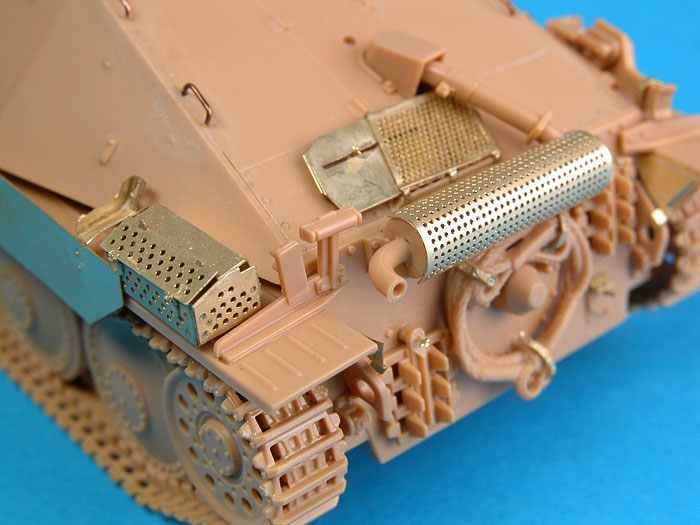
The photo-etched metal
was quite easy to cut from the frame, tidy up and fold into place.
There is not too much origami demanded by this set, but some of the
smaller parts that make up the machine gun mount do require care.
Several butterfly nuts are absolutely tiny - I drilled fine pilot
holes before gluing them in place.
I did not use all of
the parts. For example, I substituted fine copper wire for the rear
deck handholds, and I did not replace the straps on the jack block.
Most of the other parts were used though.
At first, I was a
little intimidated by the side skirts but I was pleasantly surprised
at how easily the mounts were formed with the aid of my Etch Mate
metal folding tool. My only word of caution is that the instructions
seem to label the part numbers for the mounts incorrectly. Check
your references before gluing the mounts to the inside of the
skirts.
I also added
electrical cable from the Notek light using fine wire, and hex bolts
for the side skirt mounts punched from scrap styrene with my
Historex punch and die set.
By the way, in case
you are wondering why some of the mounts are not touching the
superstructure in the construction photos, the skirts were only
temporarily attached to the model using Blu-Tack!
There is no doubt that
Hauler has astutely assessed the most important areas where
additional finesse is required on Tamiya's little Hetzer. This set
is neither outrageously expensive nor unnecessarily complicated, and
it really adds a great deal to an already fine kit.
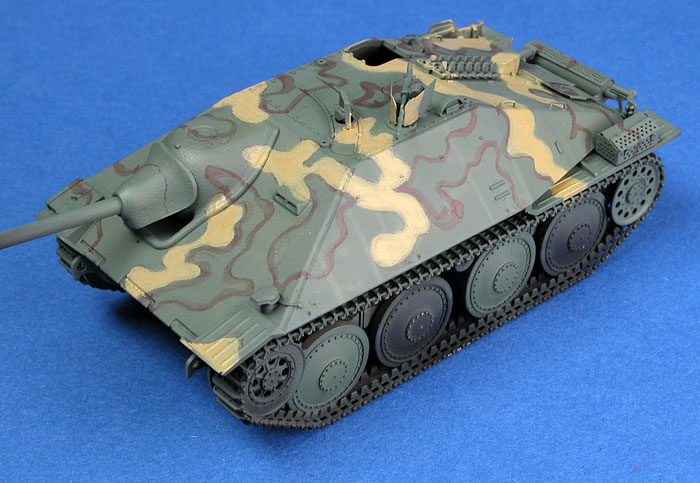
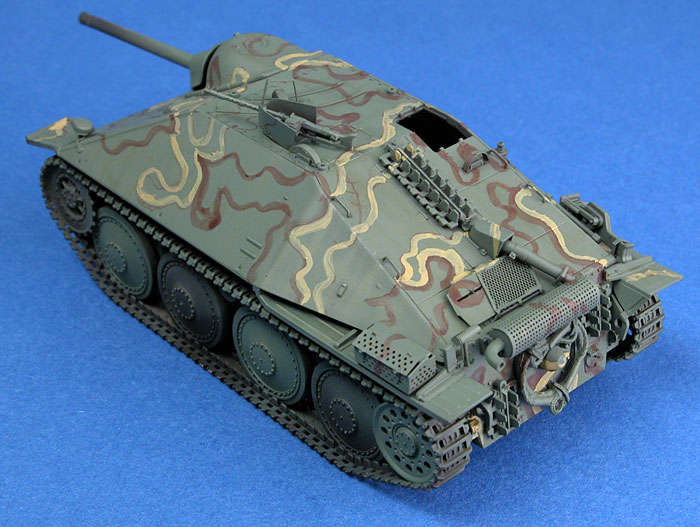
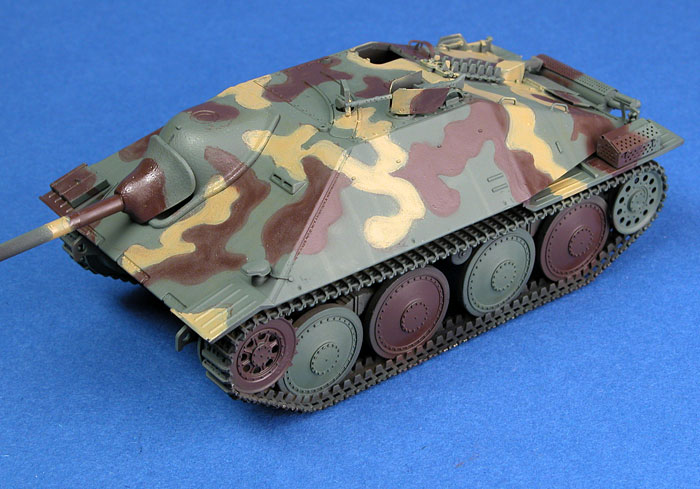
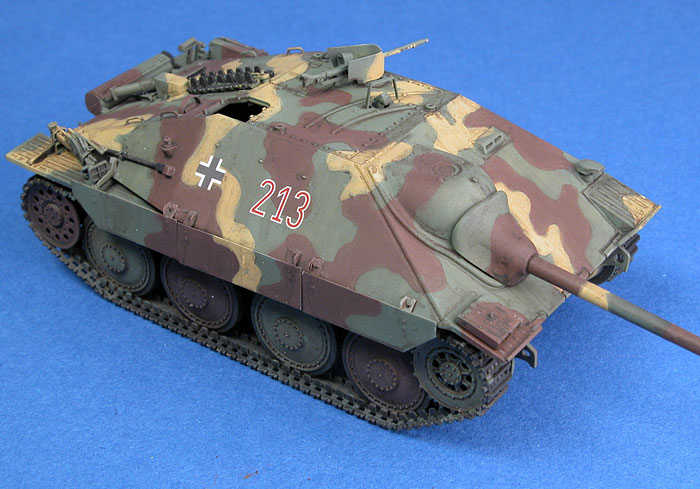
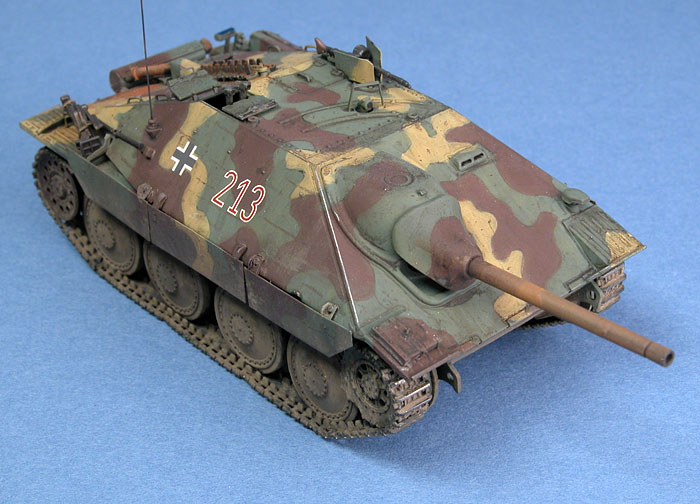
Painting and Weathering
I wanted to replicate
the typically hard-edged camouflage of the Hetzer in 1/48 scale, but
I did not want to completely brush-paint the camouflage, nor to mask
the pattern. I was concerned that brush painting would leave
out-of-scale brush marks, while a masked pattern always looks, well,
masked! I therefore decided on a middle route
The first step was to
spray the model in an overall coat of Tamiya XF-1 Flat Black. I was
careful to reach every nook and cranny, including the nether regions
of the lower hull and the insides of the tracks. In addition to help
identify imperfections before the camouflage colours are applied,
this black coat will be a good base for the track colour and for
deep shadows.
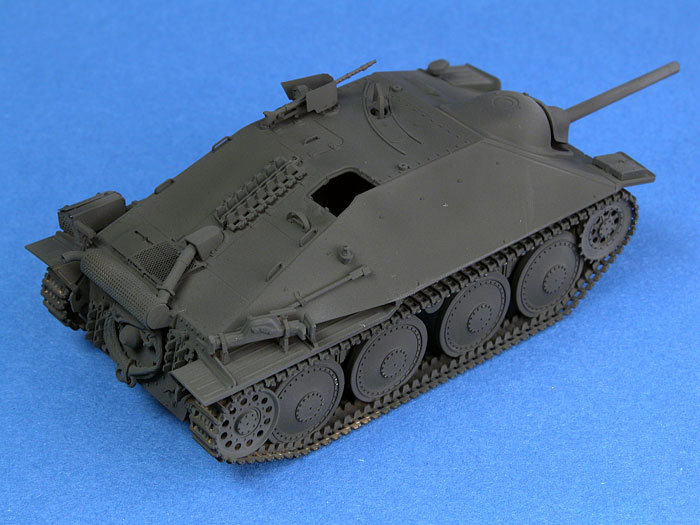
Next came the base
camouflage colour. Out of the three camouflage colours, it is hard
to tell which colour might have been applied first. I took a punt
and chose green. Polly Scale Panzer Green was used for this coat.
Polly Scale paints are
very durable and fast drying acrylic paints. They tolerate handling
much better than either Tamiya (which seems to scratch and rub off
easily) and Gunze (prone to fingerprints), although Polly Scale
paints are undoubtedly more temperamental to spray. The Polly Scale
Panzer Green was thinned with around 20% Windex to improve the flow
through my Testor Aztek A470 airbrush.
I did not worry too
much about full coverage on the lower hull and tracks, but the upper
hull was thoroughly painted.
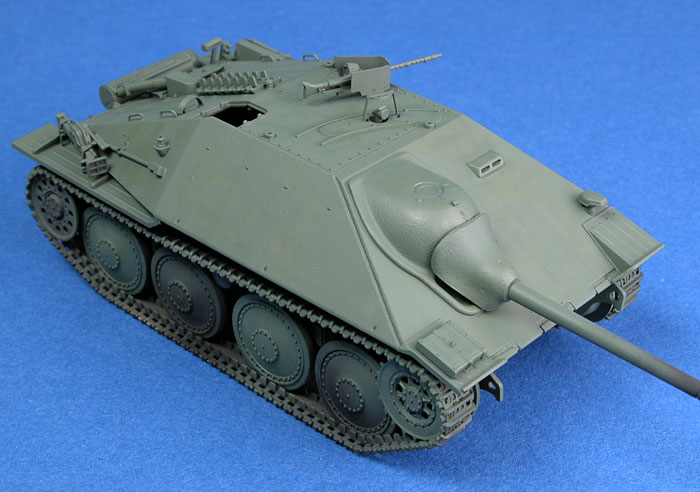
Using Tamiya's
instruction diagram as reference, the camouflage pattern was now
drawn onto the green surface with a brown artist's pencil. This, in
turn, acted as a guide to a brush-painted outline in each of the
additional camouflage colours. At this stage the paint job looks
pretty bad, and some serious self-discipline was required to
continue!
Gunze Panzer Dark
Yellow and Panzer Red Brown were used for these additional colours.
Click the thumbnails below to view additional images:
|
|
|
|
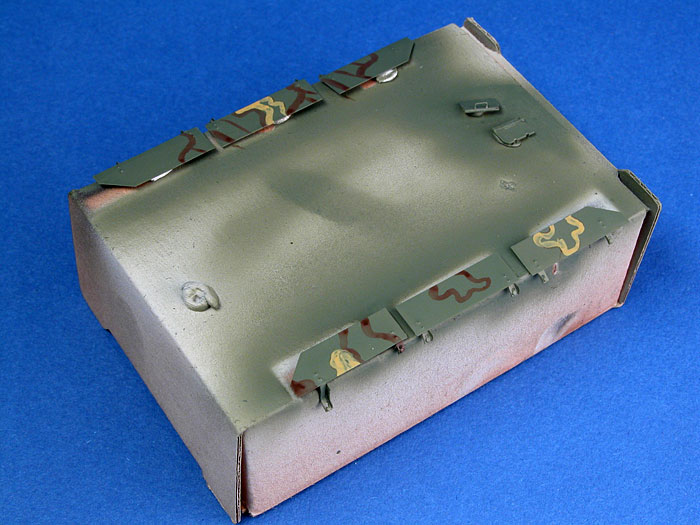
Skirts and smaller details were Blu-Tacked to a small box and painted separately
|
|

|
|
The rough outline is filled in using camouflage colours sprayed carefully with the airbrush
|
|
|
Now
the painted outline was "coloured in" with the airbrush. The
camouflage colours were heavily thinned and very carefully
sprayed inside the painted outlines. This starts to improve the
untidy finish, but not much.
At
this stage I checked the pattern against Tamiya's instructions
and made several corrections to the pattern.
To
seal the basic paint job and prepare the surface for decals, the
model was sprayed with an overall coat of Future floor polish
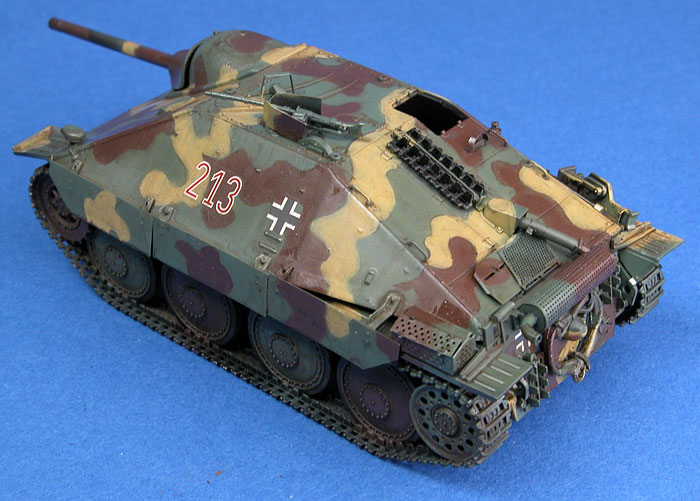
thinned with isopropylene alcohol. Tamiya's decals were used.
These settled down perfectly under Micro Set and Micro Sol decal
solutions. Unfortunately I handled the side skirts too early
after applying the Micro Set and managed to mangle the
duplicated crosses. I did not like the look of them anyway, so I
sanded them off and re-painted the centre of the skirts.
The
first stage of weathering involved a selective oil wash. Lamp
Black and Raw Umber oil paints were heavily thinned with
odorless thinners, then applied to rows of bolts, weld beads and
other structural features. Some subtle vertical streaking was
also brushed onto the hull. The wash was then left to dry
overnight.
With
the wash thoroughly dry, I sprayed the entire model with Polly
Scale Flat. I wanted a dead flat finish but this coat left a
very slight sheen, so I applied a second coat with the same
result. A third flat coat, this time using Gunze Flat Clear,
finished the job nicely.
With
the basic paint job finished it was time to attend to the
details. First, the tyres and tracks were touched up with flat
black as required. Next, the machine gun, spare tracks, tools
and exhaust were painted with a fine brush.
I did
not want to obscure the camouflage with weathering, but I did
want to convey the impression of a vehicle that had seen some
use:
-
Pastel chalk was used to give
a slightly oxidised appearance to the gun barrel and the
spare track links.
-
Dirt and mud were added to the
wheels, tracks, lower hull and rear hull plate using a
slurry of pastel chalk mixed with odorless thinners (mineral
turpentine would do the same trick). This mixture, once dry,
won't rub off with handling. You can also mix different
coloured pastel chalks to obtain variety in the finish. Do
keep in mind, though, that the slurry is much darker when
wet than it is when it has dried, so some experimentation on
scrap material is advisable.
-
Tiny spots and streaks were
drawn onto the surface of the vehicle using a brown artist's
pencil. I tried this as I thought that my previous use of a
lead pencil looked underdone in low light and overdone in
bright light. I was pleased with the results using the
coloured pencil, especially the horizontal streaks on the
hull sides and the skirts representing scuffing against
branches and other obstacles.
-
I still used some 2B
lead pencil though, for the edges of the major structural
surfaces and handles. Lead pencil was also used for the
shiny track shoes.
-
An antenna was added from
stretched sprue, dipped in Testor's Gunmetal Metalizer
(twice for proper coverage) and polished for a metallic
finish.
-
The plastic rod formation
light was painted with a base coat of dark grey and two
generous coats of Tamiya Clear Blue.
At last, after more than a few anxious
moments, the camouflage was starting to come together.
A final thin coat of Gunze Flat Clear
was applied to seal the pencil weathering.
Conclusion
I think that this new generation of
1/48 scale armour kits has a lot of potential.
When I started modelling in the 1960s, it was the simple bagged kits
from Airfix and Frog that fired my imagination, and that were
appropriate for my limited skills. Tamiya's new 1/48 scale armour
kits possess a similar appeal. They seem to offer something for
everybody - a beginner can build them straight for the box in hours,
or a more advanced modeller can superdetail to their heart's
content.
I really like the philosophy behind
Tamiya's new range of 1/48 scale vehicles and, even more
importantly, I like the plastic in the boxes.
Hauler seems to feel the same way. Their growing range of 1/48 scale
photo-etched parts and accessories will lift these simple models
into a new class.
Model, Images and Text
by Brett Green
Page Created 18 July, 2006
Page Last Updated
23 July, 2006
|