Home >
Gallery >
Britain > Building a Full Resin
Resicast Sherman ARV Mk.I
Part Two - Painting, Weathering & Finishing |
|
Building a
Full Resin Resicast Sherman ARV Mk.I
Part Two - Painting, Weathering & Finishing |
Resicast,
1/35 scale |

|
by Paul Chatfield
|

Resicast's 1/35 scale Sherman ARV Mk.I is available online from Mission Models
Preparation
Having finished the basic build, as detailed in Part one of this
article, it’s time to get on with the really fun part, painting.
After going over the model, checking for glue smears, cracked seams
and other flaws (and cleaning up where required), I would usually
give a resin model a quick wash in warm soapy water. However, with
this model having so many small delicate surface parts, I felt it
safer to leave out this stage. I did go over the entire model with a
very soft, clean brush to remove any little bits of dust, though.
All loose parts, including the tracks, were removed from the model
and set aside. Resin and PE needs priming before any other painting
can be done, so that was the first stage of painting. Last thing
before priming the lenses on the headlights were covered with liquid
masking fluid. Once dry the primer was applied over the whole model.
I used Alclad II’s Grey primer for this. I find this provides a good
base for most types of paint and adheres very well to the resin and
PE.
With the primer coat on and dried, I again looked over the model for
any flaws. It’s amazing how often little rough patches of filler or
cracks only show up when the primer goes on.
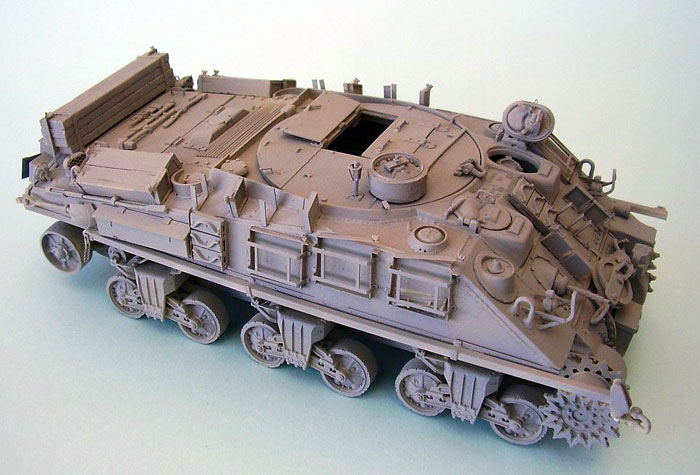
All loose small parts and the tracks need this treatment too before
moving on to the main painting.
Painting
Base colour
The first bit of painting I did after the primer was dry was to
spray a white patch on the turret plate. This was for the white Air
Identification Star. Once dry an Eduard mask was applied over it.
The whole model was then painted Vallejo Model Air Dark Green. A lot
of modellers will either pre-shade or post-shade a model, especially
one with a single colour paint scheme, I tend not to do this but
break up the single colour starkness with oil washes. I will
describe this later, after the markings are applied.
The mask over the Star was now removed. It was at this point I
glanced at my reference photo and noticed that the vehicle in the
photo also has a white star on the side of the hull at the front!
After uttering a few words unrepeatable here, I waited for the Green
to dry over night, then applied 2 more masks and sprayed a star on
each side. The moral of this story take notice of your references
and look at them regularly!
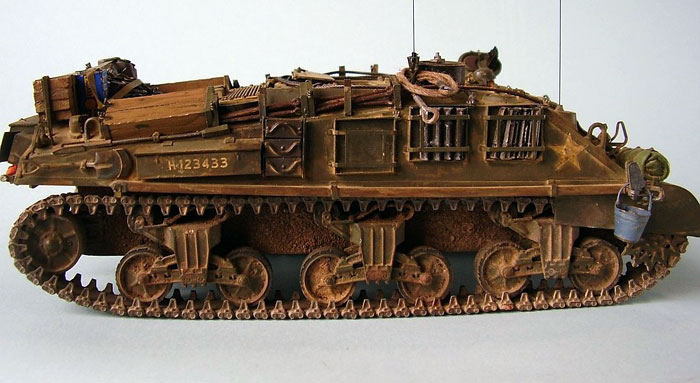
Markings
One thing missing from the Resicast kit is Decals or any kind of
marking instructions or colour scheme reference. So it is up to the
modeller to find some. I found a picture of a British Army Sherman
ARV MkI in the Histoire & Collections Publication “ The British
Soldier, From D-Day to VE-Day. Vol 2 Organisation, Armament, Tanks
and Vehicles.” The view was a ¾ shot from the front showing the left
hand side of the ARV as it tows a Panzer IV (probably Aust H). The
divisional Badge and serial number were clearly visible and
references showed the Vehicle to be from 3rd Infantry Division, 8th
Infantry Brigade workshop. (This information was also found in the
same publication) Unfortunately no vehicle registration number is
visible in the photograph and a 2-hour trawl through other
references and the Internet failed to turn up a photo of an ARV
displaying a registration number. I could have just left it off, but
felt it would look bare without one. This is where an educated guess
had to be made on the prefix letter. I figured that an ARV would
probably not be classed as a Tank and therefore not have the “T”
prefix, although I could easily be wrong. The problem I then had was
would it be classed as a Towing Vehicle “H” or an Engineering
Vehicle “E”? After a bit of head scratching and asking other armour
modellers no definitive answer was forth coming so I picked “H”. If
anyone out there has the correct definition please let me know. The
numbers were just chosen at random, so in all honesty this model
does not represent an actual ARV and is hypothetical.
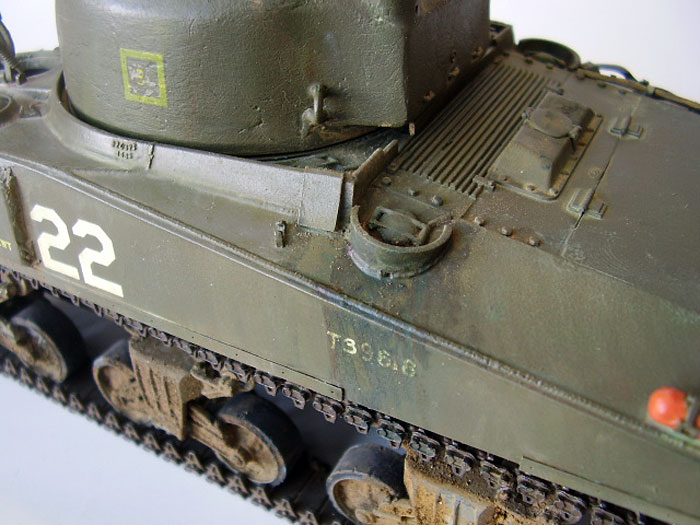
The Unit emblem and the Serial numbers were clearly painted on the
vehicle by hand so, even though I had some decals to suit, I too
painted them on by hand with a brush. The registration numbers were
made up from Archer Dry Transfers and that completed the markings.
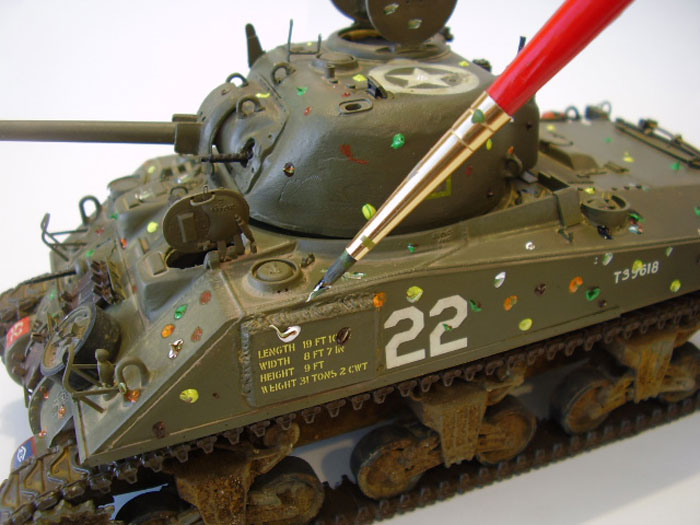
Oil Filters
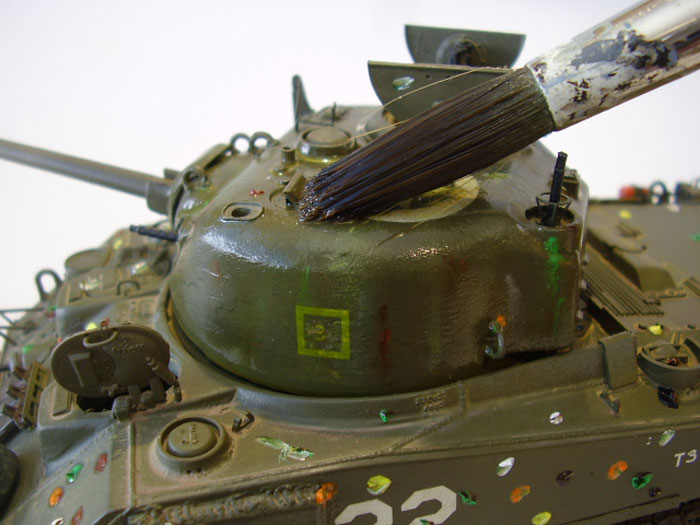
Once the markings were on and dried it was time to break up the
starkness with some filters of oil paint. Before the oils could be
applied though there were two other little jobs. First the dry rub
decals of the Registration Number were sealed with clear satin
varnish to prevent them lifting. Then the White stars were scratched
up. This was done with a very old brush with filaments splayed out
in a random, messy manner. The brush was then lightly dipped into
the Dark Green base colour and wiped almost dry before applying lots
of random, tiny scratches all over the stars. The big Air
Identification Star was the most heavily attacked, as this is right
beside the main hatch and would be walked over constantly by the
crew.
I should, at this stage, have had photographs of how I applied the
Oils to the hull. Unfortunately as I was editing the file in which
I’d placed them my computer decided to crash and they were lost.
With the memory card of my Camera now also wiped to make room for
other pictures I have no record of this stage of painting on this
Model. Luckily I do still have pictures of this same process used on
a previous model and I will use them to illustrate the technique. As
luck would have it they also feature a Resicast Sherman M4A4 based
Vehicle, this time a Sherman V Tank, so I’m using exactly the same
base colour and main hull.
The technique is simplicity itself. Firstly cover the whole vehicle
in random dots of oil paint in a variety of colours. I use Green,
Yellow, Brown, White and Orange mainly, with Black and a small
amount of Blue around fuel fillers. Then take a large round brush
filled with clean white (Mineral) spirits. Keeping the brush clean
drag the oils downwards cleaning most away with the brush. Around
fuel fillers more is left behind to represent spills and stains. How
much you remove is down to personal taste. Leave it all to dry for
around 24 hours for the full effect to appear, if you feel you have
removed too much simply repeat until you are happy with the
colouring. You should be left with a subtle and varied colour across
the model with a lightly streaked and weather faded appearance.
Click the thumbnails below to view additional images:
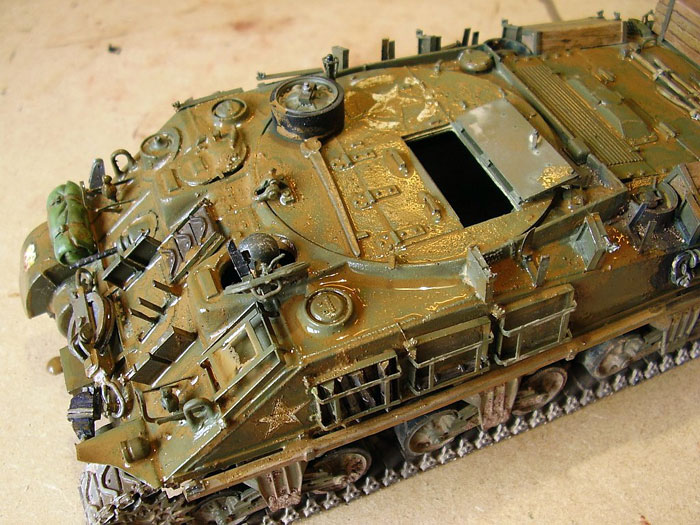
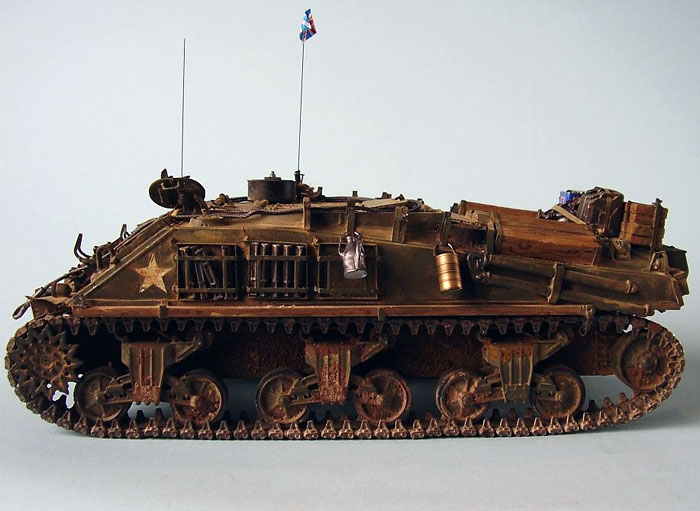
Details, details!
This Vehicle has more surface details than almost any other I’ve
seen. It also has a wide variety of textures and materials to
replicate and so is perfect for this kind of Article. It’s almost
hard to know where to start; there is so much to paint! I started at
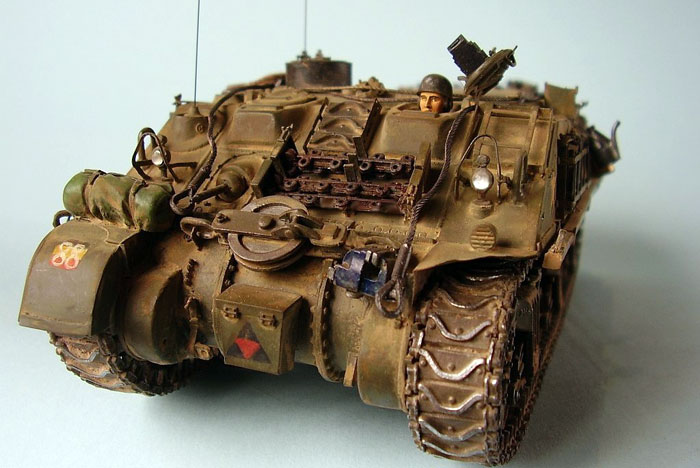
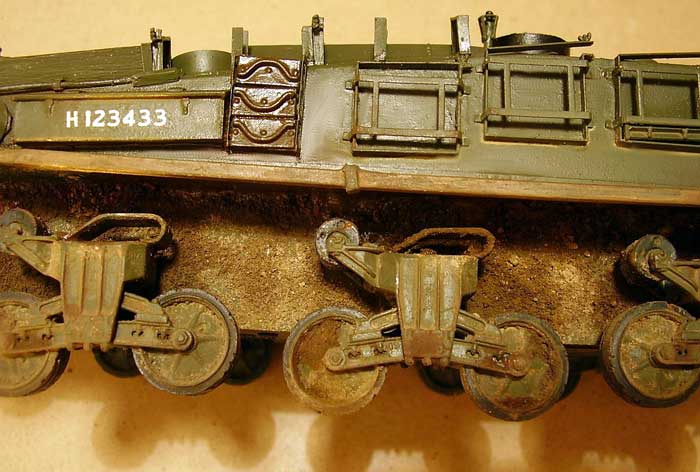
the bottom, with the road wheels and running gear. On this style of
Sherman, with VVSS suspension this is quite a simple task. I used
Vallejo Model Air RLM 21 black for the rubber tyres and rollers. The
track Guides were first painted with a mix of Vallejo Steel and
about 10% German Grey on the part that would be in almost permanent
contact with the Tracks, then rubbed with Graphite from a soft
pencil. The ends of the Teeth on the front Drive sprocket and the
running surface of the rear Idler wheel were dry brushed with the
same Steel, German Grey mix, and that was about it for the running
gear until weathering, which will come later.
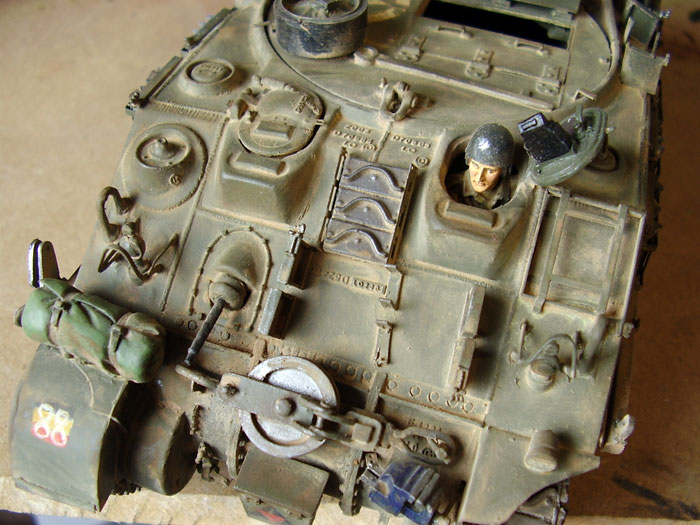
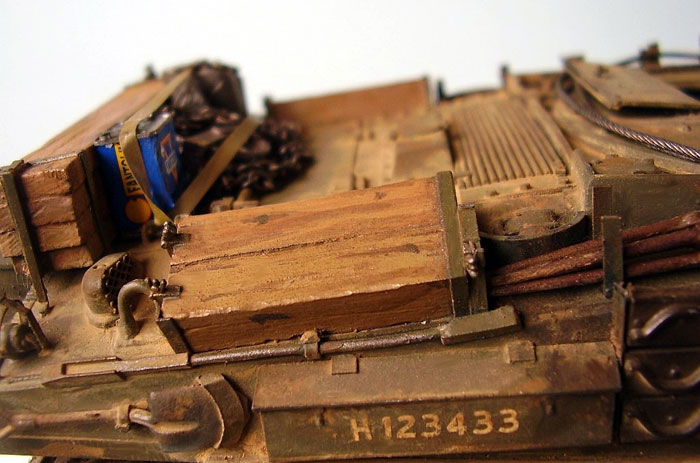
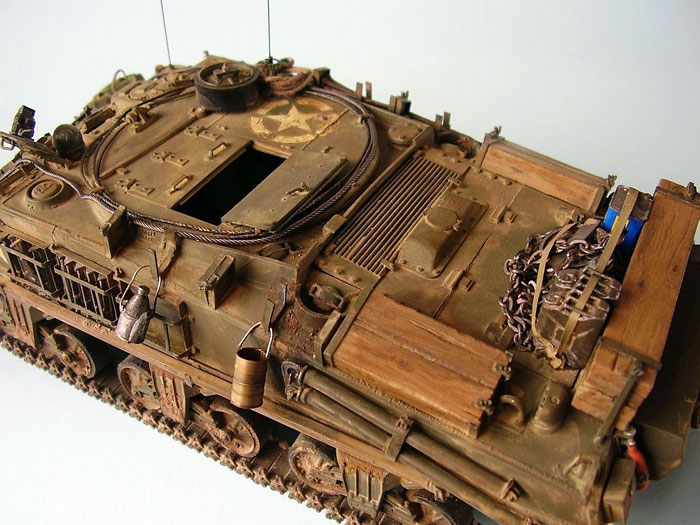
Now onto the main hull fittings, I decided to start with the wooden
Gun Planks and Skid Blocks mounted in frames at the rear of the
vehicle. Both are moulded as solid blocks, fitted into their
respective frames. The wooden parts carry a nice wood grain texture.
As a base colour I chose Vallejo’s Aircraft Colors Sandgelb. To give
variation in tone between planks, I painted a few in the basic
colour then added a little white and painted a couple of adjacent
planks and then some dark brown and finished the rest. This gives a
subtle distinction between the planks. Next using thinned black I
dotted in a few knots. Whilst this was still wet very thin Chocolate
Brown stripes were added to simulate grain, the two colours mixing
slightly to give a “blur” to the edge of the knot. By going over
some parts twice and leaving others thin a realistic wood grain
effect was achieved. Finally when all was dry a thin wash of dark
brown oils was flowed over to pick out the texture and highlight the
gaps between planks. Other “wooden” areas such as tool handles and
the two long spars for the lifting jib were treated in the same way,
although the base colour for the tool handles was Deck Tan.
The ARV carries quite a variety of Metal fittings and tools and most
are basically painted in the same way with some variation to give
differing shades for different grades of Steel or Iron. As an
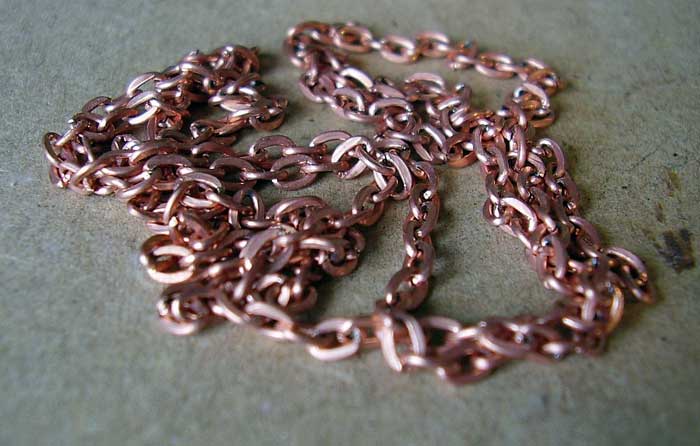
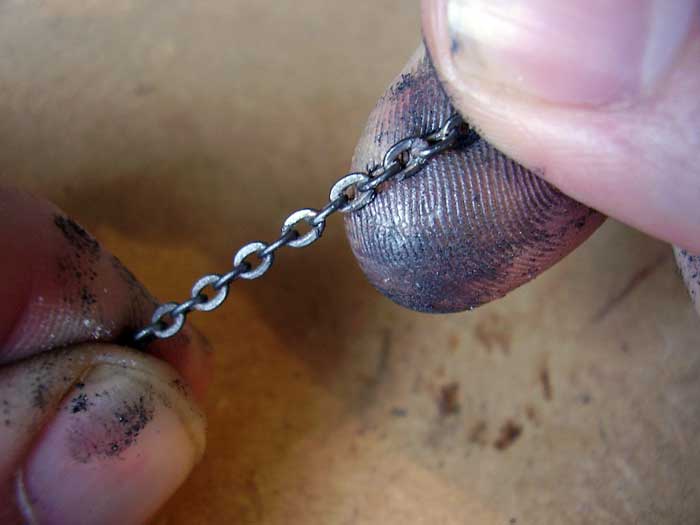
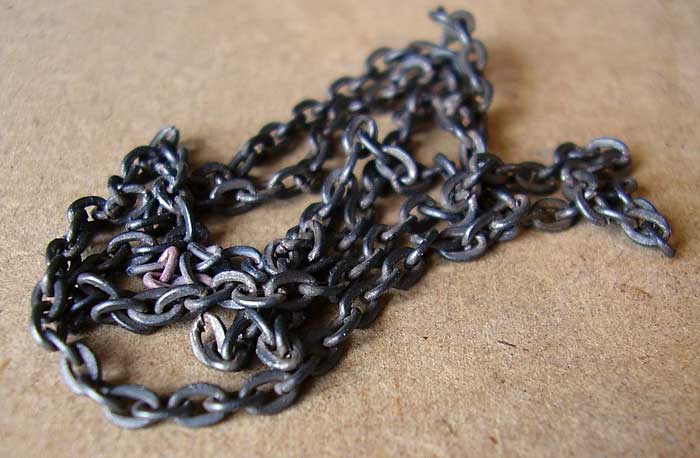
Example I will use the Chain for the jib. The chain is from Accurate
Armour and is made from copper. The first step is again to apply
primer to give a base for following coats of paint. Chain is not the
easiest thing to handle when painting, but I now have a little
technique I use to help a little. First cut the chain too long for
what is need, then tape down one end. Taking the other end in your
hand stretch out the chain and it can now easily be airbrushed,
twisting the chain with your fingers as you go to cover all sides.
After the primer use Burnt Umber to leave the chain a nice Dark
Brown. The chain must now be left at least 24 hours so that the
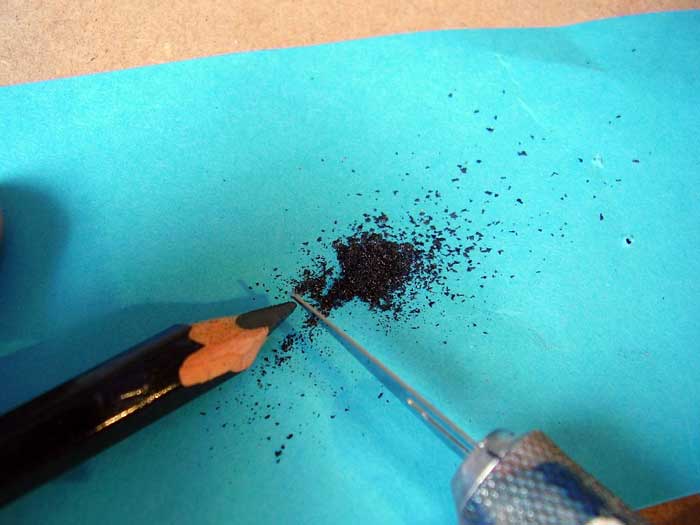
paint dries thoroughly. Once fully dry scrape some graphite from a
very soft artist’s pencil and rub the flakes between thumb and
forefinger. With your fingers coated rub the graphite into the
surface of the chain coating the whole thing. Once covered cut the
unpainted ends off and there you have a nice tough looking, iron
chain.
Click the thumbnails below to view additional images:
The same technique can be used on
braided copper wire to simulate tow cables and the like. For steel
tools a more “silvery” finish is desirable and so I use Vallejo
Steel as a base coat on Shovels and spades and Steel mixed with
German Grey on Hammers, Pick Axes and other tools. Graphite is
applied over this again to give the final finish. Grousers fitted in
square “cages” down the sides if the ARV are treated in the same way
as the tools then secured in their cages.
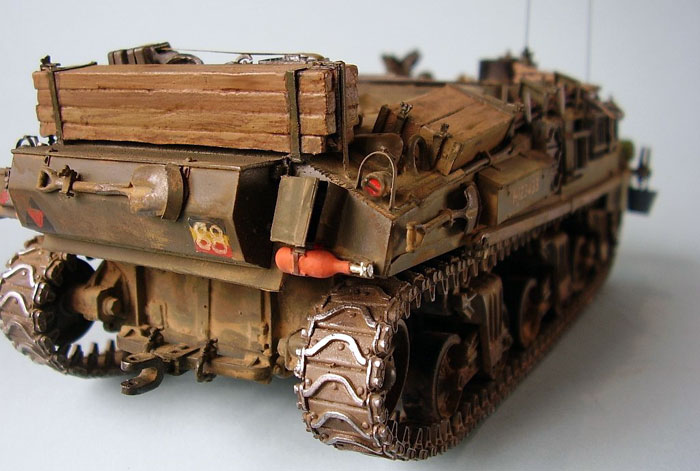
The final metal pieces of equipment on the ARV are mounted in
racking along the top of the Hull and on the front plate. These are
Ground Spikes and Hold Fasts used for a variety of tasks. Resicast
do provide photo references of these items, showing them to be quite
roughcast and of a dark dull rusted appearance. To replicate this
texture and colouring I used Artist oil paint, un-thinned. For the
base colour I mixed Burnt Umber and Burnt Sienna roughly 50/50 with
just a touch of Orange. A coat of this was dabbed all over to give a
raised texture. To add to the roughness a brush filled with dry Mig
Pigment powder Dark Rust was worked into the wet paint. This gave a
pleasing and convincing look of oxidised rough cast iron. While the
oils were still wet Mig pigment powder Dry Mud was sprinkled over a
few of the ground spikes and left to stick to it. This was to give
the impression that they had been used and hammered into the ground,
with some soil remaining when they were pulled out of the ground.
With the oils being neat and un-thinned they took about 3 days to
fully dry. The loose dust was now shaken off and the parts placed
into their racks.
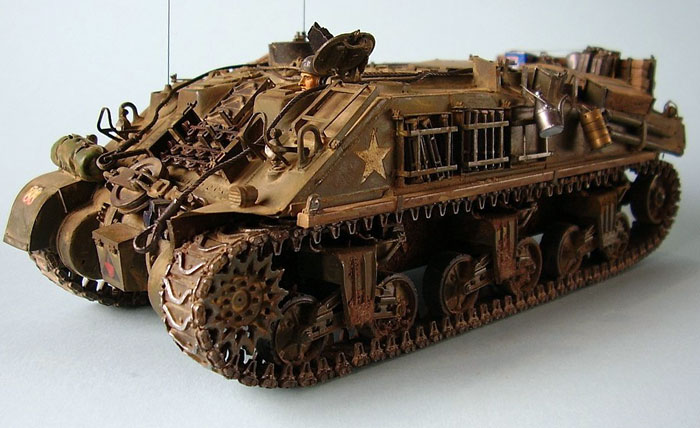
Tracks
This Sherman ARV is fitted with metal chevron style tracks. The base
metal colour was mixed from Vallejo Acrylics. I used three colours,
Chocolate Brown and German Grey from their Model Color range (mainly
designed for brush painting) and Steel from their Model Air Range
(pre-thinned for airbrushes). I used about 50/50 of the Brown and
Grey with a couple of drops of Steel. I then thinned the mix with
about 10% tap water and loaded the Airbrush. An even coat was
applied over the whole surface of the tracks.
Almost every Tank track you see will be polished on the surface that
comes in contact with the ground, even off road. (Although rust will
quickly appear on these surfaces if the tank stands for any time,
even over night if the weather is damp). To give this polished look
I mixed Vallejo steel with about 10% German Grey and dry brushed it
onto all high spots on the tracks. Finally, to give the tracks a
metal “sheen” I scraped some graphite dust from a soft artist’s
pencil and rubbed it into the track surface. The finished tracks
have a nice metallic look to them. I left the tracks like this for
now as I haven’t decided on the surface on which the Sherman will be
standing, so final weathering will be done to blend them to the base
when the diorama base is finished.
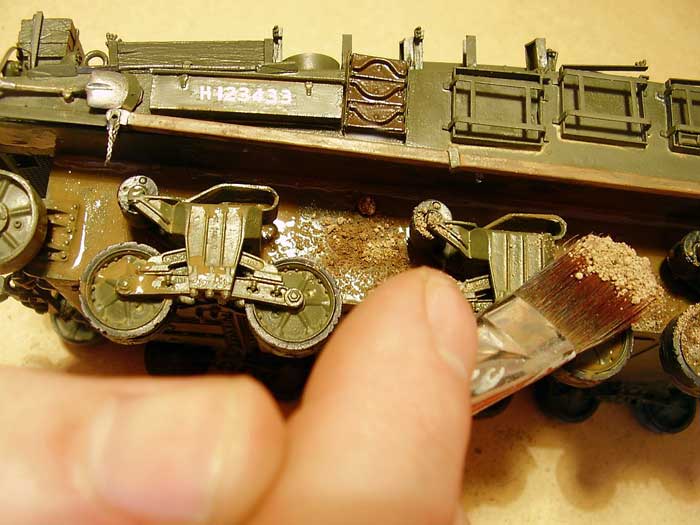
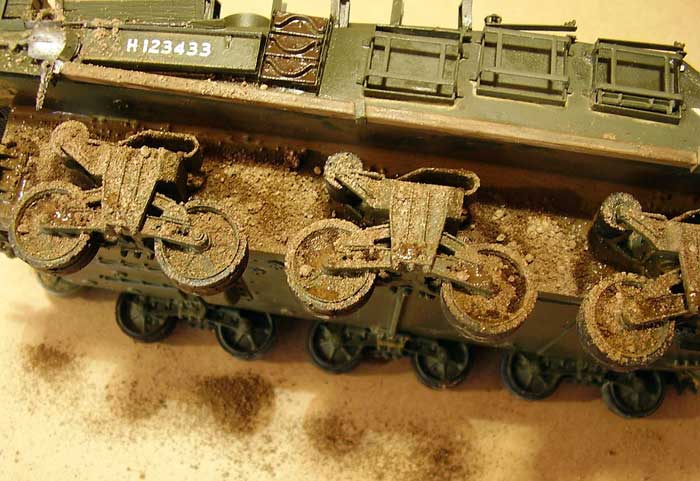
Weathering
Running gear and lower Hull.
On all Tracked vehicles the road wheels, suspension and hull sides
behind the tracks get pretty dirty, pretty quickly. To represent
caked on mud and dirt in this area I used about 5 different shades
of weathering powders, from both the Cmk Stardust range and Mig to
give a varied finish and to show a vehicle that has travelled over
different terrain.
First step is to mix some PVA adhesive 50/50 with water then add a
small amount of the pigment powder. This slurry wash is applied over
the whole of the lower hull, behind the tracks and road wheels.
Blobs are also put on the top of the suspension units and swing arms
and inside the wheels. Keep this mixture off of the running surfaces
of the wheels and track guides. Now with the slurry still wet
sprinkle your mixture of pigments over it. Leave the tank on it’s
side while you do this and give the powders about 5 minutes to “fix”
to wet slurry. Now stand the model up and shake off the excess. This
is rather a messy process and I usually do before detail painting on
the upper hull. Any spilled powder on the upper hull can be brushed
off with a soft dry brush and smears washed off with a damp cloth.
Click the thumbnails below to view additional images:
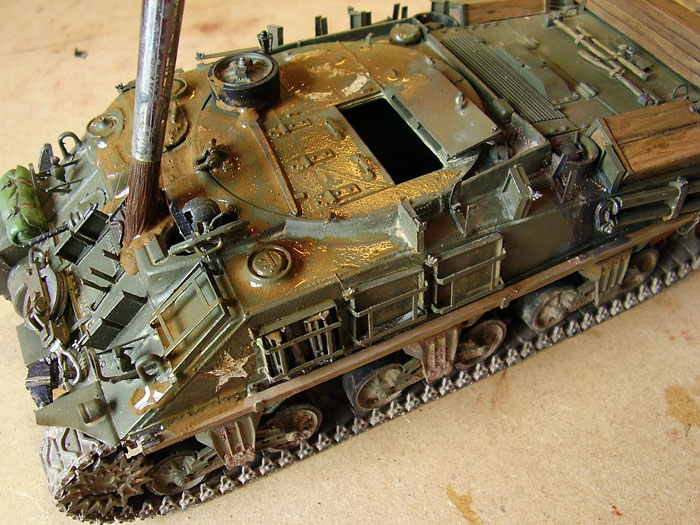
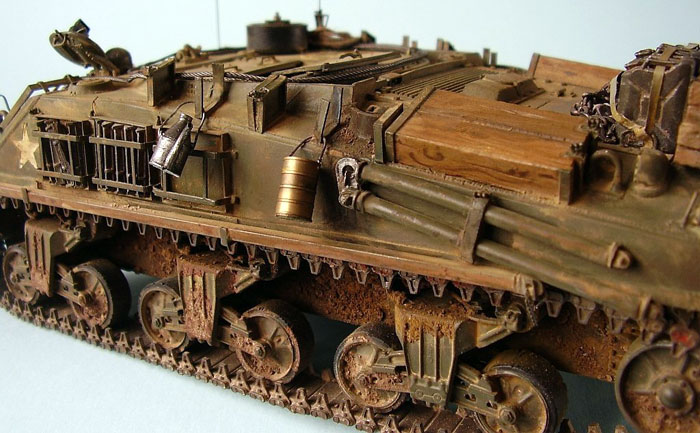
Upper Hull.
The upper hull is treated slightly differently to the lower hull, as
unless it is wading through deep mud it is unlikely to have much
thick, caked on mud on it. That doesn’t mean it wouldn’t be dirty
though. To replicate a well-used vehicle with a heavy coat of dust I
use the following method.
Using the same pigment colours as for the lower hull mix again with
water, this time without the PVA, as we don’t want it to stick to
the surface like paint. Mix it to a thin, wet mud like consistency
and spread over most of the upper hull. Don’t cover the interior of
hatches or other hull features such as spare wheels (These can be
done with a lighter, dry brush of powder). Leave this for around 12
hours until a thick layer of dry dust covers the model. Now using a
large soft brush start brushing away the dust. In areas of regular
use remove almost all the dust, leaving it collected around details
and in inaccessible areas. Some raised areas and ridges, such as in
front of the hatches and around fuel and coolant fillers, can be
rubbed with a finger to vary the effect. Like the oil filters how
much you remove is down to personal preference and how dirty you
want your model to look. When weathering don’t forget a little brush
of dust for the headlight lenses, as they would get dusty too.
Click the thumbnails below to view additional images:
Finishing Touches.
Almost done now, and time to add all the little finishing touches.
All the tow cables were wound around their hooks on the turret ring,
with the thick one dangled over the front. Some stowage is placed on
the rear engine deck and secured with straps of Tamiya tape painted
Khaki. No AFV would be complete without at least one bucket hung
somewhere on it. I used two PE ones from Plus model, filling one
with shackles and hanging it from the jib at the front. There is
actually more stowage with this kit than I could use on one model,
unused parts include a camo net, a tarp, two gas welding bottles
(with two sets of optional fittings), another full set of pioneer
tools, an optional rear stowage box, more spare track and two more
spare wheels. I did use the two jerry cans from the kit and added
Resin oil cans from plus model. Finally the model was topped off
with a couple of Accurate Armour’s excellent new carbon fibre
Aerials.
My final photograph shows some figures to be used with the kit in an
up coming Diorama. The ARV will be reversing into position. The
Commander is leaning over the side to check clearance, another
crewmember stands at the rear using the exterior telephone to pass
on instructions to the driver and an MP adds some “helpful” advice.

This was an enjoyable and involving model and would recommend it to
anyone with a bit of Multi-media experience. I hope you’ve enjoyed
it too.
Click the thumbnails below to view additional images:
Model, Text and Images by Paul
Chatfield
Page Created 15 October, 2006
Page Last Updated
14 October, 2006
|