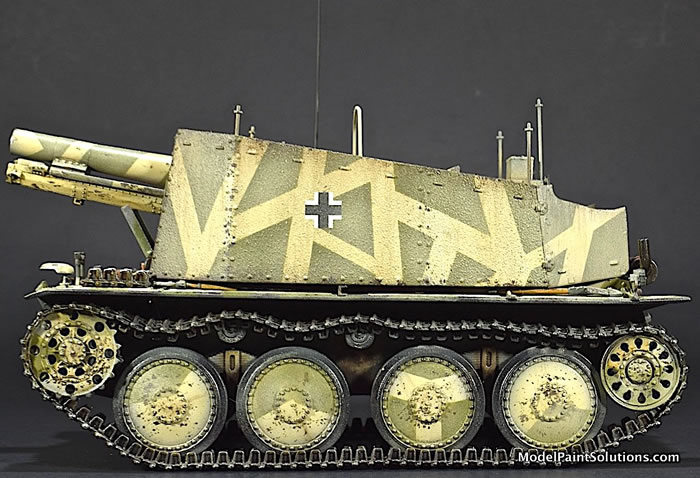
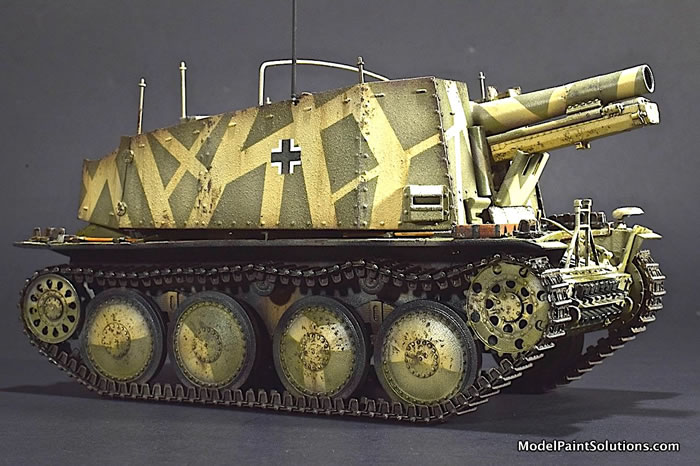
IntroductionThe Grille (“cricket”) was a series of self-propelled artillery vehicles used by Nazi Germany during World War II. The Grille series was based on the Czech Panzer 38(t) tank chassis and used a 15cm sIG 33 infantry gun. The first variant of the Grille (and the subject of this review) was based on the Panzer 38(t) Ausf. H chassis, which had its engine in the rear. Instead of a turret, the vehicle had a low-slung superstructure and open fighting compartment.
The 15cm Schweres InfanterieGeschütz (sIG) 33 (heavy infantry gun) was mounted in the front of this armored compartment. Being built on a tank chassis, its hull armor was 50 mm (front) and its superstructure armor was 25 mm (front). A total of 200 were produced in the BMM factory in Prague from February to November 1943. The official designation was 15 cm Schweres Infanteriegeschütz 33 (Sf) auf Panzerkampfwagen 38(t) Ausf. H (Sd.Kfz. 138/1).
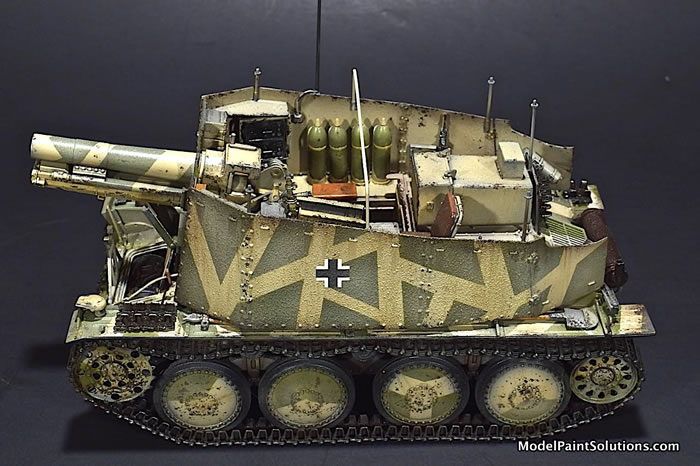
Painting and FinishingThe subject of this build is the Dragon Models Geschutzwagen (kit# 6857). I decided to paint the sIG Geschutzwagen using a slightly complex camouflage pattern which required me to deviate from the instructions in several places so that I could mask the parts more easily.
I also wanted to employ paint-chipping throughout using the hairspray technique. While there are several approaches and paint products that work for doing this, I have found that Tamiya paints, thinned with Gunze Leveling Thinner, works best for me, so that is what I used. Primer, Pre-Shade, and HairsprayEven though I worked in stages, everything started with a primer coat consisting of Krylon Color Master with Durable ColorMax Technology rattle-can (Flat Black) enamel paint. This is a superior product, drying super thin and very tough (not to mention cheap and quick).
Once the paint degassed overnight, I touched things up back in the paint booth using Tamiya NATO Black, including the tire portions of the wheels. I then dusted everything except the wheels with Vallejo German Red-Brown Surface Primer – this is the color I want to expose when the camouflage layer is chipped away. I left the lower chassis and wheels black. The primer/pre-shade coat gives the plastic some grip for the following coats, and fills in the recesses, creating a shadow effect near the flat surface edges. This will add depth for the subsequent coats to come.
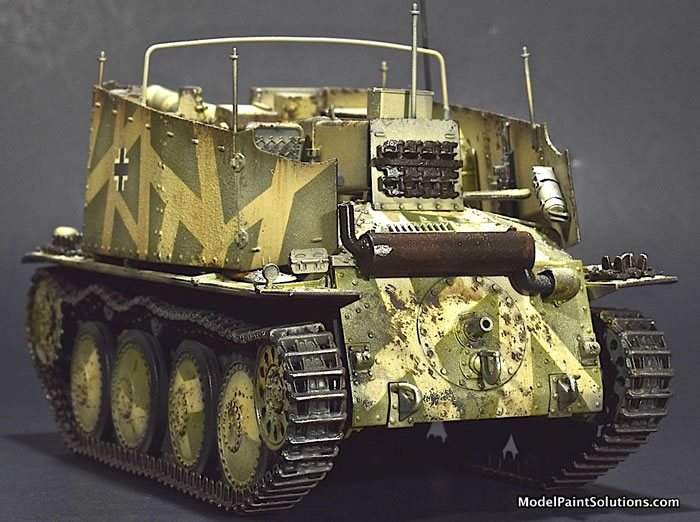
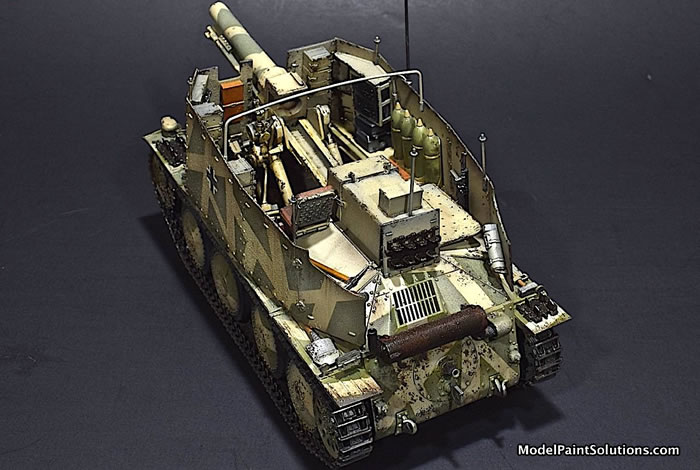
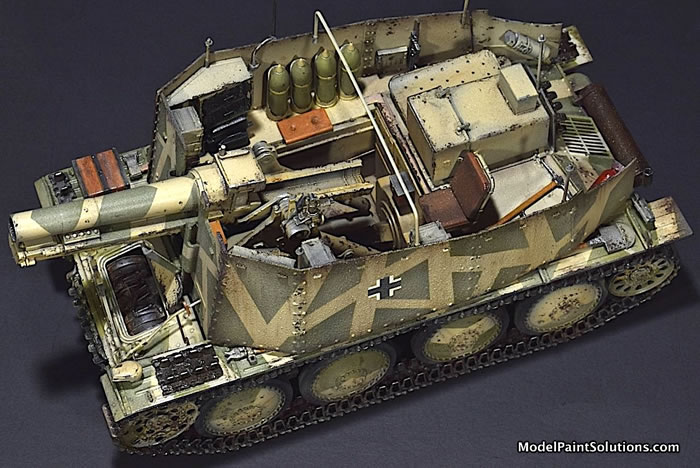
Once the paint had dried, I followed up with a layer of rattle-can hairspray on everything – at this point, I don’t know where I will add the chipping, but the acrylic layer is very thin and doesn’t affect subsequent layers of paint, whether it is chipped off or not. Also, the hairspray will act as a mask for the tire portions of the wheels when those are painted. I use TRESemmé ‘Two Extra Hold’ hairspray directly out of the aerosol can, but I don’t think it really matters what type you use or how you apply it, as long as you get a decent amount on the model. InteriorFrom Step 12 onwards, I painted parts added with the same color mixes used on the exterior where appropriate. For parts (such as the fuse storage boxes) I added hairspray so they could be ‘chipped’ later. Once everything was in place, I rubbed off some of the paint to simulate chipping, and gave the entire interior several filter layers of Mig Wash Brown Oils and a pin wash of Mig Dark Wash, both thinned with Mona Lisa.
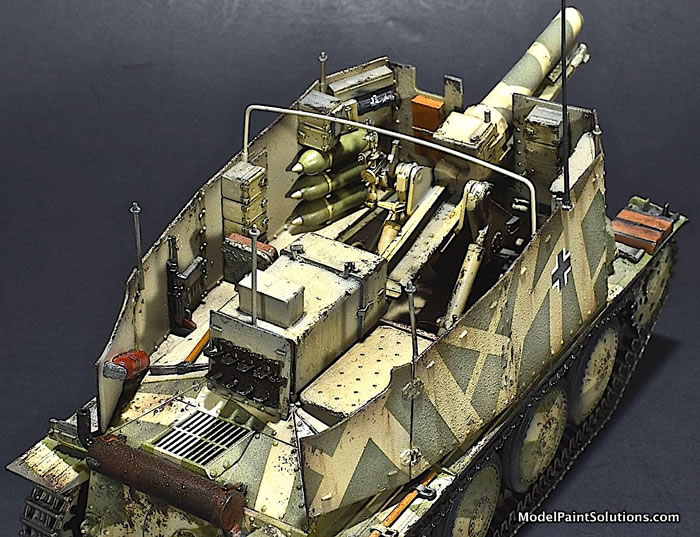
I used a variety of Vallejo paints for the interior detail including Panzer Aces (PA) 312 for the seats, and PA 336 and 340 for the racked ammunition rounds. Once I was satisfied, I weathered the engine and interior using LifeColor 207 ‘Oil’, Vallejo 73.815 ‘Engine Grime’ and Vallejo 73.818 ‘Engine Soot’ acrylics.
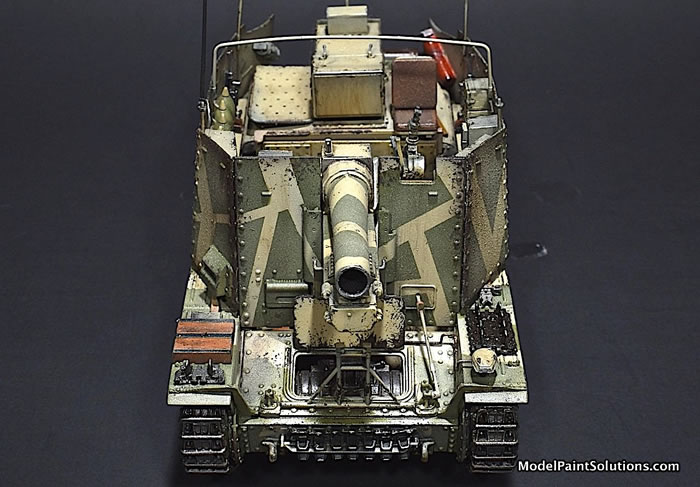
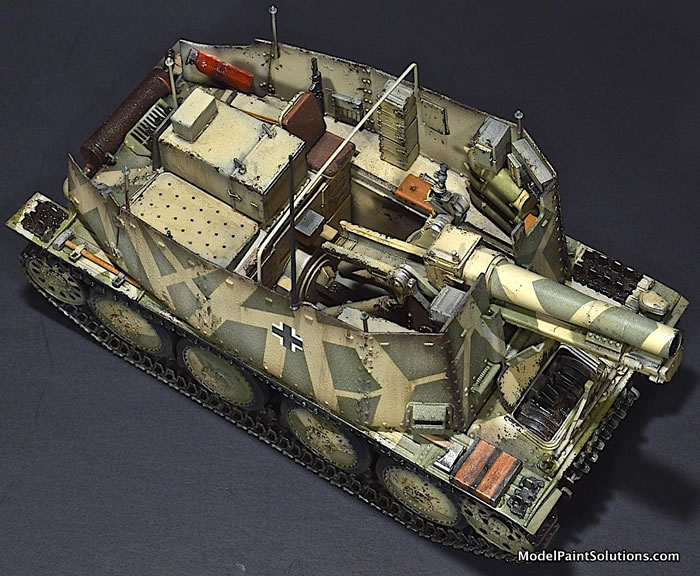
The two hanging Schmeisser MP 40’s were first painted Flat Black, then covered with AK Interactive True Metal ‘Gun Metal’ before being buffed out to bring out the detail. I then hand-painted the jack block using Vallejo New Wood, leaving the strapping black. ExteriorThe busy camouflage pattern I chose only adorned the exterior surfaces of the vehicle, and the front 2/3rds of the gun barrel. Since I needed to add a variety of detail to the interior and exterior of the model, I decided to paint the exterior camouflage first, stopping after attaching the fenders in Step 11 of the instructions.
Once the primer, pre-shade, and hairspray had dried, I laid down a light coat of Tamiya XF-55 Deck Tan with a few drops of XF-59 Desert Yellow added to give it a yellow tint. Once that was dry, I used different widths of Tamiya tape to create a cross-hatch pattern on the exterior surfaces, which were still in pieces, taped to a sticky board. Over that, I added a layer of Tamiya XF-58 Olive Green, lightened a bit with Deck Tan. I mixed extra batches of both camouflage colors for the remaining detail that had yet to be added. Pulling the tape off I examined my work and touched up any spots that needed it.
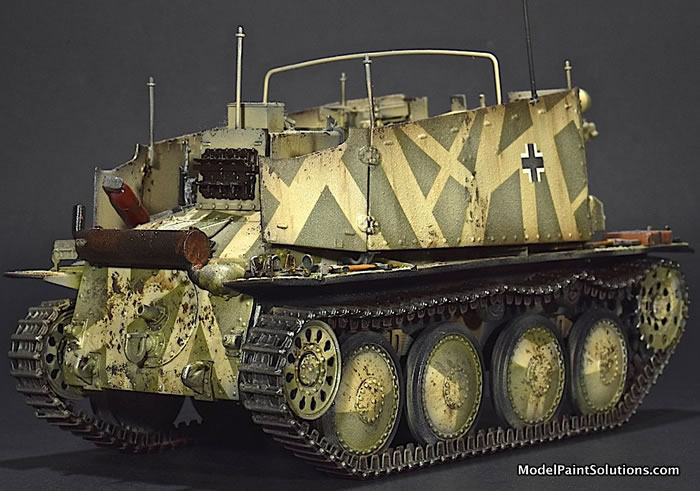
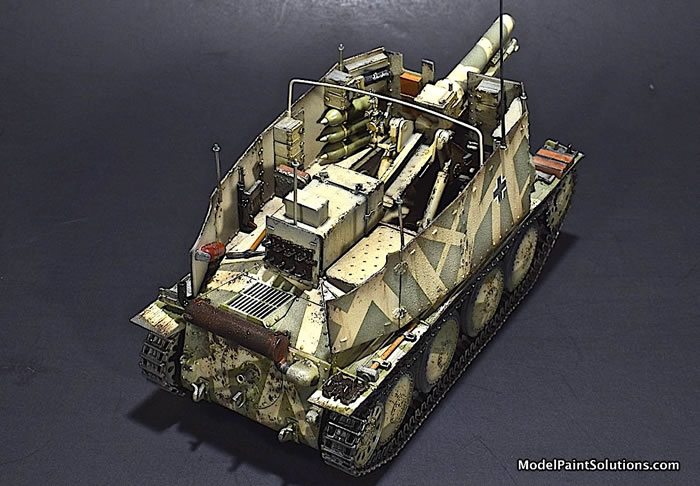
Before the paint had dried too long, I went to work with a stiff brush moistened with water, rubbing off the paint along various edges to give everything a chipped-paint look. Once satisfied, I returned to Step 12 and carried on with assembly. Once that was done, I hand-brushed AK Interactive Track Wash onto the track being careful to miss the wheels themselves. With the model in four major pieces now (main hull, 2 sides, and gun) I was ready for weathering. Decals, Detail Painting, and WeatheringWith painting and initial filters completed, I hand-brushed Future (acrylic) on the two areas that would receive the decals to give them a smooth surface to set up on. While the decals were drying I hand painted the array of deck detail and pioneer tools using mixes of Vallejo New Wood and Flat Flesh paints for the wooden detail, and AK True Metal (Gun Metal) ‘wax paint’ for the metallic portions.
Once dry, I sprayed a heavy coat of Future on everything to seal the decals and set the model up for weathering. Now that I had a glossy surface, I started weathering with an overall pin-wash using a 10:1 ratio of Mona Lisa thinner to Mig Dark Brown (enamel) Wash. I find this mixture perfect when applied to a glossy surface – the detail pops and the wash left no smudges. After applying wash to wheels, I placed the vehicle on its side so that the wash would not run down vertically due to gravity, but puddle up and dry, simulating real grease and grime. I brushed Mig Wash Brown and Old Holland Warm Sepia Oil paints directly from the tubes on various wooden parts, leaving them to set overnight. In the morning I wiped the oil paint off using Q-tips, leaving behind a realistic wood finish. The glossy acrylic coat underneath prevents the parts from soaking in too much oil paint.
Once the oil-based products had a chance to dry, I airbrushed a thin line of Vallejo Model Color German Cam Black Brown (70822) along the edges of the superstructure walls and added a ‘road-dusting’ coat of Vallejo Model Air Light Brown along the track. Once finished, I laid down a coat of Vallejo Flat Varnish to kill any shiny spots still remaining. I cut all three of these products 50/50 with Vallejo Airbrush Thinner, and then added a few drops of Liquitex Flow Aid to improve flow. The last touch was to go over some of the edges and weld seams with a Silver Artists Oil Paint (Gamblin) using my finger, as well as Uschi Chrome Metal Polishing Powder applied with a rubber-tipped artists blender.
ConclusionBuilding this kit was a lot of fun. This was my fourth Dragon 38t-based model and repetition definitely helps in knowing what works and what doesn’t. The fit, as always, is spot on and really helps with the high parts count. I would have liked to have plastic pioneer tool alternatives (with molded on attachment hardware), but other than that, the project was a lot of fun. Dragon kits are amazing – the detail, the design, and engineering, opening hatches, slide molding, Magic Track – Dragon produces some of the very finest models in the industry, and that’s what keeps me coming back for more. I’ve developed a real fondness for (both) 38(t)-based armor, as well as the s.IG.33 field howitzer, and Dragon is my go-to company for these little gems since they produce such a large variety of both. This little open-topped howitzer will be a unique addition to my model case. I would like to thank both Dragon Models for providing the kit for review, and IPMS USA for giving me the opportunity to review and build it. IPMS-Seattle For more on this build go to ModelPaintSolutions.com Home
Model, Images and Text
© 2021 by Eric Christianson |
|||||||||