This build of the Tamiya 1/35 Panzer IV H (Kit number 35209), was
always going to be an abandoned Panzer, being removed by a British
Sherman ARV in a Diorama. However as I planned the build details
were changed. To begin with it was going to be a simple scene, with
an ARV towing a Panzer IV H. This scene was from one of the
reference pictures I had gathered for my earlier ARV build. I later
decided the scene would have more interest if the ARV crew were in
the process of recovering the Panzer from an abandoned position.
This, therefore, would show the Panzer with open hatches. So that
would require an interior to be added, I chose the Verlinden item
and this was were the build began.
Construction and Painting
Interior
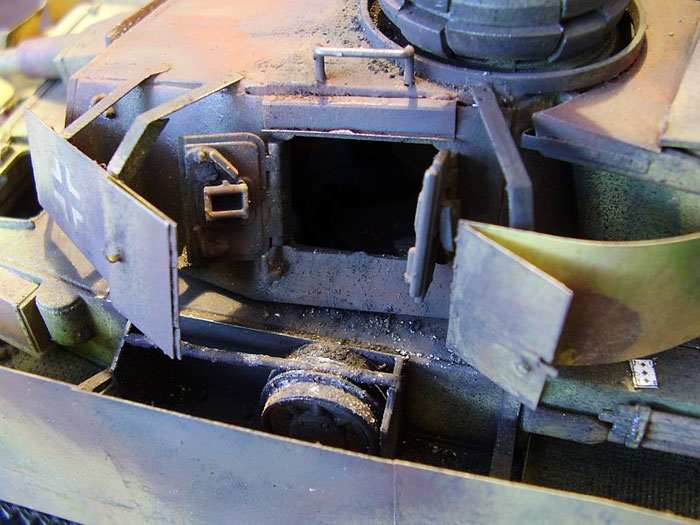
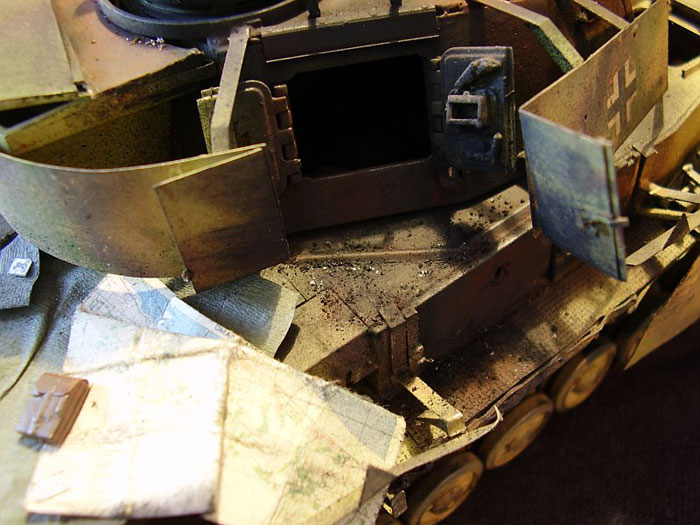
I began the build by fitting the Verlinden Interior set for this
kit. The Verlinden set is detailed enough for a simple “through the
hatch” view and I decided to build it without adding any additional
details. The various parts fitted together with no problems. The
only area that needed attention was the fighting compartment, which
was a little too narrow to fit to both sides of the lower hull, so
the gap was filled with a slice of plastic card. This stage took
only a couple of hours and then it was ready for a coat of primer
(As the interior kit is resin), before painting.
Click the
thumbnails below to view larger images:
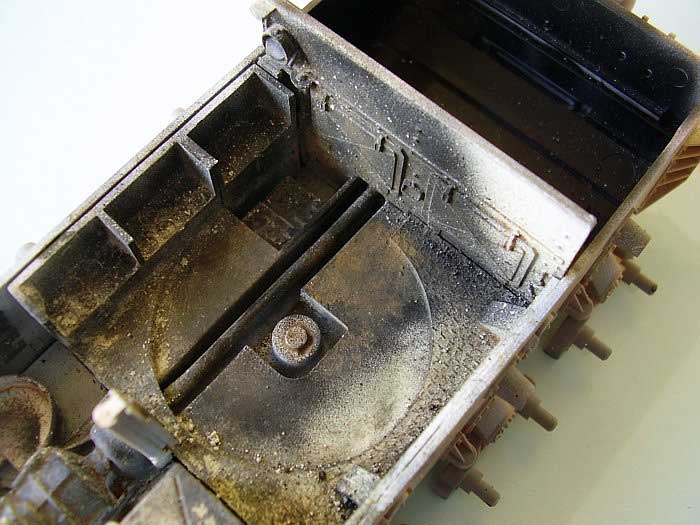
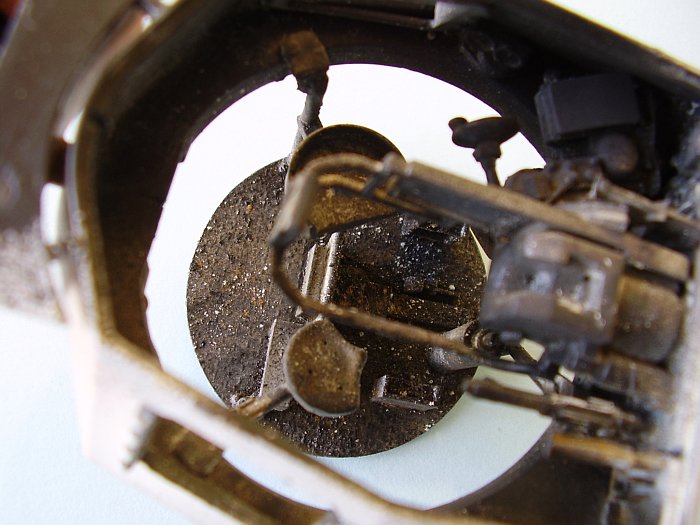
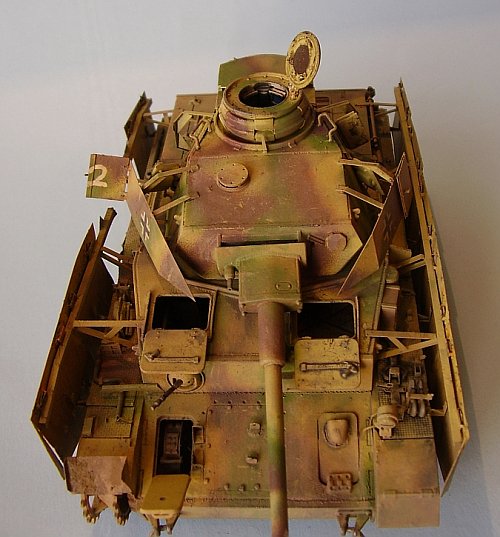
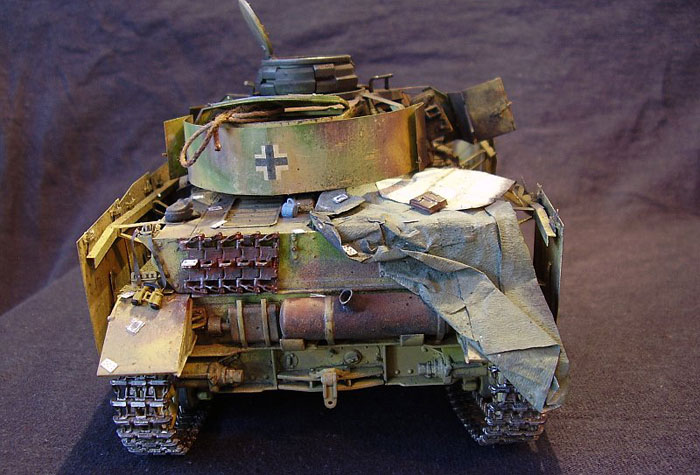
I kept the painting basic and
simple, as by this stage I had decided this Panzer wouldn’t just be
abandoned, it would be burnt out! I figured I would keep the burnt
area mostly confined to the turret area; otherwise all you would see
through the hatches would be a black hole. Having never done
anything burnt before I would have to come up with a way of showing
this in an interesting way (rather than just painting everything
flat black). I decided to experiment on the interior then transfer
what I learned to the exterior, which would be the most visible
burnt area. Also, if I made a complete mess of the inside I could
either start again or just close the hatches if it was a complete
disaster! Luckily the first attempt worked quite well. All it took
was a coat of Black airbrushed over the burnt area, and then whilst
the paint was still wet I took weathering pigment dust and dry
brushed it over the wet paint. I used a varied combination of Soot
Black from Cmk’s Stardust range and Dark Rust and Copper Rust from
Mig. This produced a very flat and scorched look. Then to give an
ashy, flaky look I used blobs of Black and Copper Rust scattered
randomly around the interior. This quite simple technique had a very
pleasing and effective result. With the burnt area done, that was
the inside finished.
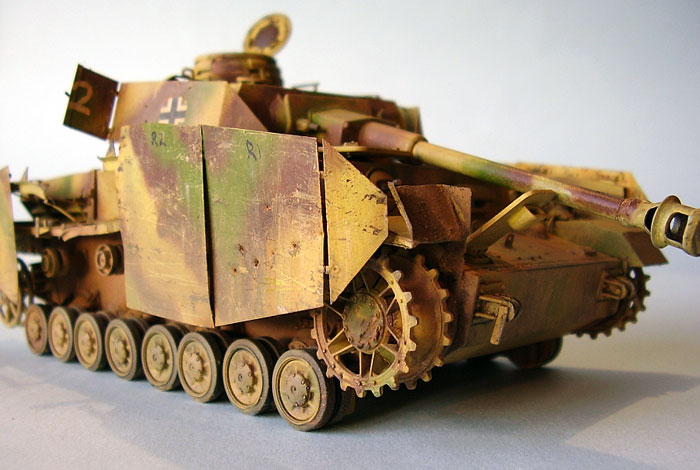
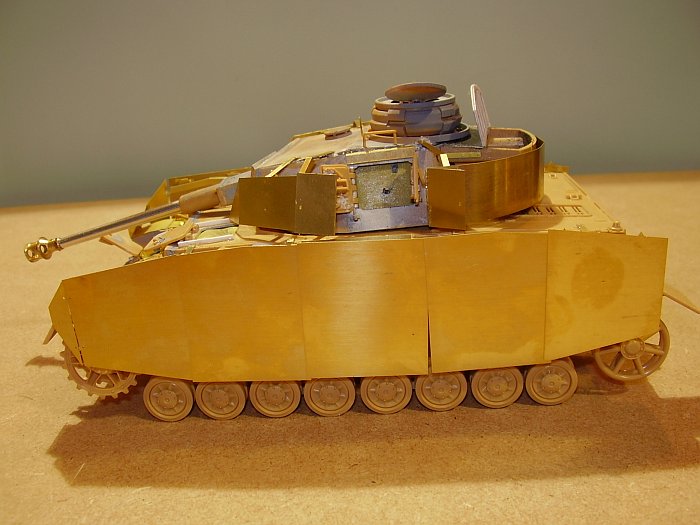
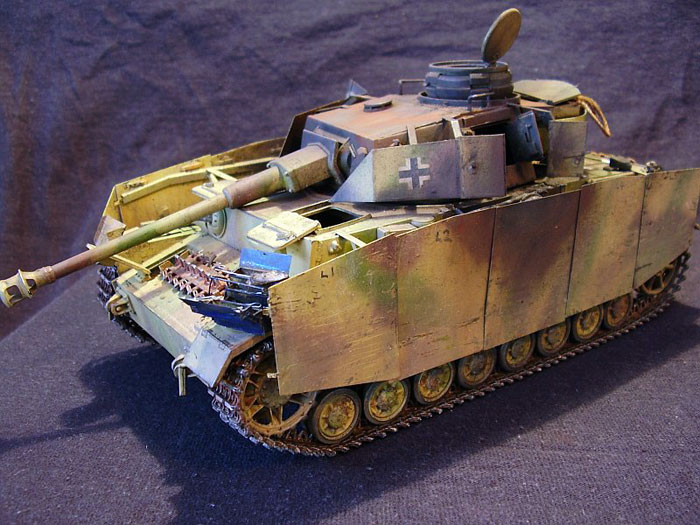
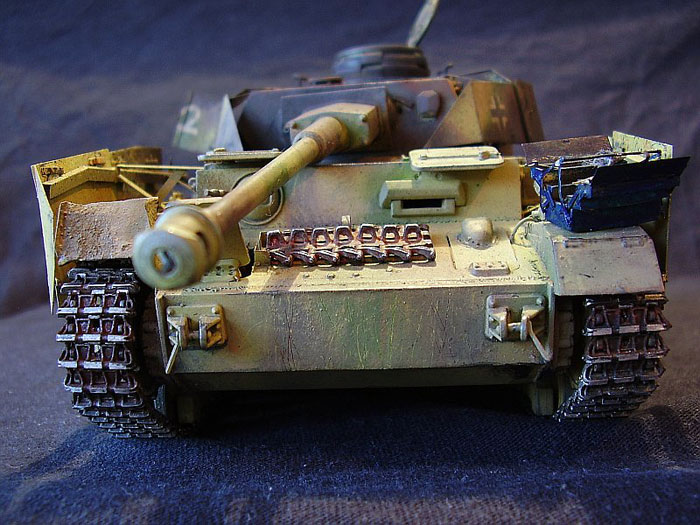
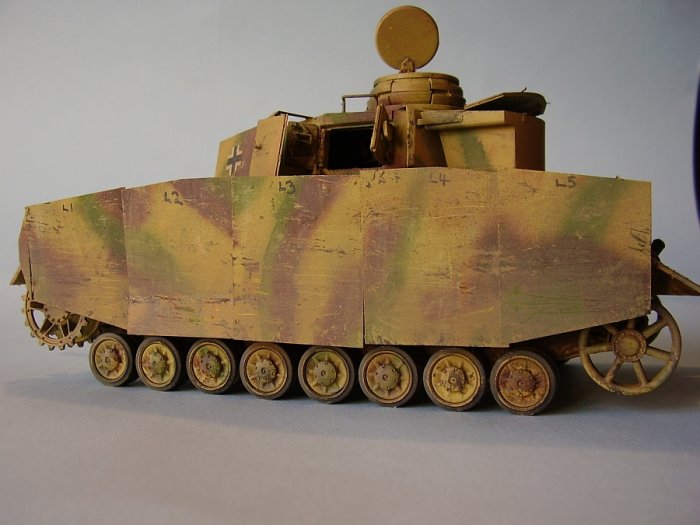
Exterior
The Tamiya Kit has quite good
detail but still benefits from sharpening up with some PE and Resin.
I wanted to show a more Mid-production version than Tamiya’s kit, so
a few little bits needed altering. Tamiya provide both an Early and
“Normal” drive sprocket so I used the “Normal” Kit front sprocket.
My Panzer would need later pattern return rollers though, and these
were provided by Mig Productions resin items, which are a direct
replacement requiring no further modification of the kit. The kit
“rubber band” tracks had to go and were replaced with Fruil
individual Metal links. The kit has early style angled protectors
around the two front hatches; these were sliced off with a Swann
Morton blade and replaced with Square items cut from plastic card.
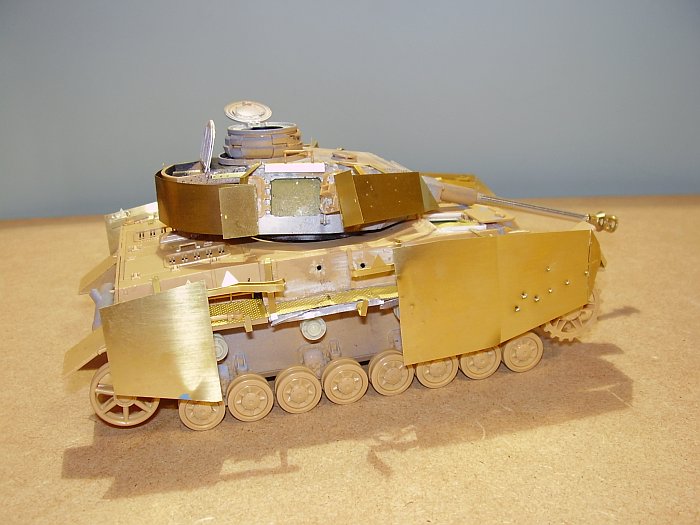
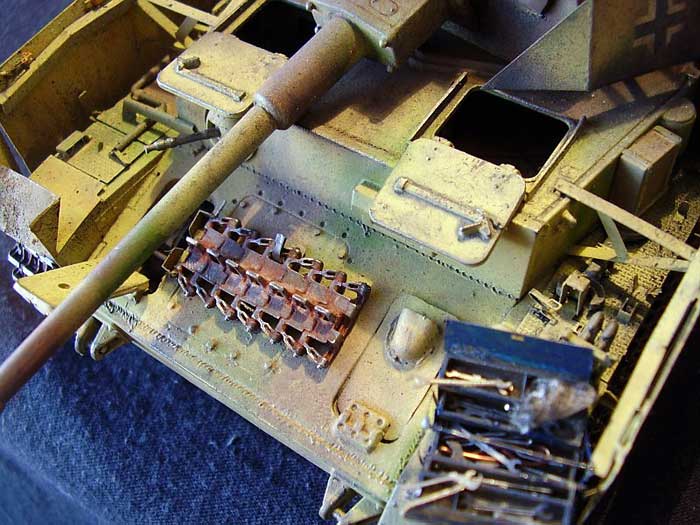
The next replacement item was the Main Gun barrel. I used Aber’s
latest turned aluminium and Brass item. This has to be the finest
detailed replacement barrel I’ve yet seen. The Muzzle Brake is
superbly detailed and really puts the plastic kit item firmly in the
shade. It has three turned brass parts and seven PE brass parts,
giving all the internal and external features of the real muzzle
brake. I had to make a small modification to the base of the barrel
and to the Verlinden resin parts for the Gun breech, as Aber’s
barrel is designed to fit into Tamiya’s kit parts. Whilst looking
through reference photographs, of various Panzer IVs in the field, I
noticed that none of them exhibited blackening around the Muzzle
Brake. Normally on my Panzer builds I will put a blackened end to
their barrels, but as I couldn’t see this in any of my photos, I
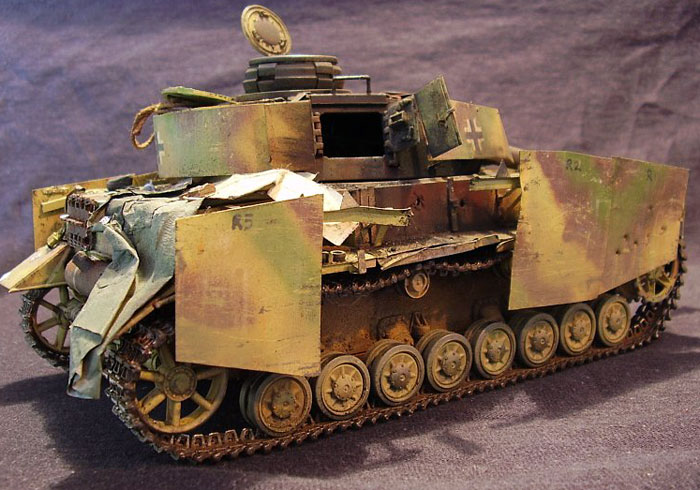
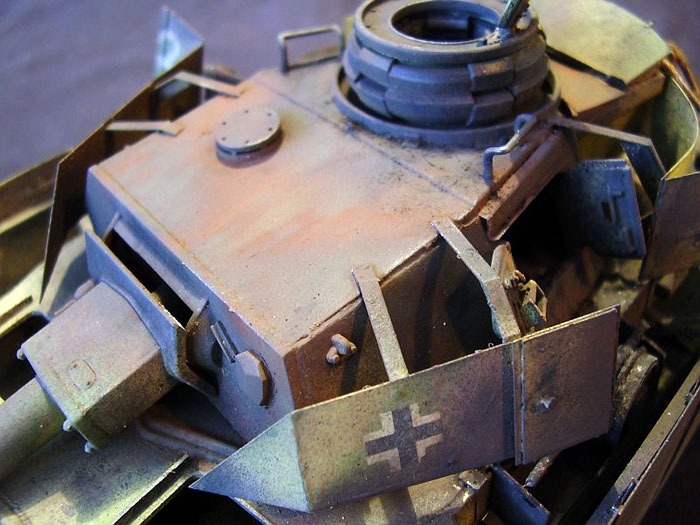
left it off this one. To finish the Turret I cut along most of the
weld seams and repositioned them as though the turret had been blown
out, by an internal explosion and some of the weld seams ruptured.
(This effect is often seen in photographs of knocked out Panzer
IVs). Later in the build the repositioning of turret parts caused a
few problems with alignment of PE parts for the turret “Shurzen”
armour plates.
For the detailing on the rest of the exterior I used the Lion Roar
PE brass set. The set comprises of most of the tool brackets, some
tool parts, front fenders, anti-slip surfaces for the side fenders
and a complete set of “Shurzen” shields and their brackets.
Strangely no rear fenders are included in an otherwise extensive
set. As with all PE sets, fitment was time consuming and sometimes
tricky. There are no side fenders in the set only the anti-slip top
surfaces, but this is not a real problem requiring only the sanding
off of the kit moulded surface and the new parts attaching in their
place. The fitting of the Shurzen to the hull was fairly straight
forward, with care needing to be taken on positioning of the support
Brackets. To show Battle damage, a section of the support bracket
was cut out of the right hand side and the ends twisted as though
damaged by an artillery strike. Two Shurzen plates were left off of
this area, whilst others received damage using pliers. I then used
the tip of a pointed blade to dig out two holes in the side of the
main hull, to represent penetrations by AP rounds (The cause of this
Panzer’s destruction). Small arms fire holes were made in the
Shurzen with a small drill bit. As mentioned previously fitment of
the Turret Shurzen was made tricky by the fact that I had distorted
the shape of the turret to show damage from an explosion.
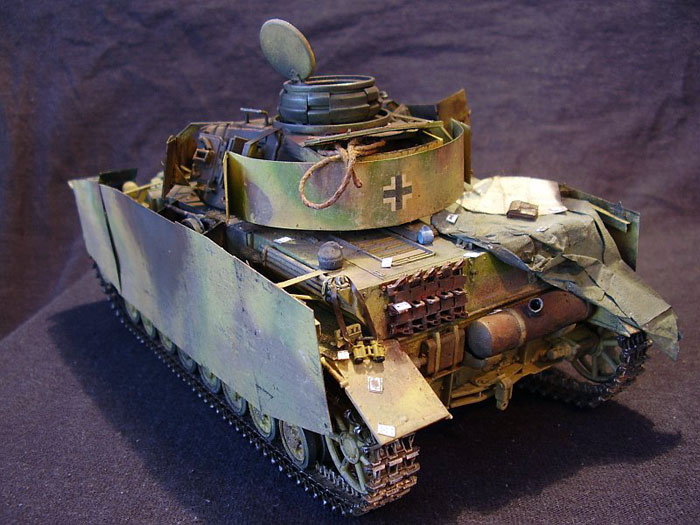
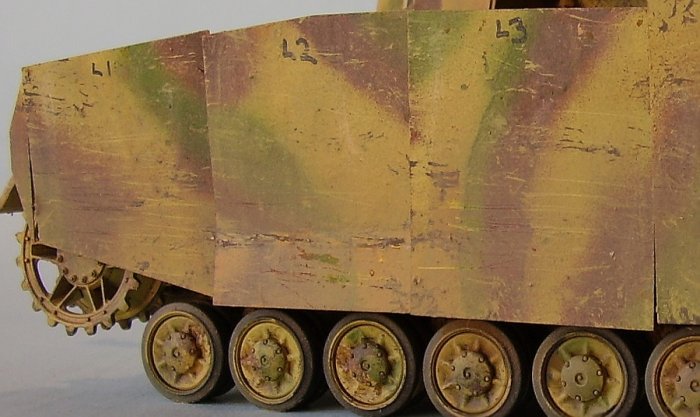
After several days of building the exterior, it was ready for the
primer coat and then painting. The only part of the painting that
went as planned was the Yellow base colour. I had been looking at
photographs of Panzer IVs in Normandy and it had seemed to me that
on quite a few of them the camouflage colours had been quite roughly
painted. I decided to try and represent this and to be honest it
looked awful. I tried to mask it a bit with scratches and
weathering, but it still looked terrible and there was nothing for
it but to start the painting all over again. This time I decided to
just paint the camo as normal and it came out OK. Before I got to
doing the burnt area I decided to completely do all painting and
weathering, as the burning was the last part of what had happened to
this Panzer and I figured that would be the way I would do it. After
basic painting I started with some fine scratches over the whole
Tank. First scratches were done in the base Yellow over the other
colours. Then fewer “deeper” scratches were applied with a Dark
Brown/Grey mixture. With all scratching done the colour was dulled
down with oil washes of various browns, yellows, whites and oranges
to show fading and rust streaks. Last layer before burning was a
“dusting” of dirt, for this I used a bit of very thin Vallejo Khaki
acrylic, sprayed quite heavy on the running gear and lower hull
going to almost none by the time I reached the turret. While this
was drying, but not wet, I made dozens of little surface scratches
in it with a sharp tooth pick, as the final layer of scratching. I
wanted this Panzer dirty and battered looking, as though it had been
off road a lot and had pushed it’s way through a lot of undergrowth
as it tried to avoid Allied Fighter Bombers and Anti-Tank crews. I
hope this is what I achieved with these layers of paint and
weathering.
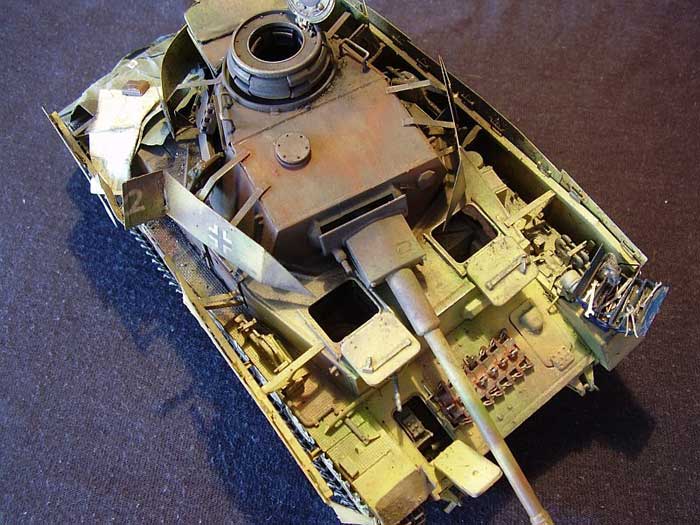
Now I was ready for the burning of the exterior areas. This was
concentrated around the turret and not spread to the Engine or
drivers area. I used exactly the same technique as on the inside,
but left rather more ash in some areas, particularly around the
burnt Spare wheels, just outside an open Turret hatch.
Additional Details
With the painting stages finished,
it was time to add some more details to the exterior, telling more
of the story of this Panzer.
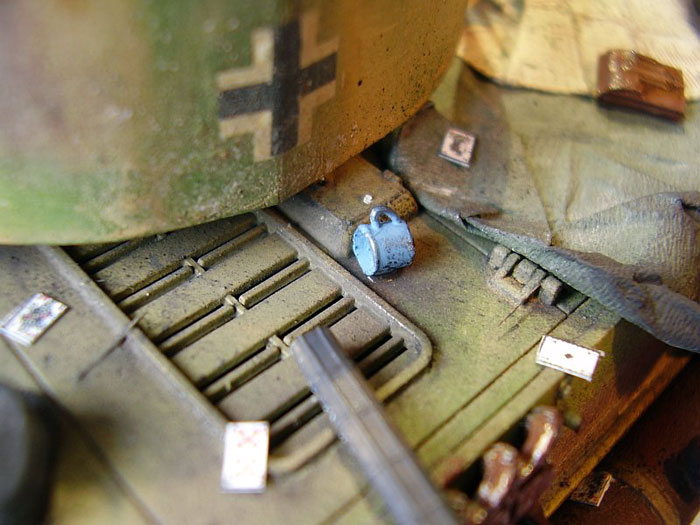
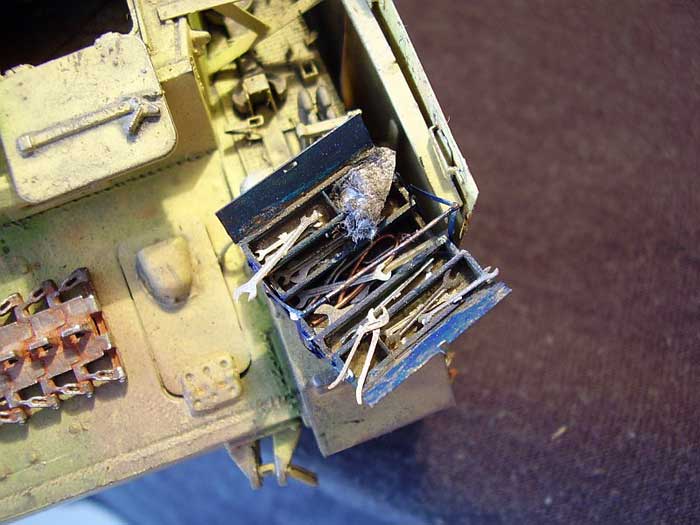
Before the Soldiers arrived to recover this Panzer, locals have gone
through the Turret bin looking for anything useful. So around the
rear deck I used various bits and pieces from the spares box to make
up a variety of items. I figured the turret bin being separate from
the main turret would have got hot inside but that it contents would
have survived with just a bit of scorching.
On the front left fender I used a PE and Resin toolbox and tools
from a set by Plus Model, to add a bit of interest. And that was it;
finally the Panzer IV H was finished. This Panzer will now be part
of a much larger diorama than I originally planned. I have two more
vehicles to add and then the groundwork to do. By the time I’m
finished, I think this project will have run to around 8-9 months.
Click the thumbnails below to view additional images: