|
Sd.Kfz. 251/2 |
Tamiya, 1/35 scale |
 |
| by Mike “The Weatherman” Millette |

Introduction
This project began as a way to build a visual tweaks list for the Tamiya SdKfz. 251/1 ausf D model (kit No. 35195). I had seen a number of very extensive tweaks lists on a variety of sites, and as good as the description of the tweaks were, there were many times I was left wishing for pictures to do the work of a thousand words; hence the genesis of this build.
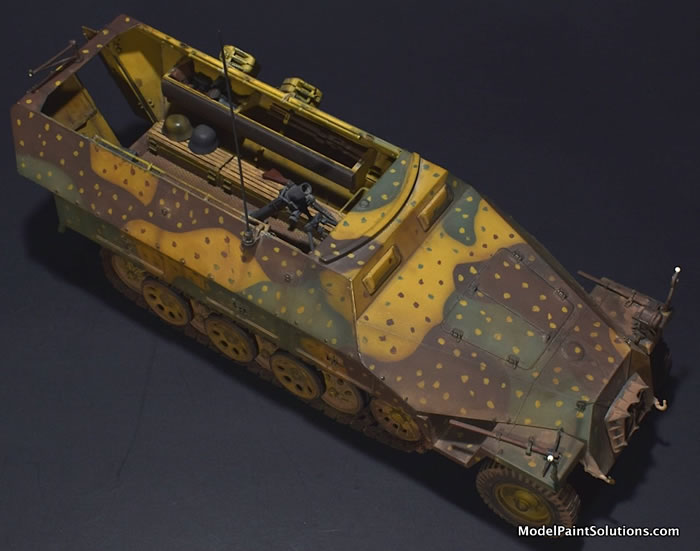
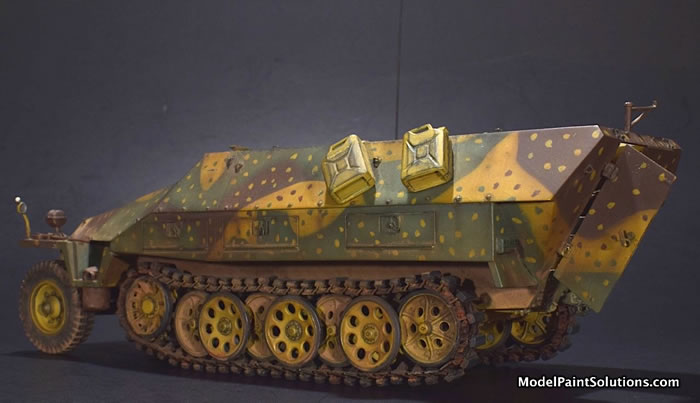
This particular vehicle was chosen because A) I wanted a model that was pretty close to the base SdKfz.251/1 that came in the kit, but B) still wanted to build something that wasn’t commonly modeled, and C), the actual vehicle that I was modeling had a version of the very rare (for anything other than late built panzers) “dot” ambush scheme, which I thought made for a really interesting finish.
Construction Notes
Construction of the kit was very straightforward. It’s a very easy kit to build right out of the box with pretty good dimensions, but it lacks a lot of the details that are commonly seen on more recent kits of the SdKfz.251. The majority of the effort put into building the kit was in the detailing that was added to support the development of the tweaks list. The list is still available online at the Missing Lynx website so rather than repeat that content, I’d like to refer you to the original article; with photos and illustrations (http://missing-lynx.com/articles/german/mm251/mm251.htm) or the unillustrated version in ML’s standard tweaks list format (http://www.elccweb.com/MissingLinks/Tweaks/251_Tweaklist.pdf).
Color and Markings
While I did address painting in the original article, I didn’t get into the details of the finish as much as I did the mods since painting wasn’t the objective of that article. Having seen the model and read the original article Dr. Strangebrush asked me if I would write a short companion article addressing the paint and finish in more detail, so here we are. When the good doctor and I first discussed my build he had a number of basics questions which seem reasonable to address at this point.
To start with, did I use primer? to which I answered “No”. While this may seem odd to a lot of modelers who use acrylics, I have always favored enamels and lacquers which tend to have a good “bite” when applied to most plastic models. I also like to use very thin coats of paint so I tend not to use primer all that often as I think it can soften or obscure details as color coats, clear coats and effects coats are added later in the process.
My paint application tool at the time was a Badger 150 which I really liked (still like). My more recent projects are shot with an Infinity airbrush for most applications. Over the years I’ve used a number of different enamels and lacquer paints for my modeling projects. For this kit I used Floquil’s “SP Panzer Yellow”, Model Master “Schoklatenbraun ’43” and “RLM 80 Olivgrun(SG)” for the color coats and Testors Gloss and Flat lacquer for clear coats. I liked the smooth finishes I could achieve with them. They were reasonably quick drying. I thought the colors were reasonably true-to-life and, unless I was shooting in some atmospheric “corner conditions” I had a good handle on how they behaved. I still have a good sized stash of them, but I have been converting to AK Interactive lacquers for more recent builds.
Typical of my builds from this period, the color coats were shot using a 20% paint/80% hardware store lacquer thinner ratio and the clear coats were shot at closer to 10% paint/90% thinner ratio. Air pressure was varied between 15 and 25 psi depending on how the paint was spraying under varying conditions of heat and humidity. With all of that covered, let’s get into the actual painting.
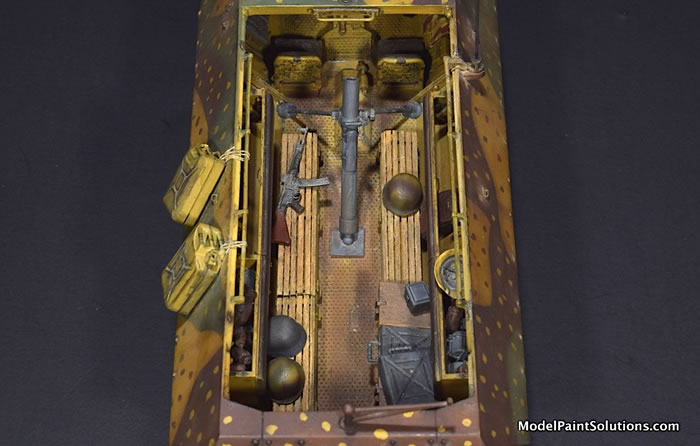
Interior:
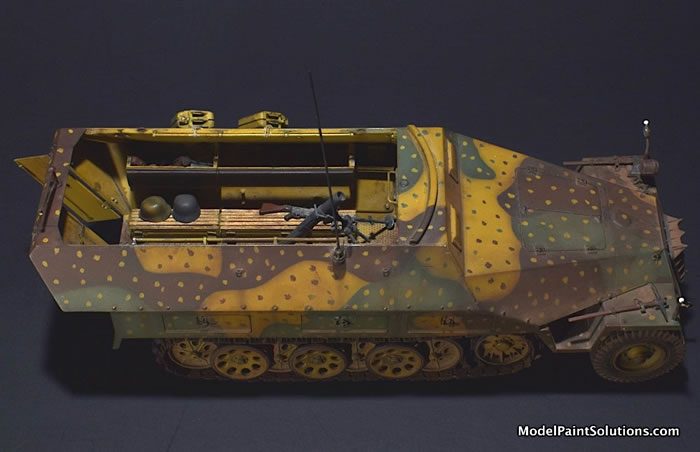
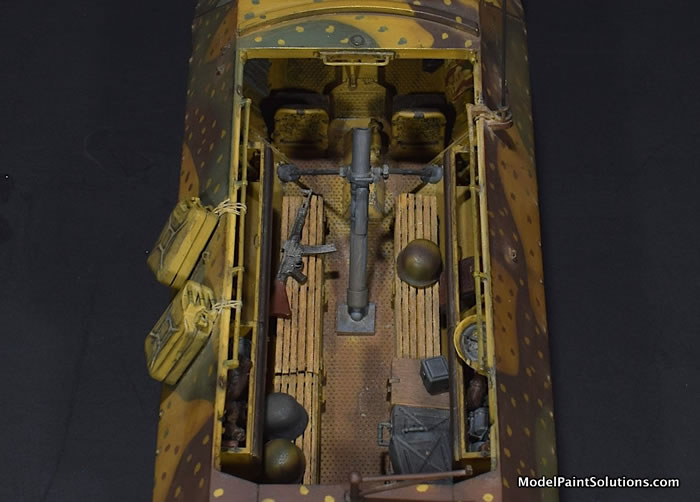
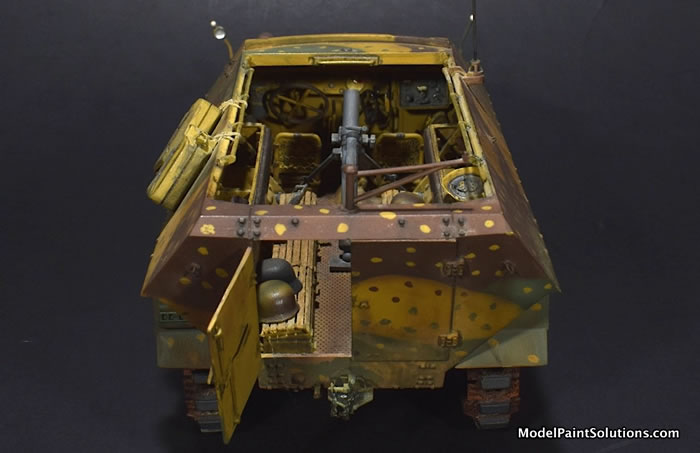
The interior was painted with Floquil’s version of Panzer Yellow. Once that was dry, the interior was then shot with a couple thin coats of the Testors Clear Gloss lacquer and washes were applied. My washes are a set of home brews of various enamel colors, heavily thinned with turpentine. These were applied to corners and details throughout to provide shadows and depth to the details. The floor was also given a couple of thin coats of Rust-All followed by more washes to give the level of grime that I wanted to portray. Testors Flat Clear coat was then applied as the last paint coat. The final addition to the floor was the used of pencil graphite to replicate where the paint had been worn to bare metal.
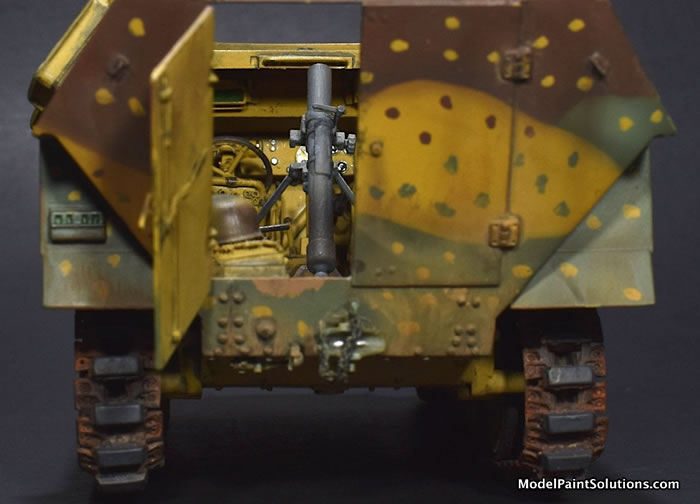
The driver and radio operators seats, as well as the backs of the troop seats were painted using Model Masters Leather color, tinted with Black to get the dark leather color. After the initial leather color was applied, the ratio of Leather to Black was tweaked and dry-brushed on to get some variation in the color. Gun stocks were painted Wood and when that dried, a darker oil paint color was thinly added to give the stocks grain. The metal parts of the guns were painted black and then thoroughly rubbed with pencil graphite. Other equipment in the crew area was painted Uniform Gray, Black or with the exterior camouflage colors as desired. A final application of pencil graphite was added throughout the interior to simulate paint wear, where it seemed logical.
The seat bottoms for the troop seats were made from very thin wood strips, purchased from a local hobby store. They weren’t painted per se, but covered in a wood varnish and applied. I thought they looked much better that way than the plastic parts provided in the kit.
Exterior:
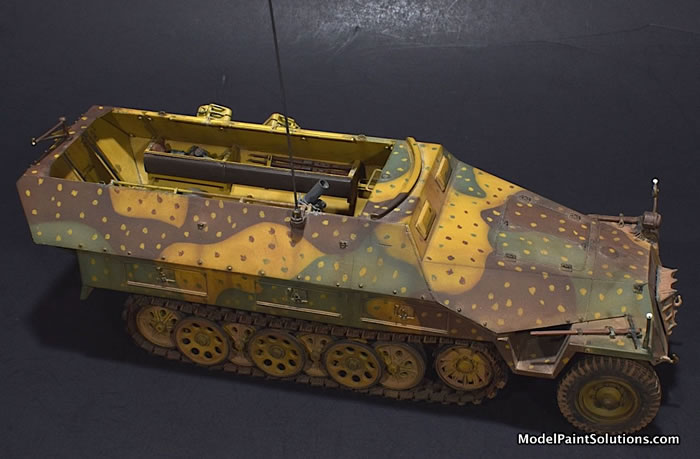
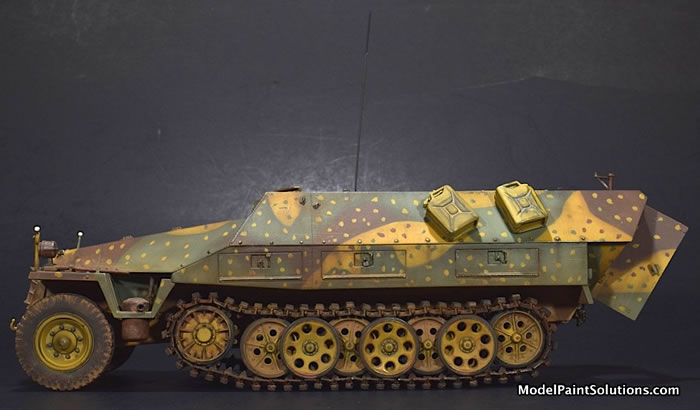
The model represents an actual vehicle so the paint scheme on the driver’s side follows the scheme in the picture as best as I could. Since the rest of the scheme was not visible, I did a number of test layouts to create a scheme that flowed with what was visible. This took a few tries which resulted in a several cycles of paint/sand, paint/sand, paint/sand. As I noted in the initial article some attempts resulted in color combinations or schemes that just didn’t work and some occurred because I put my masks in the wrong location and didn’t notice until after I had applied paint.
Once the scheme was established the entire exterior was sprayed, again using Floquil’s SP Panzer Yellow out of the bottle. I then created a small batch of slightly darker paint, slightly lighter paint, as well as a bit darker and a bit lighter tints as well. Once the base coat was laid down, the lighter and darker versions of the base color were dry-brushed on, based on where the light and shadows occur on the real vehicle. This gave some depth and variation to the paint in a way that I though looked more realistic.
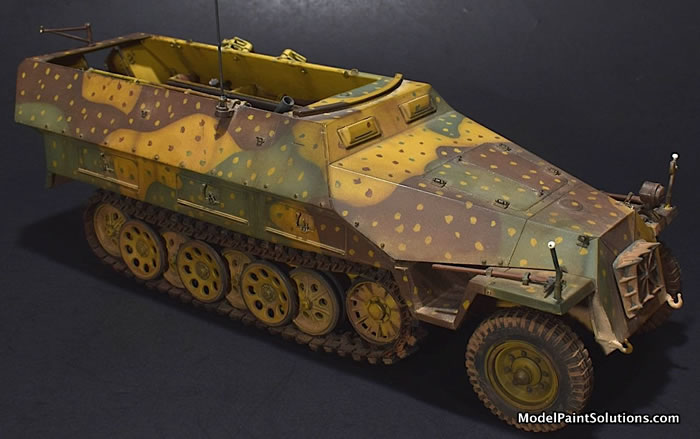
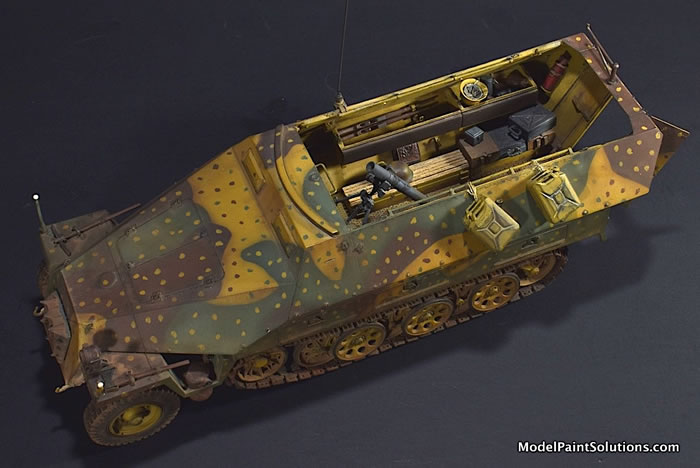
When I was happy with the Panzer Yellow coat and all applications of the tints were cured, I used Tamiya tape and paper masks to lay out the green and brown areas of the scheme. Again, a base coat of the bottle colors were used and again two darker and two lighter tints of each color were prepared. Each base color was sprayed in turn and tints were applied by dry-brushing. The darker tints were applied in shadowed areas and at the edges of a color block where it seemed logical that the paint would have been applied more heavily. The lighter tints were used more in the centers of the color blocks where the paint seemed to be more faded.
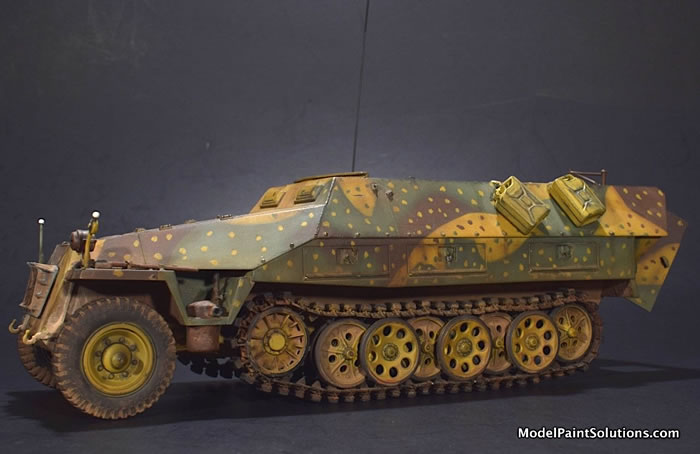
The green and brown colors were applied with the rest of the model masked off so that overspray didn’t interfere with the sharp edges of the scheme. All of the base colors and tints were applied using my airbrush. Once all of the color blocks were complete, the dot camouflage was added using a fine paint brush. I used the slightly darker tint of all three colors to apply the dots. In retrospect, my dots are probably a little too large, preventing the final result from having the same “dot density” as shown in the picture. Live and learn.
The painted model was left to cure for about a week and then I gave it two thin coats of clear gloss lacquer. The gloss allows a smoother surface for the next stage which included pin washes and grim streaks. Using a lacquer also protects the previously applied paint from being attacked by the turpentine in my washes. As with the interior, pin washes were added to bolt heads, indentations or any detail or feature that would cast a small shadow. Streaks were applied using the same mix I used for pin washes but in this case I would dip the brush in the wash mixture and then wipe most of it off on a paper towel. To get the streaks usually required multiple applications to get the look that I was after. After all that was complete, I sprayed clear flat lacquer until I got a finish I liked.
The muffler in the photo showed several different shades of rust which I was initially unclear as to how to replicate. Prior to this point I had never painted anything approaching a realistic rusty surface so some creativity was called for. An initial coat of Model Master “rust” paint was sprayed on to the muffler which made for a smooth and unrealistic rust effect. Finely ground pastels in a couple of rusty colors were applied to the slightly wet paint. This gave a rusty texture and some additional range to the rusty color. Last Rustall was applied to the muffler and exhaust pipe giving more variation in rust tones and texture.
The tracks were painted with a custom mixed dark metallic gray and then several coats of Rustall were applied to give a random rusty look. The track pads were brush painted with a rubber black color and two or three colors of artists pastels were applied to complete the look
Decals and Final Finish
The only decals that were used were the instrument panel decals that the kit provides. I used Solvaset to get them to conform and adhere and when they were dry a couple coats of Clear Gloss lacquer was added over the top of them to simulate the glass. The last part of the finish was to apply a few different but complimentary colors of Schmincke artist’s pastels to give the model a dusty look. The pastels were lightly scrubbed onto the surface of the model to unify the completed paint scheme and more heavily applied on horizontal surfaces. I used flat clear to fix the pastels which made much of the lighter applications disappear. One last application was added to the horizontal surfaces and the model was complete.
Conclusion
This was a fun project. It resulted in a unique tweaks list that included images of all the tweaks. It tested my building and painting skills and encouraged a lot of new approaches to both my armor and aircraft builds. Although my painting techniques have evolved over time, I can still look back at this and feel good about the finished model.
I hope you enjoy the pictures as well.
Mike
For more on this build visit Modelpaintsolutions.com.
Model, Images and Text
© 2022 by Mike Millette
Page Created 12 March, 2022
Page Last Updated
12 March, 2022
|