SummaryMaterials:-
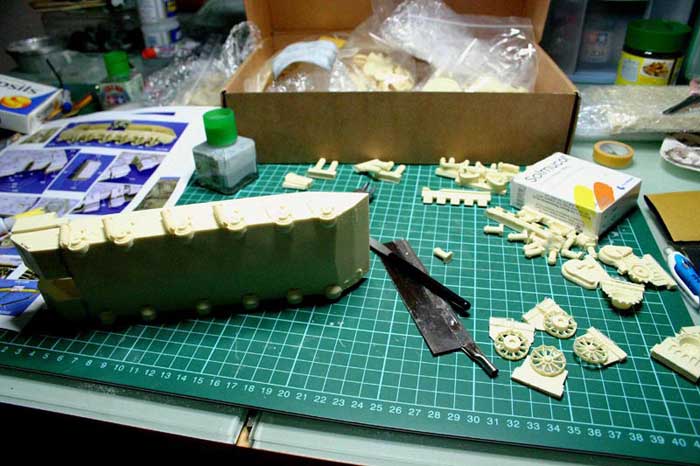
Difficulty: Advanced Medium : Resin, Plastics, Brass and Steel wires, Brass etched materials Paints used: Proprietary mixture of Creos Lacquer paints, Vallejo and Tamiya Weathering : Schminke pastels, Mig Pigments, EAA glue, Winsor and Newton oil colours, Rowney Turps, M Workshop pigments Tools: M Workshop, Minimat, Olfa, XActo, 3M sanding films, emery sticks, Cyanoacrylate glues, Dremel, Tamiya, soldering iron, toothpicks and a very sharp electronics assembly tweezers. IntroductionThe Merkava or Chariot in Hebrew is one of the most fascinating armoured fighting vehicles ever conceived. Its design is predominantly not only dominated by war time inputs of veterans, but also the veterans’ unique desire for survivability of the crew. It is the first tank we know that is designed from ground up to be around the crew and not with the crew in a tank. Its use and activities are as well documented by many news agencies in the recent combat action in Southern Lebanon, once the safe enclave of Israel’s close Christian ally, the South Lebanese Army, now populated by large number of Israel’s sworn enemies of choice. The development of the Merkava is one of the longest in the history of armoured vehicles for Israel. It started in 1970 after the failure to materialize the joint developed desert version of the Chieftain tank, with Britain, who, out of a difficult political situation then, decided to sell the tank instead to her enemies in Jordan and some other Arab countries. The event has its roots in the widely publicized Centurion deal where almost 800 Mk 5s were bought for an exchange of an understanding that Israel will be granted the local production the Chieftain, which was then under development for desert operations. However, as circumstances dictated, the deal fell through the roof and it dawned on Israel that IDF needs to have its own indigenous tank, despite higher costs; production security and availability being cited as it chief driving force. The tank first saw action in 1980s in the war in Lebanon during the “Operation Peace for Galilee”. Over the course of a quarter century, it has evolved into present fourth rendition with each, the inclusion of new cutting edge technology in armour, network centric communication system, firepower, active and passive defense and optical instrumentation. Version III saw a great number of action in the recent wars with various rendition of clad on armour catering to the threats commonly found in modern Middle Eastern theatres, large scale tank battles. However, when a tank was needed for close range defense against IEDs and CE weapons, the system was redesigned completely for counter insurgency and conventional warfare as well. For more comprehensive details on the Merkava story, one can easily find a good number of websites with loads of reference materials, so, what’s stopping the internet savvy from digging? Kit in viewThe kit from Legend is a piece of hard work given the amount of details the kit contained. Getting the master in place is no mean feat. The amount of rivets found on the tank is no less than 500 I think! Kudos to the lads at Legend for the hard work put into the creation of this kit making it the only available piece in the market at the time that article was written. The work cut out for resin construction is no mean feat either. The need to cut or saw them out of the chunks than comes with it, coupled with dealing with shrinkage and warped parts can be trying to the uninitiated. The need to use cyanoacrylate glue plus the photo etched parts and the fact that the kit contained no markings or instruction sheets, with the exception of a couple of photos of the completed master is a sum total for a most challenging build. ConstructionThe kit was supplied to me by an IDF collector from the US who commissioned me to build the model. The kit arrived by FEDEX in good shape due to the excellent double layered carton used by Legend. On first inspection, as with all resin kits, is to locate what parts is what and where it goes. Next up is to group them into useable assemblies. A complete kit with more than 200 resin parts, one has to be psyched up to begin with and to have a good assessment of the amount of work at hand. Next, I did list down all the parts that needed attention and would either need replacement or replenishment by the manufacturer. Others, are grouped into parts that needed to be discarded or constructed by other means, and lastly, parts that needed some trimming.
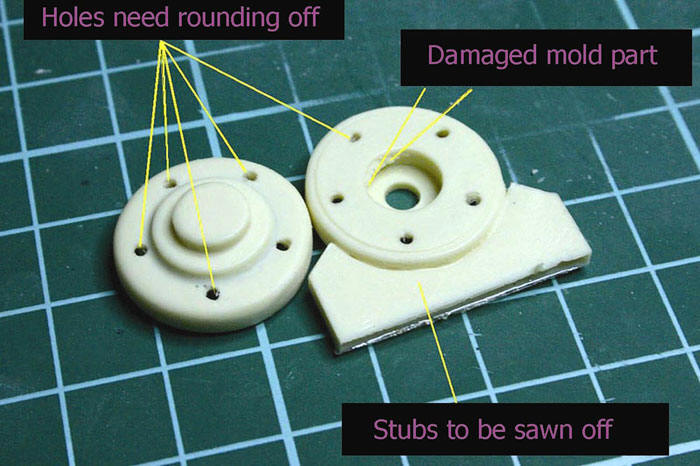
Pic 1 The wheels all needed a good session with trimming and hollowing out the flash and chunks of resin due to the fact that the mold was damage and the excess resin is replicated on all 12 wheels! This is coupled with the fact that the fit is not flat as one would expect from a Swiss precision Tamiya kit. All these are solved easily in 15 minutes with a Dremel tool, a motor grinding stone sander, a pin vice, drill bits and a very powerful vacuum cleaner! The only gripe is, this is repeated 12 times! For the love of my life, I would have junked these for an alternative, but given the lack of metal road wheels from the aftermarket parts suppliers known to me, I was stuck to the kit. I took it to the local distributor who was helpful and offered some advice, but I left the shop empty handed eventually. I also sort some redress or some help by emailing to Legend, its been a few months before I could get a reply on the matter, the good chaps at Legend explained on the shrinkage issues and offered to send new replacement parts to me. Alas, the parts would arrive after the model was completed. I would not expect the rapid replacement or spare parts sale by Tamiya and its distribution chain, but I think Legend is trying, being a smaller company, it would be unfair to expect the same level of commitment from a cottage industry player as compared to a public listed multi national! Alas, I must admit that there is no harm hoping that change for the better is at hand!
Pic 2 The fit of the under chassis to the rear exit door and the stowage bins was quite a challenge as these were cast in solid blocks. The contact areas were quite small for any contribution to structural strength. I assembled the body parts with internal brace using 1.2mm Tamiya plastic cards so that it can hold up the weight of the model, which incidentally, tips the scale at close to 2 kilograms. The tricky part I realized was that the kit had some shrinkage in the rear compartment where it, unfortunately, also supports the rear return roller. This part comes under the most stress in a model kit given the tension the track exerts on it. The kit part was too weak to support the stress, so holes were drilled into the bodywork and plastic cards with wire insertions are used to form the bracket for the wheel and sprocket of the return roller. I replaced all the springs with the Academy Merkava III for its better definition and details.
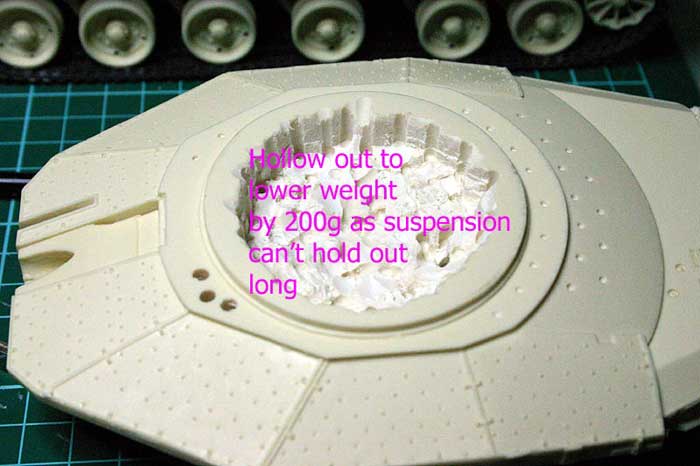
Pic 3 The fit of the chassis has to be aligned to the vertical and horizontal as well. As CA glue is used, this accords the constructor no time to do alignment checks, thus, I use a slow CA gel and once I get the correct alignment, or in this case, the best case scenario, I dash it with a CA accelerator from Hobbylinc to instantly polymerize the glue. After fitting the parts, the tank bottom is banked at an angle. This is necessary for the tank to sit correctly to the horizontal plane. The bottom is then built up to flush slightly and the bubble holes and sink points are sealed in with nitrocellulose putty thinned with commercial recycled thinners. These are later roughened to simulate mud and scraping damage. Once the Chassis is done, the top of the chassis, which is cast in one hollow block was “capped” on. The gaps are again filled with my version of liquid nitrocellulose which I made with 6 parts putty and 4 parts thinners. There is a further diluted version, which I also stored in a separate bottle of spent Tamiya liquid cement with the brush applicator; this is a 80:20 concoction that allows filling out smaller seam lines. Once the assembly is completed, it is set aside for a day for it to cure. But for the kick if boosting my imagination, I can’t resist the itch of putting on the turret to visualize how the model will look like when it’s done. I forgotten about taking the 1.2 kg beast off before switching off the lights at 3 a.m. in the morning to get some shut eye. The next day arms itself with a huge surprise that is a great challenge for both my sanity and resurrection of my long forsaken self pity party throwing tendencies. All but four wheels are broken off the suspension torsion bars! The kit was designed as a knock off from the Academy Merkava III using it as a base I suspect. It boasts the same “D” lug for positioning, however, for a resin kit this weight, the ½ of the 2mm diameter piece of resin can not take the stress of the weight of the complete model. Some resin kit manufacturers that I have built had attempted to cast these parts in white metal, which I think is a good idea if Legend would do the same for this, otherwise, a superb looking kit. To remedy the situation, I drilled out the 8 broken lugs and reinforced them with steel wire. Corresponding holes were also drilled into the chassis and then these are fitted back again and set aside to cure for 24 hours. Lessons, hard taught, now caught and are hard to come by like this one. I began a major weight loss regime for the model. I drilled close to 50 holes into the turret base and in places out of view’s way and then I remove the resin by chipping them off with shears and finally grind out the unreachable areas with Dremel.
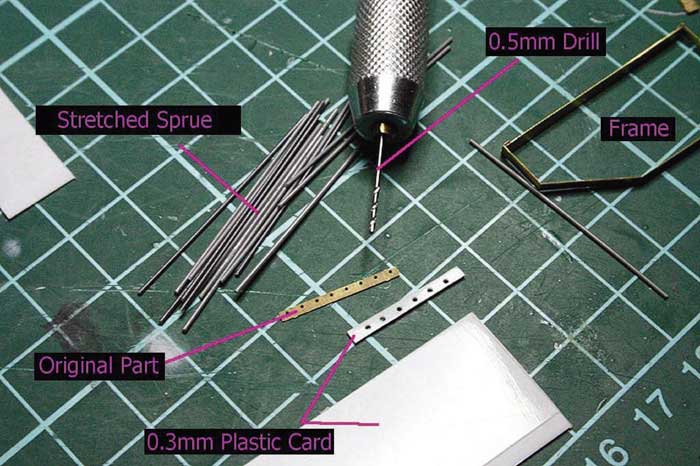
Pic 4 The whole exercise extended to the body parts etc, the total savings in weight was 265 grams! Hoping that it helped, I put the whole thing together again, bearing always in mind that the model has to be packed and shipped 7000 kilometers to the other side of the world for centre stage display amongst 200 other IDF models! I left it alone for 2 days and was happy that it stayed in one piece. I decided to replace some of the parts for easier construction. One such part is that of the slat armour at the last part of the side skirts. The parts provides for the superstructure and brass wires for the horizontal parts that were never possible to be made straight and parallel easily. Even though I tried soldering it with my micro tip soldering iron, it was too small. I discarded the wires and the middle section and replaced it with a 0.5mm Tamiya plastic card drilled with the evenly spaced holes and laced it with 0.5mm plastic rods from stretched sprue.
Pic 5 Ingredients for Slat armour
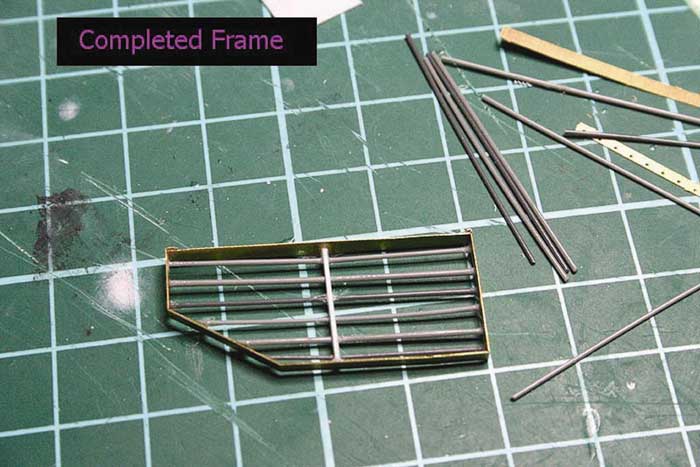
Pic 6 Frame completed to be loaded with spring and attachment points The rest of the construction is pretty much straight forward only with the exception that I had to be extra careful on the direction and fittings of some parts as the instruction provided are only a few photos. Thus, a lot is left to guess work and referring to photos grabbed from the internet and the Merkava reference books that I borrowed helped in heaps. The grab handles on the turret were replaced with sprue and the whole upper surfaces were covered with anti slip materials. As I do not wish to lose all the beautiful details provided, so I did not use the usual cast a cote or sand with acrylic resin methods; instead, I learnt how to use CA gel and massage it into the surface with a blunt out toothpick. Aware of the toxic fumes, I used a commercial exhaust fan behind me and blast the fumes out of my window, but I needed long pants to shield myself from losing too much body heat in my legs even in a tropical island of Singapore, the monsoon season can lower temperatures into the twenties, and with a 30km/h wind blowing constantly for hours, you can still get wind chill factors that can cause aching to joints!
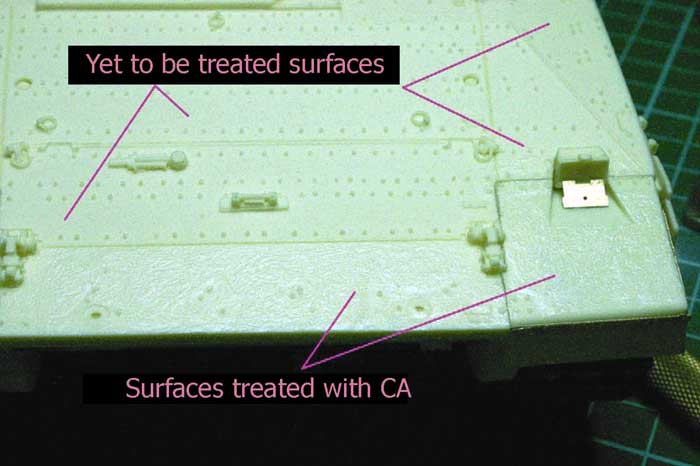
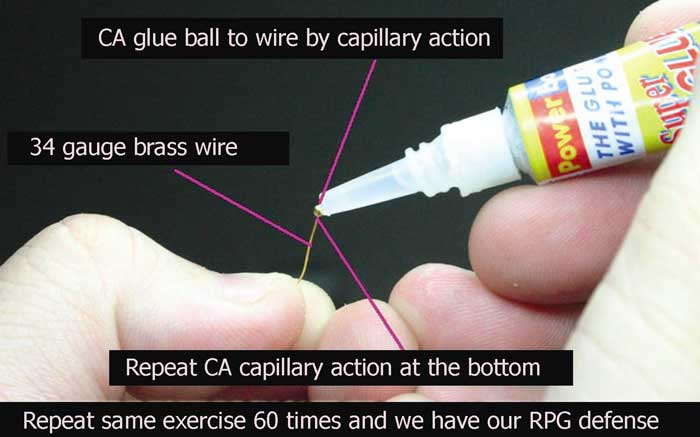
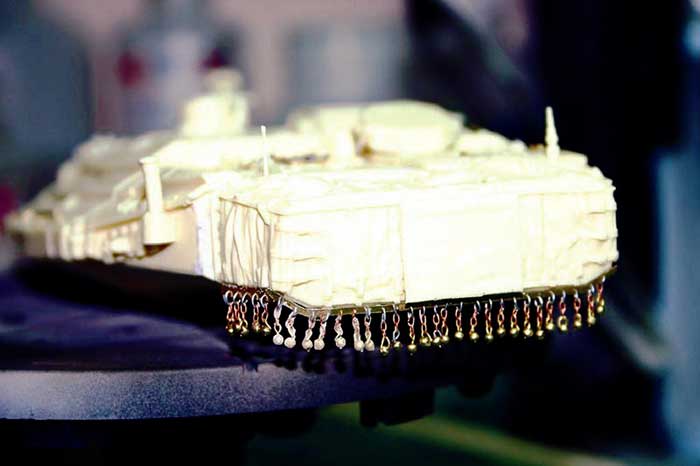
Pic 7 The difference is very evident if you compare the surfaces as depicted in Picture 7. This was done carefully around rivets, panel lines and hinges as the real thing does not have these moving parts covered in stone chips the size of 5mm in diameter! This is different from earlier anti slip material which is nothing more than sand paper like texture glued to the surfaces. Soldier still slip and fall off when the soles of their boots get clogged with mud or snow. On many modern tanks that I saw this year at the recent Eurosatory, many have chips of stone or metal grains almost as large, if not larger than 5mm in diameter! Makes sense to me, as these will hold on to the grooves in the soles despite the presence of mud or snow! The most demanding part of the tank is the ball chain armour system. The kit parts provided by Legend is quite near to perfect in scale, whereas, there is great temptation to use the kit parts from the Academy offering as the metal cast ones are simpler and fewer to assemble. However, there are almost 60 such chain balls in the Merkava IV. They have to be cut from the chain, attached to a 34 gauge steel wire (the brass ones provided are difficult to manage, so I headed down to an artist supplies shop and got me the beads variety). These were individually cut and capillary glued with dilute CA glue to staples of 34 gauge wires. The instructions showed you the copper chain being cut and clipped on to the brass part provide. Believe me, unless we have fingers of the seamstresses of Lilliput; that is not going to be a stroll in the park. After a few attempts, I decided to use the steel wire, coil round a 2mm diameter rod and cut them into rings, and with these, individually attach to the 2 links of the copper chain and with the ball and wire as illustrated in Pic 8, coiled through the bottom link to form the last. The excess can be cut away when the CA has cured.
Pic 8
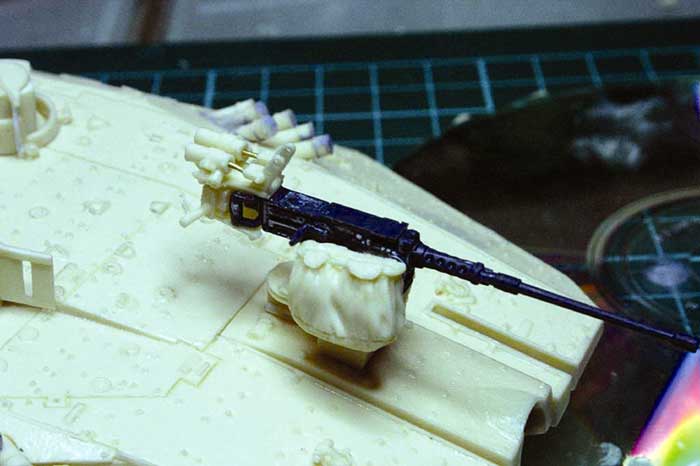
Pic 9, Ball Chains attached to turret The 50 caliber machine gun coupled to the gun sometimes used as an anti sniper weapon and other times as a spotter gun. The parts supplied in the kit were a very complex affair and there were some warped parts and 1 damaged part in the shipping. It was also tricky to cut out of the stub anyway, so I used the one provided in the Academy Modern Weapons set and work around it. I left the ammo belt out but attached the cartridge and link bags. Care is to be exercised to make sure that the remote control station and attachments are correctly positioned as the kit contained in excess of 20 parts. The small parts can be lost when dropped, broken, or assembled in the wrong orientation. Some parts were replaced with Evergreen styrene parts to get the correct alignment. As there is no such thing as a correct sanding tool for parts measuring 2mm in size, so I prefer to make them out of Evergreen styrene structures. The thing can mean the final fit going awry if individual fit is less than perfect. Even though the real stuff have the mechanism attached to the edge of the twin handle, it is not quite possible in my case since I used the styrene part. Thus, I attached the mechanism inward slightly to get a stronger bond. Bearing in mind, to still bear the resemblance to the real thing. This is depicted in picture 10.
Pic 10 About the AuthorBorn in 1965 in Singapore, Norman served 6.5 years in the army as a commando and trained in many countries. He picked up the hobby at 8 years old making an Airfix Spitfire from a plastic box with a rubber bladder adhesive included in the plastic bag costing a total of 30p. After 32 years, still at it. Norman studied in the US and now resides Singapore with wife Eunice with daughter Dorothy and son Dominique, who is also an avid model maker that just won Runners up in the Gundam Asia Cup this year. 39 year old brother Ming is also a modeler for the same amount of years as the author. A head research scientist in new materials for armour and aerospace industry by profession, Norman globe trots to many defense shows giving him special access to many modern and historical armour and aerospace projects. To be continued in Part Two
Home
Model and Text by Norman
Lim |
||||||||