|
|
||||||||||||||||||||||||||||||||||||
|
|
| Home > Reviews > 1/48 Scale > Gaso.Line 1/48 scale KV-85 Conversion |
KV-85 Conversion
Gaso.Line, 1/48 scale
| Catalogue Number and Description: | Gaso.Line Item Number GAS48048 - KV-85 Conversion |
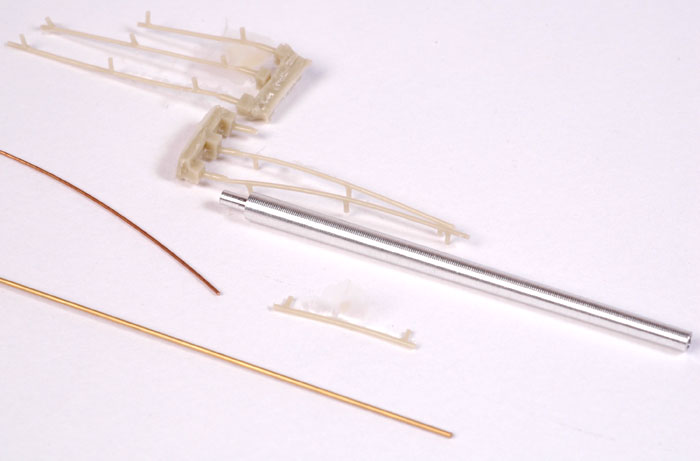
| Contents and Media: | Around 50 parts in grey and green resin; turned metal gun barrel; two lengths of brass wire; four pages of instructions. |
| Scale: | 1/48 |
| Price: | Discounted to Eur €25,42 available online from Quarter Kit's website |
| Review Type: | FirstLook and Construction Preview |
| Advantages: | Excellent casting; convincing surface texture; good fit; appropriate use of multi-media (resin and brass wire); major transformation of Tamiya's KV-1; separate hatches to display figures if desired. |
| Disadvantages: | Understated vision slots on cupola |
| Recommendation: | Highly Recommended |
Reviewed by Brett Green
FirstLook
Is it a KV-1? Is it an IS tank? Is it a T-34?
No. It is a KV-85!
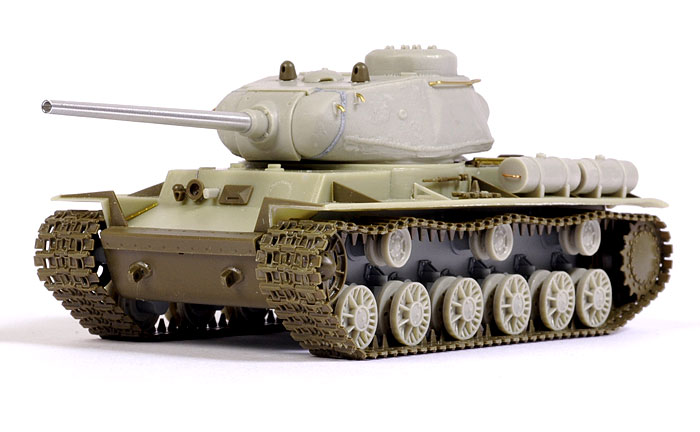
The KV-85 was an interim step between the KV and the IS tanks - an expedient measure to hastily equip the hard-pressed Soviet armoured units with a tank gun that would be able to deal with new German types. The 85mm D-5T gun was the logical choice, and the KV-85 was the result of mating a new, larger turret with this more powerful weapon on a modified KV-1S hull. 130 KV-85 tanks were manufactured, seeing service with various Guards Armoured units from late 1943.
Rapid development of the concept resulted in the IS-1 (also equipped with the 85mm gun), and the IS-2 in much larger numbers. The resemblance between the KV-85 and the IS family is unmistakable.
Gaso.Line has been producing 1/48 scale armour conversions and kits for some time now, but the recent explosion of Tamiya and Hobby Boos kits onto the market must have seemed like a incredible stroke of fortune. Suddenly, 1/48 scale armour was transformed from a niche interest, its exponents scrounging parts and searching for kits long out of production, into a mainstream interest with state-of-the-art models.
Gaso.Line has taken advantage of its lineage in the scale and these new models with several new conversions based on Tamiya kits.
Gaso.Line's 1/48 scale KV-85 conversion comprises around 50 parts in grey and green coloured resin, a turned metal gun barrel and two lengths of wire - one copper and one brass.
Click the thumbnails below to view larger images:
|
|
|
|
|
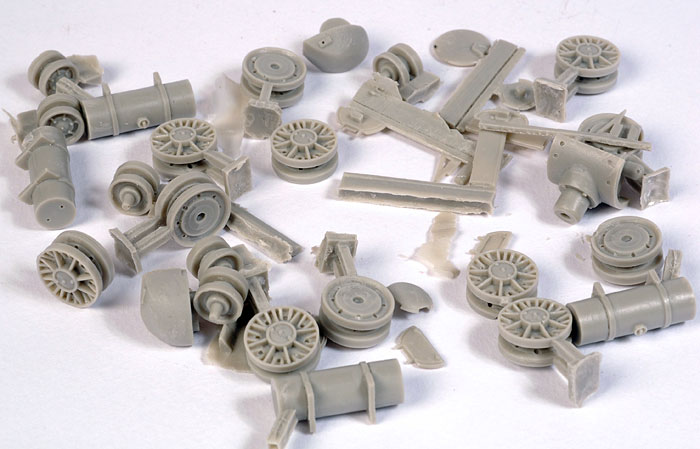
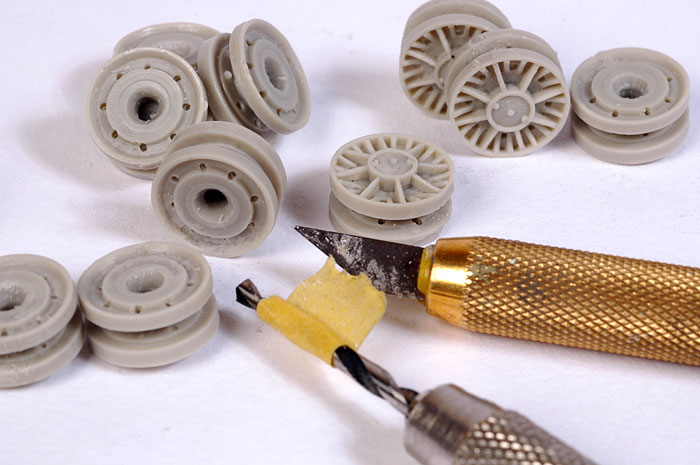
The resin parts are very well cast.
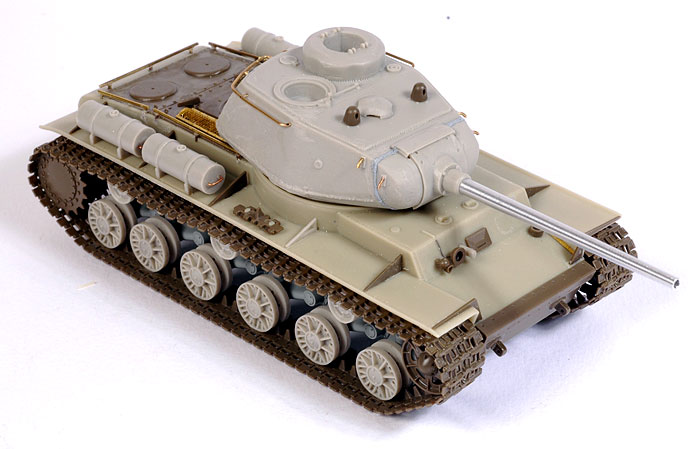
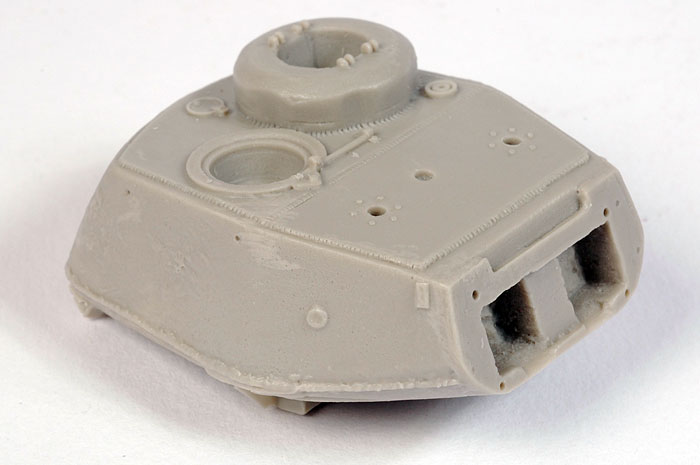
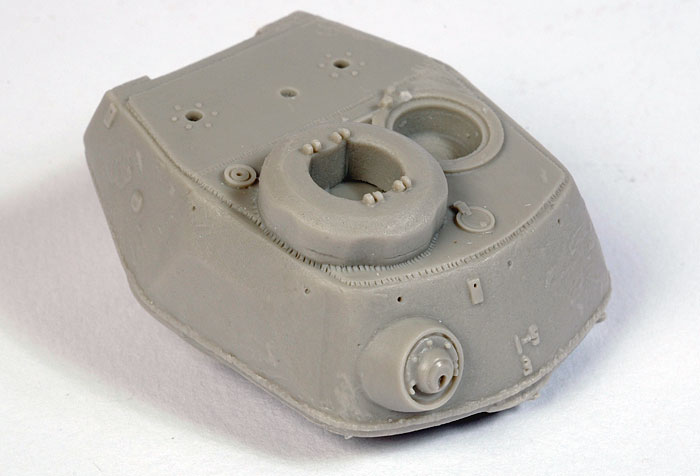
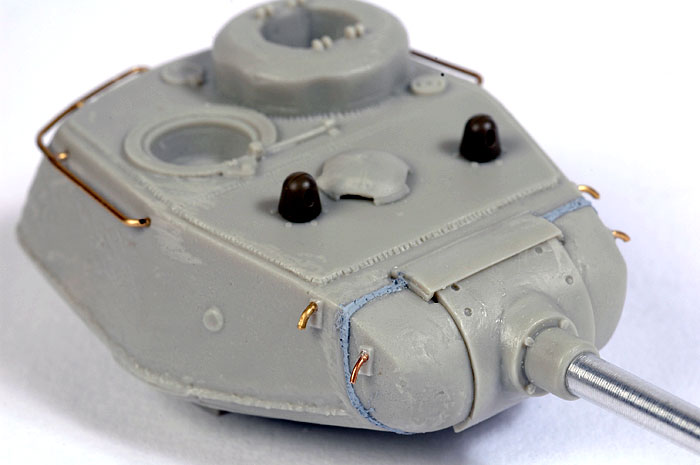
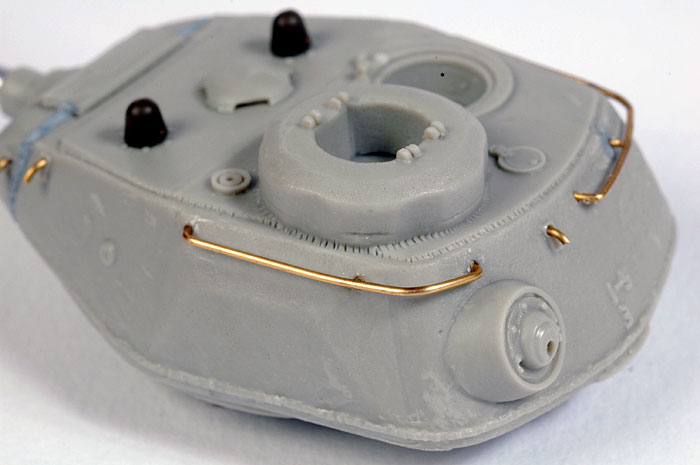
The focus of the conversion is the replacement turret, upper hull and running gear parts. These turret is a large, solid casting with holes cast in place inside the hatches, permitting the installation of crew figures if desired. The characteristically rough casting texture is authentically represented, as are the heavy weld beads along the bottom of the turret. Smaller raised weld lines are also present on the turret roof and cupola, as appropriate. Hatches and the dome vent are supplied as separate pieces. The gun mantlet is designed to be trapped between two resin parts using the poly caps supplied in Tamiya's kit. This works perfectly, allowing full elevation and depression of the gun when assembled.
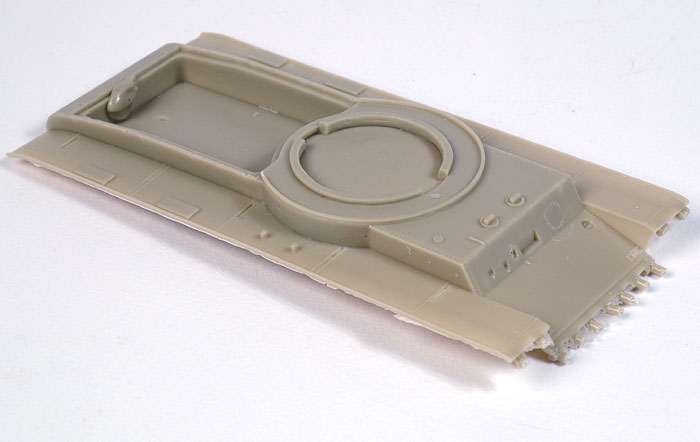
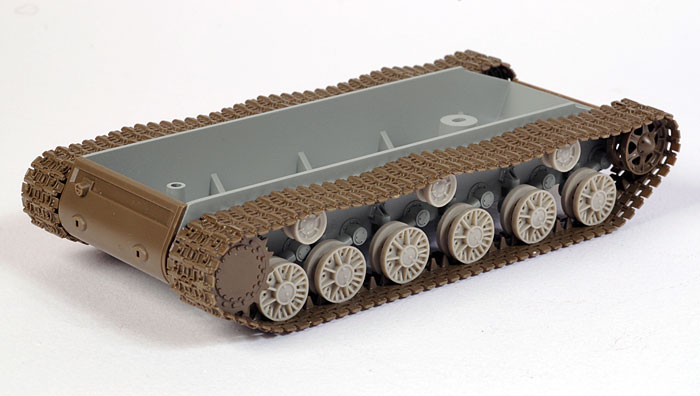
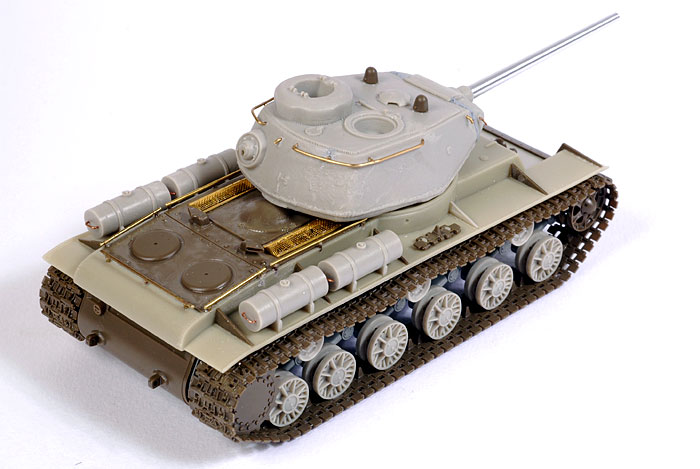
The upper hull is another one-piece casting. Even the track guards are cast in place. Tamiya's engine deck simply drops into the recess on the rear of the hull. The inside of the turret ring is flashed over, but a few minutes with a sharp hobby knife and a pair of sprue cutters will quickly open the large hole. The remnants of the casting block are still present on the front of the hull and the track guards. Some care is required when removing these tabs to avoid damaging the resin, especially from the mudguards.
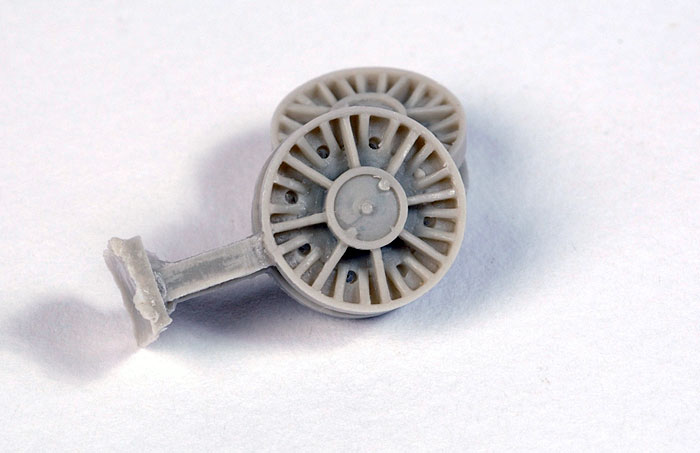
Gaso-Line has supplied the correct style of steel wheels for the KV-85. These are in one piece each, and will need to be carefully drilled out to install on Tamiya's axles.
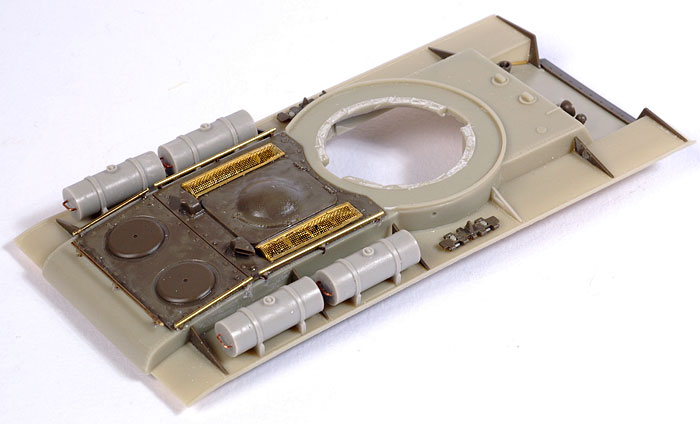
Additional resin parts include four external fuel drums, hull fittings and engine deck rails.
Brass wire is supplied for the turret rails and lifting hooks, while fine copper wire is provided for the fuel drum handles.
Instructions comprise construction diagrams and reference photos over four pages. These are generally okay, but additional reference would be helpful.
Construction Preview
I have always liked the aggressive lines of this big "animal hunter", so I decided to test fit some of the parts. Before long, I had actually finished building the tank!
The fit is generally very good, but careful preparation and regular test fitting are essential, especially as the instructions are a little basic. I can offer the following observations about construction:
-
The road wheels are supplied with a depression cast into the rear. This will have to be drilled out to fit onto the suspension arms of the Tamiya lower hull. I wanted to make sure that I did not drill too deep and break through the wheel hubs, so I measured the depth required to drill and marked it onto the drill bit with masking tape. This worked quite well. The axle arms on Tamiya's lower hull are flared, so the rear of the newly drilled holes were widened with a new hobby knife before installation. With this preparation finished, the wheels fitted snugly and in perfect alignment.
-
With the road wheels and return rollers in place, the drive sprockets, idler wheels and tracks may be installed per instructions. Well, almost per instructions! I found that the tracks fitted better if the single link (Part A26) was installed at the bottom of the rear track run (ie, just below and in front of the drive sprocket between Parts A25 and A31) instead of the front of the bottom track run as indicated in the instructions.
-
The turret seemed to ride a bit high on the unmodified hull, so I nibbled off the raised turret ring with a pair of sprue cutters.
-
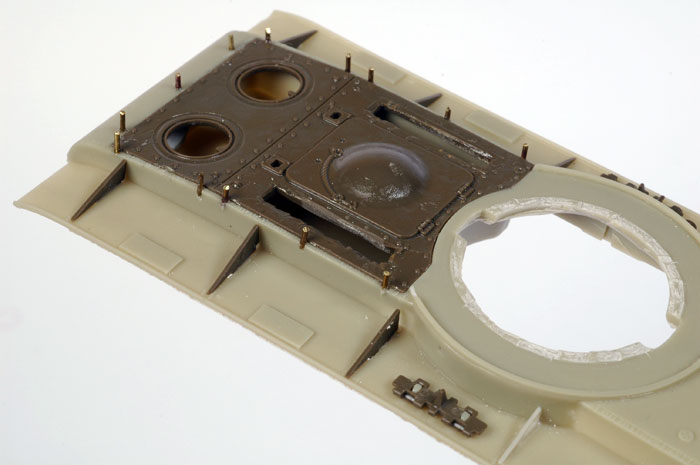
I thought that the solid Tamiya engine deck vents really needed replacing. I used the Hauler vents from their KV-2 set for this tricky task. First, the solid vents were cut out with a cutting wheel on my Dremel motor tool, then cleaned up with a hobby knife and sanding stick. The delicate photo-etched vents were the assembled, but not yet glued in place.
-
The Tamiya engine deck is a tight fit. This was secured to the resin hull using super glue, then clamped until set.
-
The resin engine deck rails were very delicate, so I decided to replace them with brass wire. The locating holes in the resin hull were deepened, and over-length brass posts were glued into place. These were cut to the correct height after installation and the rails glued in place.
-
With all this heavy work out of the way, the fragile grilles were glued onto the engine deck.
-
Mission Models' Grabhandler was worth its weight in gold for precise folding of the copper wire fuel drum handles. These were simply glued into the locating holes after they were folded.
-
Installing the gun mantlet left a narrow gap at each side of the turret. Weld beads were applied to these recessed lines using Tamiya Putty
-
The Gaso.Line instructions show a resin antenna mount (in front of the cupola) and a different style of vision cover in front of the loader's hatch, but neither of these parts were included in my set.
-
The turret grab rails are supplied as a single length of brass wire, so some careful measuring and bending is required. I used Mission Models' Multi Tool to obtain the different angles required, plus a lot of trial and error! Once again, the locating holes were drilled deeper to ensure robust joins.
-
The vision slots on the Commander's cupola are little more than scribed lines. They were more substantial on the real vehicle. I will emphasize these by deepening the slots (perhaps drilling them out as well).
I will post a detailed article on the construction and painting when the model is finished.
Conclusion
Gaso.Line's 1/48 scale KV-85 conversion is an impressive set which will transform Tamiya's KV-1 into the forerunner of a powerful family of Soviet tanks.
Casting is very good, detail is well done and fit is generally trouble free. Construction as detailed in this review took place over a period of less than two days.
This conversion will be warmly welcomed by Soviet armour modellers.
I look forward to seeing what Gaso.Line has planned next!
Highly Recommended.
Thanks to Gaso.Line for the review sample
Home
![]() Discussion Groups
Discussion Groups
![]() Gallery
Gallery
![]() Articles
Articles
![]() Reviews
Reviews
Copyright
![]() Vendors Room
Vendors Room
![]() Links
Links
![]() Contact us
Contact us
Copyright www.missing-lynx.com 2007
![]()
Text and Images by Brett Green
Page Created 01 April, 2007
Page Last Updated
22 April, 2007