|
|
|
|
| Home > Reviews > Modern > Cutting Edge Australia 1/35 scale Australian Light Armoured Vehicle ASLAV-25 |
Australian Light Armoured Vehicle
ASLAV-25
Cutting Edge Australia, 1/35 scale
Reviewed by Neil Stokes
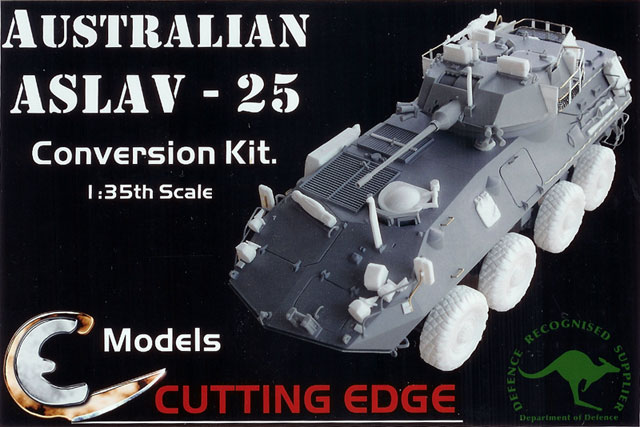
| Catalogue Number and Description: | Cutting Edge Australian ASLAV-25 Conversion Kit |
| Contents and Media: | 48 resin pieces plus styrene sheet, decals and a resin jig for creating tie-downs. |
| Scale: | 1/35 |
| Price: | Contact Gosford Hobbies (www.gosfordhobbies.com) for details |
| Review Type: | FirstLook |
| Advantages: | Well engineered, nicely cast parts to convert a USMC LAV-25 to the Australian ASLAV-25 variant |
| Disadvantages: | Requires some experience with resin parts and fabricating parts from wire and styrene sheet |
| Recommendation: | Highly recommended for modelers with some experience. |
FirstLook
I’m normally a World War 2 guy. If it didn’t see service between 1939 and 1945, I’m not that interested. However, as an expatriate Aussie a long way from home, I must admit to a certain fondness for Australian subjects, and the Australian Army’s ASLAV-25s (ASLAV is short for Australian Service Light Armoured Vehicle) are no exception.
The ASLAV was the result of a 1990 evaluation of the U.S. Marine Corps’ LAV-25 Piranha, some 15 of which were purchased by the Australian Defense Force for the evaluation. Phase 2 of the program in 1992 saw the acquisition of 97 additional vehicles from General Dynamics Land Systems – Canada. The design of these vehicles was modified to suit Australian requirements, and the vehicles were issued to the Australian 2nd Cavalry Regiment which was fully equipped with ASLAVs by 1997. Phase 3 of the program is currently underway, with a further 144 vehicles scheduled for purchase. The Phase 3 vehicles include a laser rangefinder, thermal imaging systems, improved turret drive and upgraded suspension systems. Phase 3 vehicles also include a greater degree of local content including turrets manufactured by General Dynamics Land Systems – Australia.
There are numerous variants of the ASLAV, including the basic ASLAV-25 which is a reconnaissance vehicle armed with a 25mm Bushmaster cannon in a fully rotating turret, the ASLAV-PC which has no turret but has a higher rear superstructure, the ASLAV-C command vehicle, ASLAV-S surveillance vehicle, ASLAV-A ambulance and ASLAV-F fitter’s vehicle. The ASLAV currently equips the 2nd Cavalry Regiment, the 2nd/14th Light Horse Regiment and several training units. ASLAVs have seen active service with the Australian Defense Force. C Squadron, 2nd Cavalry Regiment deployed to East Timor with INTERFET and more recently, both A Squadron and C Squadron along with A Squadron from the 2nd/14th Light Horse have been deployed in Iraq.
The Kit
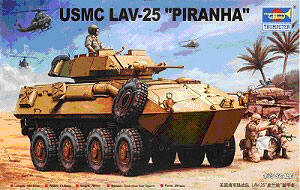 Some
time ago, Trumpeter released a very nice kit of the LAV-25 in U.S.
Marine Corps configuration, which is a huge improvement on the old
Esci kit from the 1980s or even the more recent Italeri offering.
However, the Trumpeter kit represents the USMC LAV-25 rather than
the ASLAV-25, and there are a number of significant and visible
modifications that a modeler will need to make to accurately
represent an ASLAV. Until now, anyone who wanted to build an ASLAV
was faced with a lot of kit-bashing and scratch-building.
Some
time ago, Trumpeter released a very nice kit of the LAV-25 in U.S.
Marine Corps configuration, which is a huge improvement on the old
Esci kit from the 1980s or even the more recent Italeri offering.
However, the Trumpeter kit represents the USMC LAV-25 rather than
the ASLAV-25, and there are a number of significant and visible
modifications that a modeler will need to make to accurately
represent an ASLAV. Until now, anyone who wanted to build an ASLAV
was faced with a lot of kit-bashing and scratch-building.
Into the breach steps Cutting Edge Australia from Australia, with a very nice resin conversion set for the Trumpeter kit that provides all the necessary parts to depict an ASLAV-25. Furthermore, the Cutting Edge Australia set includes decals and a CD-ROM with instructions and extensive reference material on the ASLAV. Note that you will need the Macromedia Flash Player on your computer to view the presentations containing the photographs, line drawings etc.
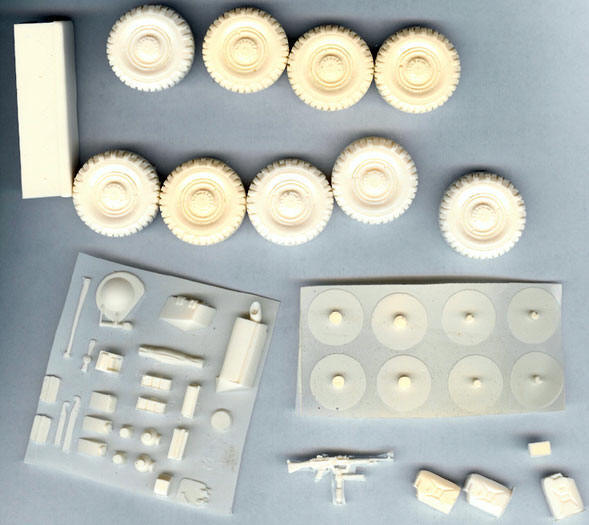
The conversion set consists of 48 pieces, cleanly cast in a cream resin, plus a small styrene sheet and resin templates to cut the styrene into the correct shapes for the turret stowage basket. You will need some 0.5mm brass wire to complete the model, and this is not included in the Cutting Edge Australia set. The various parts are well packed in separate bags which, along with the instruction/reference CD-ROM in its case, are shipped in a sturdy cardboard box to minimize the chance of breakage.
The kit instructions are in multiple formats. There is a Macromedia Flash presentation on the CD-ROM itself, plus a Microsoft Word document, drawings and templates that can be printed out if your computer isn’t conveniently located close to your workbench. Fortunately I have a laptop so I was able to go high tech.
The instructions follow the same sequence as the Trumpeter kit’s instructions. Steps 1 through 4 follow the Trumpeter instructions exactly, but warn you to trim the drive shafts (parts A21, A27 and A28) a little short so that the resin wheels will fit into the locating holes. Take your time here since the Trumpeter suspension faithfully reproduces the complexity of the real suspension, but this means that you must take care that everything lines up.
Step 5 deals with the road wheels, which are the largest parts in the Cutting Edge Australia set. These accurately depict the Michelin XML tires fitted to ASLAVs, which are larger in diameter, wider and have a different tread pattern than those seen on USMC LAV-25s. One or two of the wheels in the review sample were marred by some bubbles, but these were easily fixable with some gap-filling cyanoacrylate. The wheels feature accurate tread and hub detail on the outer faces, and a separate thin piece must be glued to the back of each wheel to provide the inner hub detail and attachment point. Take care to get these hubs centered on the backs of the wheels, since there are no locating marks or holes to assist you.
Step 6 instructs you to omit the Trumpeter wheels and rear hull brackets, attaching only the rudders. This is the point where life gets interesting, since the Cutting Edge Australia instructions provide templates allowing you to construct the protective cages for the propellers from brass wire. Soldering is recommended as the strongest means of attaching the wire parts to one another and this reviewer concurs, but you might need some soldering practice before you get a good result.
Step 7 deals with the upper hull fittings, and instructs you to remove certain items such as tie-downs. Other items must be repositioned, such as the rear lifting eyelet (part B5 in the Trumpeter kit), according to the ASLAV drawings provided in the Cutting Edge Australia set. The jerry can holders and the camouflage basket must be constructed from wire using the templates provided by Cutting Edge Australia, as must the front light guards. Numerous resin parts are then attached including the light fittings, additional engine vents and the new driver’s hatch which operates differently than the “standard” LAV hatch, being designed to pivot as well as open upward.
Step 8 deals in more detail with the headlight assemblies, mirror brackets and tool stowage. Take care here as it is easy to jump straight into assembling these parts using only the information provided in Step 7, and there will be cursing if you do so. There will be even more cursing when you go to Step 8 and realize that all the information you wanted in Step 7 is right there. Note also that you must omit the whip aerial (part B27 in the Trumpeter kit) and remove its mounting bracket from the upper hull since the ASLAV aerials are mounted on the turret.
Steps 9 and 10 deal with the remaining hull fittings including the revised exhaust on the right-hand side of the upper hull. The Cutting Edge Australia set includes the large stowage box seen on some ASLAV-25s in Iraq.
The Cutting Edge Australia set includes an extra wheel to use as a spare. However, this wheel is cast with the hub in place, whereas the spare should have a hollow center and bolt holes where the hub attachment bolts would be. The resin part can be modified to correctly depict the spare wheel, but this will require some careful drilling and cutting. Photographs of ASLAVs in Iraq show the spare wheel carried on the hull, but earlier photographs of vehicles in Australia and in service with INTERFET in Timor show the spare wheel carried on a swinging bracket on the rear hull. The instructions provide photographs of this bracket but Cutting Edge Australia do not provide the parts for the bracket or its mounts, so these will have to be scratch built if you wish to depict a Timor vehicle.
Step 11 in the Trumpeter and Cutting Edge Australia instructions deal with attaching the road wheels. However, Cutting Edge Australia wisely advises you to leave the wheels off until after painting.
Step 12 deals with the turret modifications and the construction of the side and rear turret baskets. These must be fabricated using wire and the styrene sheet included in the Cutting Edge Australia set, plus the plastic mesh from the Trumpeter kit. I would personally abandon the plastic mesh in favor of the metal components available from after-market vendors such as Aber.
Various resin parts are then added including aerial mounts, turret visors, machine gun and the distinctive wire cutter mounted on the turret front. Note that the machine gun mount from the Trumpeter kit must be modified to fit the resin MAG-58 machine gun, and the Cutting Edge Australia instructions indicate this.
Step 13 instructs you to create the whip aerials from stretched sprue. While this certainly provides realistically thin aerials, some modelers may wish to substitute very thin brass or steel wire for additional strength.
Step 14 completes the major construction of both the Trumpeter kit and the Cutting Edge Australia conversion set.
Step 15 shows you how to construct and add the tie-downs. Though these are admittedly out of sequence with the rest of construction, it is easy to see why, since there is no corresponding step in the Trumpeter instructions. Cutting Edge Australia provides a rather ingenious jig for constructing the single-piece bent rod tie-downs from brass wire. The resulting pieces are then cut to length and attached to the hull and turret according to the drawings.
Painting and Marking Options
Cutting Edge Australia provides five-view drawings for the three-color camouflage scheme used on the ASLAV. A mixture of Gunze Sangyo and Tamiya paint colors are called out in the instructions, which also provide an in-depth guide to weathering the vehicle.
Cutting Edge Australia provides a small decal sheet as part of the conversion set, which includes vehicle names, registration (ARN) numbers, bridge tags and the kangaroo insignia.
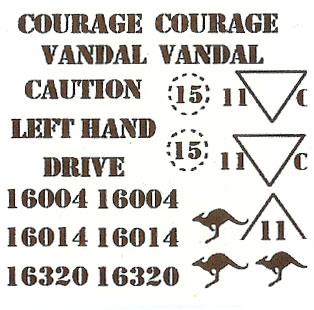
The decals allow you to model vehicles in Iraq, but if you wish to model a vehicle in service with INTERFET in Timor, you will need to create the black “UN” letters on their white background for the hull sides. The Trumpeter kit provides the letters and the background can be easily created with white paint or decal stock.
Conclusion
In summary, this is a very nice conversion set that will assist greatly in creating an accurate model of the ASLAV-25. I highly recommend it to modelers with some experience in resin kits and in scratch building, due to the need to modify kit parts and fabricate some parts from wire and styrene sheet. As with the “vanilla” Trumpeter kit, there are a number of improvements that could be made such as adding the mesh screens over the engine intake and exhaust grilles using the sets available from Eduard and Lion Roar. Combining these with the Trumpeter kit and the Cutting Edge Australia conversion set, along with care and patience, will allow you to build a superb replica of the ASLAV-25.
My thanks to Mike Bass at Cutting Edge Australia and Glenn Andrew at Gosford Hobbies for the review sample. The Cutting Edge Australia conversion set as well as the Trumpeter LAV-25 kit are available from Gosford Hobbies (http://www.gosfordhobbies.com), and they ship worldwide.
References:
ASLAV – The Australian Light Armoured Vehicle Program by Paul D. Handel (http://anzacsteel.hobbyvista.com/Armoured%20Vehicles/aslavph_1.htm)
Home
![]() Discussion Groups
Discussion Groups
![]() Gallery
Gallery
![]() Articles
Articles
![]() Reviews
Reviews
Copyright
![]() Vendors Room
Vendors Room
![]() Links
Links
![]() Contact us
Contact us
Copyright www.missing-lynx.com 2006
![]()
Text and Images by Neil Stokes
Page Created 22 December, 2006
Page Last Updated
21 December, 2006