|
|
|
|
| Home > Reviews > Small Scale > Revell AG’s Tiger 1 Ausf. H and Tiger I Ausf. E, and the Dragon Tiger I Late Kits in 1/72 scale |
Tiger I Kits in 1/72 Scale
Kit Preview, Comparison & Contrast
by Stephen Brezinski

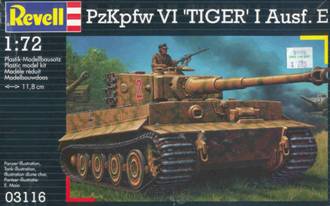
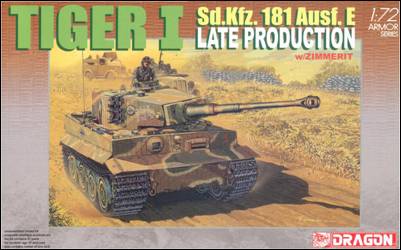
Revell AG’s Tiger I Ausf. H and Tiger I Ausf. E, and the Dragon Tiger I Late Kits in 1/72 scale
Introduction
Here is one of my long reviews again, this time examining the Revell 1/72 scale Tiger 1 model kits with a bit of compare and contrast with the Dragon Tiger 1 Ausf. E. Also discussed will be the MIG Productions Tiger 1 resin detail set, and the Eduard and PART etched brass details. In addition to a comparison of the three unassembled Tiger model kits we’ll examine the differences between the early and late Tiger 1.
Why another article on the Tiger 1 tank you may ask? Well: it is a very common subject among model builders; and I find the tank a very interesting vehicle considering its history and influence on other tanks. Also there is an ever-increasing demand for correct historical details from model builders that may not have access to good references and I hope this article may help fulfill this demand.
Though this article covers Revell’s and Dragon’s 1/72 scale Tiger 1 models, I also wish to give commendation to the very well done Fujimi Tiger 1 model in 1/76 scale which is comparable to Revell’s in quality and accuracy. Hasegawa’s Tiger 1 releases have been covered in other kit reviews and being brief, is antiquated in complexity and detail compared to Revell and Dragon’s offerings.
Vehicle History For The Model Builder
There are three commonly recognized variants of the Tiger 1: Early (SdKfz. 182 Ausf. H), the Middle Tiger and the late Tiger 1 (SdKfz 181 Ausf. E). The Early Tiger is best known for the drum-shaped commander’s cupola, two main-gun sight holes in the mantlet and rubber tired roadwheels. The Mid Tiger is characterized by the new lower, cast cupola but still with the rubber tired roadwheels. The Late Tiger 1 is best known for the fewer, steel-tired roadwheels, low cast cupola and now a single sight for the main gun in the mantlet. There are many more differences and tank history that I cannot delve into here.
Confused about nomenclature? According to Osprey’s New Vanguard 5 book by Jentz, et al, the proper name of the Tiger 1 was Panzerkampfwagen VI H (8.8 cm) (Sd.Kfz. 182) Ausfuhrung H1 until March 5, of 1943. As of March 5, 1943 the official name was changed to Panzerkampfwagen Tiger (8.8 cm L/56) (Sd.Kfz. 181) Ausf. E. We may feel comfortable in that both Pz.Kfw. VI and Tiger were in common use ever after. The Tiger underwent continuous modifications and fine-tuning and these changes are not reflected in the designation H or E. The best way to describe the variations for most modelers appears to be just early, middle and late.
Kit Comparison & Contrast
1. Both Revell models are essentially the same except for different sprues for the late or early parts. These parts include different right turret halves and different commander’s cupolas. The early Tiger H kit (#3108) has just the rubber-tired roadwheels while the late Tiger E kit (#3116) includes both the rubber and the steel-tired roadwheels in the box. The Dragon Tiger Ausf. E kit (#7203) is comparable to Revell’s late Tiger 1kit #3116 in being a steel road-wheeled vehicle produced in 1944. Using a new slide-molding process Dragon has an impressive way of molding detail in three dimensions which allows an upper and the lower hulls molded as one piece units with the zimmerit and axles molded in, and the gun muzzle to be molded open (no drilling needed here!). Good News: Dragon’s Tiger kit includes NO die-cast metal parts like many of their initial 1/72 scale releases!
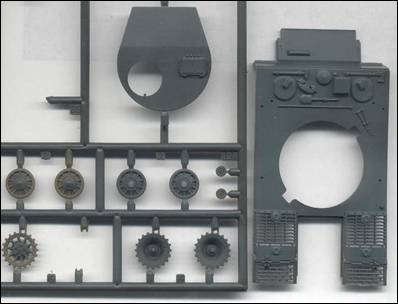
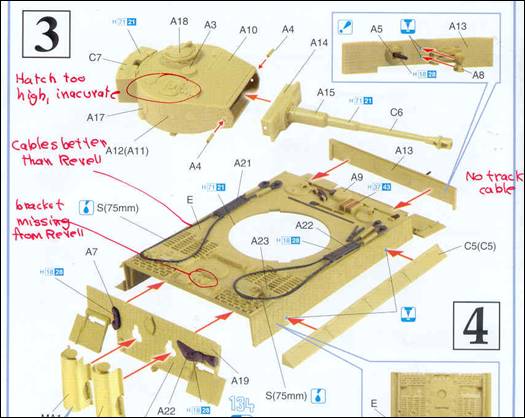
Revell kit parts.
2. So exactly what versions of the Tiger 1 do the two Revell kits represent? Well, both the early and late Tiger kits by Revell have the same turret roof and hull roof (except for an add-on periscope for the late turret roof). Based on the references Modeler’s Guide To The Tiger Tank, and TIGER 1 HEAVY TANK 1942–1945, by Tom Jentz, et al, the Revell Tiger 1 kits do not appear to be completely accurate for any particular period, but a compromise of several evolutionary periods of the Tiger 1.
-
The sledgehammer on the hull roof is in the September 1942 position and is not correct for a late Tiger produced after December 1942. For a super accurate late Tiger the hammer will need to be moved to the right.
-
The shovel, tow cables, prybar and axe are in the location for a 1944 produced Tiger 1. If we do an early Tiger in Tunisia or Russia these will all have to be relocated.
-
Neither kit offers a rectangular toolbox for the upper left rear of the back plate. This should be present on the early Tiger H, but was deleted on the later Tiger E.
-
The loaders hatch is correct for an early Tiger H though is inaccurate for a Tiger E with the thicker roof armor. The hatch also needs a grab handle.
-
The starter guide plate (the diamond shape plate between the exhaust pipes) is that for the 1944 Tiger E and is not correct for an early Tiger, such as in Africa or at Kursk.
-
The kit’s track-pulling cable, common to both models and to be mounted on the hull’s port side, is attached in the post-September 1943 location so is not true for the early, Africa Tiger H. [The kit track-cable is too thick anyway so you may wish to scratchbuild this cable from sewing thread.]
-
The kit’s rear idlers are the original 700-mm diameter. In the later Tiger this was replaced with a smaller, 600-mm diameter idler that was less prone to clogging with mud.
-
There were three different styles of sprocket wheel hubs used by the real Tiger 1. Revell gives us the middle version introduced in April 1943. This is therefore not possible for an African Tiger.
Please make note that because I point these features out I am not advocating we make every small change if that’s not your interest. Also keep in mind that many vehicles were sent back for repair and refit, parts would be scavenged from out-of-service tanks; and the German assembly plants practiced last-in first-use when putting the vehicles together. A blend of old and later parts therefore may be possible on a late Tiger.
3. What version does The Dragon Late Production Tiger Ausf. E represent?
-
With the steel wheels, cast cupola and zimmerit coating, Dragon’s kit represents a late Tiger 1 Ausf. E.
-
Dragon’s idler wheel is pretty comparable in size and quality as Revell’s and represents the original, early 700-mm diameter idler wheel. This is not ideal for a late Tiger and it perhaps should better have a 600-mm diameter idler, but probably is acceptable and found on late Tigers.
-
With inclusion of the screw holes and grenade launcher in the turret roof (missing in Revell’s late Tiger E kit) the Dragon is a more accurate late Tiger than Revell offers.
-
The tool placement on Dragon’s Tiger is more accurate for an Ausf. E Tiger, primarily in placement of the sledgehammer.
4. Both hulls appear to have about the same dimensions. The Dragon hull (left) gives the appearance of being wider but this is because the hull sides are molded with the roof as one piece, simplifying assembly. Dragon includes the turret ring and an engine-hatch latch that Revell does not include. Both have the same tools molded onto the hull roof. Oddly, Dragon’s kit has no seam for the engine hatch, this will need to be scribed in. Both hulls have the driver & radio-operator’s hatches molded shut.
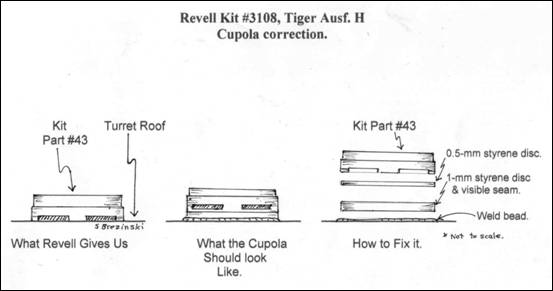
5. The early Revell Tiger H Kit #3108, has an odd cupola error that I have rarely seen corrected in a build of the kit so far: the drum cupola is too low and only includes the upper 2/3 of the cupola or so. If we examine a completed Revell Tiger H model we note the commander’s vision slots are incorrectly even with the turret roof. Checking references, the vision ports should be five or more (scale) centimeters above the roof [several mm in 1/72 scale). This can be corrected by splicing in a few millimeters of stryrene discs under the cupola. Below is a fix for Revell’s early-cupola problem.
The cast cupola of the Revell late Tiger 1 (Kit # 3116) does not share this height error [but its periscope ports should be opened up more]. While Revell’s late cast cupola is molded well, in several parts, and comes separate from the turret roof. Dragon’s commander’s cupola comes molded onto the turret roof. I feel this is a small weakness of Dragon’s kit.
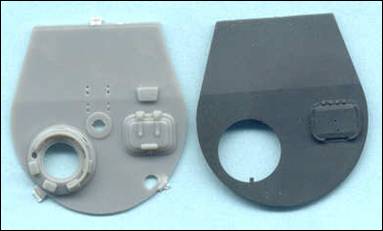
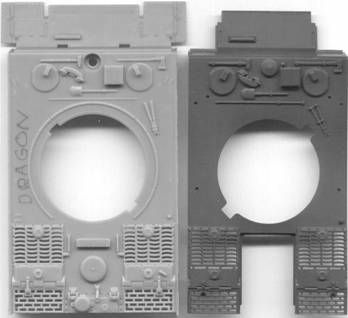
6. The above scan shows a side by side comparison the Dragon turret roof (at left) and the dark gray Revell turret roof (at right). The Dragon cupola comes molded on: not a great idea. The Dragon loader’s hatch is way too high for a late Tiger 1 and should actually be flush with the roof. Of course Revell’s loader’s hatch is also not correct for a late Tiger 1. Oddly, the underside of Dragon’s loader’s hatch has hatch detail, even though it cannot be seen? The plus for the Dragon turret is the smoke grenade launcher included (something Revell excludes) and the boltholes in the roof for the internal gun travel lock.
7. Contemporary plans show that the Tiger 1’s turret shape as viewed from above was not quite a true bi-symmetrical horseshoe shape. The right turret side was closer to the centerline of the turret than the left side. This asymmetry was in order to centralize the gun in the turret, and have the binocular sites on the left side of the mantlet. My first impression is that both companies did this satisfactorily but we cannot determine real accuracy till assembled.
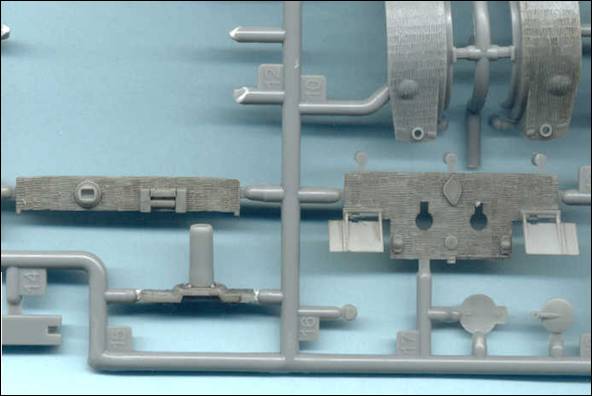
8. Above is a scan of some of Dragon’s hull & turret parts with molded in zimmerit. I have added a black wash to accent the relief of the zimmerit. The rear mudguards look good and are molded onto the rear hull plate while Revell’s rear mudguards are separate. Overall the zimmerit looks great and I feel is equal to the etched brass zimmerit from PART that I used on my Revell model. If you look closely at the turret sides you’ll see the major flaw I have found: the side vision slots are zimmerit-textured blobs, poor renditions of the real thing. Fortunately this can be fixed with a good scribing tool.
9. Revell’s towing cables and track-pulling cables are well molded, unfortunately they are much too thick for 1/72 scale. The vehicle-towing cables (Parts 31 & 32) should be about the diameter of the kits track-pulling cables (part 33) on the port side of the hull. [If you are curious about what is a “track-pulling cable”: imagine trying to pull several tons of steel track under and over the roadwheels of 56-tons of tank. With a track-pulling cable I understand you attach one end of the cable to the sprocket, take the cable around the idler and attach the other end to the track and let the engine do the work.] The overly thick Revell kit cables may be replaced with nylon string, or cotton tea-bag string (soaked in white glue to remove the fuzz).
Dragon’s Tiger 1 towing cables come in two styrene parts (A20 & A21) representing the cable loops & gun-cleaning rods and a length of realistic more in-scale metal cable for the rest of the towing cable.
10. The Revell late Tiger E model kit includes individual spare track links to mount of the turret sides as supplementary armor. The early Tiger H kit typically did not have spare tracks on the turret though they could be added in the field workshops. Dragon’s late Tiger 1 model unfortunately comes with no spare tracks that were typical of the Tiger Ausf. E. Several of the etched brass frets contain the hangers that held these links on.
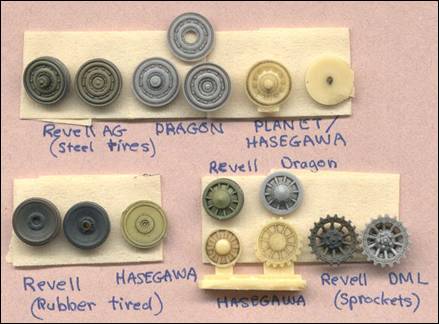
11. Kit Wheels: In this scan we compare 1/72 scale Tiger 1 wheels from Revell, Dragon/DML and from Hasegawa/Planet Models (The Planet Sturmtiger wheels are resin copies of the Hasegawa late-Tiger 1 wheels). The wheels in the above scan have been given a black wash to highlight the detail better. Comparing the late, steel-tired roadwheels in the top row we note that the Dragon Tiger 1 wheels are slightly larger than the Revell and Hasegawa wheels. Revell and Dragon are pretty comparable in detail. Hasegawa’s wheels are less well done, being too flat among other inaccuracies. In the early rubber-tired roadwheels at the lower left: the Revell roadwheels are more accurate when compared to the Hasegawa. Again with the sprocket and idler wheels at lower left the Revell and Dragon are comparable though Revell’s sprocket wheels are more accurate in having open sprockets (see above scan to see better what I mean).
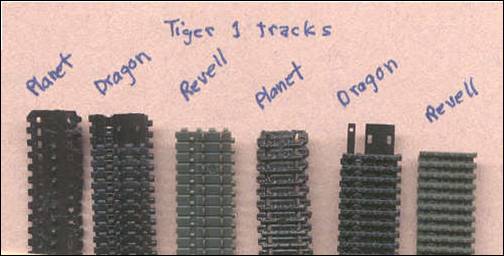
12. Tiger 1 Tracks: Beginning at left, the stiff, band tracks from the Planet Sturmtiger kit (now out of production) are hopelessly inaccurate in pattern, have only one set of track teeth and are too narrow (perhaps copies of the Hasegawa Panther kit?). The Dragon soft-band tracks are with superb detail on inside and exterior. Revell offers styrene link & length tracks the same width as Dragon’s. Revell’s only drawback is the inaccurate link detail on the inside of tracks: straight groves rather than hinged links. Overall I judge that Dragon makes the better-looking tracks even though some modelers hate band tracks.
Kit Instructions
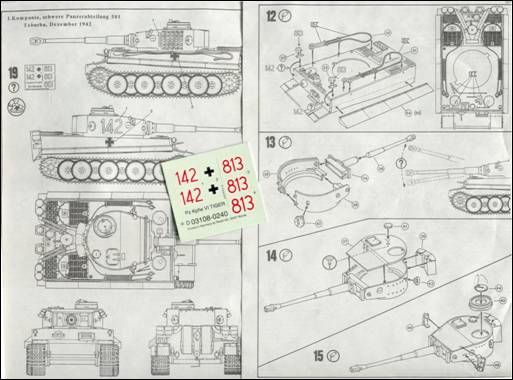
13. The above scan from the early Revell Tiger 1 instructions shows us the assembly of the turret, early drum cupola and adding the headlights and cables to the hull. Also shown are the water-slide decals for two different vehicles. Except for details like different cupolas, roadwheels and exhaust shields both the early and late Tigers have the same assembly.
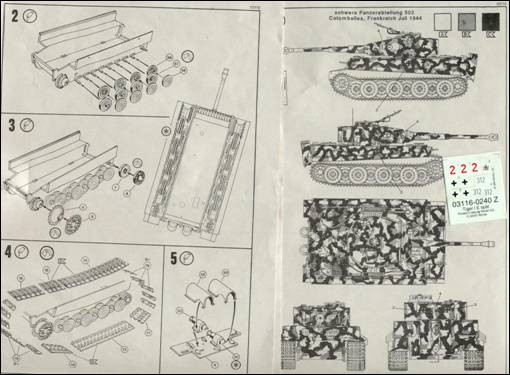
14. The scan above is from the Revell late Ausf. E Tiger instructions showing the assembly of the steel-rimmed roadwheels and the link & length styrene tracks. In comparing the profile of the early and late Tigers we can see that the late, steel-tired roadwheels have dispensed with the outer set of roadwheels. [This is a major area that the Hasegawa late Tiger 1 erred; Hasegawa uses the same number of roadwheels and same stations for their late Tiger model.]
15. In the above scan of Dragon’s instructions see that the paired roadwheels B2 & B1 comes as separate wheels, this contrasts with Revell who gives us one thick wheel instead. [Hasegawa takes the same approach as Revell but is worse in giving us just a plane, thick disc.] I commend Dragon for taking the extra effort to do this for us. The pre-formed brass exhaust guard is a nice touch though you may wish to add the missing bolt detail.
15. An almost amusing thing we see in Dragon’s instructions above is that the molded-in loader’s hatch on the turret roof appears to have been a separate part, different from that offered in the actual kit, and this loader’s hatch in the instructions has been mounted upside down! The instructions otherwise appear complete and clear.
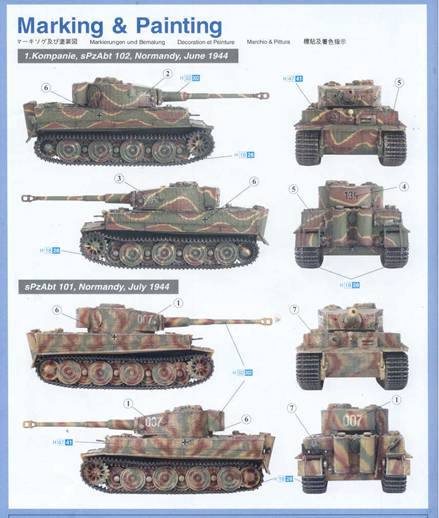
16. Above is the excellent painting guide for the Dragon kit with water slide decals for two Tigers of the French Normandy Campaign, 1944. The bottom guide is for the Tiger that Ace Michael Whitman was killed in.
Detail Accessories
MIG Productions Tiger 1 Detail Set #MP 72-045

17. This MIG Productions all resin set is designed for the Revell kit and features an excellent one-piece 700-hp Maybach HL230 engine, engine compartment; engine hatches for both the early Tiger with Fiefel air cleaners (bottom left) and the late Tiger 1. The hatch undersides are accurately detailed which you do not get with the Revell engine hatch. Top-right are driver, r/o & gunner’s hatches that are detailed inside and out. At the center right for the driver & radio-operator’s hatches are brackets for the hatches and two periscopes. From reference photos the MIG engine, with two air cleaners/filters on top, appears to be for the middle and late Tiger 1. The initial Tiger produced in 1942 used the Maybach HL210 engine with three larger circular air cleaners. I feel comfortable that some early Tigers were eventually fitted with the later HL230 engines as the early engines wore out. This engine would not be accurate for Revell’s Africa Tiger. (This detail set should be usable for the Dragon kit as well.)
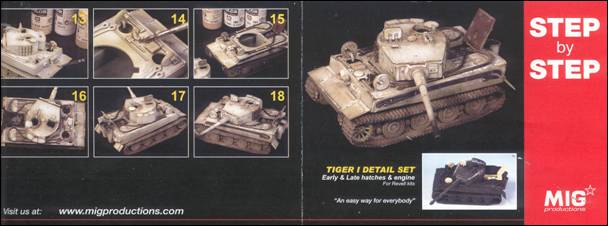
18. Above are part of MIG’s Production’s instructions with painting suggestions. Though attractively done, I feel MIG would have been better to do the instructions in simple line drawings. The photos are beautiful but too small and placement of the enclosed hatch brackets is up to the study of our references and deduction. (Not until after the model was done did I realize that two unidentified resin parts were the periscopes for the driver & radio-operators hatches.)
19. ExtraTech EXK7210 [not pictured] Maybach HL210 engine for the (initial) Tiger 1H; and EXK7211 Maybach HL230 engine for Tiger 1E, consisting of both etched brass and cast resin parts. See ExtraTechs website for more details or several reviews at the On The Way website.
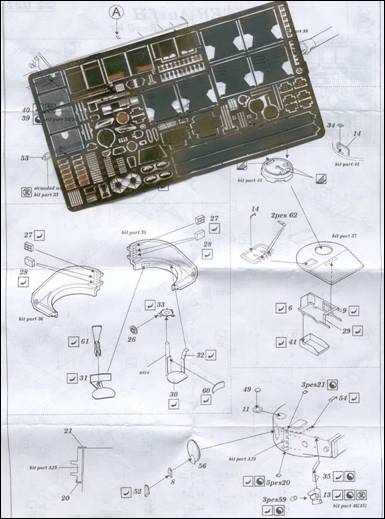
20. Eduard 1/72 scale Etched brass Detail Accessories (above) An excellent fret for the Revell Tiger with both inside and exterior details. This fret #P72 092 is for the early Tiger Ausf. H though can supply many parts for the late Tiger Ausf. E as well. Included are: three different muffler guards for early, mid and late Tigers; new fenders; spare track brackets; turret interior seats and boxes; hatch hinges; engine grate screens; tow hooks, and tool brackets, etc.
21. Eduard’s other etched brass for the Revell Tiger 1E and Tiger 1 H are sets #22032, #22021 and #22033. The late-Tiger fret should also be helpful with the Dragon kit. See Eduard's website at http://www.eduard.cz/ for more information.
22. Eduard etched brass zimmerit sets 22033 and 22045 for Tiger 1E: I have not seen this fret though Eduard typically has outstanding products.
23. PART’s P-72 092 Tiger 1 Ausf. H and P72 093 Tiger I Ausf. E etched brass detail sets from PART is similar to the Eduard photo-etched frets but even more extensive. Included are new hatches, smoke bomb brackets, engine screens and a plethora of other small parts, but only one set of muffler guards. See PART’s website at http://www.part.pl/ for further information. PART P72 031 Tiger 1E Zimmerit, for REVELL version 2.
24. ExtraTech offers their etched brass frets EXV72011 for the Tiger 1 H and EXV72009 for the Tiger 1 E. These sets offer new mudguards, periscope guards, smoke launcher brackets, and spare track brackets, etc. Not as extensive as PART’s and Eduard’s frets but still a very nice. Suitable for Revell, Dragon and Hasegawa Tiger 1 kits. See Doug Chaltry’s more complete review at: http://www.ontheway.uk/reviews/Extratech/Tiger1Ebrassprev.htm
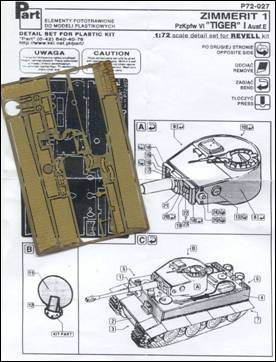
25. PART 1/72 scale Etched Brass Zimmerit P72-027 Zimmerit was applied by the German’s in September 1943, till about September 1944, and so would not be appropriate for the Revell early Tiger Ausf. H model. This set has a beautifully depicted pattern for the vertical surfaces of the hull and turret. The etched brass zimmerit appears more accurate and in-scale to me than hand applied with putty.
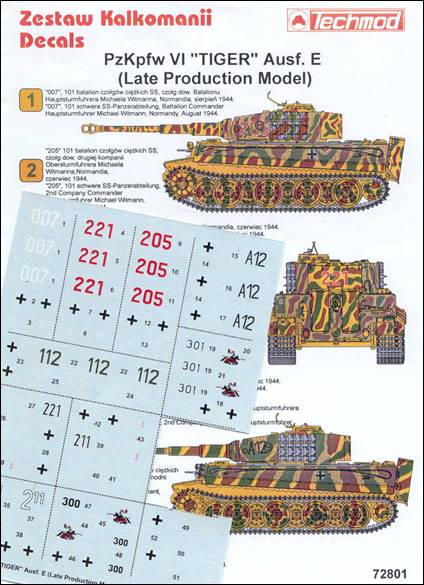
26. Above is the Techmod #72801 waterslide decal sheet and a page from the instructions (note, one set of markings have been cut out already). This set is specifically for twelve late Tiger 1’s that served on the Eastern Front and the Western Front. The instructions are superb showing two or four-view color drawings of the markings on a Tiger with its appropriate camouflage scheme for the Tiger. Included are the markings for the Normandy, 1944, Tiger that Michael Witmann was killed in. Oddly it describes the Heer (Army) Battalion 505 vehicles as belonging to the SS, which is incorrect; and makes no mention of the Panzer Division Totenkopf Tigers as being an SS unit. The markings are printed sharply on thin film and appear all in-register.
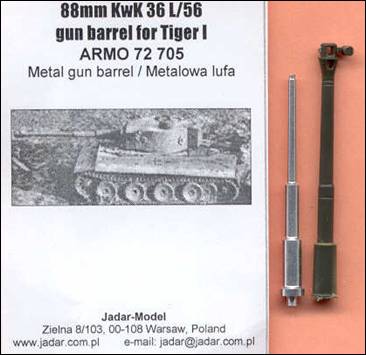
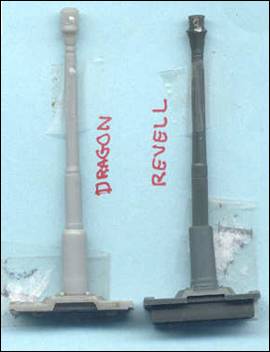
27. Above is the ARMO turned aluminum KWK 36 gun barrel next to the dark olive Revell kit barrel. Comparing to photos, the forward end of the Revell barrel, just aft of the muzzle break appears way too thick. The ARMO barrel appears too thin but I feel more acceptable than Revell’s. To install the Revell barrel it must be carefully sawed off the mantlet and the ARMO barrel glued in. Note that the ARMO barrel includes no muzzle break, which must be taken from the Revell gun. Dragon’s light-gray styrene plastic 88-mm barrel at right is compared with Revell’s. Dragon’s barrel diameter appears more correctly in scale and the muzzle-hole is already molded in so there is no need to drill out the muzzle.
28. Aber turned aluminum KwK 36 gun barrel (#72L01): based on photos and from reviews this appears to be an excellent replacement barrel and does include a superior muzzle break.
Conclusions
The two Revell Tiger 1 kits are no doubt very good models and have been the best available in this scale for several years now. They are not without problems that need fixing for a first class display model (such as the drum cupola, & tow cables). Built out of the box they will make fine wargame models, though if you can find the Hasegawa Tiger model cheaper the Hasegawa may make a preferred wargaming piece as I think it assembles easier and is more robust. The Hasegawa Tiger is one kit I chose as a starter model for my daughter.
The Dragon Tiger 1 is the more cost-effective model in giving you more for your dollar, yen or Euro. It comes with good zimmerit already molded-on so there is no need for aftermarket etched-brass or resin zimmerit. Dragon’s towing cable is more accurate and the kit includes little details like fire extinguisher and smoke ejector that Revell leaves out. Revell has the more accurate late-model commander’s cupola. I personally prefer Dragon’s tracks for accuracy and ease of use. On several assembled Revell Tigers, including my own, I have noted all too-common a problem of uneven links, you know where the individual links do not fit well or are crooked.
I have built the Revell Tiger 1 and the Hasegawa Tiger 1 models and know that both assemble well. I have not built the Dragon Tiger so I am mute as far as how well the parts fit together.
References
-
THE MODELER’S GUIDE TO THE TIGER TANK, from Military Miniatures in Review, by Patrick Stansell, Bruce Culver, et al. Ampersand Publishing (2003). This is absolutely the finest modeling and information guide to the Tiger tank series I have yet seen. The 172-page softcover book contains hundreds of color and black & white photos of superbly done models and WW2 era photos. Dozens of line drawings show the progressive development of the Tiger 1, Porsche Tigers and the Tiger 2 tanks. No, the Sturmtiger and Ferdinand/Elefant are not included. This was my primary reference for assembling and detailing a Tiger of early-mid 1944 construction.
-
TIGER 1 HEAVY TANK 1942–1945, by Tom Jentz, Hillary Doyle & Peter Sarson; New Vanguard #5; published by Osprey Military (1993). An up-to-dated very informative softcover book with brief development history and description of the units operating the Tiger 1. Good color illustrations.
-
http://www.ontheway.org.uk/articles/tigercompare.htm A kit comparison review of the Revell Tiger 1 by Doug Chaltry, for another opinion.
-
TIGER TANKS, by Michael Green, Motorbooks International Publishers (1995). Nice softcover book covering development and performance of the Tiger 1 and Tiger 2 tanks. Lots of period and reference photos and geared more for history, rather than for the modeler.
-
Color Close Up, World War II Wehrmacht Vehicles, by Jan Suermondt, Crowood Press Ltd. (2003). Good but expensive hardcover book featuring sharp, interior & exterior color photos of a restored German Tiger tank, VW Type 82, RSO, SdKfz 250 Nue halftrack, etc.
Home
![]() Discussion Groups
Discussion Groups
![]() Gallery
Gallery
![]() Articles
Articles
![]() Reviews
Reviews
Copyright
![]() Vendors Room
Vendors Room
![]() Links
Links
![]() Contact us
Contact us
Copyright www.missing-lynx.com 2006