|
|
|
|
M2A1 Medium Tank
Reviewed by Cookie Sewell
Summary
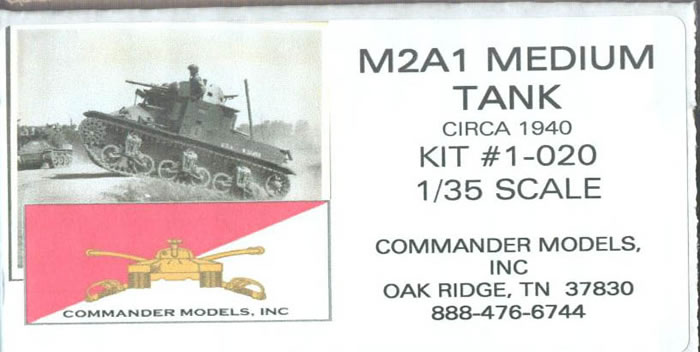
| Stock Number and Description | Commander Models Inc. 1/35 scale Kit No. 1-020; M2A1 Medium Tank |
| Scale: | 1/35 |
| Media and Contents: | 164 parts (135 in resin, 29 etched brass) |
| Price: | Retail Price USD$120 |
| Review Type: | First Look |
| Advantages: | Clean, ground-up new kit of this seminal American tank; possibility of adding an interior and partial interior provided with the kit |
| Disadvantages: | Buyer must provide his own track set (see text) |
| Recommendation: | Highly Recommended for the true hard-core US medium tank fans and interwar armor buffs |

FirstLook
In the mid 1930s the US created a light tank family which proved to be robust, easy to maintain, and able to meet their then-established tactical needs. These light tanks were produced in the M1 and M2 series of light tanks (for cavalry) and “combat cars” (for infantry). As the evolving series of M2 tanks were seen as just the ticket, orders were given to produce an enlarged version of the tank in the 25 ton class for use as a medium tank.
The designers enlarged the M2 design and added a large number of weapons stations and weapons to it: it went from two .30 caliber and one .50 caliber machine guns to a total of up to 10 .30 caliber machine guns and one M5 37mm cannon. The cannon was mounted in a revolving turret with a coaxial .30 and the rest of the machine guns were located in four corner barbettes in the main casemate, two fixed bow guns, and up to three flexible machine guns at the top hatches for engaging aircraft.
The T5 prototypes showed the design was mechanically in need of development, and eventually 21 M2 tanks and 94 improved M2A1 tanks - mostly with better mechanicals and a new slab-sided turret - were produced between 1938 and 1941.
But in the meantime events in Spain demonstrated that light tanks with only bulletproof armor and machine gun armament could not provide effective infantry support, and firepower even with light cannon was distinctly lacking. As a result, the M2 series underwent a redesign to mount a 75mm gun in a sponson on the right side, and its machine gun armament was reduced to only two fixed guns, a coaxial .30 with a 37mm in a new cast turret, and a .30 in a commander’s cupola. The evolved T5 version was accepted for service in 1941 as the M3 Medium Tank, but until new factories and facilities could be ready the M2A1 remained in production for use in training.
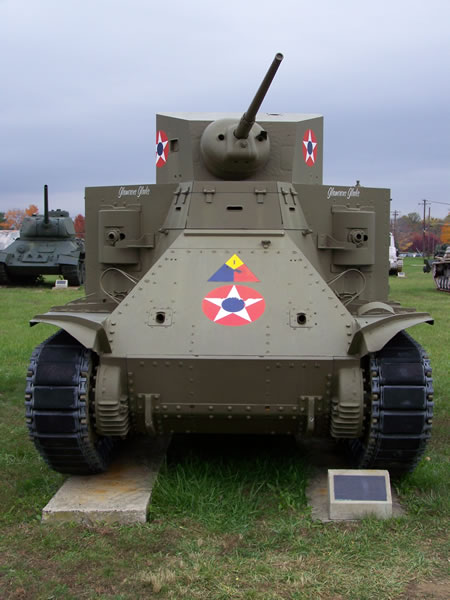
Elements of the 1st and 2nd Armored Division were briefly issued with the M2 and M2A1 in early 1941, with two battalions of the 69th Armored Regiment (Medium ) of the 1st Armored Division equipped with these tanks, but September 1941 all of them were out of divisional service as they had been replaced by the M3. They spent their lives as trainers and mechanic’s training equipment as the driveline – the R975 aircooled engine and transmission – were the same as the M3 and early M4 series tanks. Only one T5 prototype with twin 37mm guns and one M2A1 remain on display in museums today.
If you are a “Shermaholic” as many of us are, an M2 or M2A1 is a necessary part of your collection. But as the tanks never saw any combat service, they have generally been ignored for many years. More than 10 years back, Commander Models released a kit of an M2A1 which I snapped up the first time I saw it. But it was state-of-the-art at that time, which means it was what is usually derisively referred to as “cheeseblock” construction: the entire hull and turret were cast in single units, which meant that they were likely to shrink and warp – and they did. After attempting to fix its problems several times, I reluctantly gave up on it.
At this year’s AMPS International Show in Fredericksburg, Ted Paris of Commander Models appeared with a new line of kits. Ted is based out of Rochester, NY, but has now allied himself with Iron Shipwright from Oak Ridge, TN, who does the actual casting and modeling. This is a wholly new effort and while many subjects are ones Ted covered years ago, these are reengined, remastered and totally new efforts from the ground up.
The first one which caught my eye was a GOER – a Le Tourneau earthmover modified as a cargo carrier for the Army – but right beside it was a new kit of the M2A1. Always a sucker for this tank, I picked it up. Ted warned me that these were the first run of kits – and unfortunately they were missing their etched brass frets which had not arrived prior to the show. Ted sold them with the understanding that the frets would follow as soon as they were available. (Also shown but only getting ready for release later this summer were an M2 Combat Car, T5 Combat Car, T3 Christie conversion (1/35), M103 Heavy Tank, Char D2, M7 Medium Tank, T7 Scout Car, and a T3 Christie (120mm scale). These will be announced when ready for formal release, but the GOER and M2A1 will be released this month - June 2011.)
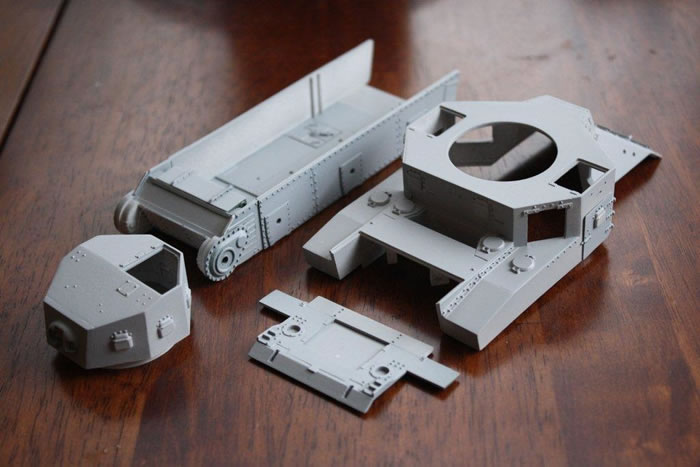
The frets and directions have now arrived, and as noted above complete kits are now offered from Commanders. First off, note that other than its subject this kit bears no relation to the older M2A1 kit. The hull comes in two parts and is hollow, with the essential elements of an interior in place and fittings to install an interior when one becomes available. The parts were clean, warp-free and neatly done with minimal pour overage (no “pour blocks” to whack off in a cloud of obnoxious resin dust!) The top hatches are separate parts, as are the fenders and sponson floors with large openings in the engine deck for the open gratings.
Ditto for the turret, hollow with a separate base and hatch. The machine gun barbettes are four separate parts for installation in the casemate once the openings are cleared out, and the machine guns and sight blocks are both separate parts. The antiaircraft machine are also separate with two-piece cradles and separate mounts.
The suspension follows the DML mold with front and rear halves to the bogies, two-part bogie cradles, return rollers, VVSS springs and five-spoke welded wheels. Six-spoke idlers and machined drivers complete the suspension.
The tracks are not included as many modelers do not like hassling with resin tracks, and to hold down the price and not provide an unwanted product Commander Models left them out on purpose. The proper set for this vehicle is the T41 irreversible rubber pad type, which means the outer face is thicker than the inner one. DML makes a DS Plastic set of these which is included with their early M4 suspension set (No. 3870); however, the bogies are not correct for this tank as the M2 series used bogie carriers with a number of cast in strengthening fillets (present on the Commander suspension) so if you get that one you at least wind up with a set to correct an early Academy M3 kit. In a pinch you could use any T51 reversible pad track (which is thicker) to complete the model, but the thinner T41s are correct.

Note that the DS Plastic tracks are usually about 2-3 links too long, but cutting and splicing them to fit is simple. Once the proper lenght is established, cut out the overage (trimming so one end has the end connects on it and one does not), use a small two-link long section of .020" sheet cemented to the inside face of the track on top of one link, and then cement the other one to the other end. If placed on the underside of the top run the splice is nearly invisible.
The directions are, surprisingly, spartan at best and maddening at worst. They comprise but three pages, one of which is a general “boilerplate” one (e.g. you can’t put resin together with tube cement, make sure to clean up the parts, etc.) Ted sent along a letter noting that due to some shared bits the same brass fret serves for the M2A1 Medium and will also be for the M2 Combat Car. As such not all parts are used.
Page 2 covers the parts - all parts are cited but the callouts are not fully complete. For example, etched parts “G” are the front fender braces; a line shows them in the overhead drawing but the actual circle G flag is missing (it’s under the circled H for the brace base). For the rest of the etch: A is the air exhaust grille at the rear of the hull; B the air intake at the front of the engine deck; C machine gun deflector guides to prevent shooting into the engine compartment (mirror images, not shown on the directions!); D and E the parts for the curious bullet deflector plates at the rear of the hull; F the headlight guards; G and H, the front fender braces.
For the resin, parts 1-7 are the suspension bogies: inside and outside frames, spring sections, five-spoke welded wheels, bogie carrier front and rear, and return roller. Also drivers (two parts) and a six-spoke idler wheel are provided. 8-9 are the idler support arms, 10 the stern plate, 11 the drive shaft tunnel, 12 the turret base, 13 the turret shell, 14 the firewall, 15 and 16 sponson floors, 17 the gearbox, 18 the mufflers, 19 the air cleaners, 20 and 21 the idler adjustment mechanisms, 22 and 23 headlights, 24 the machine guns, 25 left engine compartment door, 26 the commander’s hatch, 27 and 28 the top hatches, 29 right engine compartment door, 30 M5 37mm gun, 31 mantlet, 32 and 33 shackle mounts. Missing from the directions are keys for the shackles (U shaped objects), the machine gun mantlets (shown next to the machine guns, but nearly impossible to see on the directions) and the two halves of the bogie and bogie carrier. The four sponson rotors are not given parts numbers but are flagged 1 to 4: 1 left front, 2 right rear, 3 right front, 4 left rear.
If you have ever built a DML, Italeri or Academy M3 or M4 suspension, it’s the same basic work. If not, you first assemble the bogie with the wheels trapped between the halves. Slide them on the back half of the bogie carrier, insert the spring section and return roller, and then attach the front half. Done.
No painting or finishing instructions are included, but the tanks were delivered in a gloss dark olive drab (which dulled quickly but stayed dark). Serial numbers were among the first to transfer to blue drab, and from what I can determine ran from U.S.A. W30472 to U.S. A. W30566. I have seen one photo of U.S.A. W30496 on exercise with 69th Armored Regiment, 1st Armored Division, in mid 1941. These tank additionally had a 1st Armored Division patch painted on the glacis between the 1st and 2nd bullet splash rails and an 8" white letter and number (e.g. B-4, E-10) between the 2nd and 3rd splash rails; the number was repeated on the engine access doors.
Overall this is really a nicely done kit and has the basics provided for installing an engine (I have an old Legend Wright R975 suitable for the task) in the bay as it can be seen. But the directions need work and hopefully Ted & Co. fix them; too many good products are let down by bad directions. (Note that I will be building this for an article in Military Modelling.)
Parts Breakdown:
2 Hull top and bottom
1 Turret top
4 Fenders and mudguards
16 Sponson floors, stern plate, main gun, drive shaft, shackles, hatches
24 Transmission, air cleaners, exhausts, barbette drums, machine gun bases, lights
88 Suspension, .30 machine guns, mounts, details
29 Etched brass
Thanks to Commander for the review sample.
Home
![]() Discussion Groups
Discussion Groups
![]() Gallery
Gallery
![]() Articles
Articles
![]() Reviews
Reviews
Copyright
![]() Vendors Room
Vendors Room
![]() Links
Links
![]() Contact us
Contact us
Copyright www.missing-lynx.com 2011