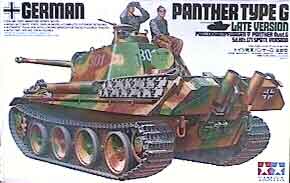
The Last Panther in Pomerania
by Rhodes
Williams
Construction
The build up of the Dragon kit is fun and without any real headaches.
However, as I wished to use the Aber PE sets I had to constantly hop
back and forth between directions at every step. Before I started gluing
anything I read over more than a few times the Dragon and Aber instruction
sheets. Also, bookmarking references were helpful as a few bits in the
Aber instructions were not properly placed.
After feeling secure enough in the knowledge that I had read the various
directions I decided to improve the texture and the weld seems on the
Dragon hull and turret. I built the hull and turret per the instructions
and then covered the panels with Model Master "Liquid Cement".
With an old rough rush I stippled it and then when still somewhat tacky
I took a Ryobi Moto-tool and using a circular steel buffing burr set
at low speed I tore into the glue and in some places pulled up a little
bit of the styrene. Once it was quite dry I sanded it down. I was pleased
with the improved rolled steel texturing.
Then I set about improving the weld seams. This was done by laying
down thin strips of masking tape and with a toothpick smearing on thin
lines of Tamiya "Putty". The type that comes in the orange
cap. This was then scribed with the backside of an exacto knife and
the tape pulled up.
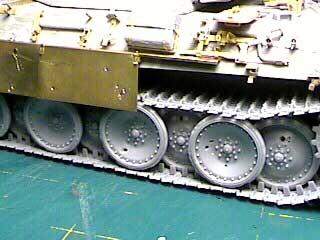
Next I built the running gear and roadwheels. The Dragon offerings are
nice enough indeed. I intended to make this Panther part of a small
based diorama depicting the last Panther in Pomerania in the closing
weeks of the war and would have survived a right good thrashing in combat.
Using various drill bit sizes I drilled out holes in the roadwheels
simulating small caliber shell hits and shrapnel damage. This was also
done to the turret and hull. Some holes were
enlarged with an exacto but only one was designed as a penetrating shot,
and that is the hole entering the starboard radiator cell causing the
fire damage on the engine decking. I also wanted to show damage to the
rubber road wheels. This was done with the mototool and cleaned up with
an exacto and needle files.
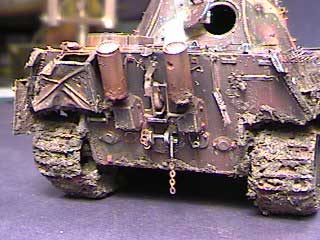
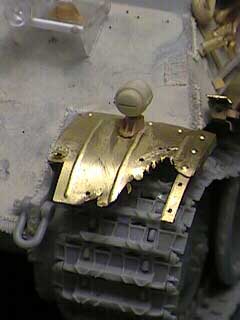
Once this was done I went to work on the rear hull plate. I wanted
to model excessive combat damage here so I scratchbuilt one of the rear
stowage bins from TechStar "Lead Foil" (#TC 3011) by making
a template of the Dragon part and then cutting it out using medical
scissors. The criss-cross detail on the bin face plate was achieved
by simply pressing the lead part over the original and rubbing around
the periphery with a toothpick. Scratches in the foil were buffed out.
Battle damage was created with a small drill bit and an exacto. Dents
were recreated by pushing in the very soft foil with a pencil. The fasteners
for the lid are by Royal Model "Buckles" (#085) and for what
my opinion is worth are much better in both size and ease of construction
to the Aber offering. The other stowage bin was to have been torn off
so the hangers underneath were constructed using thin strips of lead
foil. Panther in Detail and Achtung Panzer were consulted for details
on the rear plate and I added various chains to the engine access plates.
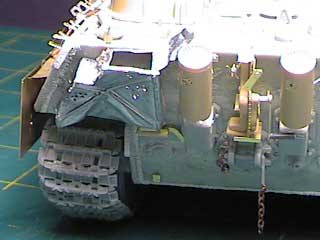
The two fire trap mufflers were pilfered from the Tamiya kit as they
were a bit crisper. I added battle damage and then rusted up the bottom
with a mixture of baking soda, white glue and water. The jack and its
mount are Aber PE. The basic form of the jack came from the Tamiya "Panzerkampfwagen
IV On-Vehicle Equipment Set" (#TAM35185).
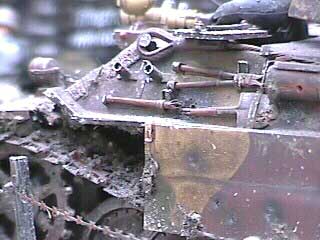
Now as I had some thirty odd shell hits on the hull and turret I had
to match the damage to the tools and Aber PE tool brackets. I left off
all but one spare Dragon track link, rilling out the guide horns. The
Aber retaining pins in the Aber sets were not used anywhere on the model.
These were supplemented with brass wire suitably shaped. The spade which
ay right over a hit on the port side hull was replaced with the Tamiya
part and then split on the wood handle where the shell hit. In reality
the spade would probably be blown clear away, but I wished to leave
some of the tools on for variety, so I settled for drilling small
shrapnel holes in the spade face. The barrel cleaning tube and spare
aerial stowage was replaced using the Tamiya part. To this I shaved
off the L angle steel bar, replacing it with the Aber PE and simulated
battle damage and excessive rusting as this was just thin sheet metal.
Similarly the Dragon towing cable was scrapped for one made of Tamiya
eyes from the Panther G kit and cables of twisted brass wire.
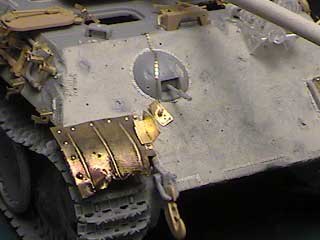
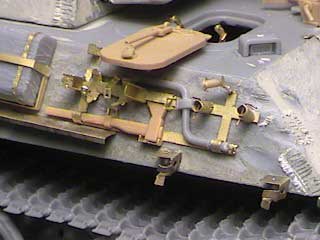
The front hull plate was detailed by adding the Aber bow machine gun
plug and chain often overlooked. I also replaced the surviving towing
clevis with a Tamiya part and hung it on the front towing hook. As much
as possible I replaced the Dragon tools with Tamiya Pzkfw. IV On Vehicle
Equipment as they look a bit crisper and fit the Aber PE it was designed
to hold. I bent some of the tool hangers on the front Starboard side
where glancing shots tore them up. I should mention here that I found
the photo-etch much easier to manipulate when it was first scored with
a cigarette lighter. I replaced all the hatches and travel clamp with
the Tamiya parts as again they were a bit crisper. I drilled out the
solid closing handles and added the Aber hatch counterweight assembly
arms. After an hour in hell winding brass wire around a pin to make
the springs I celebrated life with a cigarette to calm my nerves and
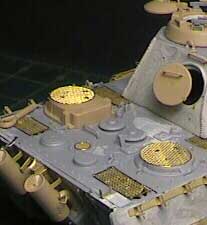
then moved onto the rear engine decking.
Here I replaced the raised engine fan with the Tamiya part as it had
neat serial numbers inscribed in it. Next I fitted all of the Aber engine
mesh, which is the best I've ever come across. It was pricked with an
exacto here and there to simulate shrapnel damage. The weaved look is
very convincing. I only touched these with Zap-A-Gap, CA glue as I wished
to remove them for painting the air inlet housings without fear of gumming
up the mesh.
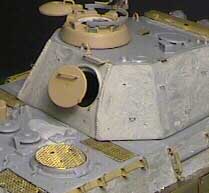
Next came the turret. I used the cupola from the Panther G as it had
a nicer pitting and it accepted the Aber interior parts better. I added
periscopes from the Royal Model "Interior Details Set No. 2"
(#098). The escape hatch was also pinched from Tamiya as the Dragon
part does not provide for the interior swing out mounting which I then
detailed with Aber parts. The Dragon barrel is very nice. The trick
to losing the seam is to put on ample glue and squish the barrel halves
together. When dry the excess glue is filled away erasing the seam.
However, I constructed it before I inserted the Aber rifling so I had
to use the Tamiya barrel. With this I correctly inserted the riffling
into the muzzle brake. I also added a hollowed out piece of stretched
sprue into the mantlet machine gun position as Dragon does not include
one. I had seen a photo of a Panther with the remains of a Russian shell
burrowed into the mantlet and decided to include this in my banged up
beasty. This was done by shaving off a tiny piece of plastic from a
scrap of stretched sprue and curled it around a needle nosed file. Once
I was happy with the shape I cut it down and stuffed it into a pre-drilled
shell hole in the mantlet to right of the 7.5cm main gun. The welded
camouflage rings, five to a turret side, were made of brass wire. Using
a fine drill bit I drilled out holes in the side of the turret and slipped
long thin brass wire through the holes. Lopping the wire to form the
hangers I Zap-A-Gapped, CA glued the wire on the inside of the turret
to secure them and once dry trimmed away the excess.
Next I constructed the kit link to link caterpillars. Very nice and
easy. No problems here. After they were glued in place I went to work
on the Aber fenders. I had already removed the thick Dragon fender mounts
and found the Aber PE fit well. I banged up the fenders by cutting them
with sharp scissors and bending them back with tweezers. I drilled several
holes to simulate small arms hits and cut away a portion of the left
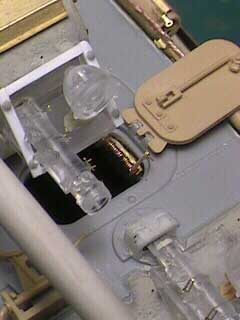
fender to expose the PE frames underneath. I replaced the Dragon Bosch
lamp with a resin part by Royal Model "Headlights-Tail Lights 1/35"
(#077), adding blown open wiring with scale rubber hosing from the Academy
"German Tank Supplies & Crew Set" inserting brass wire
into the rubber hose to simulate loose wiring.
Finally I went to work on the Aber side skirts using the supports,
retainers and pins included. I wished to simulate multiple shell hits
on the ones which remained so this was done with a nail and a small
hammer. Where there was to be penetration hits I went back to the mototool
and using a small drill bit gradually drilled through the brass.
The principle construction of the Panther was now complete.
 Next
page Next
page
Page 1, 2, 3,
4 ,5
,6 ,7
,8 ,9
|