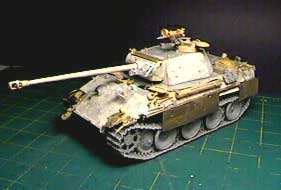
The Last Panther in Pomerania
by Rhodes
Williams
Painting and Weathering
Thus far fifty hours had been invested into construction.
I read that Mr. James Blackwell spends 30% of his time in construction
and 70% in painting and finishing. I was in trouble. Before I applied
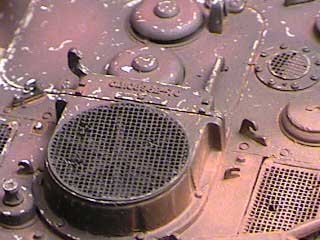
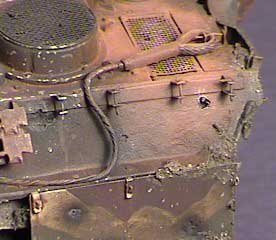
the base coat, I removed the IR sets and mesh engine deck grills to paint
separately. I also removed the Aber side skirts allowing me access the
roadwheels and caterpillars without interference.
I saw an interesting rendition of the ambush scheme on a Panther G in
Military Miniatures in Review No. 11-12 Spring 1997. The model had been
built and painted by Masahiro Doi who many know from amongst others, Armour
Modeling Magazine. His Panther lacked any ambush scheme on the hull deck
and turret lid. I thought I would like to do something similar allowing
the use the "pre-shading" method.
I skipped the priming process and using a Badger 150 airbrush
sprayed on several coats of 30% Humbrol "Flat Black" #33 to
70% thinner to begin the "pre-shading" process. This would also
double as the primer coat. I prefer Best Kleen "No Odor Thinner"
as it does not ponk and dries quite quickly. The first few coats are nearly
invisible, but after they dry it goes on quickly and very thin. As I opted
to pass on any interior detail I also painted the interior flat black.
Any exposed interior details were painted Panzer buff and washed with
an oil wash of 80% Raw Umber 20% black thinned to 20/80 with thinner .
Once dry I drybrushed with the Buff to bring out some detail on the interior
of the cupola. The periscopes were painted flat black and drybrushed
with gray and Model Master "Steel".
With the minimal interior details completed I began the
"pre-shading" process. I mixed Humbrol colours #153 (Red oxide)
at 70% with #113 (Brown) 20%, and #33 (Flat Black) 10% and thinned it
down 40/60. I blew it though my airbrush using 5 psi. into the centers
of panels. The harsh lines were then misted by lowering the pressure to
2 psi to create a nice fade between the black "pre-shade" and
the oxide primer. This same process was used on the roadwheels using a
circular motion.
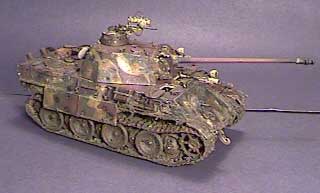
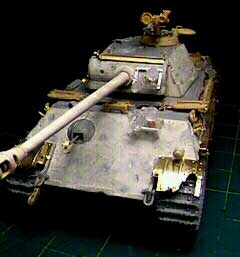
Once the oxide-primer was set, I added the Dunkelgelb and
Dunkelgrun hard edge camouflage using a soft paint brush. Be sure to thin
the pant adequately to avoid brush lines. I kept the ambush scheme to
a minimum so as to reveal as much of the red primer coat as possible.
The small "spots" were added with a spotter brush, Dunkelgelb
over the Red Oxide and Dunkelgrun, Oxide Primer over the Dunkelgelb. Once
this was completed on the hull, turret and side skirts, I went to work
on the caterpillars. As they were already sprayed flat black, I simply
airbrushed them with a very thin wash of Raw Umber and set them aside
to dry. Once sufficiently dry I washed them with several coats of Rustall
to give them an extremely worn out look. The results were pleasing.
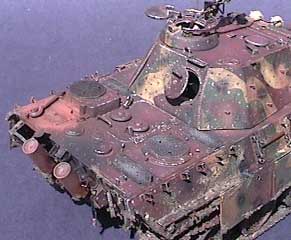
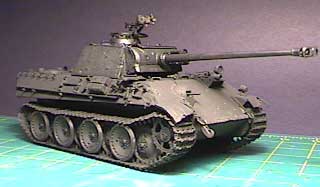
Once the basic camouflage scheme was hardened I airbrushed
it with Testors "Dullcoat Lacquer" (#1160) to seal and protect
the paint from the subsequent oil washes. As I was modeling a Panther
during the very closing days of the war I skipped adding decals. The basic
wash consisted of a mix of 80% Raw Umber 20% black which was then thinned
at a ratio of 20% oil paint to 80% thinner. This was airbrushed on at
a psi of 20. A heavier wash was laid into the subassemblies and running
gear. I found by laying the model carefully on its side and spraying into
the roadwheels it settles in nice and even. With regard to the hull and
turret I sprayed on several coats to almost obliterate the camouflage
scheme. Before the oils had set I took a fine brush and washed in a direction
gravity would cause staining to run. This broke up the wash and simulate
extreme exposure to the elements and combat.
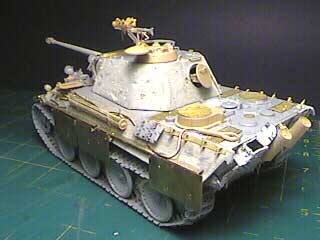
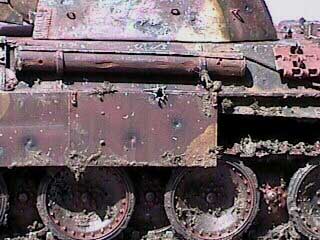
After the wash had set, I set about rusting the hull and
turret. This was done with Liquitex acrylic "Burnt Sienna" mixed
to a ratio of 40/60 with distilled water. Then with a fine brush and capillary
action, I laid the paint into all the nooks and crannies and around raised
details such as handles and the improved weld seams. Heavy rusting took
several coats but was done sparingly as to not totally erase the flat
black "pre-shading". I also laid in, using a thicker brush,
a few coats of "rust" on the fire trap mufflers as these were
nothing more than thin steel and tended to rust after exposure to continual
heat. I also washed a few of the shell hits and bouncing blows with "rust"
to differentiate between older and more recent hits. I also heavily rusted
around the bolts in the roadwheels. When this was finished I took a fine
brush and painted the rubber roadwheels flat black. The black I reserve
for this is cheap nasty latex house paint from Orchard Hardware. It dries
brilliantly flat, almost gray. It was then dry brushed with shades of
gray.
Next I mixed some water based flat black and airbrushed
the scorching caused by shell hits both large and small caliber on the
hull, turret and side skirts. This mixture was quite thin and required
several hits with the airbrush to achieve proper coverage. At the same
time I blew some flat black on the 7.5cm muzzle brake to simulate cordite
staining, the close defense machine guns in the bow and port and to simulate
exhaust staining on the engine deck.
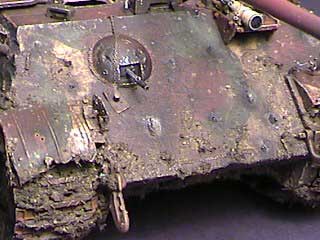
Touching the weld seams with khaki to bring out the detail came next.
I did also do a bit of drybrushing with Testors "Steel" on the
guide horns where they were in constant contact with the roadwheels and
on the exterior tracks, but only on the cleats where they made heavy impact
with the road surface. I drybrushed a bit of steel onto the edges of the
hull and turret that were prone to excessive wear.
Finished with the drybrushing, I thinned the steel paint
and with a fine pointed spotter brush reproduced scratches from combat,
element wear and crew scuffing. This was laid in heavy at high contact
points such as around the crew hatches and engine access hatch. To simulate
the impact of shell hits and glancing blows I took an old frayed brush,
dipped it into the steel, wiped the brush nearly clean and scrubbed it
into the black scorching.
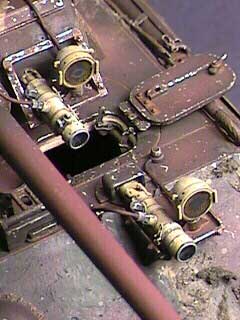
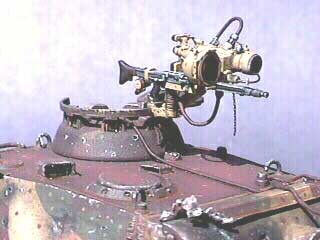
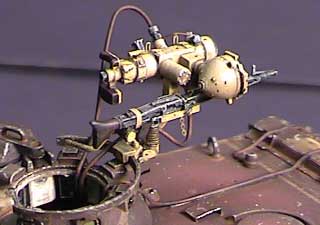
Painting the IR sets came next. These had been removed and
to a certain extent deconstructed and mounted using cryno glue onto toothpicks
for ease of painting and detailing. They were airbrushed using Humbrol
Dunkelgelb (#93) and washed with a thin coat of Raw Umber oils. Once dry
I used the capillary effect to bring out all of the details using water
based Raw Umber. The focusing knobs and power couplings were painted flat
black and drybrushed with gray and Testors "Steel". The red
identification numbering was painted on upside down with Testors "Red"
as per references in "Panther in Detail". The optics and lamps
were painted with Raw Umber and the centres touched with purple as I am
reliably informed the optics appeared this colour in sunlight. The power
cables were made of TechStar "Styrene Rod .20" (#TC3014) and
painted with water based Burnt Sienna and washed with flat black.
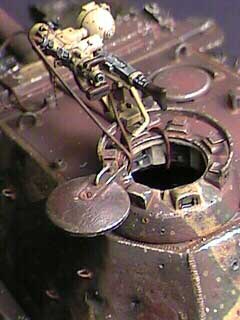
To achieve the glass periscopes and rear convoy light realistically
I painted them first with Raw Umber and painted the centres with Humbrol
#80 (Bright Green). To achieve the glassy effect I then mixed "Aristocrat"
two part resin and laid it in with a fine brush on all the glass surfaces.
Artists pastels were ground up in a variety of colours, mostly rust orange
and dark brown and laid in with a fine brush to simulate running rust
stains and with a wider brush for the burnt effect on the rear deck plate
on a rear starboard hull side where a penetration shot caused the radiator
to burn.
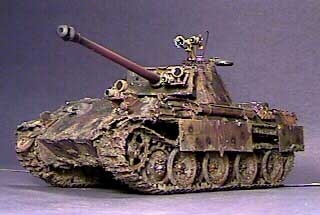
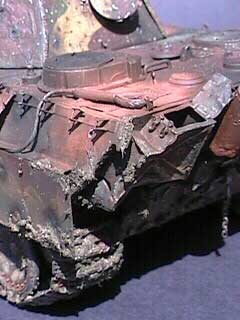
Lastly, I wanted to add some serious gunk. I mixed Hudson
& Allen "Static Grass" (#9617) with coffee grounds, fine
sand, a large amount of flower bed soil and Polly S Colors "Dark
Earth Brown" (#500064), "Military Medium Brown" (#500065),
and "Field Drab" (#500830) mixing it with water to create serious
spring thaw quagmire. This was applied once some of the water was absorbed
by the soil until it resembled porridge. This was then applied using a
thin brush very heavily to the sub-assemblies, roadwheels and tracks,
being sure not to completely cover the nice rusted effect. I also added
splattered mud to the lower front hull plate, rear plate and hull sides.
Some splashing was even added to the turret. The nice part about adding
real Mother Earth is that when it dries it lightens, looking quite natural.
After completing the Panther I set it aside whilst I got started on the
diorama lay out.
|